
LS1 + T56 + C4 = Good times!
 10-31-2009, 10:44 AM
#21
Staging Lane
Join Date: Nov 2007
Posts: 52
Likes: 0
Received 0 Likes
on
0 Posts

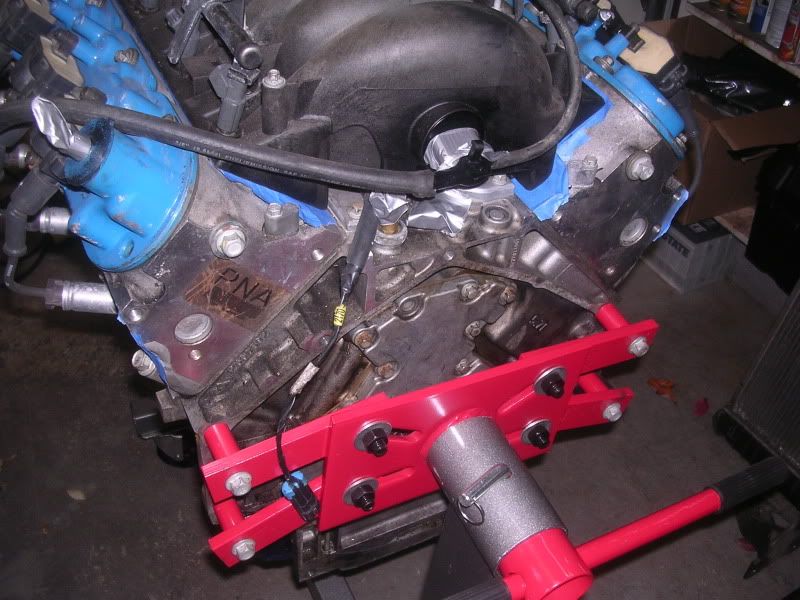
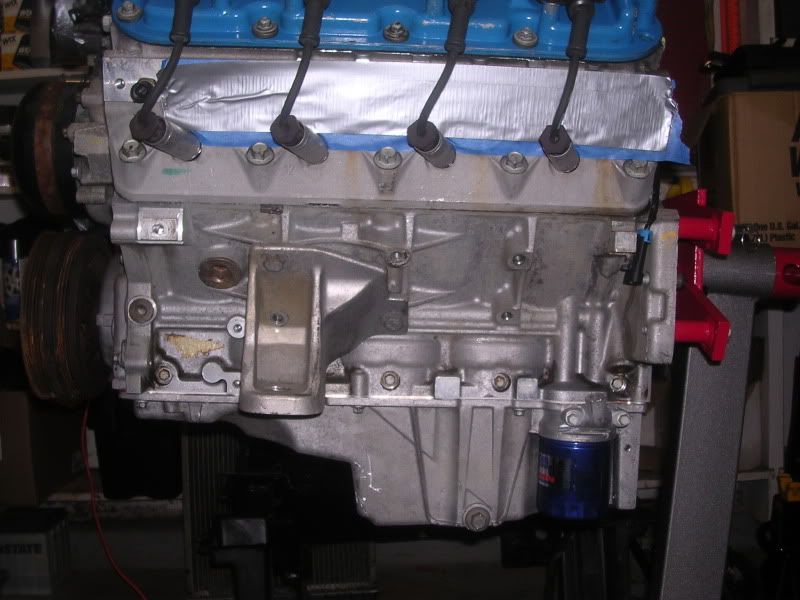
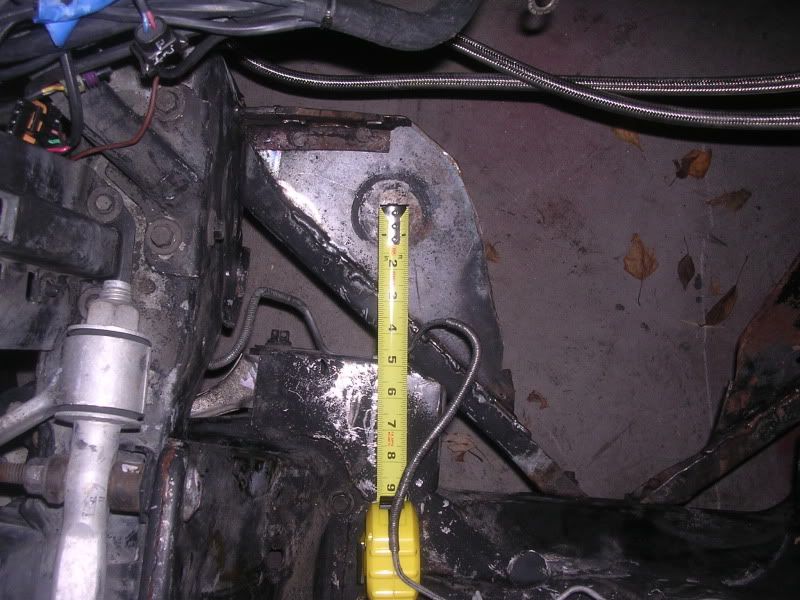
Don't know if these will help at all? Notice the crossmember cut, i'll be welding in a new piece to cover that back up. This was required to get the motor low enough. The vette pan is not as deep so I can get the motor lower than if you used the fbody pan. You have to remove the small crossmembers (where your engine mounts seem to now be). I'm going to bend a small dia tube to clear the bat wings so that the diagonal braces are back in there, not sure they are really needed but GM put them there for a reason.
Ignore my stray wires


Ignore my stray wires
 11-01-2009, 12:24 AM
#24
TECH Fanatic
Thread Starter
iTrader: (15)
Join Date: Jun 2006
Location: Janesville WI
Posts: 1,155
Likes: 0
Received 0 Likes
on
0 Posts
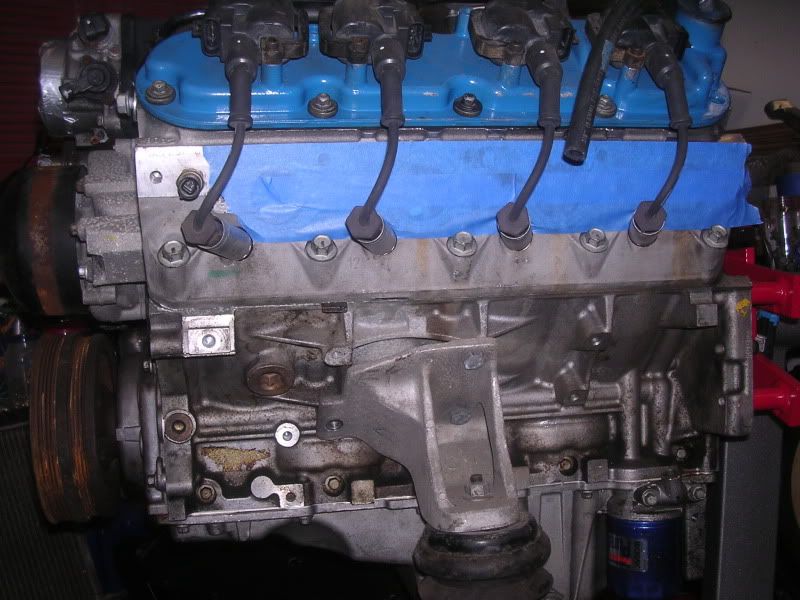
Decisions, decisions... My 1st plan was to leave the engine together so I could focus time and energy on the other areas of the swap. Then go through the engine next winter.
But, with all the 1/2-@$$ stuff I'm finding, I wonder how much could be wrong with the engine. I noticed the rear of the engine is abnormally oil covered (was an auto car) and the rear cover is missing a bolt... Also, the driver's valve cover is missing a bolt...
I picked up:
LS6 heads
LS6 cam (and springs)
Ported Oil Pump and TB (by Drag Werks)
LS6 Intake
Katech rod bolts
and I'm considering an Improved Racing F-Body Trap-Door Race Baffle (oil pan baffle)
So I'm strongly considering going through the engine now, rather than gamble. Not to mention more power is a beautiful thing!
Tomorrow I'll clean this thing off and ponder...
Input is welcome here.
Also, does anyone have an extra rear cover or 98 Valve cover bolt?
 11-01-2009, 09:57 AM
#26
Staging Lane
Join Date: Nov 2007
Posts: 52
Likes: 0
Received 0 Likes
on
0 Posts
I don't remember when we talked if you already had the clutch pedal installed?? If you do is it possible to post a pic of that? I know very well it's a pain in the #@@ getting under there I'm having a hell of a time getting mine put on, seems the only way to get it into position i have to somehow pull the main power wiring harness out of the way? Just not seeing how the damn thing fits up there.
I'm having a hell of a time getting mine put on, seems the only way to get it into position i have to somehow pull the main power wiring harness out of the way? Just not seeing how the damn thing fits up there.
11-01-2009, 02:33 PM
#27
TECH Fanatic
Thread Starter
iTrader: (15)
Join Date: Jun 2006
Location: Janesville WI
Posts: 1,155
Likes: 0
Received 0 Likes
on
0 Posts
Mike
I tried to get some photos... not the easiest spot...
We did talk to you about the clutch. It was difficult to work around the wiring harness and dash plastics. I ripped everything out at that point.
I would highly encourage you to keep shopping for an 84-88 set up! I have both (I got the later set 1st also). But the correct ones are a simple bolt in deal.
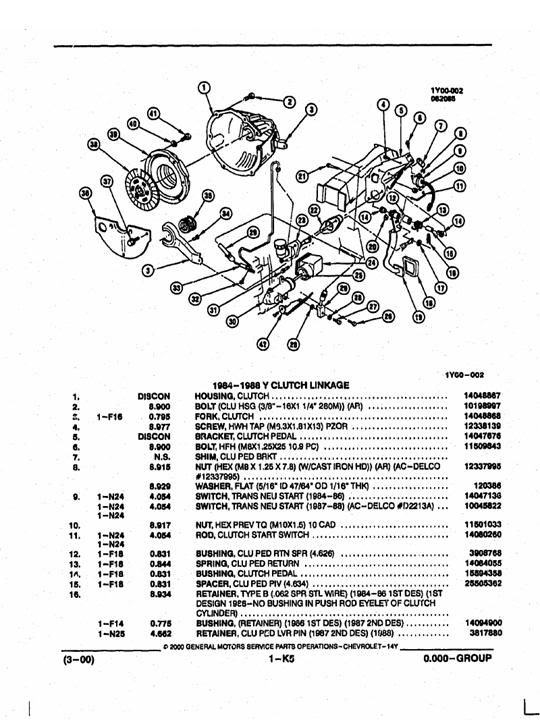
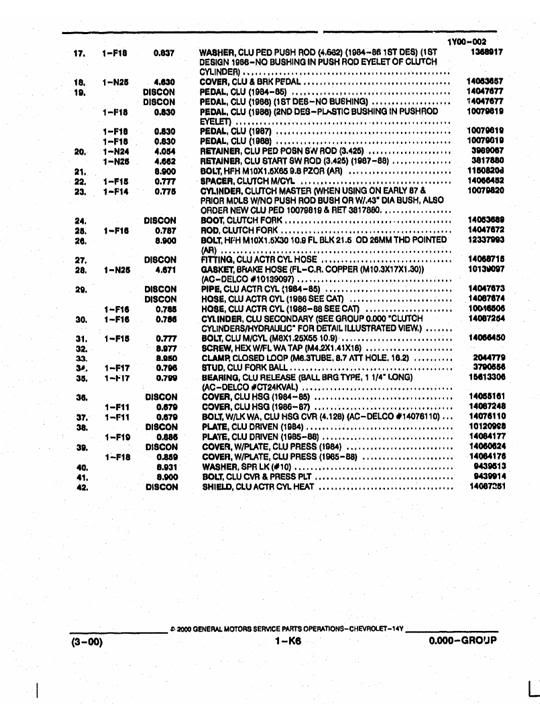
Here are some diagrams I received from another forum member:
84-88
90-95
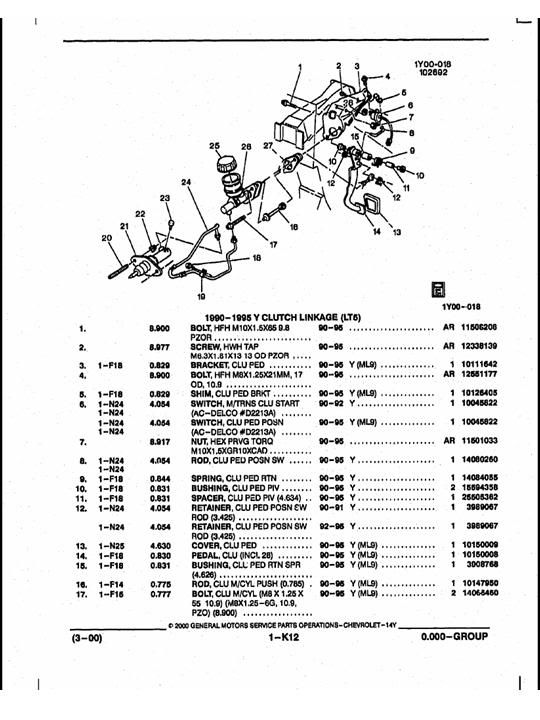

PM me you're email, and I may be able to forward them to you larger.
I tried to get some photos... not the easiest spot...
We did talk to you about the clutch. It was difficult to work around the wiring harness and dash plastics. I ripped everything out at that point.
I would highly encourage you to keep shopping for an 84-88 set up! I have both (I got the later set 1st also). But the correct ones are a simple bolt in deal.
Here are some diagrams I received from another forum member:
84-88
90-95
PM me you're email, and I may be able to forward them to you larger.
11-01-2009, 05:40 PM
#28
Staging Lane
Join Date: Nov 2007
Posts: 52
Likes: 0
Received 0 Likes
on
0 Posts
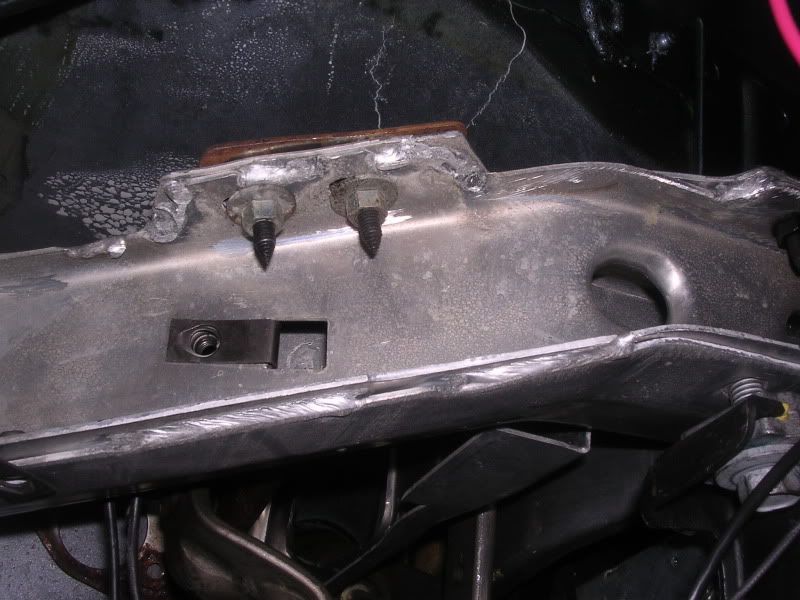
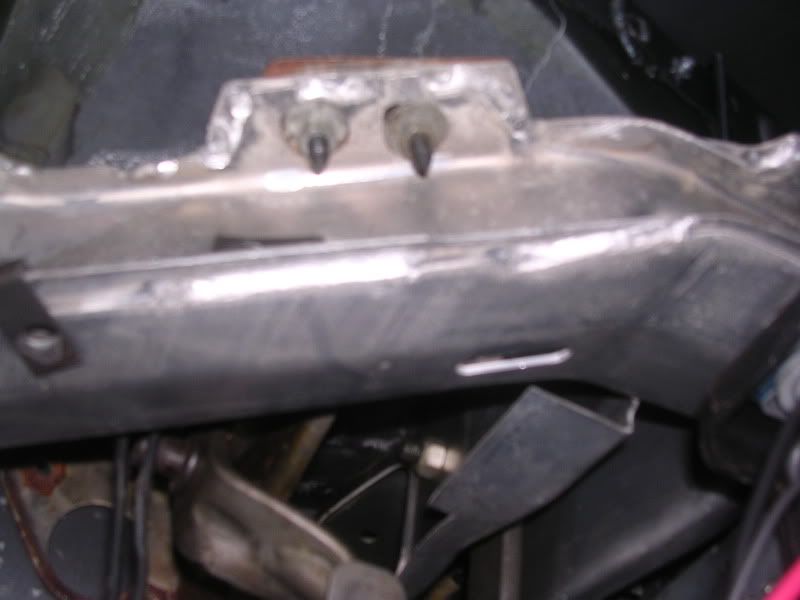
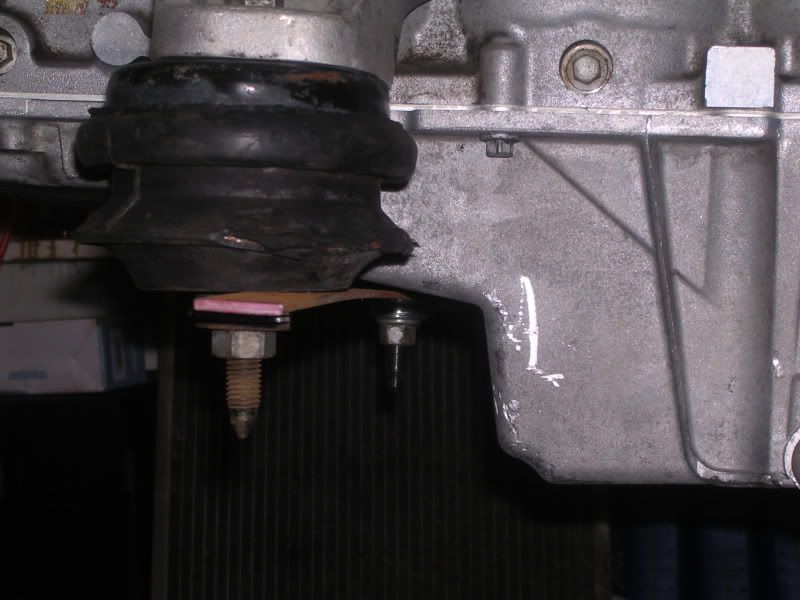
pm sent. Today I was out there thinking about how your engine mounts where done. I cut off my engine mount cradle today with the plasma and now I'm going to go with the C5 type mount. Underneath the stock mount brackets there is enough flat material that's welded to the main crossmember that I can fab up a pedestal for the C5 engine mounts. I'll post some pics when I get a chance to get them done. I'm either going to get a set (C5 mounts) from ebay or just make them myself out of mild steel. Looking at your pics, I don't know which direction the actual C5 vette has them but if you swap them around that should put you right over top where the original mounts used to be allowing you to mount them on the main cross member and not the diagonal small tube braces where you have them now.
Here's what I'm talking about showing it on yours.


Here's what I'm talking about showing it on yours.
11-01-2009, 06:39 PM
#29
TECH Fanatic
Thread Starter
iTrader: (15)
Join Date: Jun 2006
Location: Janesville WI
Posts: 1,155
Likes: 0
Received 0 Likes
on
0 Posts
Interesting... The mounts sit much lower than you are talking about. The plate is at the bottom of the diagonal braces. That said, my engine was too low anyway. The pan was lower than the cross member. I'm looking to raise the placement, and offset it slightly to the pass side. It was in the center, I believe the stock placement was offset.
If this ends up too high, you could just do custom stands or thinner biscuits or bushings.
2 potential issues for consideration:
1-The passenger mount will occupy the space formerly taken up by the C5 A/C bracket/compressor. Not an issue for me, and you talked about top mounting that anyway, right?
2-Mounts so far to the front of the engine will allow the engine to tip back, thus putting more weight on the C-beam. Though I assume with the trans already hanging off the rear of the engine, this is not a deal breaker.
I'm liking your idea. I'm heading to the garage for some measuring!
11-01-2009, 07:14 PM
#30
Staging Lane
Join Date: Nov 2007
Posts: 52
Likes: 0
Received 0 Likes
on
0 Posts
Interesting... The mounts sit much lower than you are talking about. The plate is at the bottom of the diagonal braces. That said, my engine was too low anyway. The pan was lower than the cross member. I'm looking to raise the placement, and offset it slightly to the pass side. It was in the center, I believe the stock placement was offset.
If this ends up too high, you could just do custom stands or thinner biscuits or bushings.
2 potential issues for consideration:
1-The passenger mount will occupy the space formerly taken up by the C5 A/C bracket/compressor. Not an issue for me, and you talked about top mounting that anyway, right?
2-Mounts so far to the front of the engine will allow the engine to tip back, thus putting more weight on the C-beam. Though I assume with the trans already hanging off the rear of the engine, this is not a deal breaker.
I'm liking your idea. I'm heading to the garage for some measuring!
If this ends up too high, you could just do custom stands or thinner biscuits or bushings.
2 potential issues for consideration:
1-The passenger mount will occupy the space formerly taken up by the C5 A/C bracket/compressor. Not an issue for me, and you talked about top mounting that anyway, right?
2-Mounts so far to the front of the engine will allow the engine to tip back, thus putting more weight on the C-beam. Though I assume with the trans already hanging off the rear of the engine, this is not a deal breaker.
I'm liking your idea. I'm heading to the garage for some measuring!
With the original brackets gone I actually think I can now fit the A/c in the Stock LS1 location
I done minor measuring and I "think" it will fit.The mounts in this position would be exactly where the original L98 mounts would be so I don't see any issues regarding weight. Plus the LS1 is lighter, even my iron block 6.0 is lighter than the old SBC.
I think the final placement would still put the motor far back enough that I would have to extend the plate that I was talking about so this will allow it to be mounted lower but it still would be in the original SBC mounting location. I'm not seeing a downside yet but I only done minor measuring today.
 11-01-2009, 11:17 PM
#33
TECH Fanatic
Thread Starter
iTrader: (15)
Join Date: Jun 2006
Location: Janesville WI
Posts: 1,155
Likes: 0
Received 0 Likes
on
0 Posts
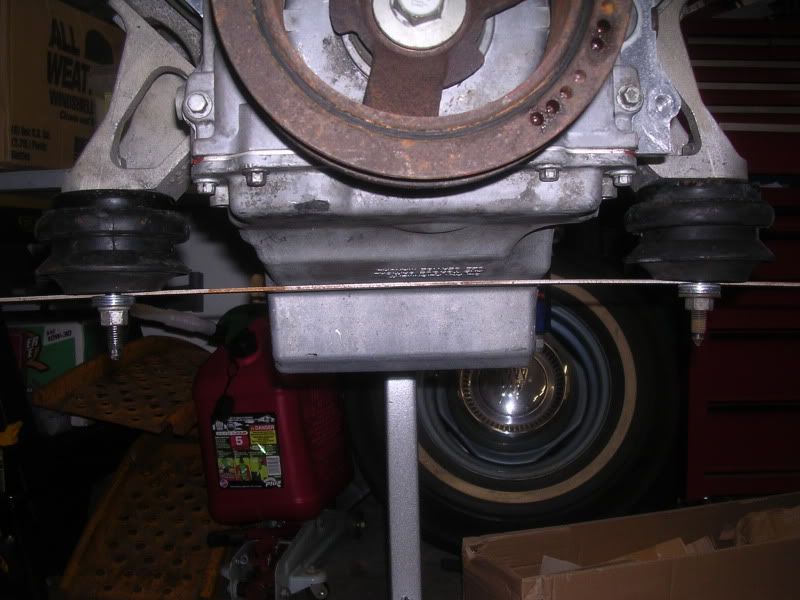
I like how you think Mike! Flipping the stands moves the contact spot ahead ~4.5". The bushing lines up with the bosses on the block, so flipping to the front mounting bosses is easy to calculate even without C5 stands.
The bad news is on the passenger side the stand interferes with the C5 A/C bracket. The good news on that is the part of the A/C bracket it contacts doesn't seem necessary. It is that furthest back ear, I don't yet know why it couldn't be ground off, or even what it is for...
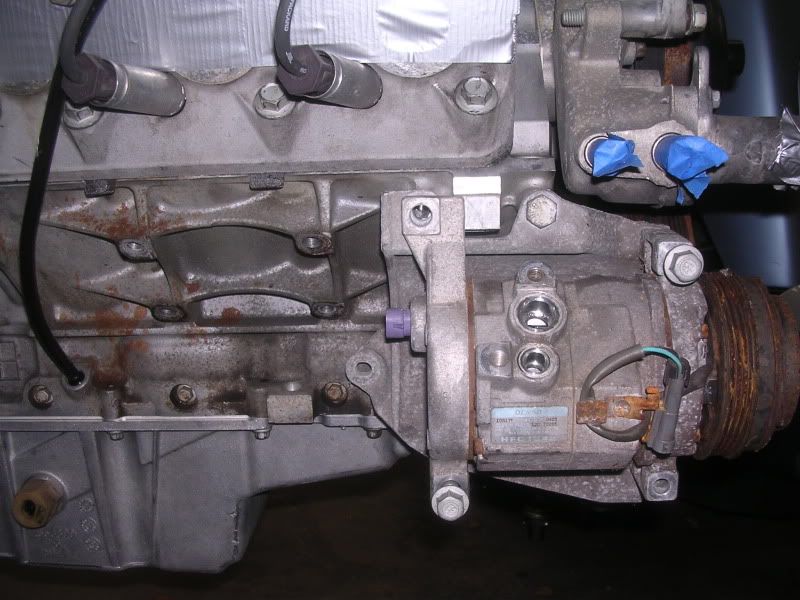
That far left hole is just kind of floating back there.
BTW, Mike, if you don't have a C5 bracket or compressor, I will not be needing mine. It appears to be in working order. I just put it up to see if it would work for you.
Now, moving my mounting location ahead 4.5" puts me just behind the flat surface of the cross-member. This would be an easy location to add a plate.
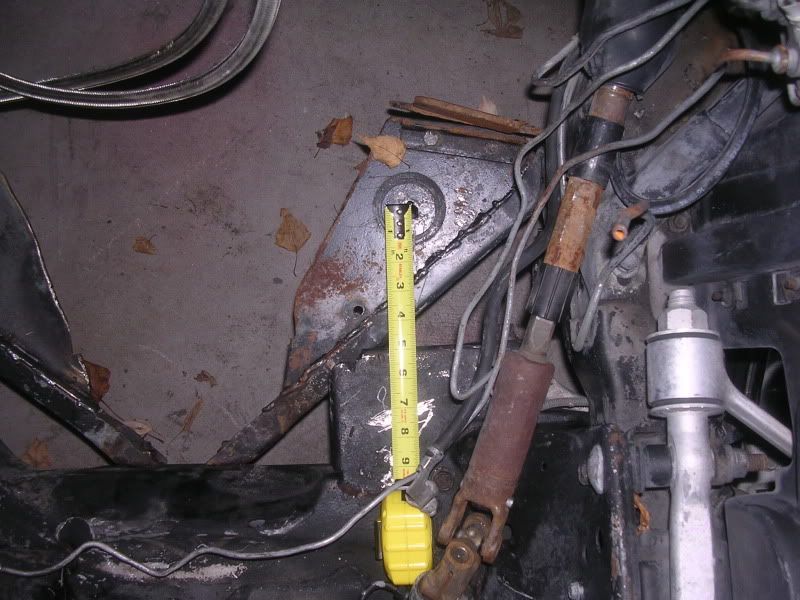
Only down side it the flat surface of the crossmember is 2.5-3" higher than the current mount location. I want to raise the engine, but not quite that much. Although I would think using something other than the C5 bushings would solve that.
The C5 stands bushing location is about even with the top of the pan. My f-body pan hangs ~5.5" below (your C5 pan ~5" according to the conversion pan sticky). The C5 bushings are ~3". So if the cross member hangs 2.5" below the bushing, I'm set.
More good news is that by moving the mount back 4.5", I can run flat between the 3" bushings and not hit the pan (no cut out required).
The bad news is on the passenger side the stand interferes with the C5 A/C bracket. The good news on that is the part of the A/C bracket it contacts doesn't seem necessary. It is that furthest back ear, I don't yet know why it couldn't be ground off, or even what it is for...
That far left hole is just kind of floating back there.
BTW, Mike, if you don't have a C5 bracket or compressor, I will not be needing mine. It appears to be in working order. I just put it up to see if it would work for you.
Now, moving my mounting location ahead 4.5" puts me just behind the flat surface of the cross-member. This would be an easy location to add a plate.
Only down side it the flat surface of the crossmember is 2.5-3" higher than the current mount location. I want to raise the engine, but not quite that much. Although I would think using something other than the C5 bushings would solve that.
The C5 stands bushing location is about even with the top of the pan. My f-body pan hangs ~5.5" below (your C5 pan ~5" according to the conversion pan sticky). The C5 bushings are ~3". So if the cross member hangs 2.5" below the bushing, I'm set.
More good news is that by moving the mount back 4.5", I can run flat between the 3" bushings and not hit the pan (no cut out required).
11-02-2009, 08:02 AM
#34
Staging Lane
Join Date: Nov 2007
Posts: 52
Likes: 0
Received 0 Likes
on
0 Posts
Good deal ! Yes I actually need a C5 compressor, the one I got is from the 6.0 LQ4 and is completely different, even the mounting bracket is different as the original truck acc sit much further forward. The small idler pulley is also different. So do you think it will actually fit in that location now?? To use the a/c that I got from the 6.0 i'd have to rig up some sort of custom mount, doesn't sound fun
11-02-2009, 08:48 AM
#35
TECH Fanatic
Thread Starter
iTrader: (15)
Join Date: Jun 2006
Location: Janesville WI
Posts: 1,155
Likes: 0
Received 0 Likes
on
0 Posts
It looks like it will clear the engine mount, if you loose that rear ear. Still baffled by why that is there. Anyone?
I shot out a PM on another board to see if it clears chassis wise. I'm thinking it does, but don't want to sell you mine if you cannot use it.
I shot out a PM on another board to see if it clears chassis wise. I'm thinking it does, but don't want to sell you mine if you cannot use it.
11-02-2009, 09:39 AM
#36
Staging Lane
Join Date: Nov 2007
Posts: 52
Likes: 0
Received 0 Likes
on
0 Posts
Do you have the motor where you can drop it back down in the cradle with the a/c compressor on? I had my motor in/out about 6 times yesterday, takes less than a min to get it all the way in now The motor really wants to sit offset, if you look at the base of the windshield you'll see where it curves, that's where the dist needed clearance on the L98 and also is very close to where the crank lines up when you place the motor. I can't move mine any further to the drivers side as the pwr steering pulley will hit. If it will fit I know it will be very very close, that C5 a/c look smaller than what came on the LQ4. Mine is 8 3/4" long from pulley to back end.
The motor really wants to sit offset, if you look at the base of the windshield you'll see where it curves, that's where the dist needed clearance on the L98 and also is very close to where the crank lines up when you place the motor. I can't move mine any further to the drivers side as the pwr steering pulley will hit. If it will fit I know it will be very very close, that C5 a/c look smaller than what came on the LQ4. Mine is 8 3/4" long from pulley to back end.
11-02-2009, 09:52 AM
#37
Staging Lane
Join Date: Nov 2007
Posts: 52
Likes: 0
Received 0 Likes
on
0 Posts
I went out and looked again with the pics you posted. I really think your motor can go back more than what you have it?? I put mine at about the same location that you show and think the shifter will be too far forward by at least a couple inches but that was just eye balling it so I could be wrong. but going back even an inch I assume would give you the needed clearance for the bushing then?? I don't have a hole drilled yet for the shifter, waiting for final placement now that I'm changing the mount type
11-02-2009, 10:32 PM
#40
Staging Lane
Join Date: Nov 2007
Posts: 52
Likes: 0
Received 0 Likes
on
0 Posts
There was no link in the pm What was the site/thread?
Edit: I searched a little and see what you are talking about tho. Yea, same idea I was talking about but i'd still have to use the C5 mounts as I believe the LT1 block was the same as any SBC?? Regardless to also use the C5 stock bushing you'd have to make the mount a little lower (no big deal) or use a short bushing (again no big deal). I can fab up something like that pretty easy, probably with the steel I have laying around already. Seem the C5 mounts cost about $99 (used) by themselves tho then another $100 for the bushings that sucks which points me to just fabbing the motor mounts too maybe but would be nice to have replaceable pieces.
What was the site/thread? Edit: I searched a little and see what you are talking about tho. Yea, same idea I was talking about but i'd still have to use the C5 mounts as I believe the LT1 block was the same as any SBC?? Regardless to also use the C5 stock bushing you'd have to make the mount a little lower (no big deal) or use a short bushing (again no big deal). I can fab up something like that pretty easy, probably with the steel I have laying around already. Seem the C5 mounts cost about $99 (used) by themselves tho then another $100 for the bushings
that sucks which points me to just fabbing the motor mounts too maybe but would be nice to have replaceable pieces. Last edited by black87c4; 11-02-2009 at 10:41 PM.