


BMW Z3 install started

Thread Starter
Staging Lane
Joined: Feb 2010
Posts: 61
Likes: 0
From: UK Leeds
I'm just starting my LS3 installation into a Z3M. I have a LS3 crate engine and new T56. I started the install into the car last weekend and will post a few pics when its progressed a bit.
Over the last few weeks I have been creating CAD models of all the parts I have, and also parts of the car. I'm using CAD to optimise the installation and its proving great for finding the obvious problems that I will encounter. THe headers and engine mounts will be designed on CAD and it will help me made a good job of the design of all the parts. I thought you guys would be insterested in this. A few pics here show how far the CAD installations is so far:
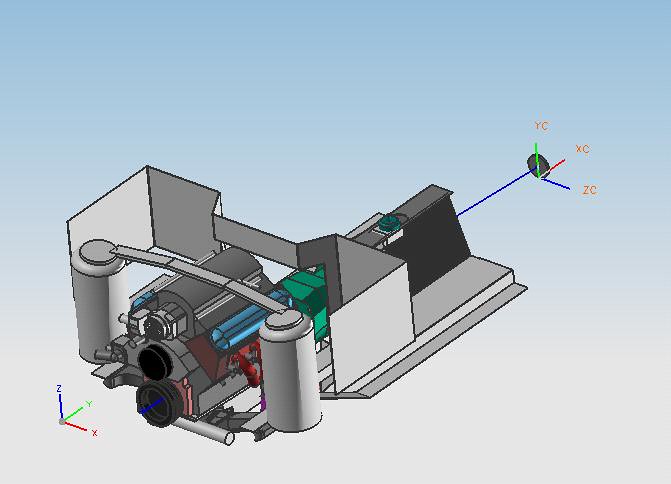

I have taken extensive measurements of the car, and have found a minor snag which I dont remember anyone reporting on other E36 installs. The existing engine sits 2.5 degrees down and the LS3 will be going in at the same angle on roughly the same crank centreline. I have the CAD model sitting at that angle with the oil pan flush with the bottom of the cross member - it looks to fit well at that position. The problem is with the diff, which measures at 0.75 degrees. I think the diff and engine need to be closer in alignment than that. Its ok with a 2 section BMW drive shaft but wont be good with my new one-peice prop. I think I should be able to alter the diff angle via using an eccentric bush at the rear mount. Anyone else noticed this issue?
Will post more info when I have it.
Cheers,
Mark
Over the last few weeks I have been creating CAD models of all the parts I have, and also parts of the car. I'm using CAD to optimise the installation and its proving great for finding the obvious problems that I will encounter. THe headers and engine mounts will be designed on CAD and it will help me made a good job of the design of all the parts. I thought you guys would be insterested in this. A few pics here show how far the CAD installations is so far:
I have taken extensive measurements of the car, and have found a minor snag which I dont remember anyone reporting on other E36 installs. The existing engine sits 2.5 degrees down and the LS3 will be going in at the same angle on roughly the same crank centreline. I have the CAD model sitting at that angle with the oil pan flush with the bottom of the cross member - it looks to fit well at that position. The problem is with the diff, which measures at 0.75 degrees. I think the diff and engine need to be closer in alignment than that. Its ok with a 2 section BMW drive shaft but wont be good with my new one-peice prop. I think I should be able to alter the diff angle via using an eccentric bush at the rear mount. Anyone else noticed this issue?
Will post more info when I have it.
Cheers,
Mark
Thread Starter
Staging Lane
Joined: Feb 2010
Posts: 61
Likes: 0
From: UK Leeds
I have the old engine removed, and sold. The engine bay has been cleaned but I think I will respray the engine bay to get it looking good. I will get some paint mixed up this week.
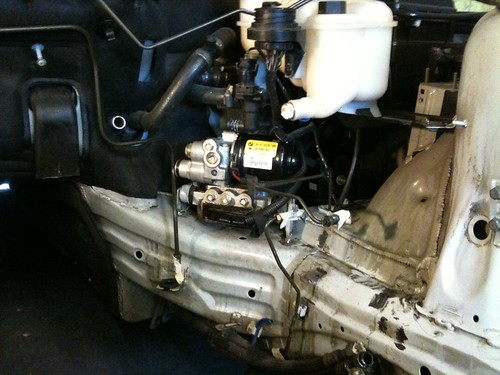
The ABS needs moving to clear the manifolds so I now have it fitted under the coolant tank. It should look good after its all painted. The old brackets have been ground off. I have to make brake pipes and a heat shield. I bought a cheap flaring tool but it doesnt seem to work well so i think I need to spend some more on a better tool.
Next job is to fit the F-body pan to the engine and try it in position for the fist time. Im off in the garage now...
Thread Starter
Staging Lane
Joined: Feb 2010
Posts: 61
Likes: 0
From: UK Leeds
The F-body pan went on ok, but I was lucky to spot a problem with the oil seal on the pickup tube. The LS3 pickup had a thicker red seal. When I put the F-body pickup in place (with its blue seal) it pushed in too easily. I measured the diameters of both tubes and they were within 0.2mm. I ended up using the red seal on the F-body tube and it went into the housing with a nice firm push. I'm pretty sure the blue seal wouldnt have worked at all.
A few other snags - the F-body pan had a missing hole for one of the fixings. Schoolboy error from me was to fit the sump and then notice the dipstick goes into a hole in the side of the block. The LS3 had a core plug fitted hrere since the LS3 dipstick goes straight into the sump. Anyway 30mins work and the sump was off to get the core plug knocked out and then back on again.
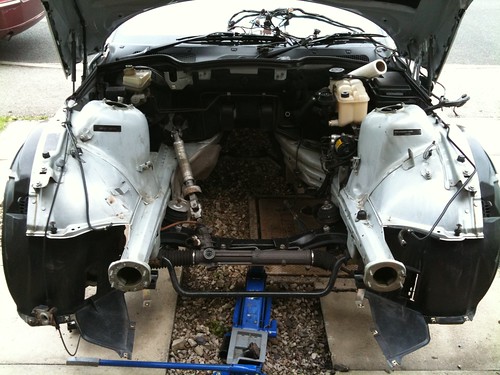
I have the engine trial fitted now. Its looking a nice snug fit. The tranny is a TUET2066 from a GTO and the shifter mech is just into the forward part of the existing hole for the shifter. It should work ok - happy days.
http://www.flickr.com/photos/7197859@N04/4863826421/
Flckr seems to have changed so cant insert images in the normal way.
A few other snags - the F-body pan had a missing hole for one of the fixings. Schoolboy error from me was to fit the sump and then notice the dipstick goes into a hole in the side of the block. The LS3 had a core plug fitted hrere since the LS3 dipstick goes straight into the sump. Anyway 30mins work and the sump was off to get the core plug knocked out and then back on again.
I have the engine trial fitted now. Its looking a nice snug fit. The tranny is a TUET2066 from a GTO and the shifter mech is just into the forward part of the existing hole for the shifter. It should work ok - happy days.
http://www.flickr.com/photos/7197859@N04/4863826421/
Flckr seems to have changed so cant insert images in the normal way.
Trending Topics
Thread Starter
Staging Lane
Joined: Feb 2010
Posts: 61
Likes: 0
From: UK Leeds
Update - the engine is now installed on it mounts. I made the fronts out of 6mm plate. The transmission mount was more tricky but looks the part now, in 3mm steel. The pics show how tight the engine is to the tunnel, but its all >5mm clear except for the bolt you can see in the centre of pic 3. Anyone got a view on how much clearance is required?
Next job is to remake the X-brace. I have been looking on CAD to see whether there is room to get 4x 1 3/4" primaries over the rear part of the brace. Its tight but I think it can be done. A world first though I think. THe front part of the brace just needs bending a bit to clear the pan. The rear section of the x-brace will be replaced with 50x25mm box steel.


Next job is to remake the X-brace. I have been looking on CAD to see whether there is room to get 4x 1 3/4" primaries over the rear part of the brace. Its tight but I think it can be done. A world first though I think. THe front part of the brace just needs bending a bit to clear the pan. The rear section of the x-brace will be replaced with 50x25mm box steel.
LS1 Tech Stories
The Best V8 Stories One Small Block at Time

Topdon ONE vs. Artidiag 800 BT2: Which is the Diagnostic Tablet For You?
Pouria Savadkouei
Gas Monkey Built a 6-Wheel Ferrari Testarossa With a Corvette LT4 Engine
Verdad Gallardo
7 Most Reliable High-Performance Engines GM Has Ever Built
Verdad Gallardo
Amazing '71 Camaro Restomod Is Modern Muscle Car Under the Skin
Verdad Gallardo
6 Common C5 Corvette Failures and What's Involved In Repairing Them
Pouria Savadkouei
Retro Modern Bandit Pontiac Trans AM Comes With Burt Reynolds' Autograph
Verdad Gallardo
Top 10 Greatest Cadillac V Series Performance Models Ever, Ranked
Pouria Savadkouei
Top 10 Most Powerful Chevy Trucks Ever Made!

Hennessey's New Supercharged Silverado ZR2 Has 700 HP
Verdad Gallardo


Thread Starter
Staging Lane
Joined: Feb 2010
Posts: 61
Likes: 0
From: UK Leeds
Here is a pic of the car a few months ago. Agree the breadvan version would make a great conversion, but I need wind in hair (while I still have some lol)

http://www.flickr.com/photos/7197859@N04/4912822548/http://www.flickr.com/photos/7197859@N04/4912822548/ by http://www.flickr.com/people/7197859@N04/, on Flickr
Thread Starter
Staging Lane
Joined: Feb 2010
Posts: 61
Likes: 0
From: UK Leeds
Question for anyone that can help -
I have some LS1 F-body accessories (alternator + pullies + brackets). The belt doesnt line up with the LS3 damper/waterpump etc. I figure I have 3 options:
Can anyone advise whether there is room to push the standard F-body steering pump and reservior 20mm rearwards? It would need a new bracket making but thats an easy enough job to do.
Thread Starter
Staging Lane
Joined: Feb 2010
Posts: 61
Likes: 0
From: UK Leeds
Updates...
Brake pipes made for ABS unit.
http://www.flickr.com/photos/7197859@N04/4942452169/http://www.flickr.com/photos/7197859@N04/4942452169/ by http://www.flickr.com/people/7197859@N04/, on Flickr
Made a new X-brace. Its a bit lower than standard - about an inch - and fits well.
http://www.flickr.com/photos/7197859@N04/4942453157/http://www.flickr.com/photos/7197859@N04/4942453157/ by http://www.flickr.com/people/7197859@N04/, on Flickr
http://www.flickr.com/photos/7197859@N04/4943042264/http://www.flickr.com/photos/7197859@N04/4943042264/ by http://www.flickr.com/people/7197859@N04/, on Flickr
Gear lever just needed 1" offset, and works well.
http://www.flickr.com/photos/7197859@N04/4943037470/http://www.flickr.com/photos/7197859@N04/4943037470/ by http://www.flickr.com/people/7197859@N04/, on Flickr
Next job is headers. I made a start by making a collector. Worked out well.
http://www.flickr.com/photos/7197859@N04/4945669589/http://www.flickr.com/photos/7197859@N04/4945669589/ by http://www.flickr.com/people/7197859@N04/, on Flickr
Next post should show headers complete.
looks great keep up the good work! My brother was considering an ls miata, but i told him a z3 would be so much better if $ permits, and we can see that it will fit! And you helped with the second part for sure!!
Thread Starter
Staging Lane
Joined: Feb 2010
Posts: 61
Likes: 0
From: UK Leeds
Had some progress with the headers. The difficult drivers side is complete. The steering column runs through the space, and the starter motor is in the way too. It was a time consuming job but I'm happy with the results.
http://www.flickr.com/photos/7197859@N04/4960631362/http://www.flickr.com/photos/7197859@N04/4960631362/ by http://www.flickr.com/people/7197859@N04/, on Flickr
http://www.flickr.com/photos/7197859@N04/4959979751/http://www.flickr.com/photos/7197859@N04/4959979751/ by http://www.flickr.com/people/7197859@N04/, on Flickr
http://www.flickr.com/photos/7197859@N04/4960572246/http://www.flickr.com/photos/7197859@N04/4960572246/ by http://www.flickr.com/people/7197859@N04/, on Flickr
http://www.flickr.com/photos/7197859@N04/4959978365/http://www.flickr.com/photos/7197859@N04/4959978365/ by http://www.flickr.com/people/7197859@N04/, on Flickr

Thread Starter
Staging Lane
Joined: Feb 2010
Posts: 61
Likes: 0
From: UK Leeds
Got the passenger side header made now. Exhausts next and the difficult part of the conversion will be all done.
http://www.flickr.com/photos/7197859@N04/4980421634/http://www.flickr.com/photos/7197859@N04/4980421634/ by http://www.flickr.com/people/7197859@N04/, on Flickr
http://www.flickr.com/photos/7197859@N04/4980421634/http://www.flickr.com/photos/7197859@N04/4980421634/ by http://www.flickr.com/people/7197859@N04/, on Flickr