When you click on links to various merchants on this site and make a purchase, this can result in this site earning a commission. Affiliate programs and affiliations include, but are not limited to, the eBay Partner Network.
It's been over a month since I've made much progress, partly because of the head gasket and partly because I just haven't had time to mess with it. The cam and all that came, so I figured I'd spend a few minutes taking the motor at least partially apart. Things went pretty well with the heads until I got to the front driver's side bolt, which for whatever reason is a 1/2 inch hex bolt. Had to make a run to store to go buy a new set of hexes since all of mine stopped at 3/8. Classic.
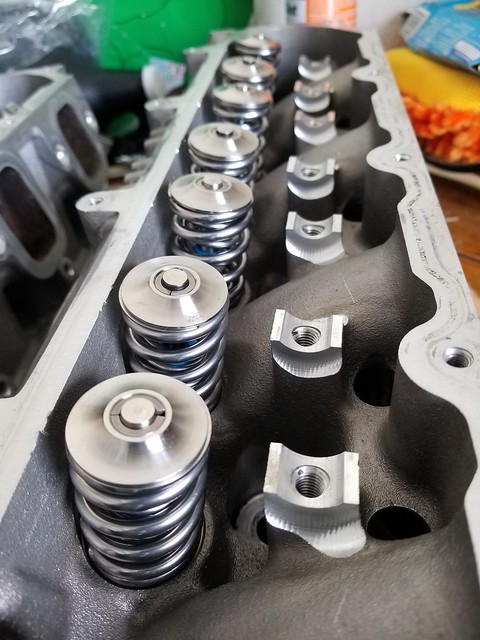
With that out of the way I was able to get the head off no problem. I bought this motor knowing a piston had been replaced, and this didn't really concern me too much since while I personally can't do it I know that other people do it all the time. What I didn't know is that there would be metal shavings on top of it. Not what I was hoping to see, but fortunately there is a machine shop 6-7 miles away and they weren't too busy to pull it apart and check things out. Turns out everything is fine, which is a relief. While there I went ahead and paid them to swap out the springs and etc for me. A simple job, but a really boring and potentially frustrating one that I am glad I didn't do myself.
]
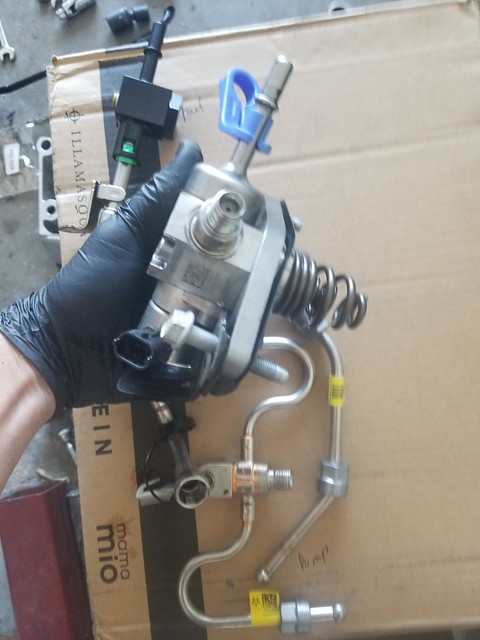
The fuel pump has to come off, but this is easy if you just undo each side a little at a time. I've heard that the high pressure fuel line isn't reuseable, but I've also never heard of anyone NOT reusing it. I'm going to reuse it and see what happens.
[
Taking the oil pan off again I noticed some discoloration on the crank which I wasn't sure about, but it turns out this is from the induction hardening process, or at least that is the word on the street. A swap shop told me that of the two dozen LTs they've done so far they have all looked just like this.
Not really a ton more I can do until Oct 4 when the gasket gets here, so I'll just wait until then to swap the cam and try to knock it all out in a weekend. Still need to drop the gas tank to hook up the PWM stuff, but not really looking forward to that. Costco has QuickJacks on sale for $900, so I'm hoping I can find a friend around Tampa with a membership to get me in to grab one. In hindsight I wish I would've bought one about a decade ago.
No, there is no indication it came anywhere from this engine or these heads. Kind of chalked it up to sloppy work, maybe it sat uncovered or something? No way to know for sure, but everything is clean and free of shavings at this point. It was worth a few bucks for the piece of mind. I was tempted to leave everything with them and let them do the cam swap, but they hadn't ever done a Gen V before.
The head gasket issue isn't likely to be helped with all the striking going on, but that doesn't mean I can't at least get the cam swapped out.
I started with the plastic tools I've been making, then got the oil pump out of the way. That ICT Billet cam handle made the cam removal process a rather painless ordeal. It was also nice having it when putting the new cam in, especially the last little bit. Pretty standard stuff overall. What I have yet to do is get the cam phaser /limiter stuff fixed, the limiting factor (no pun intended) in this being my lack of a table vise to hold the thing still. This guy did a great job showing what needs to be done to get the limiter put in place https://www.corvetteforum.com/forums...r-limiter.html
The DoD plugs from TSP went in without difficulty with a few taps of a 2/5 or 3 lb hammer, but I still think the Lingenfelter approach is a more elegant solution. No issues with getting the valley cover back in place and there is really zero chance of these coming out, so not a big deal.
While the engine is still out I (finally) decided to address this crappy looking thing on my firewall, which is the plastic cover that came with my first aftermarket A/C system a decade ago.
I got it from this guy and am tentatively planning to mount my Restomod Air passthrough in it. Seems like a good piece for under $40 after ebay bucks/Samsung pay cash back. https://www.ebay.com/itm/CAMARO-FIRE...72.m2749.l2649
I also got the motor mounts on, mainly slapping them in place to get them out of my tool chest. Kind of stopped at this point since going any farther will require the scraping of gasket from one surface or another, and that **** is boring. Maybe I'll be more motivated once the computer gets back from the tuner.
Yeah, the back of the block is supposed to be in the same place as it was before longitudinally and vertically. Really hoping this turns out to be the case for driveline length and angle purposes.
And just as a data point, the turnaround time for mailordertuner was under a day. Not bad.
It's been about 4 months since the last post and until today not much progress-wise really happened. The head gasket was a huge delay, then work, weather and getting my new (old) vehicle temporarily sorted out became the limiting factors. Also went to Tokyo an Hawaii to use up some frequent flier miles and get the @#$* away from my job.
First the good things.
Good things - I picked up an old but still cool truck, a GX470. I'd always thought they were cool (and I couldn't afford a 4Runner) so I got this when the Odyssey died. So far I've just done a lift, radio, wheels and tent, plus some other random things like make the rearmost windows power, but that's plenty until I finish the car.
I got a couple boxes of Membrane and new switches from Restomod Air; they make quality stuff and the all-in-one nature of the sound deader/heat shield seems cool. The switches are going to be pretty sweet I think, but they are pretty beefy so I'm not sure I will be able to stick them in my current console. Haven't tried yet.
My old steering column had an issue where the blinker would never turn off after I made a turn; I called the guy who rebuilt it (Don Krebs aka STLobo on ebay) and he said he would warranty it, just buy a new one and send the old one back for a refund. As with the last time I had issues, he blamed his helper but said he would make it right. I bought a new one, sent mine in and then waited, and waited, and waited for a refund. After weeks went by he stopped responding to texts so I just disputed it with Amex and got most of my money back (I didn't dispute it all, I left him enough to cover the cost of shipping). Seems like a nice guy, does pretty good work overall, terrible at running a business.
Getting the cam gear back in place right was a pain, but not terribly hard. Keeping the train rolling I decided to clean up the pistons and slap the heads on, for moral victory reasons as much as anything. Things went well until I was torquing bolts down and one broke off in the block. I set my torque wrench for 15 lbs under what I needed just to be safe, but it never clicked and it didn't seem to be all that tough to turn. I've ordered an EZ out and some new bolts (next time doing studs), and hopefully this won't turn into a huge ordeal. A digital torque wrench is also on the shopping list. After that I gave up and ordered a calzone.
Some pics of the part numbers for the cam swap stuff are at then end. You could make your own kit, but I don't think you'd be likely to save enough to make it worthwhile over just getting one with your cam from TSP or BTR or whatever.
Dude, that sucks about the bolt breaking in the block. Hopefully like you said, it just comes out without an issue. What I did too when I was building my motor was took an old bolt, flattened two sides, de-burred so not to damage the threads and then used it as a thread chaser. It worked great to get out all the old thread locker the from when the motor was originally built.
What I did too when I was building my motor was took an old bolt, flattened two sides, de-burred so not to damage the threads and then used it as a thread chaser.
I had cleaned everything pretty well but will do that just to be safe.
Originally Posted by Jimbo1367
Dud, And I thought I had bad luck. Hopefully things will go more smoothly from here on out.
I'm not sure if this was luck or me being dumb for trusting a harbor freight torque wrench. Maybe both? I dunno. Fortunately though I did finally have some good luck - the guy I took the block to was able to get the bolt out. Took several hours and broke a $200+ bit in the process, but it's out and the threads are still good. A couple shops told me the block was toast, but this guy was convinced he could get it out and sure enough he was right. It cost more than I was hoping it would, but it was way cheaper than a new block and this one was otherwise known to be good.
Work is a mess so I have no idea when I'll have time off to actually get it back in, but at least it's in my garage. Once I decide whether to use studs or give the bolts another shot slapping the heads on and getting the front back together should be a quick job. Will have to drop and reseal the oil just to make sure everything is clean, but that is more boring than hard.
Ended up going with studs, and when putting the heads on I was glad I did, I was holding my breath while torquing down the one pictured above. I used an old bolt to chase the threads, then a long narrow brush stuck into a drill just to be sure, then followed the instructions online and it was pretty easy, way better than messing with TTY nonsense. I ended up going ahead and getting an ARP crank bolt as well. To get the washers on the inner studs I first put them on an old bolt then let them slide down, I figured doing this would eliminate the chance of dropping the washer and having it fall somewhere. From there everything was easy and I chugged along until realizing that one side of the little white injector seals was missing. There were there before so I can only guess I put them somewhere I wouldn't lose them and then forgot where that was. The reuse of the LT name makes finding things harder than it should be, and they aren't on the part number diagrams I found, but I finally located them here (they were only $15 when I bought them)
I decided to wait on doing the trunnion upgrade, but plan to do the BTR V2 kit sometime in the future.
Apparently the connecting tube part of the high pressure fuel line is one-time use, presumably because of the sealant in it. No idea how true this is, but replacing it seems prudent. 12618337 is the part number.
This next part might be more globally applicable to other swap people, but I won't be able to get pics until Friday when the final version gets here. Anyway, I was helping MODO Innovations test fit their CTS pedal-to-A body floor adapter. It's a pretty sweet two-piece design with some decent adjustment built into it. He put a lot of thought into the design so I'm excited to see the end result. Mine will be naked billet but the final ones will be powdered black I think. Will get pics once it gets here. This is their site, not sure if it's on there yet. https://modoinnovations.com/collecti...nversion-parts
Getting washers in place without dropping them The white thing in question. Had to buy an seal kit, but it was cheap and came with everything I needed. Was sort of hard to find though. This has been a long time coming. So far on track for car being finished by the end of rainy season.
Here is the pedal mount I mentioned in the last post, I haven't installed it yet because I want to pull my interior and get the membrane stuff down and just do it all at one time. At least that's the plan. Anyway, this is it, and I just now noticed that he makes some pedal covers for the brake/clutch/e brake, which I suppose I'll end up buying at some point.
That aside, I made good progress on the engine until I got to the crank pulley, apparently the wet and dry sump bolts are different, though this wasn't even hinted at on ARPs site and I'm not sure how I would've known (or cared, since dry sump isn't something I routinely think about). The ARP help guy emailed me super quickly after I contacted them (on a Sunday no less), but not sure what the outcome will be.
The Holley LS to LT stuff went on without a hitch aside from having to flip my TB for clearance since I'm using a pump with driver's side outlet. Or inlet. I don't know. One or the other. After I measure the air gap on the slave I'll get the clutch put on and the trans connected, and from there it'll just be a matter of cleaning up the engine bay and dropping it in. Will still have to drop the fuel tank and install the vaporworks stuff, but that shouldn't take more than a few hours. I hope.
The part that goes against firewall Side mount with slots for adjustability Pieces assembled The new high pressure fuel line piece has no sealant or anything. Neither did my old one. Not sure why these are one time use. Just a slightly different bend to the new one. The holley LT block to LS water pump spacers. Installed on my water pump. With this driver's side outlet pump I had to flip my throttle bottle for clearance. People on Corvette forum do it all the time when going FI, so hopefully it's not an issue. Beauty cover will not clear my extra pressure sensor adapter. Should be an easy fix. I ordered the dry sump bolt on accident. Didn't know there was a difference. Live and learn I guess. And this is where we ended the day. The intake and etc will have to come back off to attach the engine hoist, but I was eager to see it look like a finished engine.
Solid progress. Just to be clear, the pedal mount is for the CTSV pedal?
Andrew
CTS or CTSV, I don't know if there is a difference. If I didn't post the part number somewhere I'll add it once I get back into the garage. I need to get all the seats out, the sound/heat stuff in and the carpet laid to see how all this stuff will play together. Once I have another day or two off I'm going to get up super early and try to knock a ton of stuff out. Not sure when that will be however.
The progress looks great. When do you gonna put the engine in? You should be getting really excited as you are getting closer to 1st start
I almost did it today, but then I got hungry and started drinking after I realized I how late it was getting. My back and elbow are killing me, but depending how I feel tomorrow I might take a crack at it.
Originally Posted by Chocolate Apocalypse
Hopefully Modo comes out with a bracket for the C6 pedal, I'd be all over that!
You could ask them, I'm sure if there is a market for it they could. Might be able to slightly alter something they already make.
Originally Posted by Che70velle
Agreed. Mobile version of LS1Tech needs a lot of work.
That infinite scroll stuff sucks. I always change to desktop view.
Regarding the pedal mount, I didn't get it in yet but I'm getting closer. These pics show the slots for the adjustability.
Lateral adjustability is in the base Tilt and up/down are in the side plate. My camera died at this point, but this is the general idea.
The replacement bolt came, and this shows the dry sump vs the regular bolt, just sort of fyi (I had no idea there was a difference)
Dry is longer and with less thread
I got the clutch assembled and in place and then the motor and trans mated together. This quarter master tool is awesome, and my trans just slid right into place. The instructions say .2-.25 of gap but I averaged .26 and called it good enough since I only had one shim on hand.
The lone unusable bolt hole
This MSD starter is clockable and fits up against the block nicely.
My firewall was a mess, so I used the panel I bought way back when to start addressing that. I pulled out the AC (which I needed to do anyway, as the wiring for it has to be redone more neatly) and mounted the restomod air bulkhead fitting into the filler panel. I'll have to paint it, but the test fit went well, so far at least. The old controls were mounted in the passenger side of the console, which actually worked well, but I'm going to mount the new pods somewhere more line-of-sight I think. There is a ton of wiring that goes with the A/C, but it's all labeled and pretty much idiot proof.
I drilled the necessary holes and got the motor mounts bolted in.
A strong magnet on a stick is invaluable when trying to put the bolts on the nuts inside the frame.
Measure once, drill four times? This actually worked out really well. Test fit looks good. I hate doing A/C stuff, but I think this is going to work out ok. Despite liking the look of aluminum I'll probably just paint this piece black before I finalize this stuff.

 09-10-2019, 10:17 PM