
'70 Nova LY6/TH400 6.0VVT
 12-14-2010, 12:51 PM
#81
Launching!
iTrader: (9)
Join Date: Jul 2010
Location: Bourbon Country
Posts: 227
Likes: 0
Received 0 Likes
on
0 Posts
The A/C idea is a great trick! When we did the swap on the C10 (not much wider frame than the Nova), we kept the 4th gen accessory brackets and notched both sides of the frame. I have pictures of the notching if you need them, I'd be happy to help
 12-14-2010, 01:43 PM
#82
Thanks Josh. Your build looks great. I'm not sure if the pictures will do a lot of good since the C10 has a different frame, but you may want to post them to your build thread for others to see.
 12-22-2010, 12:57 PM
#85
Thanks guys!
After pouring over the options, I am about 75% decided on making a new set of SBC mount adaptors to put the engine 1" higher, still 1/4" forward. This is to gain clearance to reduce the amount of frame notching and clear the swaybar. My biggest concerns with this change are header clearance and the ablity or inability to use the factory AC suitcase even after some trimming. It looks to me like the Edbrock longtubes would still clear the steering box at 1" lift and 1/4" forward, but I dont know about the collector-to-floorpan clearance. I'm also not sure about driveline angles. Any thoughts?
After pouring over the options, I am about 75% decided on making a new set of SBC mount adaptors to put the engine 1" higher, still 1/4" forward. This is to gain clearance to reduce the amount of frame notching and clear the swaybar. My biggest concerns with this change are header clearance and the ablity or inability to use the factory AC suitcase even after some trimming. It looks to me like the Edbrock longtubes would still clear the steering box at 1" lift and 1/4" forward, but I dont know about the collector-to-floorpan clearance. I'm also not sure about driveline angles. Any thoughts?
12-22-2010, 08:20 PM
#86

From all the pics I seen using Edelbrock LTs, I doubt you'll have any floorpan clearance issues. The drive line angle MIGHT be a different sinerio.
Why sere you making the swap plates 1/4" forward? It always seems when you make one "simple" change, you open yourslf to more "issues" 1 step forward, two STEPS back. lol
Why sere you making the swap plates 1/4" forward? It always seems when you make one "simple" change, you open yourslf to more "issues" 1 step forward, two STEPS back. lol
12-23-2010, 10:48 AM
#87
The 1/4" forward allows me to use the flipped SBC mount and TBSS compressor without cutting into the urethane. It also will provide clearance with the frame stands where they bolt to the frame.
I will continue investigating and measuring before I commit to a 1" lift.
I will continue investigating and measuring before I commit to a 1" lift.
12-23-2010, 11:17 AM
#88
thanks.
12-28-2010, 02:24 PM
#89
Not much of an update, but Santa was very good to me this year. I have the Mrs to thank for giving him my wish list, on the top of which was an oil pan from Autokraft.


These pans are made by a JR Manufacturing in Wisconsin. They directly market their pans under the "Champ" name and have a wide variety of pans geared toward racing applications. According to a gentleman at JR Manfucturing, this particular pan design was a joint effort initiated by Kurt at Autokraft for swapping LS engines into early Camaros. While he does sell the pans direct, he recommended I buy from Kurt and I'm happy to do so since I believe he did a lot of the legwork in developing the dimensions.
I have to say I am very impressed with both the design and quality of fabrication of this pan. I have seen aftermarket pans for small blocks that didn't come close to the level of detail built into this thing.
The pan is constructed of a stamped section that formes the one-piece flange and front section of the pan and a welded/fabricated sump area that includes kickouts for capacity and active baffling for oil control. The efforts toward keeping oil around the pickup were my primary reason for selecting this pan over some of the others available. Here are some detailed pictures of the sump area


You can see the pan uses hinges as doors to keep oil around the pickup during cornering, braking, and acceleration. The hing travel is limited to opening about 45 degrees, which shold prevent the doors from sticking open.

Another detail to admire is the stitch-welded backup flange that adds thickness/stiffness around the perimeter of the pan to help keep things sealed.

The pan also includes a nicely machined spin-on oil filter adapter.

These o-rings seal the supply & return between the adapter and the oil pan. I was very happy to see the o-ring glands include room for the o-rings to compress, a detail that some (bad) engineers overlook. This should result in a good seal as long as the bolts clamping the adapter do their job.

I haven't looked up this filter yet, but here's what you're supposed to use for this pan.

The pan also includes this fabricated pickup assembly. I suspect (but dont' know for sure) this started life as an OEM assembly and was simply modified to accept the pickup in a new location. My only complaint here is some surface rust around the MIG welds that could have been prevented by oiling it down before storage. We'll see how well it lines up when I install the pan. I do plan to check the distance between the pickup and bottom of the pan.

Lastly, Santa got me a set of solid body mounts from Global West. I was happy to find they were anodized black instead of the advertised blue I've seen just about everywhere. These bushings interlock (a nice feature) and sort of remind me of dimple dies. They included all the necessary hardware. I hope I don't regret going this route over polyurethane mounts.

That's all for now. I hope everyone had a great holiday. Time to wrap up 2010.
These pans are made by a JR Manufacturing in Wisconsin. They directly market their pans under the "Champ" name and have a wide variety of pans geared toward racing applications. According to a gentleman at JR Manfucturing, this particular pan design was a joint effort initiated by Kurt at Autokraft for swapping LS engines into early Camaros. While he does sell the pans direct, he recommended I buy from Kurt and I'm happy to do so since I believe he did a lot of the legwork in developing the dimensions.
I have to say I am very impressed with both the design and quality of fabrication of this pan. I have seen aftermarket pans for small blocks that didn't come close to the level of detail built into this thing.
The pan is constructed of a stamped section that formes the one-piece flange and front section of the pan and a welded/fabricated sump area that includes kickouts for capacity and active baffling for oil control. The efforts toward keeping oil around the pickup were my primary reason for selecting this pan over some of the others available. Here are some detailed pictures of the sump area
You can see the pan uses hinges as doors to keep oil around the pickup during cornering, braking, and acceleration. The hing travel is limited to opening about 45 degrees, which shold prevent the doors from sticking open.
Another detail to admire is the stitch-welded backup flange that adds thickness/stiffness around the perimeter of the pan to help keep things sealed.
The pan also includes a nicely machined spin-on oil filter adapter.
These o-rings seal the supply & return between the adapter and the oil pan. I was very happy to see the o-ring glands include room for the o-rings to compress, a detail that some (bad) engineers overlook. This should result in a good seal as long as the bolts clamping the adapter do their job.
I haven't looked up this filter yet, but here's what you're supposed to use for this pan.
The pan also includes this fabricated pickup assembly. I suspect (but dont' know for sure) this started life as an OEM assembly and was simply modified to accept the pickup in a new location. My only complaint here is some surface rust around the MIG welds that could have been prevented by oiling it down before storage. We'll see how well it lines up when I install the pan. I do plan to check the distance between the pickup and bottom of the pan.
Lastly, Santa got me a set of solid body mounts from Global West. I was happy to find they were anodized black instead of the advertised blue I've seen just about everywhere. These bushings interlock (a nice feature) and sort of remind me of dimple dies. They included all the necessary hardware. I hope I don't regret going this route over polyurethane mounts.
That's all for now. I hope everyone had a great holiday. Time to wrap up 2010.
12-28-2010, 08:07 PM
#90
TECH Fanatic
iTrader: (14)
Join Date: Mar 2007
Location: Phoenix/Tempe, AZ
Posts: 1,969
Likes: 0
Received 0 Likes
on
0 Posts

man, that pan is like candy
it may be a day late and a dollar short, but any reason why you havent looked at an aftermarket alt? I have a 225amp f-body alt (That was also black powdercoated!)
seems like a little more change would save you from the headache of notching; but then again youre one of those 'problem overcomers', i wonder sometimes if you just do it to do it
12-28-2010, 09:37 PM
#91

I decided to spend a little more time on this tonight and get the bushings installed. Everything went about as well as could be expected. The only complaint I have for Global West was one of the cone-headed 5/8" bolts had the leading threads boogered up and I had to clean it up with a die, but otherwise I'm very happy with the fit.


My subframe was way out of alignment with the body - about 1/2" shifted back. I used the old body bolts and 5/8" alignment holes near the firewall body mounts to line it back up - the same holes I used when I put the subframe on ten years ago. I have no explanation for how or why it moved back so far, but it does explain the lack of firewall clearance I had before with my HEI distributor. If you have to do this, don't forget to release the parking brake - that made it a little tough to get the subframe pulled forward until I realized it was engaged.
12-29-2010, 10:47 PM
#92
Those bushings look to be stock-height replacement ones, correct?
Don't forget to reuse the 1/2" thick washers from the factory above the front solid bushings. I forgot to reuse them on mine, just threw the aluminum bushings in there, it all looked good until I mocked up the passenger fender and ended up with this...

Was scratching my head wondering how I could've possibly installed the fender wrong, turns out it was because I had used the bushing only, not the bushing + stock steel washer...

Now they don't mention this fact in my instructions (SpeedTech) and they might not in yours, then again you might not have to do this in yours, but just something to double-check before you do final-tighten of the bushing bolts, it worked out for me.
I had a helpful link explaining this but I seem to have not bookmarked it. Essentially 3rd gen Nova's and 1st gen Camaro's share the same subframe and mounting points, but the front subframe mounting points on a Nova are 1/2" higher on the body for some strange reason, so from the factory they installed an extra 1/2" steel spacer/washer to make the Camaro subframe bolt up properly to the Nova body. At least this is what the internet tells me, but it worked out in my case.
Don't forget to reuse the 1/2" thick washers from the factory above the front solid bushings. I forgot to reuse them on mine, just threw the aluminum bushings in there, it all looked good until I mocked up the passenger fender and ended up with this...
Was scratching my head wondering how I could've possibly installed the fender wrong, turns out it was because I had used the bushing only, not the bushing + stock steel washer...
Now they don't mention this fact in my instructions (SpeedTech) and they might not in yours, then again you might not have to do this in yours, but just something to double-check before you do final-tighten of the bushing bolts, it worked out for me.
I had a helpful link explaining this but I seem to have not bookmarked it. Essentially 3rd gen Nova's and 1st gen Camaro's share the same subframe and mounting points, but the front subframe mounting points on a Nova are 1/2" higher on the body for some strange reason, so from the factory they installed an extra 1/2" steel spacer/washer to make the Camaro subframe bolt up properly to the Nova body. At least this is what the internet tells me, but it worked out in my case.
Last edited by frojoe; 12-29-2010 at 11:08 PM.
 12-30-2010, 01:15 AM
#94
Joe, yes they are the stock-height versions and thanks a lot for sharing that info! I currently do not have any spacers at the firewall other than the Global West mounts themselves. I had replaced the body bushings ten years ago and didn't put spacers in then either. I have no idea if they where they before that, but if the few posts around the net are correct, I probably need to get some. Thanks for pointing that out - I'll look into it some more.
12-30-2010, 11:22 PM
#95
I found a pretty decent thread explaining this firewall body bushing spacer for Novas:
http://www.stevesnovasite.com/forums...d.php?t=136832
The only thing I'm not sure about is the actual thickness of the spacer. If anyone has one they can measure, I sure would appreciate it!
http://www.stevesnovasite.com/forums...d.php?t=136832
The only thing I'm not sure about is the actual thickness of the spacer. If anyone has one they can measure, I sure would appreciate it!
12-31-2010, 11:23 PM
#97
Decided to go ahead and put the oil pan on. First the pickup tube. I harvested the gasket from the original truck pan, but I think I will get a new one as insurance.

The orignal truck bolts seemed to work fine. Most of the holes in the block are through, holes, so the only place to really be concerned about thread length is at the timing cover.


I also made progress on the 1" lift engine adapters. Actually they are closer to 15/16" lift, the product of going 1/2" thicker on the plate and adding the SBC backing plate (0.166in as measured by caliper). 0.666 inch additional thickness times square root of 2 (since the mount is on a 45 for a 90 degree V8) is 1.414*0.666=0.942in of lift compared with my previous adapters.


I still need to pick up some socket head cap screws, but you get the idea


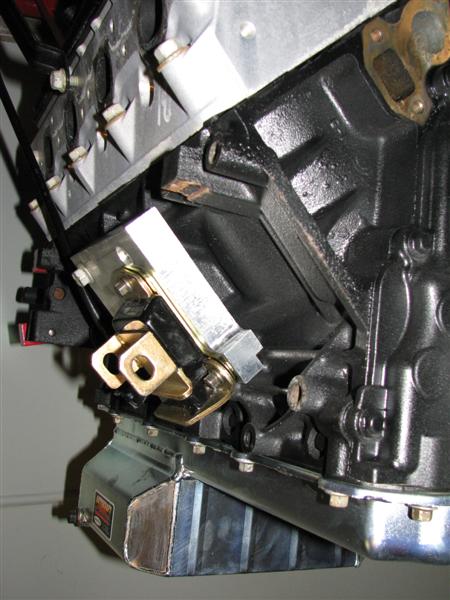
Whether this works out or not, it gave me an excuse to do some milling. Life is good. Happy New Year!
The orignal truck bolts seemed to work fine. Most of the holes in the block are through, holes, so the only place to really be concerned about thread length is at the timing cover.
I also made progress on the 1" lift engine adapters. Actually they are closer to 15/16" lift, the product of going 1/2" thicker on the plate and adding the SBC backing plate (0.166in as measured by caliper). 0.666 inch additional thickness times square root of 2 (since the mount is on a 45 for a 90 degree V8) is 1.414*0.666=0.942in of lift compared with my previous adapters.
I still need to pick up some socket head cap screws, but you get the idea
Whether this works out or not, it gave me an excuse to do some milling. Life is good. Happy New Year!
12-31-2010, 11:49 PM
#98
Would you mind posting them here? I don't think Clint would mind. ( If so, sorry Clint)
12-31-2010, 11:53 PM
#99
Clint,
Looks good. What are the motor mounts you are using? Short and wide?
Looks good. What are the motor mounts you are using? Short and wide?