
84 Corvette 5.3 build
 05-07-2012, 11:44 PM
#41

It appears that the stock engine mount placement will need to be cut and welded to adjust for the engine mount adapters. I fiddled with it for awhile tonight and couldn't get both sides to bolt in. After the oil pan gets welded I will try some more but it doesn't look like its gonna bolt in without some help
 06-27-2012, 08:59 AM
#42
Well after waiting for my oil return fitting to be welded in my oil pan for almost 6 weeks (long story  ). I finally got it back and put back on. I installed the z06 cam I got from my friend along with springs last night so I will finally be putting this engine in. I will get some pictures of installing it.
). I finally got it back and put back on. I installed the z06 cam I got from my friend along with springs last night so I will finally be putting this engine in. I will get some pictures of installing it. 
 07-31-2012, 09:04 PM
#44
On The Tree

A 5.3 Turbo C4, that thing is going to be fun!!!! What size turbo is that? Are you shooting for about 600 rwhp? Was your 84' originally an auto? In case you don't already know, but probably do, it has the DANA 36 rear, no biggie though, but if you toast that rear end, get a DANA 44 set up out of any manual car, 4+3 or ZF, the autos were all 36's and the manuals all came with 44's, I don't know why they just didn't make them all 44's. The engineers sometimes make me scratch my head and say what the fu** were they thinking by doing that!! :-) Can't wait to see video of it layin rubber at 60mph!!!
10-14-2012, 03:07 AM
#45
On The Tree
It appears that the stock engine mount placement will need to be cut and welded to adjust for the engine mount adapters. I fiddled with it for awhile tonight and couldn't get both sides to bolt in. After the oil pan gets welded I will try some more but it doesn't look like its gonna bolt in without some help
Progress report please, dying to see this thing in action!!!!!
02-26-2013, 12:46 PM
#46
well after a LONG *** break on this project I am finally back at it LOL. I had a problem getting the correct engine mount adapters both in finding the right ones and getting 2 of the correct sides and offsets sent to me from a company (took 2 months alone to get the right set). Last night the engine was bolted down for good. Tranny is almost fully set for good also. That will be an hour more tonight then it will be ready. I will get some pictures of the progress later. It has C5 manifolds now but I got a test LS4 LH exhaust manifold off a car here at work to see if it will work for the turbo setup (I pray the passenger side clears the suspension-that would make things SOOOOO much nicer than routing the hot side under the car. All accessories/wiring/fuel lines should be done in the next few weeks and I will be able to test start in N/A and then hopefully in a month it will be rocking the turbo. Turbo is a 68mm ebay special, which I know some people aren't fond of, but I just want to see what it can do!
02-26-2013, 10:35 PM
#47
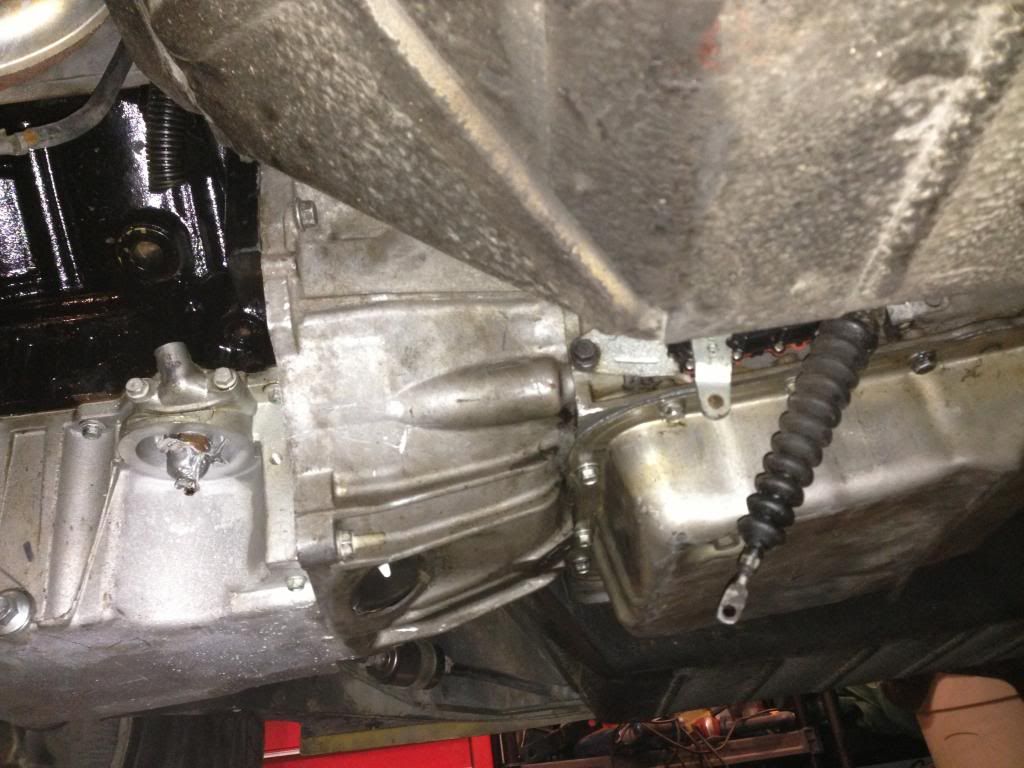
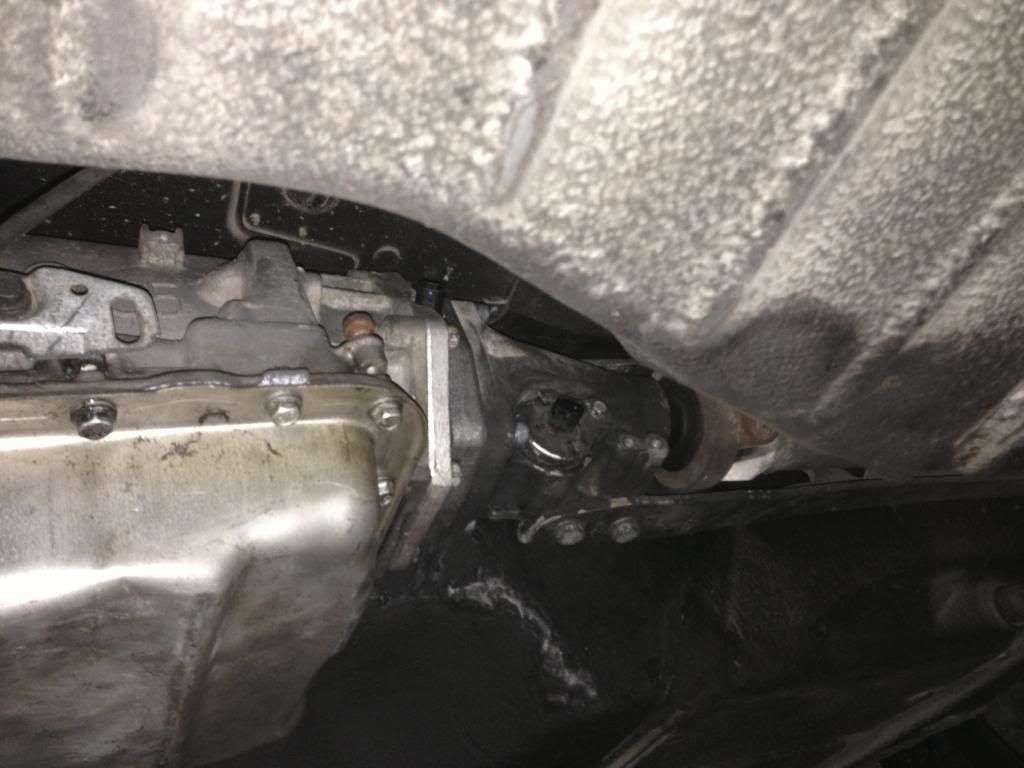
Transmission and driveshaft are in. Everything got perfect with the advance adapters tail housing adapter. No modification or adjustment necessary for the 4l60 to for right in. It looks like an ls4 manifold on the drivers side and a truck manifold on the passenger side is how the turbo setup is going to work. Just need to cut n weld a v band flange on em.
Engine in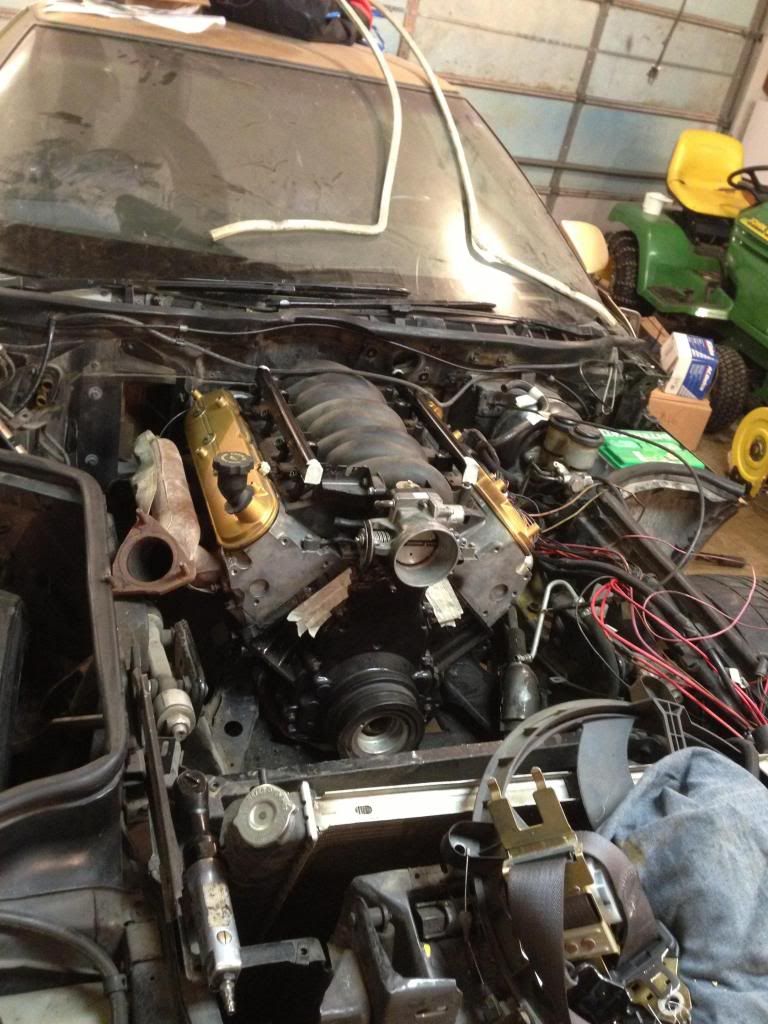
Although the fan wheels would be more sleeper these look soooo much better and have the wider rubber this thing will need... Plus they were a steal

And here is the transmission all fully installed
Engine in
Although the fan wheels would be more sleeper these look soooo much better and have the wider rubber this thing will need... Plus they were a steal
And here is the transmission all fully installed
03-22-2014, 06:33 PM
#48
Well after another year has gone by..... I finally have gotten enough free time to get it started! I will have to get lots of photos of the fuel system I made for it and post some answers to questions I was confused about getting it to this part. On a side note I purchased a fuse box from Current Performance and it was very nice and works great....BUT they forgot to put a fuse in for the ECM Batt slot.......this had me tripped up and made me do some testing to figure out just why my ECM wasn't getting any power. Anyhow heres a vid of the first start! no turbo yet. I will probably run it NA this summer then turbo it next winter.
03-23-2014, 07:41 PM
#49
Got the transmission working now. I used the factory shifter cable and just mounted the cable bracket and the shifter arm off of the 700r4 on the side for shifting. Fits great and works awesome. Also on a side note.....if anyone is going to be using PTFE braided fuel lines, I bought the summit brand hose end fittings first and they are a PITA to install. They just don't go together well or fit all that great. Well they ran out of those so I used aeroquip fittings to finish of the lines and its was a night and day difference. the aeroquip fittings go together WAY easier and nicer than the summit ones. None of them leak...but the ease of install is worth the extra dollar a fitting or whatever the difference was
 03-30-2014, 11:00 AM
#51
I bought a 98 harness from a member off of here and then re-pinned the whole thing to work on a 99+ computer. Worked out very well on the end. Then I just spliced all of the wires that go to the under dash connectors to the proper feeds from the fuse box I bought from current performance and it turned out to work very well
03-30-2014, 11:03 AM
#52
For people wiring up the TCC lockup feed wire I. These cars. One of the switches attached to the brake pedal is 12v closed when the pedal is not depressed and 0v when the pedal is depressed. When looking at the setup it is the plug on the right hand side with a purple wire coming from it. This will eliminate the need to wire in a relay.i will post a picture of it when I get back inside.
03-30-2014, 04:11 PM
#54
Here is a picture of the wire I am talking about.... Purple one on the right is the one that is open when depressed and closed normally.

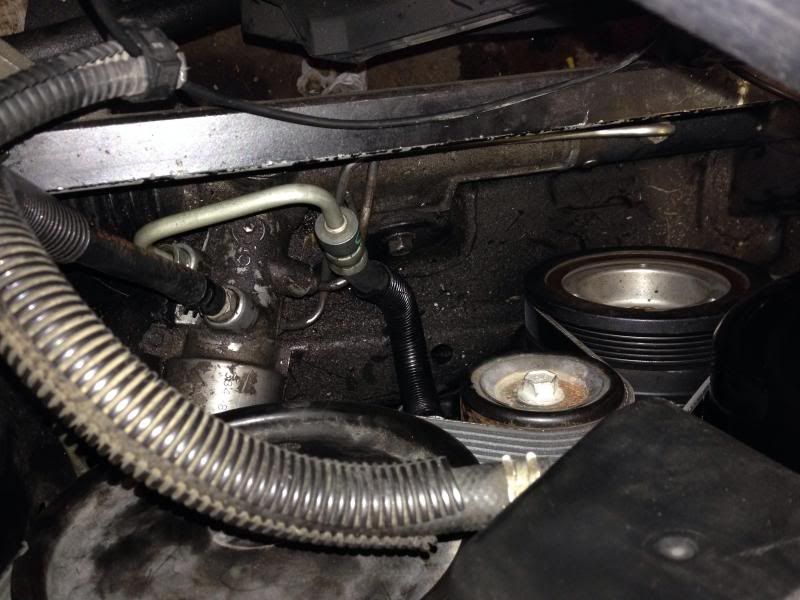
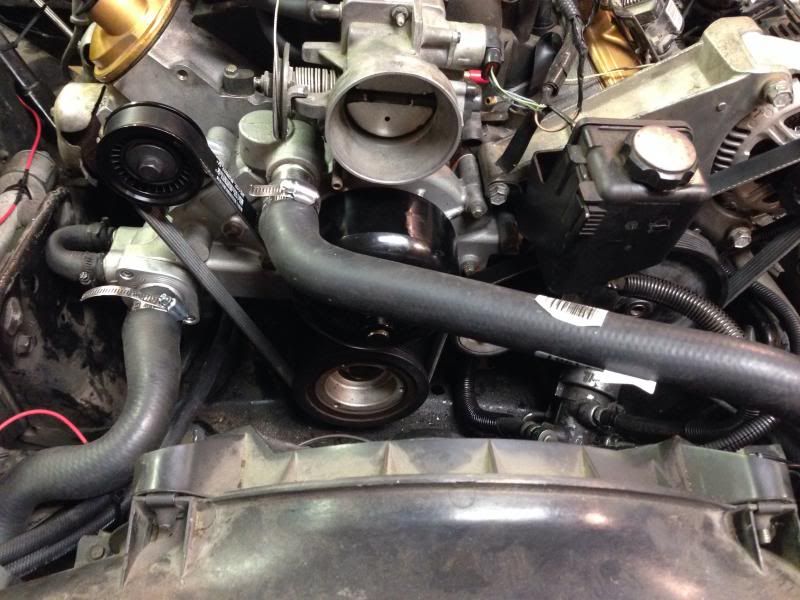
I used a C5 corvette power steering hose because bending the stock one wasn't worth the $15 I paid for this one used and it just fit right away.
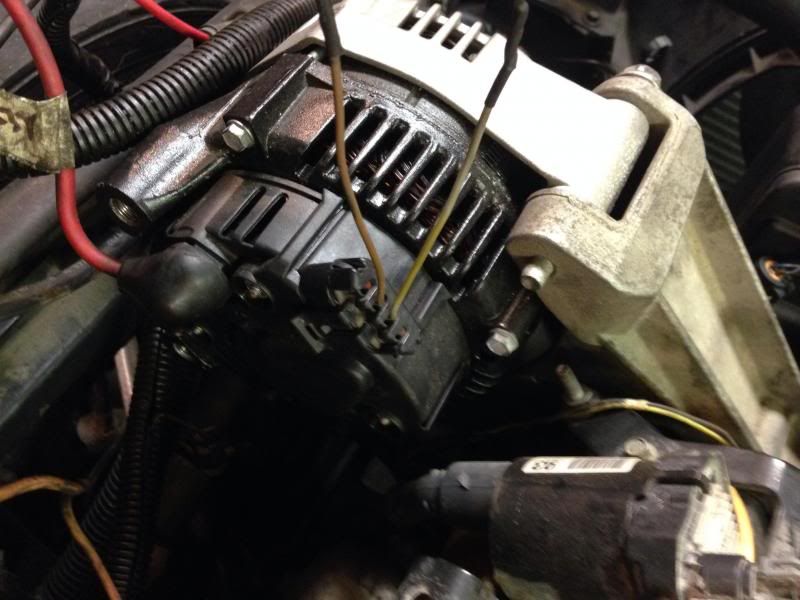
Here is how the alternator is wired. The lighter colored wire in spot C is straight 12v where the Darker brown wire has a 470 ohm resistor soldered into the wires
I used an ls2 corvette belt tensioner instead of the ls1 since I have read that the ls2's belt tensioner has higher sides and works better. Since I have a powerbond aftermarket balancer a stock c5 belt wouldn't work. I used a 6pk1995 I believe and it fits well. Some people use the smaller 6pk1970 belt.
Got all of my vacuum hoses routed today and cleaned up wiring and all......just need to make an exhaust, wait til my intake and steam pipe splice get here and throw the hood back on and she should be on the road to do some tuning!
I used a C5 corvette power steering hose because bending the stock one wasn't worth the $15 I paid for this one used and it just fit right away.
Here is how the alternator is wired. The lighter colored wire in spot C is straight 12v where the Darker brown wire has a 470 ohm resistor soldered into the wires
I used an ls2 corvette belt tensioner instead of the ls1 since I have read that the ls2's belt tensioner has higher sides and works better. Since I have a powerbond aftermarket balancer a stock c5 belt wouldn't work. I used a 6pk1995 I believe and it fits well. Some people use the smaller 6pk1970 belt.
Got all of my vacuum hoses routed today and cleaned up wiring and all......just need to make an exhaust, wait til my intake and steam pipe splice get here and throw the hood back on and she should be on the road to do some tuning!
03-30-2014, 08:37 PM
#56
1. I am mounting the new ECM under the passenger side dash... Where the old HVAC box was.
2. I mounted the new fusebox in the engine bay in the blower motor area on the far passenger side (I needed the blower motor and that entire assembly removed because that is right where the exhaust is going to run once it is turbo'ed anyhow so I figured I'd use the space)
3. The heater hose I have eliminated with a hose that just loops it. As far as radiator hoses I ordered the upper and lower for a 2000 F-Body and they fit great. On a side note I ordered a steam vent hose splice that goes into the top radiator hose from jagsthatrun.com in order to take care of that.
I will be working on an exhaust to run N/A for the summer here in the next few days. I am hoping to modify the stock 84 mid-pipe to fit and work with the stock c5 manifolds on the engine. Hopefully with a little cuttin and welding and a little luck itll work out
04-02-2014, 08:19 PM
#57
Well I got the intake tube on tonight! I am still waiting on my steam line T which shipped 2 days late so I am on hold until that happens......and of course, while I was working up front I discovered my 90 degree fuel fittings on my crossover line leak when wiggled..... These came with my fuel rails when I had them ordered in a package.... The tube nuts on the end seem to be really loose and it leaks out of the small hole in the nut.... I am guessing it is just because they are a cheap chinese POS....so note to self and everyone else.... don't buy cheap fuel fittings... same as my above post, forget everything and get aeroquip or some other name brand fitting and save yourself the hassle (or worse fire).
It leaks out of that hole in the tube nut.......on both fittings not just one
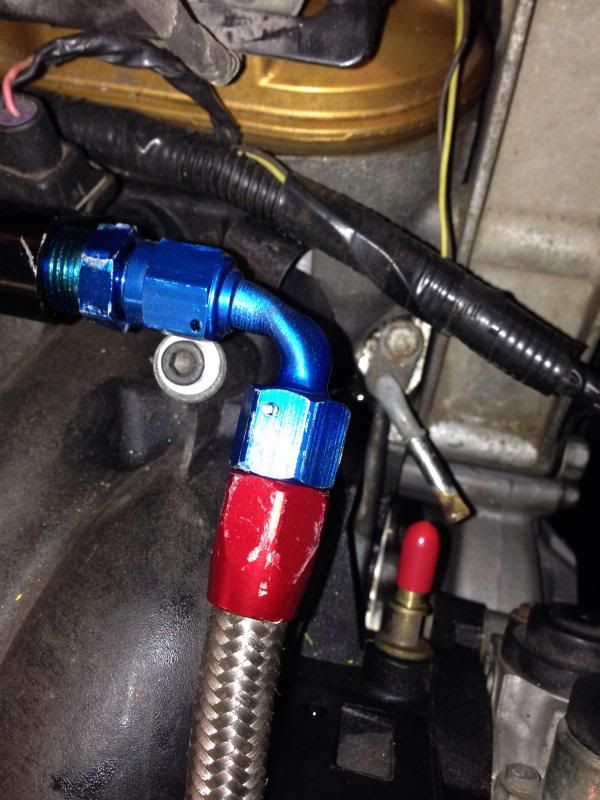
It leaks out of that hole in the tube nut.......on both fittings not just one
 04-02-2014, 09:59 PM
#59
It's leaking between the tube and nut that is pre made... After doing some research I have seen a few posts on other sites of people having the same problem with cheap fittings.... I think there is some kind of dealing ring on the inside between the nut and tube.... But I said screw it and ordered some ptfe fittings to replace the rubber hose and ends that are on there currently...
Last edited by 84lsvette; 04-02-2014 at 10:16 PM.
04-05-2014, 01:33 PM
#60
Well I got the wiper motor installed with one speed... The wiring for the corvette one is opposite the blazer... So if you can fit the stock one most certainly do that... Mine wouldn't fit  . Anyways the blazer motor grounds through the mounting bolt... Has a wire that's hot all the time then uses other grounds to complete the circuit from what I've seen... The vette motor grounds with a black wire and not through the mounting bolt and uses hot wires to turn the motor on and off.... So I used the ground on the high speed wiper and used the low speed trigger wire on the blazers hot spot.... So it just works on high when you have it on low or in the mist spot down for bumping it back to where you want em... I will post pictures... I also had to drill the rivets out of the mount and re clock the motor as well as cut a tab off n shorten it to make it fit.... All in all a lot of work.... Maybe rain x is just the way to go lolol
. Anyways the blazer motor grounds through the mounting bolt... Has a wire that's hot all the time then uses other grounds to complete the circuit from what I've seen... The vette motor grounds with a black wire and not through the mounting bolt and uses hot wires to turn the motor on and off.... So I used the ground on the high speed wiper and used the low speed trigger wire on the blazers hot spot.... So it just works on high when you have it on low or in the mist spot down for bumping it back to where you want em... I will post pictures... I also had to drill the rivets out of the mount and re clock the motor as well as cut a tab off n shorten it to make it fit.... All in all a lot of work.... Maybe rain x is just the way to go lolol