
1978 Aerocoupe Caprice: 5.3 / 4L60E


 01-06-2019, 04:36 PM
#142
I had a leak on the passengers side floor of my Custom Cruiser a number of years ago and I believe the water was leaking down from the windshield wiper area, running down the outside of the firewall and getting in that way. I think I had to use some non-hardening caulk on those air inlet screens by the windshield wipers to keep the water going where it is supposed to go.
Just incidentally, what does TAC stand for?
Just incidentally, what does TAC stand for?
I also had a leak around the heater box and cowl. I have some pictures earlier in this thread of taking the fender off and sealing it. I believe I got that leak fixed but this new one is coming from somewhere new. I believe it's coming from inside the A-pillar, but it's hard to tell. Since I'm already going to have the roof repaired I'm going to wait until I can rip the vinyl top off and see what it looks like up there before I go further. I also have new weatherstripping for the car so that may help as well.
I loaded the Caprice up on the trailer tonight and hopefully it will be ready to run by next weekend, so I can get some new tires. The tires on it right now are dry rotted so bad I wouldn't want to go very fast at all on them.
01-13-2019, 09:20 PM
#143
Well, it runs and drives! I picked it up from the transmissions shop Friday night, so my first test drive was late at night through the middle of town. I left it at the tire shop and it got an alignment and new tires then I dropped it off at the exhaust shop, so I haven't gotten to drive it very far at all. There are a few bugs to work out but I'll need to address that later. Hopefully next will be getting the emissions tested and then back to the tuners to put the finishing touches on the tune.
01-13-2019, 11:08 PM
#144
TECH Senior Member

Good to hear! Hopefully all down hill from here!
What does emission testing entail where you are?
What does emission testing entail where you are?
01-14-2019, 08:54 PM
#146
TECH Senior Member
. I have a feeling you'll pass EASILY. These engines are cleaner without the converters than the old ones were with them.
01-31-2019, 05:44 PM
#147
LIfe has prevented me from doing anything other than look at The Caprice in passing, but hopefully this Saturday I'll be back at it. I need to remove the exhaust manifold and make some clearance on the frame on the passenger side. These are 2010 camaro manifolds. I wish there was a stock manifold that wouldn't hit, it's so, so, so close.
02-03-2019, 07:03 PM
#148
Progress has been very, very slow. Overtime at work as well as weather and a host of other issues on the weekends has prevented me from doing much more than walk around the car for a few weeks. We found out one of our daughters has a food allergy and spent the day in the emergency room. I'm so close to having the car finished that I'm really anxious to get time to finish up these final details. After I have confidence the bugs have been worked out on the mechanical side I'm going to drive the car about 4 hours to a body shop and he is going to fix the rust under the old vinyl top. I got the car to a transmission shop and they fixed the stripped threads on the transmission case, so all of the transmission lines are now complete without leaks. I hauled the car to the transmission shop and April dropped me off late one night after work to pick the car up. It had yet to have moved under its own power at this point. My very first test drive was through town in lots of traffic straight to the tire shop, where it got new tires and an alignment. Unfortunately, 15 inch tires (255/60r15, raised white letter of course) are not very common anymore and that means they aren't as cheap as they used to be. After the tire shop the car went back to the exhaust shop where the catalytic converters were installed.
A couple of the lights were out and the turn signal light was burning all of the time. I am used to flashers flashing quickly when a light burns out, but apparently this one causes the light to stay on. I was expecting this to be a short because of the creek I submerged the car in the last time I drove it before the engine swap. When I replaced the bulb for the front parking light both parking lights started working correctly and the blinker worked correctly as well. The fuel gauge is still not working but I haven't had a chance to chase that down yet. I used a multi-meter to check the overcharging issue. According to the dash the car is charging at 15 volts, but checking at the alternator shows a max of 14.6 and 14.5 with all accessories on, so it seems the dash gauge is just reading .4 volts too high.
I lost one weekend because a friend was supposed to use one of his cars at a charity event and then couldn't make it so he asked me if I could fill in so I took the '31. Getting the car out and ready to haul to the event and then attending used up one whole weekend of progress. Fortunately The Caprice was mobile at that point so I didn't have to push it out of the way.
=center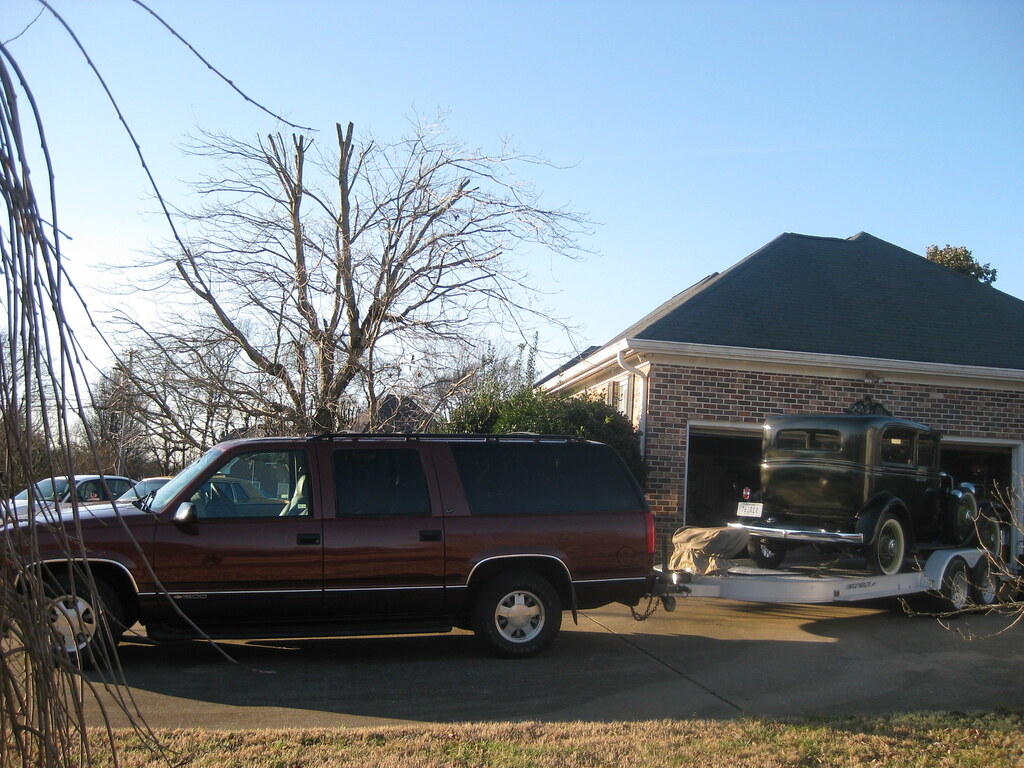
I haven't gotten a picture of the new exhaust system since it has been installed.
=center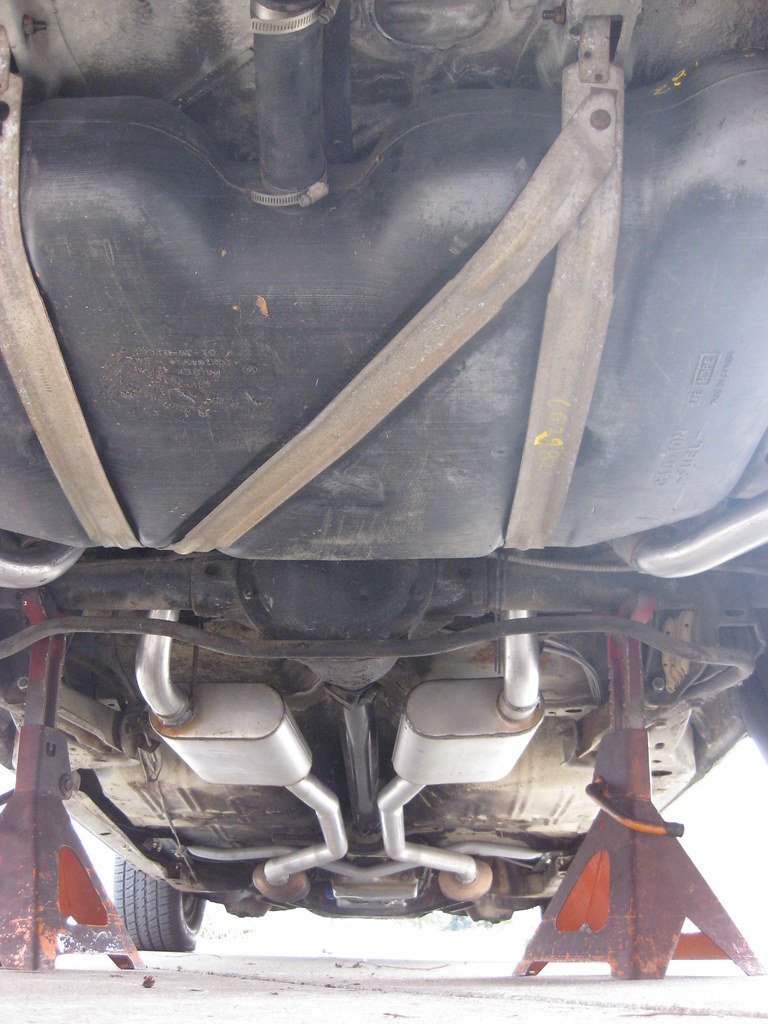
It has been raining a lot and the temperature has been in the teens so I haven't been able to work on the car during the weekdays. This Saturday, I started out addressing the exhaust manifold contacting the frame. I removed the exhaust from the manifold and was glad to find that it isn't actually contacting the frame, it just looks like it from the view from underneath, so I reinstalled the exhaust and put everything back. There were a couple small leaks resulting from the heat cycles so I got all of those tightened up. The original gas tank filler neck was all steel so it didn't have a mount near the cap. The new gas tank has a rubber tube connecting the filler neck to the tank so it needs to be mounted near the cap. I don't want to weld brackets to the original body, which would work fine, but isn't really my preferred method.=center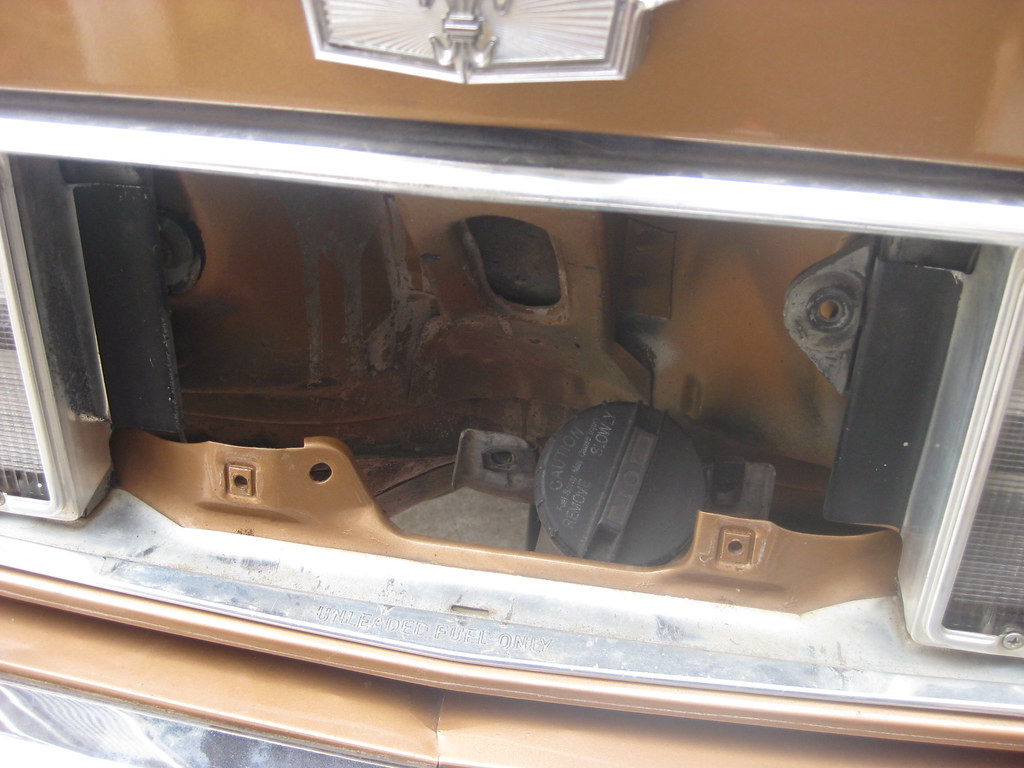
I had been looking at this area for quite a while hoping a good solution would come to me but there just isn't a good place to make a clean looking mount. I finally decided to make a mount that would screw into the existing holes in the top of the bumper and would then have two arms that would come up and mount to the tabs on the filler neck. The flat white piece in the picture below is a piece of aluminum siding trimmed and painted body color on top. These cars had a filler piece between the bumper and body made of rubber and almost all of them have crumbled and disappeared over time. This solution seems to work pretty good and unless you knew differently it appears stock from the top side. The bolts I'll be using for the mount are directly under the aluminum piece and hold the inner structure of the bumper to the outer chrome shell.=center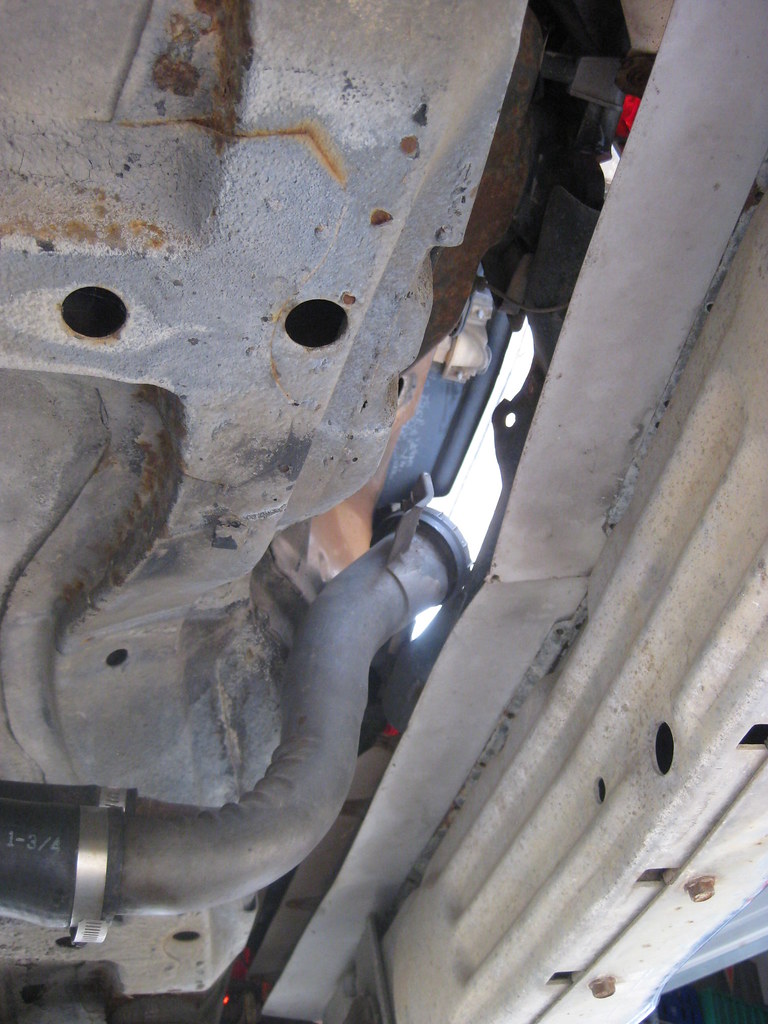
I started with a cardboard template. I didn't have a scrap piece of metal long enough to make the piece so I had to weld a couple pieces together.=center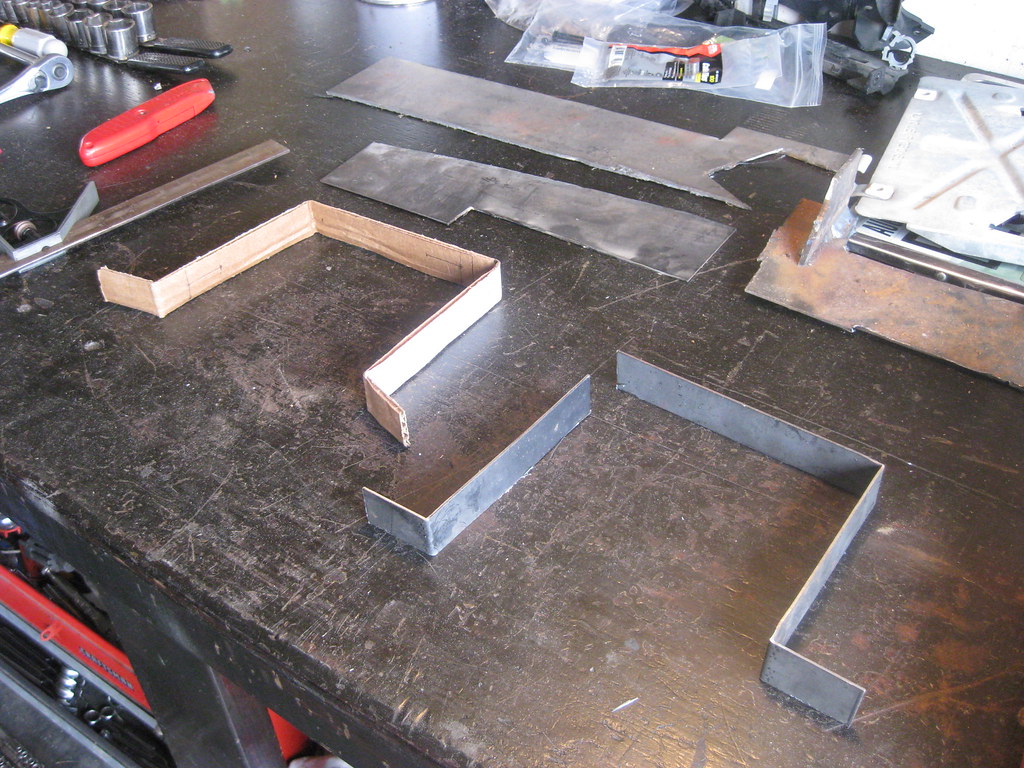
I normally like to grind all welds smooth and flat but on this piece I decided to only grind the outside. If this piece ends up with too much lateral flex I'll add a couple gussets. I had to stop here because things didn't go quite to plan. I will eventually have two arms coming off of this piece that will mount to the top of the filler neck but I had trouble getting one of the bolts out of the bumper. =center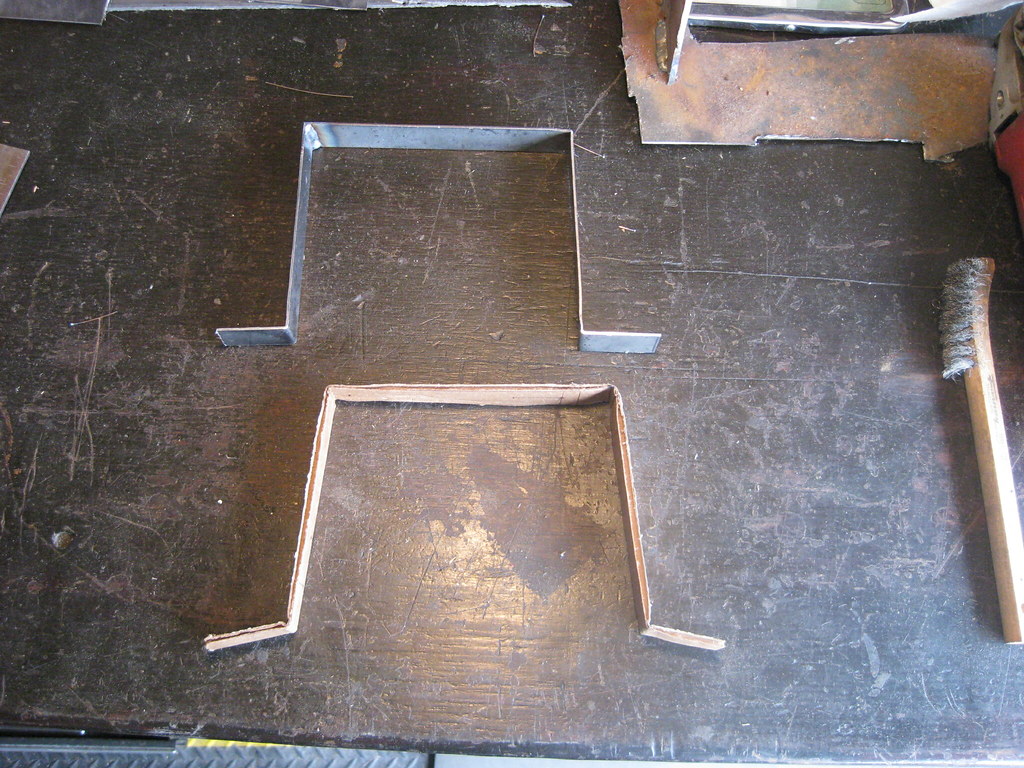
The first bolt came out fine but the second bolt wouldn't come out. They thread into place with metal clips that clamp inside the bumper, but this clip broke and is spinning inside the bumper. It's impossible to accurately explain but because of the way the inner structure of the bumper is made it is impossible to access this clip. The only way would be to remove the bumper and take all of the bolts out to remove the inner structure, which would mean grinding the head off of the afflicted bolt. This isn't a good option because I'm sure many more of these bolts will have the same problem of the clip breaking. Looking back at the picture from under the car will show that the inner structure of the bumper had a couple holes cut in it. I used a hole saw of a similar size to drill a hole in the appropriate place to give me at least some kind of access. Even then because of the unnecessarily intricate structure on the inside of the bumper it is not a straight shot. That is as far as I was able to get and I have yet to remove the clip. Even with the access hole it is very difficult to reach but I think if I can grind the head off and remove the bolt I can get my fingers in there to install a new bolt with a nut.
I took the car to pass emissions and it failed. It failed because the testing station said they could not get enough of a reading from the tailpipe. Essentially, they said that there isn't enough puff coming out of the tailpipe. I asked the guy if I could hold my foot on the gas and he said no. I have no exhaust leaks and the car is idling where it should. This entire emissions scam is such a waste of time and money and is super frustrating. I suppose I should be happy we don't have full inspections like some states do. I did make sure there was a probe in both tailpipes. I'll have to find another testing station where they aren't so ridiculous and I guess just hold my foot on the gas while they have the probes in.
I took the car to the tuner's house and he's going to drive it into his shop and tune it on the dyno. At 70 miles per house the car is turning 1450 rpm, which is way too low. The gearing, 2:41 I think, is way too high. I'm barely able to keep it at 65 because you can barely sit your foot on the gas and it speeds up. I did confirm that the torque converter is locking up and disengaging with the brake, so that's a relief. When I was in town this past weekend I heard a clicking noise when I had the hood up. I tracked the noise down to coming from the PMC/Relay/Air box. I looked into the issue and found that it is most likely a relay clicking, which was a relief because my first fear was that it was the PCM. The frequency was about 1 click per second. This is most likely due to the tune and the double fan. We knew that the fans would need to be addressed in the final tune but I didn't realize it could cause the fan relay to click. I'm not sure yet but from what I've read the PCM is trying to activate the recirculate door from the old Avalanche and a setting will need to be manually changed to the "fan 2" setting with the laptop. The good news is that the car ran great on the trip to the tuners, which was about 15 miles, some of that at interstate speeds. It doesn't seem to be overheating, has good oil pressure and voltage and currently doesn't have any leaks. The tuner is going to address some things like shift points, fans and throttle lag in the drive by wire. I'm anxious to see how the car will be after the final tune on the dyno.
02-03-2019, 07:19 PM
#149
Live with it for a while before you change the gear. 1450 rpm really isn't too low given the great low rpm torque of that motor. You'll optimize fuel mileage for sure. And you may find that you're plenty happy with performance -- which is gonna be WAY better than with the other motor. I cringe with you on the inspection front. That car is SO MUCH cleaner than it would be if you simply left the old engine in. It oughta be an automatic pass on emissions. Can't believe they require a sniffer. Mine just turned 35 -- no more inspection at all. What communist state are you in? Sorry....
02-03-2019, 10:04 PM
#150
I agree. Just get some reliable miles on the car before you try to change the world. I would not change a thing (outside repairs) until you have at least 500 or even 1000+ miles on the swap. You have far too much time invested to not be driving what is a relatively easy swap. Work out the bugs that could leave you stranded and determine if the gear ratio is actually a problem or simply an annoyance.
I personally think your cruise RPM is a little low but not worth the $2000+ (full rear axle) or $300 to $500+ (gears only in current housing setup by someone) to change it at this point. By "a little low" I would prefer the cruise RPM to be around 1600 - 1800 RPM. Had you not purchased tires, a tire sidewall height change could have made up part of that difference.
Hahaha!!! I thought he said Tennessee or something at one point.
No emissions inspection here statewide except ONE county. Fortunately I don't live there.
Can't you go for historic plates? Here and other places I've lived historic plates are good forever and no inspections. Why make life more difficult than it needs to be?
I personally think your cruise RPM is a little low but not worth the $2000+ (full rear axle) or $300 to $500+ (gears only in current housing setup by someone) to change it at this point. By "a little low" I would prefer the cruise RPM to be around 1600 - 1800 RPM. Had you not purchased tires, a tire sidewall height change could have made up part of that difference.
Hahaha!!! I thought he said Tennessee or something at one point.
No emissions inspection here statewide except ONE county.
Fortunately I don't live there.Can't you go for historic plates? Here and other places I've lived historic plates are good forever and no inspections. Why make life more difficult than it needs to be?
02-03-2019, 11:33 PM
#151
TECH Senior Member
Anything 1975 or later is tested in California. Any emissions gear that came on it better be there. Older than that a PCV system is needed.
What's the newest that can register as Historical?
What's the newest that can register as Historical?
02-04-2019, 10:22 AM
#153
TECH Senior Member
02-04-2019, 06:53 PM
#155
I'm in Tennessee. It's pretty decent here except for the counties that have emission laws, but according to what I've learned that will soon be going away.
I will definitely be changing the rear end for several different reasons. I don't change tire size to get the RPMs I want, I change tire size to fit the aesthetic of the car. I want a posi rear end so I can get sideways in the rain. That's the main thing I miss is when it rains not getting to slide the tail out on the turns. Also, lower RPM does not always equate to better gas mileage. Operating an engine at its peak efficiency is what's key. This was practically demonstrated years ago when we had a customer with a big block work truck. After installing much lower gears they actually achieved better mileage. As the car drives now it is actually lugged the car around town. Anyone that's driven Corvettes from the 90's knows of how awful they are around town constantly shifting into overdrive and basically idling and lugging all over the place. The automatics came with a 2:41 if I remember correctly, the same as my car. The tuner is going to be hooking the car up to the dyno this week and later I'll be doing some calculations to get the car closer to where it needs to be RPM-wise to blend it's peak efficiency at the range it will be driven the most against driveability, however I won't be changing the rear end soon. When I had thought the rear end was a 7.5 I planned to change it sooner, but learning that it is an 8.5 changes things and I plan to drive it for a while as is. Historic license plates aren't the easy way out if you want to daily drive a car and you live in an area where their restrictions are enforced. You can loose your ability to maintain a historic tag.
I will definitely be changing the rear end for several different reasons. I don't change tire size to get the RPMs I want, I change tire size to fit the aesthetic of the car. I want a posi rear end so I can get sideways in the rain. That's the main thing I miss is when it rains not getting to slide the tail out on the turns. Also, lower RPM does not always equate to better gas mileage. Operating an engine at its peak efficiency is what's key. This was practically demonstrated years ago when we had a customer with a big block work truck. After installing much lower gears they actually achieved better mileage. As the car drives now it is actually lugged the car around town. Anyone that's driven Corvettes from the 90's knows of how awful they are around town constantly shifting into overdrive and basically idling and lugging all over the place. The automatics came with a 2:41 if I remember correctly, the same as my car. The tuner is going to be hooking the car up to the dyno this week and later I'll be doing some calculations to get the car closer to where it needs to be RPM-wise to blend it's peak efficiency at the range it will be driven the most against driveability, however I won't be changing the rear end soon. When I had thought the rear end was a 7.5 I planned to change it sooner, but learning that it is an 8.5 changes things and I plan to drive it for a while as is. Historic license plates aren't the easy way out if you want to daily drive a car and you live in an area where their restrictions are enforced. You can loose your ability to maintain a historic tag.
02-04-2019, 09:35 PM
#156
I lived in Knoxville for about 10 years -- no emissions testing then, but things change. Perhaps you're in the Nashville area?
Not my first rodeo on gearing/mileage and efficiency. Understand that lower rpm doesn't always mean the best fuel mileage. Fact is -- more rear gear around town often can help with mileage provided you keep your foot out of it. However, what you gain there usually hurts you on the highway. I was simply suggesting that you do what you seem to be wanting to do - which is to drive it a bit before you decide. I think you'll find the late model drivetrain is MUCH better equipped to deal with low rpm 'trundling' around than the drivetrains of 20-30 years ago. But your experience will inform your decision, as it should.
As an aside -- when I pulled the 5.0L out of mine (325HP @ 5000, 350 lb-ft at 4000) to put the LS3 in (430HP @ 5900; 424 lb-ft @ 4600) I dropped the rear gear from 3.73 to 3.55 because I knew I'd have a lot more torque all across the tach and to reduce highway rpm a bit. This thing will pull from 1000 rpm in 5th gear (35-40 mph) in 5th gear like nobody's business. I should have expected that I suppose. The newer cars (say, C6 Corvette) typically have top gears that are .5 overdriven and commonly see VERY low highway rpm -- 1300-1400 rpm at 70 mph not uncommon. Hell, the CVT tranny in our 2015 Honda Fit would allow rpm as low as 2000-2500 at highway speeds of 65-70 mph with a 1.5L 4 banger. That's because that lower rpm helps with highway fuel mileage. Admittedly, new transmissions (esp CVT's) allow engine rpm to move around more easily to match the load so lugging isn't an issue. All that to say -- I'm contemplating dropping down from 3.55 to 3.27 or even 3.08. And, I realize, you're dealing with a bit less displacement and a little more weight than I am -- so we don't have apples to apples in that arena. However, we both drive "bricks".
Last edited by Michael Yount; 02-04-2019 at 09:41 PM.
02-05-2019, 09:59 AM
#157
Just read all the way through this thread. Definitely will be refering back to it a few times for my own uses as i LS swap my 1978 Impala Wagon.
Though, i will say it is neat to see someone else's take on a project like this. Not saying one way is right or wrong, but reading through start to finish you tackled the job completely differently than I plan to. I know my plans will change as I dig into it with issues that arise, as you did in yours. Nice to see another take on it. Your thread is much more detailed then mine will be. I get caught up in the doing, and forget to take pics of what it took to get there and usually only end up with a before and after photo.
Keep up the good work.
02-09-2019, 10:20 PM
#158
I drove The Caprice to my friend Matt's house so he could take it to his shop to do the final tuning. This was about 18 miles away and was the first time I'd driven the car on an interstate type road. It turned 1450 rpm at 70 miles per hour. I found it hard to keep at 65 mph. You're barely touching the gas even at those speeds and it kept wanting to creep up to 75 and 85 mph without me realizing it. I understand now why the transmission shop believed the torque converter was not locking up. The gearing is so high that it doesn't even lock up until you get closer to 60 or 65 miles per hour. I was releaved to find out it not only engages, but disengages when you apply the brake pedal. There's zero driveline vibration and the tires are balanced well, so though I'm not happy with the BRP kit I will say that they did seem to get the driveline angles correct as the kit advertises. Everything is very smooth. After the tuning the throttle response is much better and the electric fans are working correctly with both fans running on high and low speed with no clicking coming from the relays. Here's where the car spent the week.=center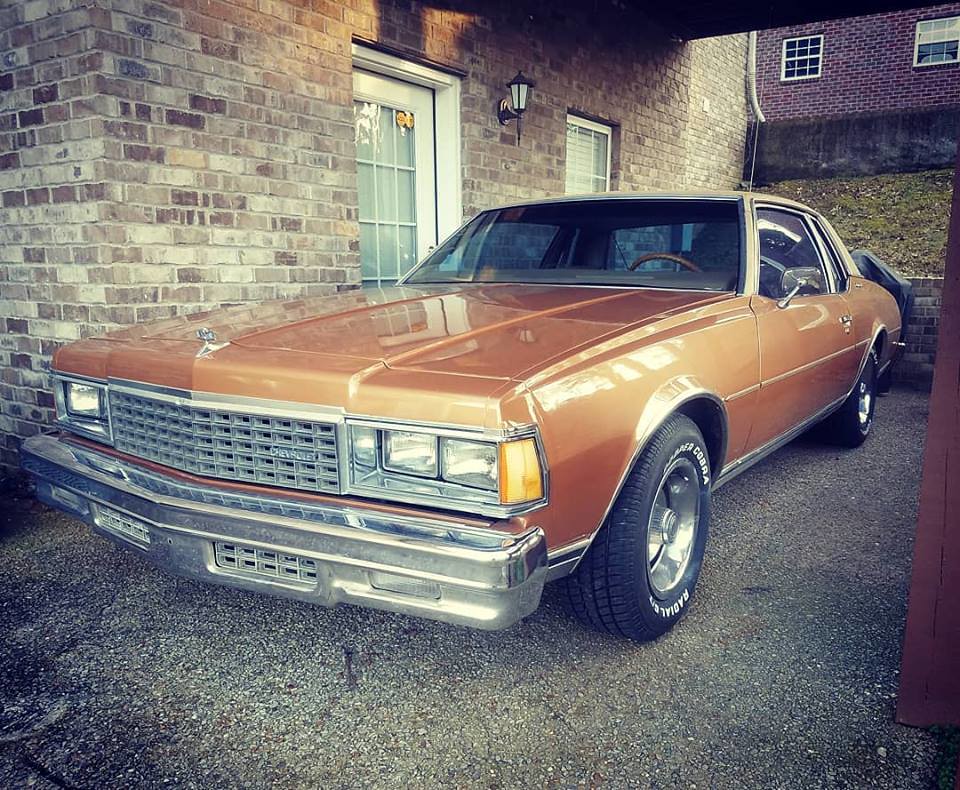
Matt had to drive 35-40 miles each way to get to the shop. He got a pretty good picture of the new gauges. I still haven't had time to get into the fuel gauge issue yet.=center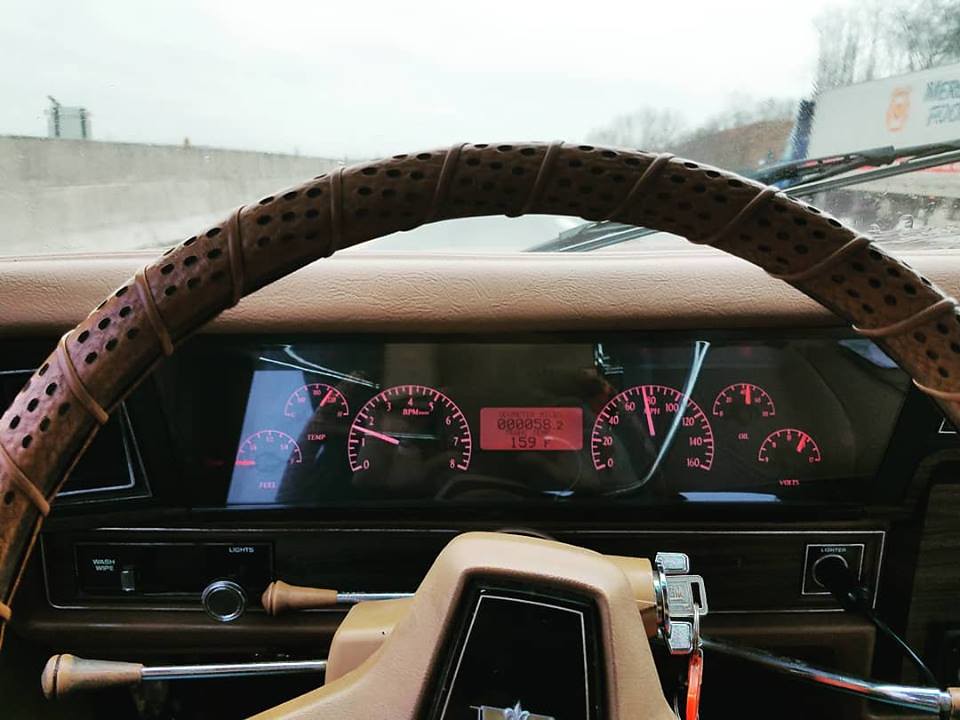
He put the car on the dyno to tune it for wide open throttle.
=center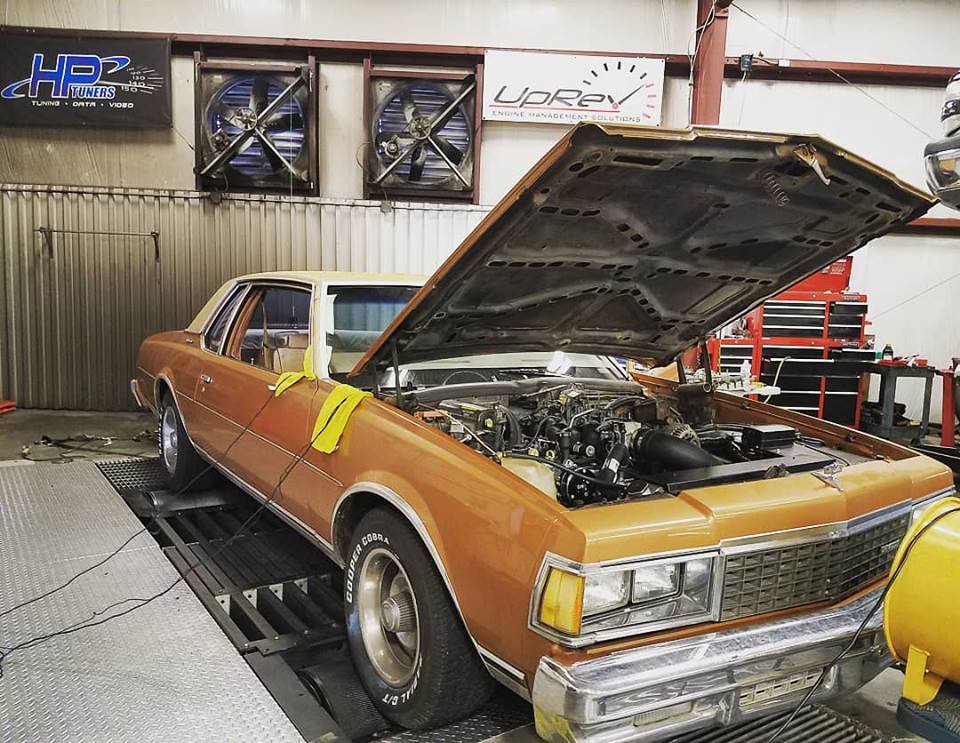
It ended up making 269 horsepower and 304 foot pounds of torque at the wheel with 2:41 gears. That's plenty enough for what I am wanting to do. I will eventually swap out the 2:41 for something closer to a 3:42 with a limited slip.=center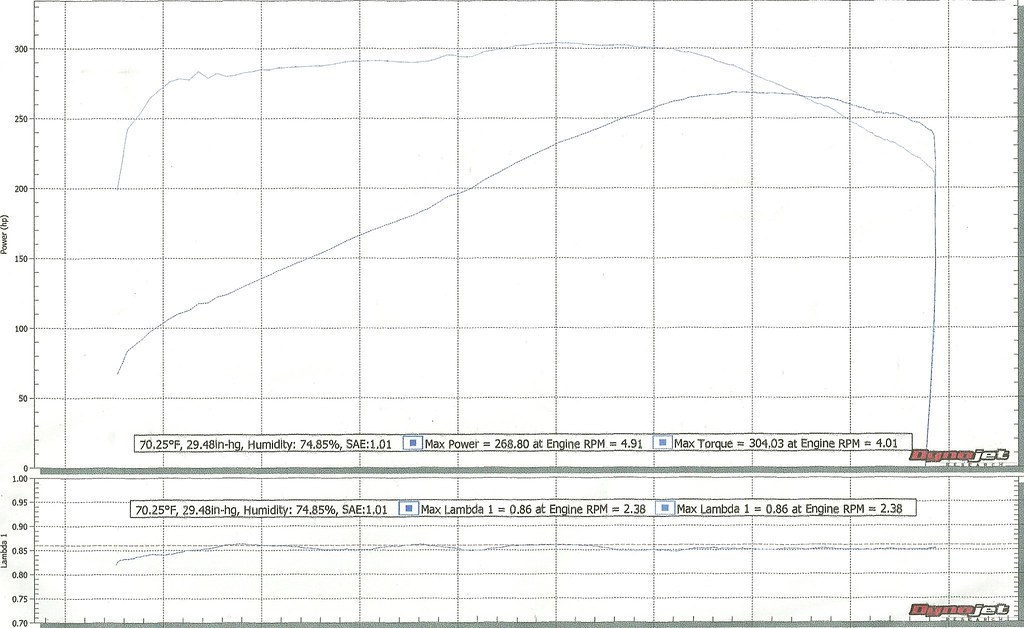
Matt made a couple trips to the shop in The Caprice. Once, the throttle shut off and threw code P2125, but when the key was turned off it started back and ran fine. Really bad weather and storms all week prevented him from driving it into work a couple days. On the 2nd day home from the shop the throttle began turning off every few minutes, getting more and more frequent. I thought I was going to have to go haul the car home, but the problem ended up being the cruise control wires. I forgot to put black tape over the ends when I zip tied them out of the way and Matt had moved some wires under the dash causing the cruise control wires to short out against the steering column. Tidying up the cruise wires solved the issue. It also developed a small transmission leak at the line on the radiator. I tightened that up and it seemed to have stopped the leak. Also, the dead parking light bulb came back. After looking into that issue it seems I have a short in the parking light wiring just as it comes out of the bulb socket. I'll have to see where the break is and fix it. Matt took it through emissions and it passed with no problem. Getting back to the gas tank filler neck problem from last weekend; After a lot of effort I realized that even if I could get the bolt out there would be no way to get a nut on the back of it to tighten so I would going to have to take the bumper apart. Even if I could have gotten a bolt and nut back in I was hesitant to grind the head off of that bolt with the gas tank so close. That meant I had to take the bumper off. It was easiest to take the bumper shocks out of the frame to remove the bumper. The bumper shocks mount to the back of the frame, but also have a 10mm bolt that goes into the bottom of the frame facing up. Both of these bolts twisted off on each side which left a stud sticking down, which made pulling the shocks out of the back of the frame very, very difficult. I eventually got them out with various sized prybars, pushbars, screwdrivers and anything I could find to leverage against. I was just about to tie the bumper to a come-along when it finally gave up and decided to let go of the frame.
=center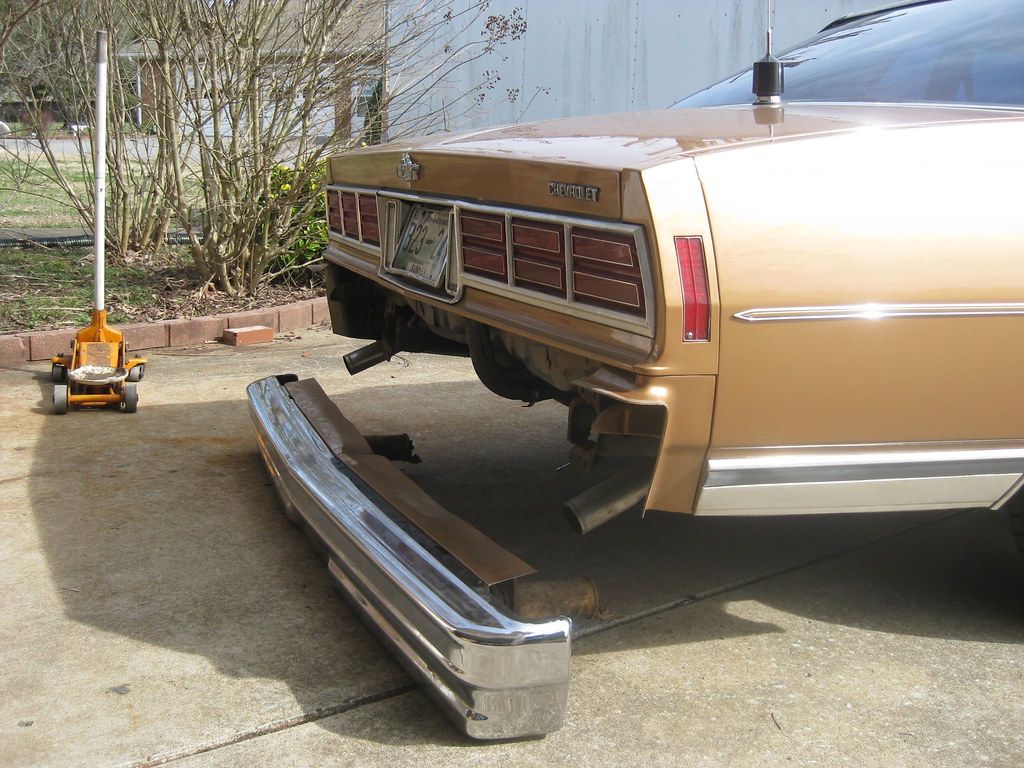
Here is a better shot of the afflicted area. The bolt on the right came out fine. The hole under the bolt on the left is the access hole I drilled. It ended up being drilled for nothing. The reason it is offset is because there is bracing in the way and that was as close as I could get.=center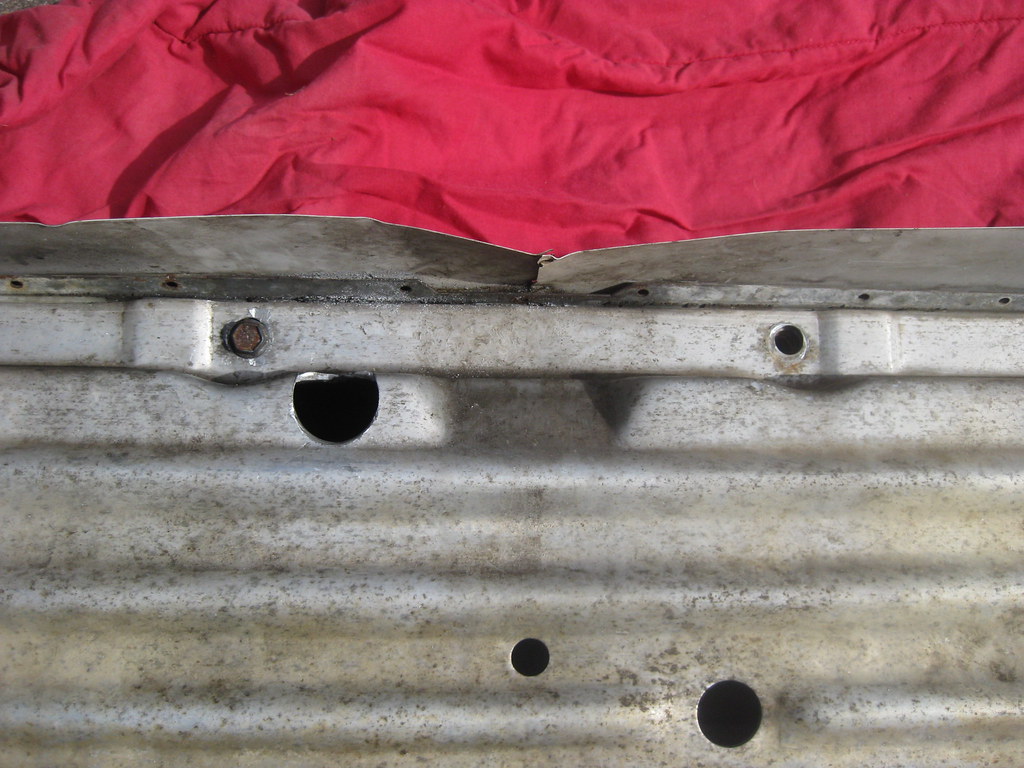
I knew if the clip on the back of that bolt broke then many of the clips for the other bolts would break. There are 19 bolts holding the bumper to the inner structure and 9 came out without breaking the clip. I had to drill the heads off of the rest. This job took all day long and I still didn't get completely finished.=center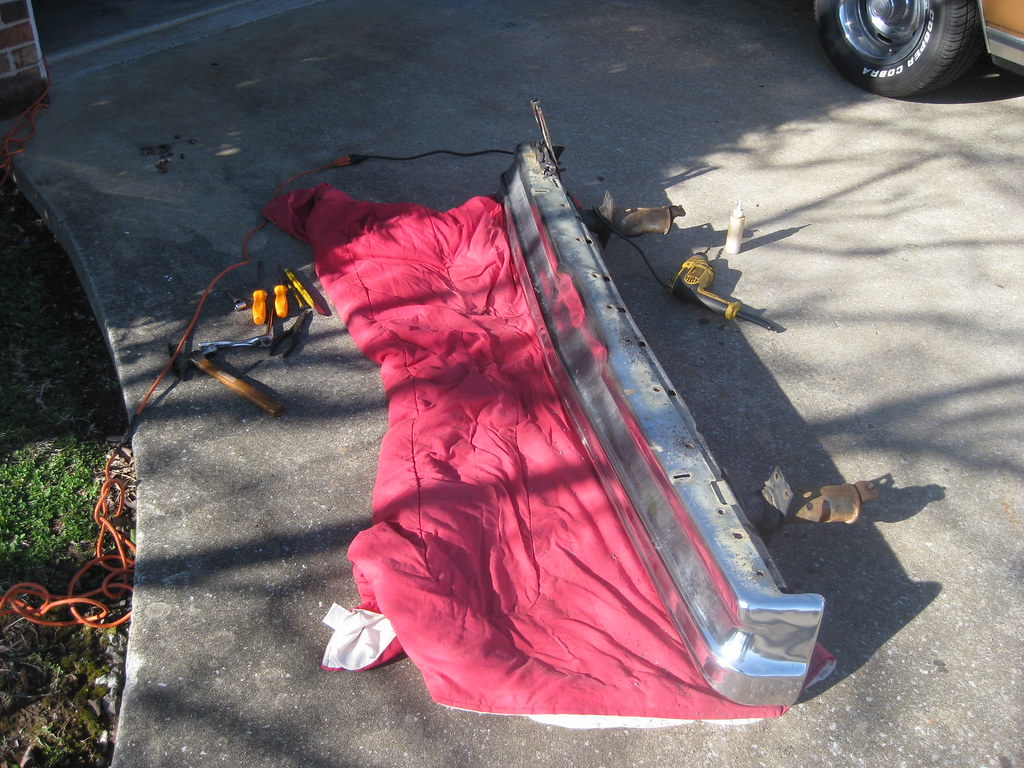
Whoever designed this bumper certainly wasn't on the varsity team. I've taken apart bumpers from quite a few 50's, 60's and 70's cars and I have to say this is the worst design I have seen. The location and design of the braces and clips definitely make things much more difficult than they needed to be.
This particular bumper has the stock mud, mice nest and feces and rocks feature. This bumper came from a parts car I had stored in a barn. I installed it on The Caprice after April totaled it several years ago. The mice in the barn had made a terrible mess and I'm not entirely sure they didn't use this as their official burial grounds at some point.=center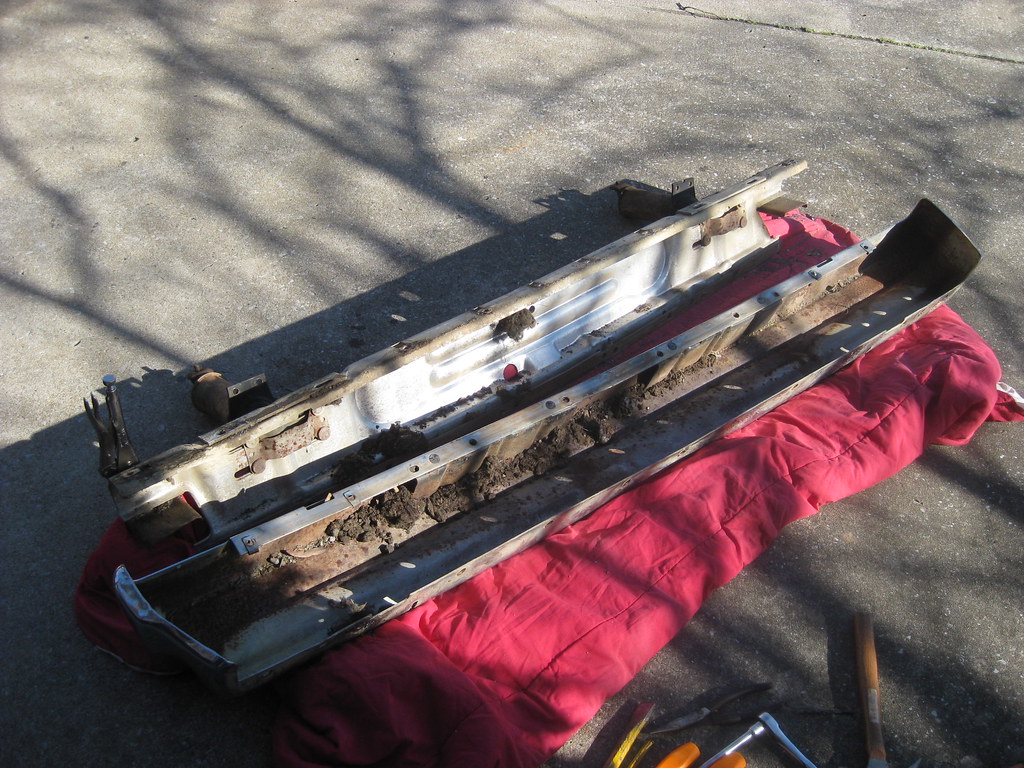
After a good cleaning with a brush I literally hung the inner structure out to dry.
=center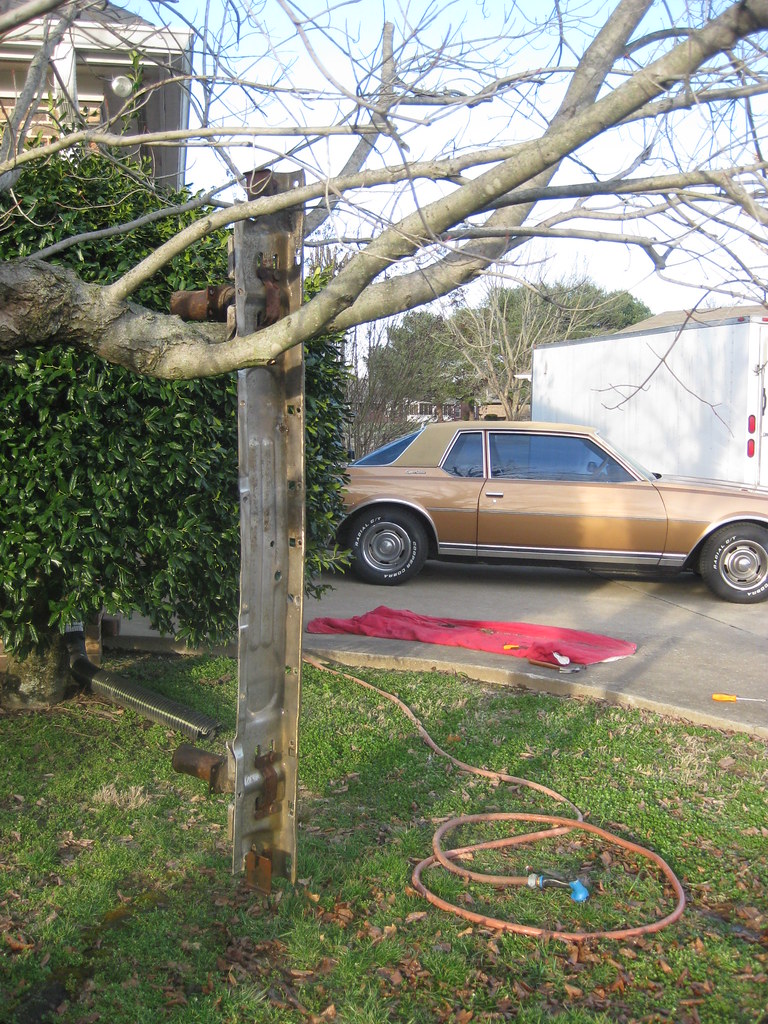
I got all new clips and bolts. $50 dollars worth. As if this entire process wasn't frustrating enough, I got hit with a big bill on top of it. I'm sure many would say this wasn't necessary, but this is how I wanted the project to be done. The filler neck mount I'm making is the cleanest design without cutting or welding onto the body and this is what was necessary to make that work the way I wanted it.=center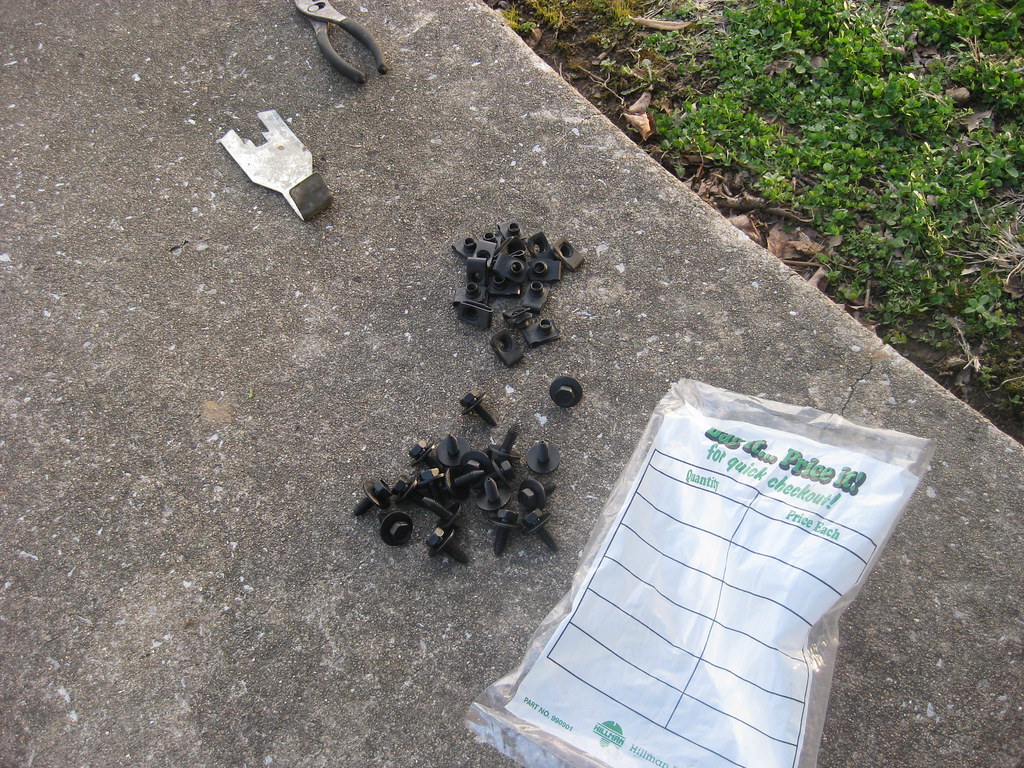