


Flex Plate
I'm having a little trouble tying to figure out why my tranny and converter won't bolt up. It's along story, but it needs to be told to help understand the problem. First I tried bolting up a regular th-350 and SBC converter to a LS1 block. The tranny of course bolted up fine and the converter bolts lined up without any drilling or any fab work, but the converter "moved" out to far when I tightened the bolts, which is bad. So I did a little research and order a spacer and new bolts.
The order I put the spacer on is: Spacer/flex plate/bolts, then when I tried to bolt the tranny up after only putting in one bolt I noticed that the bell housing had a small gap and wasn't completely flush with the bolck and the converter was tight and wouldn't turn by hand for me to line up the bolt holes? So I pulled it back out and did a little more research and found out that there are two kinds of LS1 flex plates. Ones that are "straight" and ones that are "curved".
So the big question is: Is my flex plate that I have pictured curved or straight, and will my spacer work with what I'm trying to do? Do I have the spacer/flex plate/bolts in the right order?
Gotcha. That may be the problem then. I'll try that out tomorrow and see how everything goes.
Still thought, does anyone know what type of flex plate this is? Is it a stock LS1 or is it a truck flex plate. either way I'm sure it doesn't matter, but I would like to know the difference if any at all?
Also will regular converter bolts work or will I need longer bolts for that as well?
Still thought, does anyone know what type of flex plate this is? Is it a stock LS1 or is it a truck flex plate. either way I'm sure it doesn't matter, but I would like to know the difference if any at all?
Also will regular converter bolts work or will I need longer bolts for that as well?
Alright, well if that's all the problem then its no biggie. The tranny is pretty easy to pull and move around, or at least 10 times easier than doing it in a 4th gen F-body.
TECH Fanatic

Joined: Jul 2005
Posts: 1,685
Likes: 7
From: Beebe, Arkansas
That's dished flex plate. Spacer goes after the flex plate. On the flat ones the spacer goes before it.
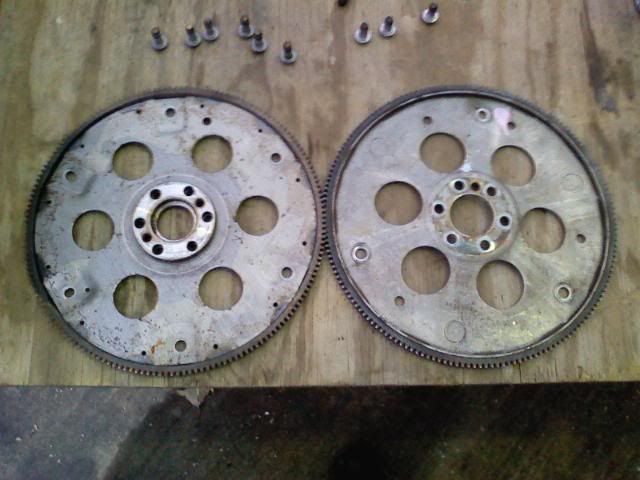
The flat 6.0L truck is the one the left. Dished 5.3l on the right

Back side (crank side) of each note spacer on flat 6.0L one
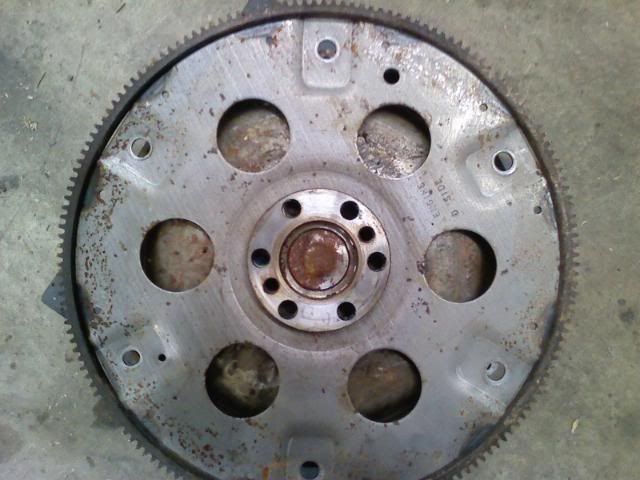
Here is the flat flexplate and spacer setting on a Gen I (Vortec 350) converter.
Same converter And the dished flex plate with no spacer. (the crank supports the Gen III long nose converters)
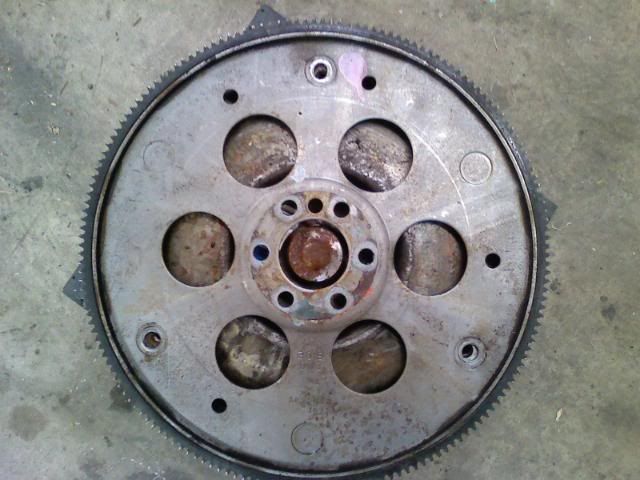
The spacer just supports the hub of the converter on the dished flex plate on the early converter.
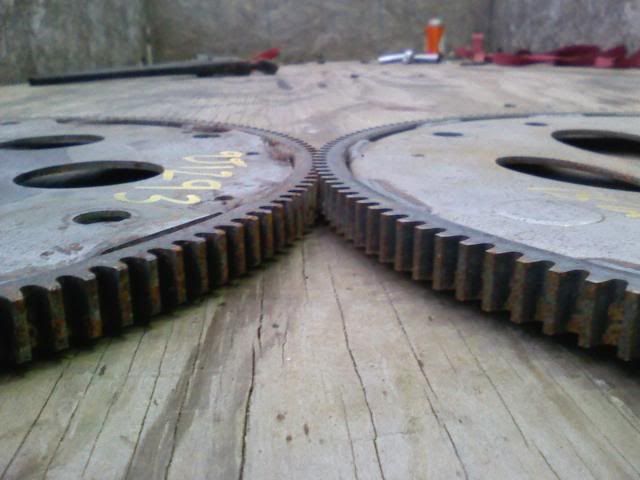
Heres a shot of the two laying flat note the teeth lay almost the same spot.
The spacer on the back of the 6.0L flat flex plate supports the hub and moves the flexplate out to the correct position for starter engagement.
The flat 6.0L truck is the one the left. Dished 5.3l on the right
Back side (crank side) of each note spacer on flat 6.0L one
Here is the flat flexplate and spacer setting on a Gen I (Vortec 350) converter.
Same converter And the dished flex plate with no spacer. (the crank supports the Gen III long nose converters)
The spacer just supports the hub of the converter on the dished flex plate on the early converter.
Heres a shot of the two laying flat note the teeth lay almost the same spot.
The spacer on the back of the 6.0L flat flex plate supports the hub and moves the flexplate out to the correct position for starter engagement.
The engine should look like this when complete.

The dish should bow away from the block. Basically there is only one "right" way to install the dished flexplate and get the starter to engage. As mentioned before the order is: engine, flexplate, spacer, bolts.
There is a special torque sequence for the bolts. They are tightened in a star pattern with the first pass at 15, then 37 and finally 74 ft/lbs as shown in the photo below. I made it larger for ease of reading.

I'm not sure you noticed in the photos posted by Bo185, but the torque converter holes will have to be elongated inward by approx 1/16" to 1/8" depending on the version of pre-Gen III transmission / converter combo you are using. Measure and do this off the car using the spacer and bolts to center things so you don't have to do it once the engine has been mated to the transmission.
Hope this helps.
The dish should bow away from the block. Basically there is only one "right" way to install the dished flexplate and get the starter to engage. As mentioned before the order is: engine, flexplate, spacer, bolts.
There is a special torque sequence for the bolts. They are tightened in a star pattern with the first pass at 15, then 37 and finally 74 ft/lbs as shown in the photo below. I made it larger for ease of reading.
I'm not sure you noticed in the photos posted by Bo185, but the torque converter holes will have to be elongated inward by approx 1/16" to 1/8" depending on the version of pre-Gen III transmission / converter combo you are using. Measure and do this off the car using the spacer and bolts to center things so you don't have to do it once the engine has been mated to the transmission.
Hope this helps.
Trending Topics
TECH Fanatic
Joined: Jul 2005
Posts: 1,685
Likes: 7
From: Beebe, Arkansas
The engine should look like this when complete.
The dish should bow away from the block. Basically there is only one "right" way to install the dished flexplate and get the starter to engage. As mentioned before the order is: engine, flexplate, spacer, bolts.
There is a special torque sequence for the bolts. They are tightened in a star pattern with the first pass at 15, then 37 and finally 74 ft/lbs as shown in the photo below. I made it larger for ease of reading.
I'm not sure you noticed in the photos posted by Bo185, but the torque converter holes will have to be elongated inward by approx 1/16" to 1/8" depending on the version of pre-Gen III transmission / converter combo you are using. Measure and do this off the car using the spacer and bolts to center things so you don't have to do it once the engine has been mated to the transmission.
Hope this helps.


Oh and that's a good book!!! Well worth it!!!!
The flat flex plate is also marked "engine side". The Dish ones will only mount one way on the crank.
LS1 Tech Stories
The Best V8 Stories One Small Block at Time

Gas Monkey Built a 6-Wheel Ferrari Testarossa With a Corvette LT4 Engine
Verdad Gallardo
7 Most Reliable High-Performance Engines GM Has Ever Built
Verdad Gallardo
Amazing '71 Camaro Restomod Is Modern Muscle Car Under the Skin
Verdad Gallardo
6 Common C5 Corvette Failures and What's Involved In Repairing Them
Pouria Savadkouei
Retro Modern Bandit Pontiac Trans AM Comes With Burt Reynolds' Autograph
Verdad Gallardo
Top 10 Greatest Cadillac V Series Performance Models Ever, Ranked
Pouria Savadkouei
Top 10 Most Powerful Chevy Trucks Ever Made!

Hennessey's New Supercharged Silverado ZR2 Has 700 HP
Verdad Gallardo