


1969 Nova L33 swap
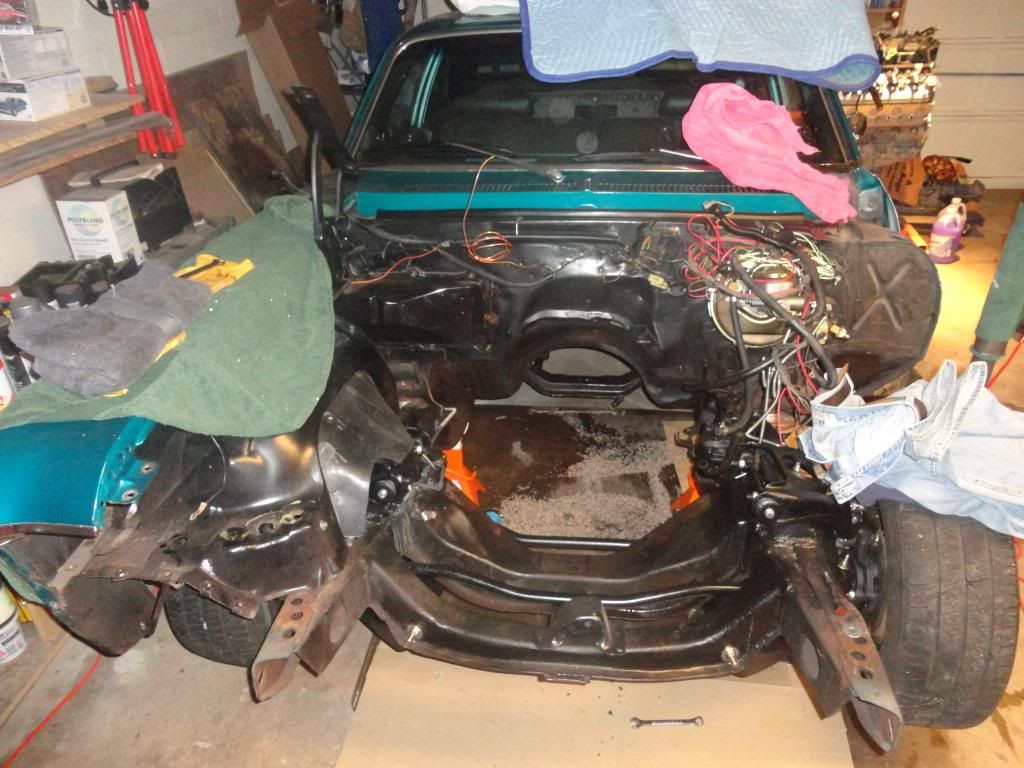
Well I made a big move tonight. I have held off pulling the 6 because I was afraid that when I start this LS swap I will not be able to drive my car. So I have been just collecting parts and doing research on the LS transformation. I still have a lot to do. Like figure out the fuel system, buy the harness, and get the EMC reprogrammed among many other things. But a friend of mine wants my 6 cyl/glide for his Studebaker. I only drove the car a few times last year so I said let's get this thing started! So I grabbed a buddy's engine hoist and went to work.

There is the new engine in the background waiting...
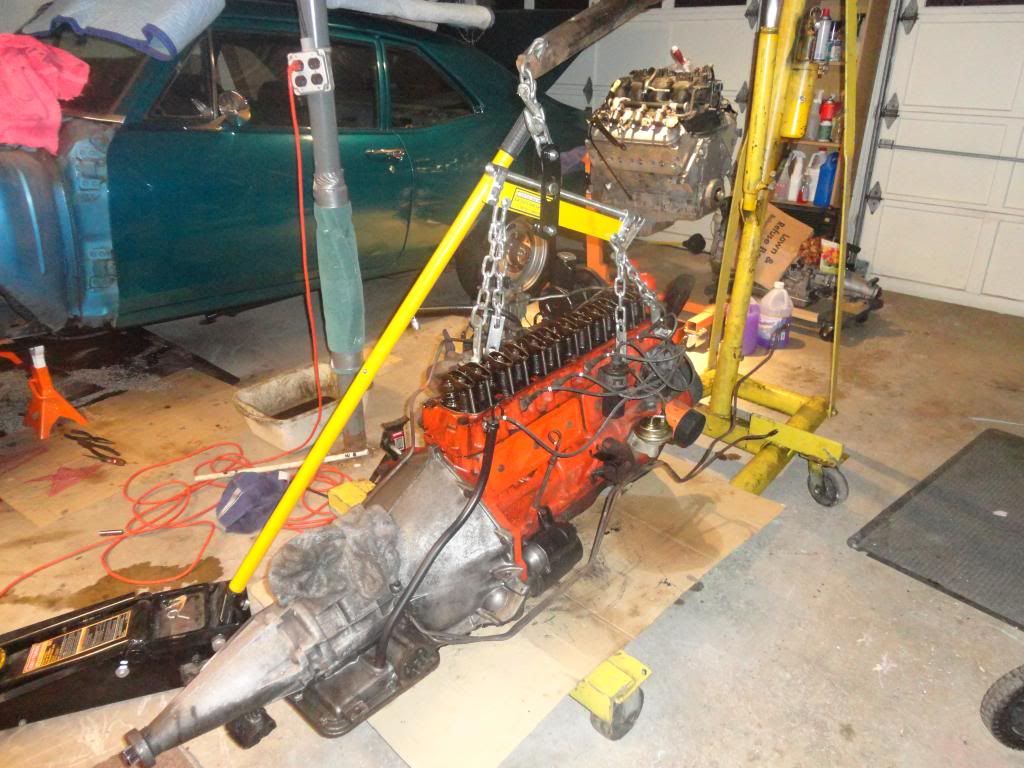
There is the new engine in the background waiting...
well, on the bright side, it's snowing right now in the 'burgh. so you shouldn't be driving her anyway.
FYI, if you haven't sold it yet, definitely notch that f-body pan like so. It's by far the best pan to use from the GM lineup.
ps - I don't think I've seen an impy tank in a nova swap. Let us know how that turns out.
FYI, if you haven't sold it yet, definitely notch that f-body pan like so. It's by far the best pan to use from the GM lineup.
ps - I don't think I've seen an impy tank in a nova swap. Let us know how that turns out.
I plan on using the f-body pan. I have heard of others using it without cutting it but I am aware that many more have had to cut it. I am anticipating having to cut it but will try to fit it in the way it is. I bought these because of their adaptability.
As far as the Impala tank...well see. I have some more research to do on that one.
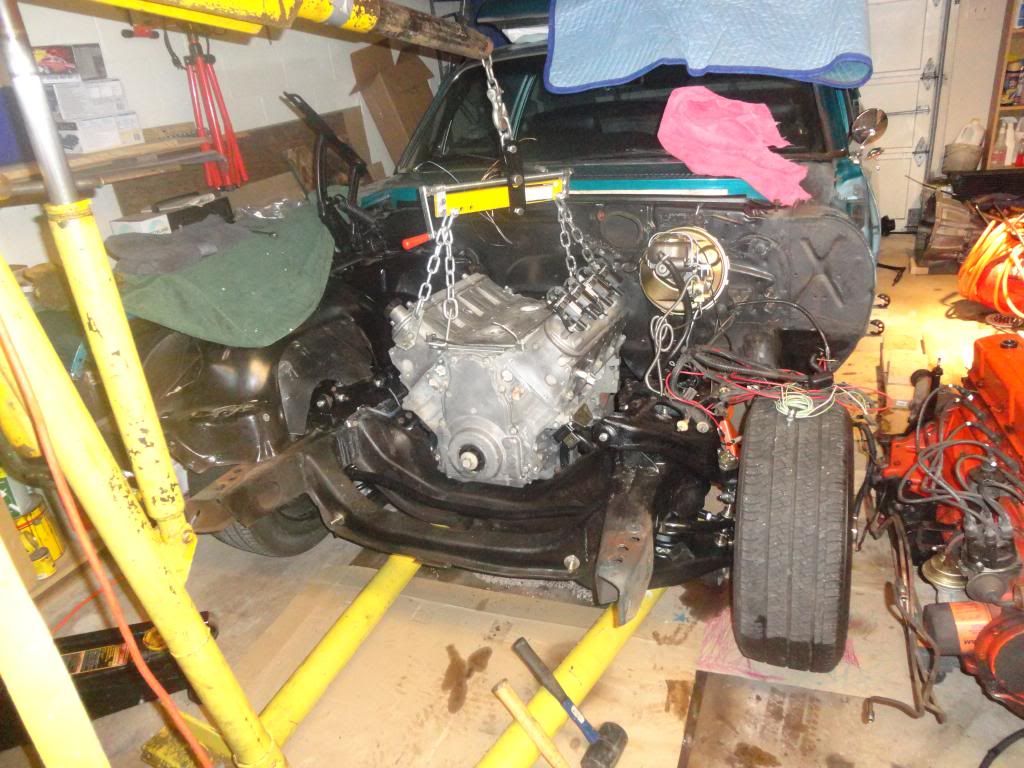
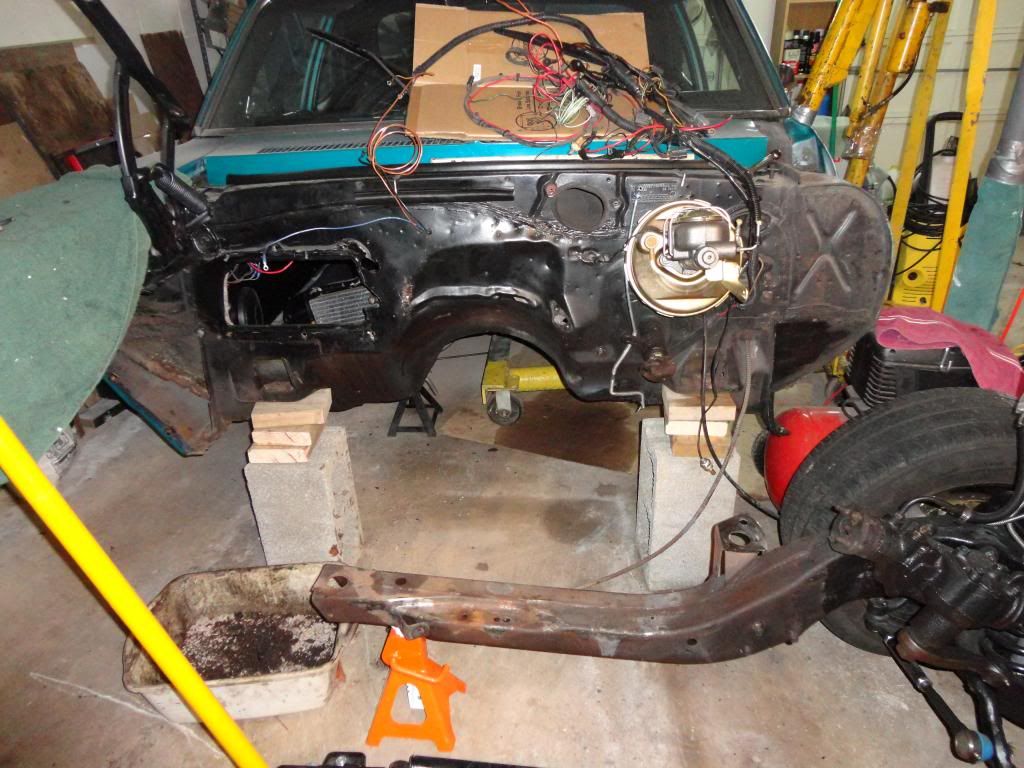
Got the engine in!! I used Dirty Dingo Double D adapter plates. Using the forward most holes the F-body oil pan clears the steering center link and tie rods. However the heads hit the heater core inlet and outlet. There is no way the coil bracket would fit on the valve cover. Using the 3/4" forward holes the heads clear the heater core inlet and outlet fine but the coil bracket does not clear the the inlet and outlet. The center link just touches the oil pan right before the steering bump stop hits the spindle. It is so close! I think a little work with the grinder on the center link may do the trick. On both attempts I had the suspension hanging so I need to do some further work before I make any decisions. But all in all I am pretty psyched that I got as far as I did. I went down in the garage when the kids went to bed at 8:00 and my wife came down at 11:00 and I had it in at that point.
So the plans are to take it back out, attach the tranny to the engine and try again. That way I can detach the hoist and allow the car to sit on all four tires. Then I can get a better idea of how this F-body pan will work. Here are some pics I snapped after I got both motor mount bolts in.
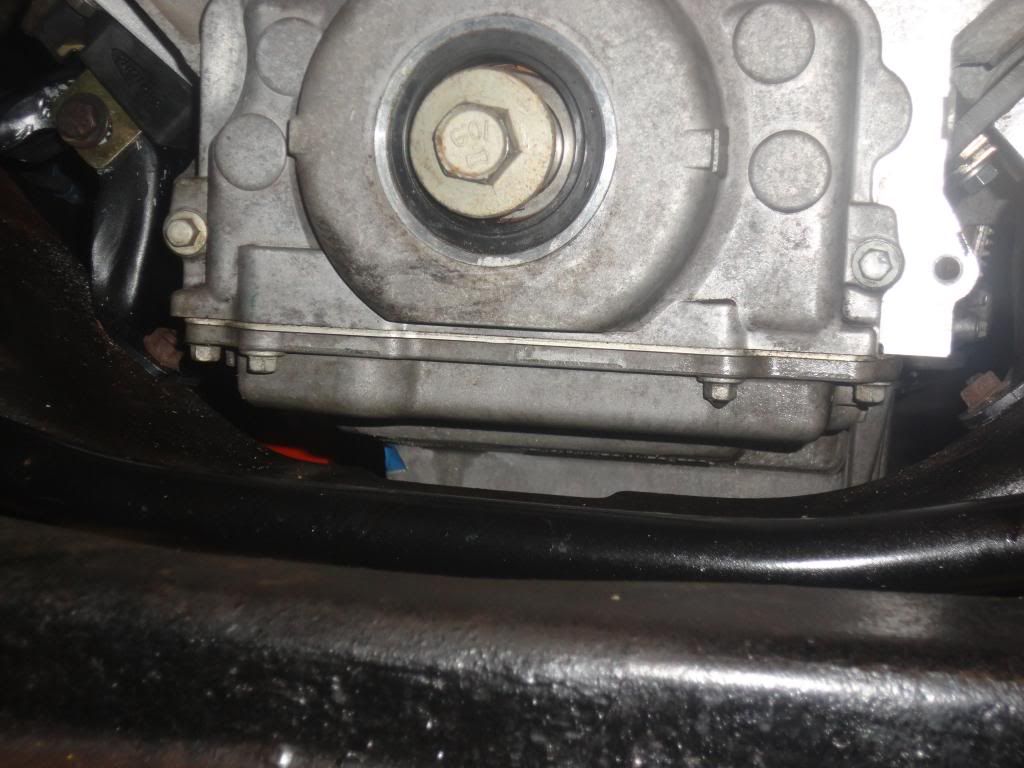
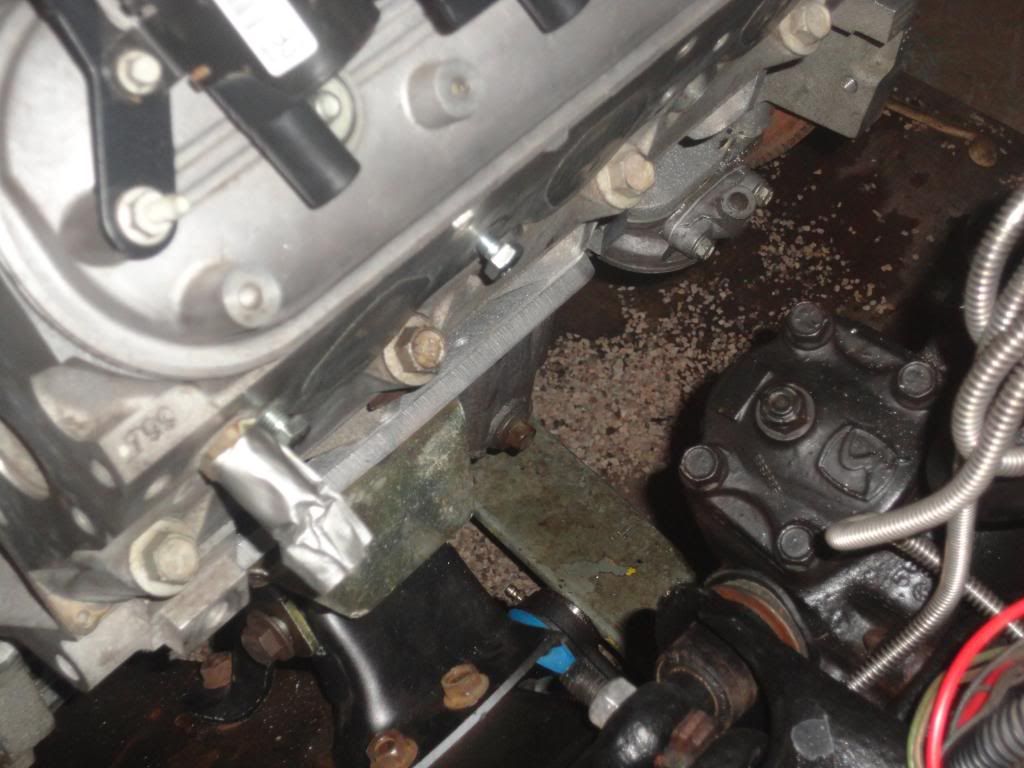
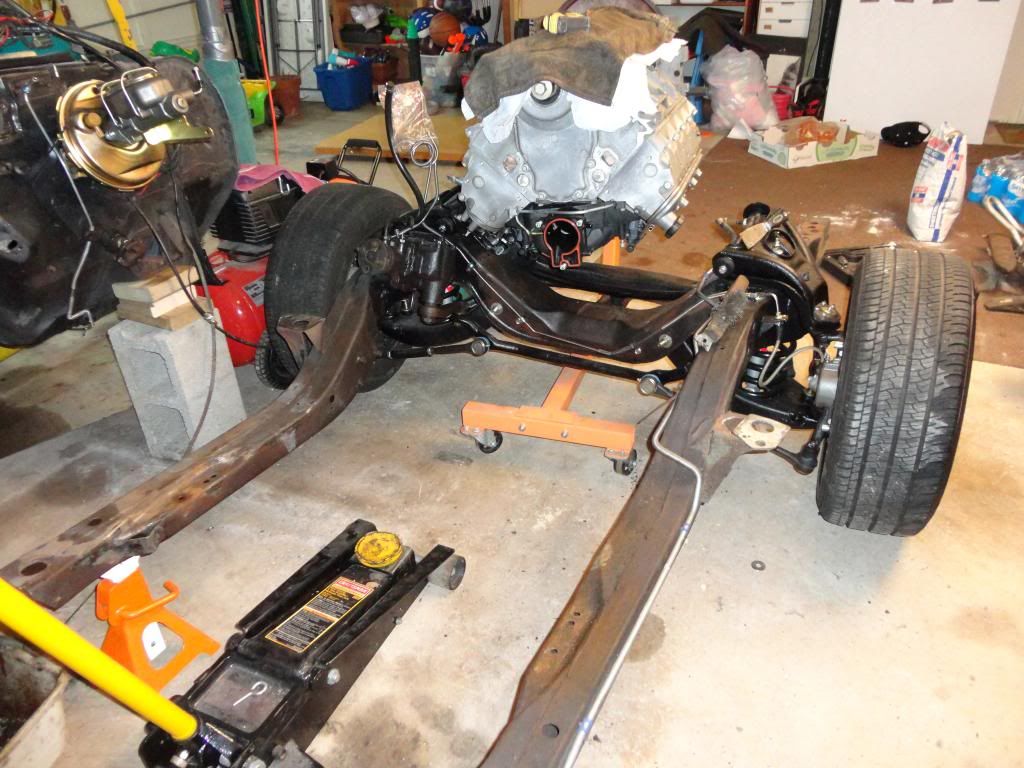
oil pan to cross member clearance
passenger side

Drivers side I'll try these Hooker headers after I get the tranny in.
Here is the center link clearance with the wheels straight and the suspension hanging. Sorry about the bad photography.
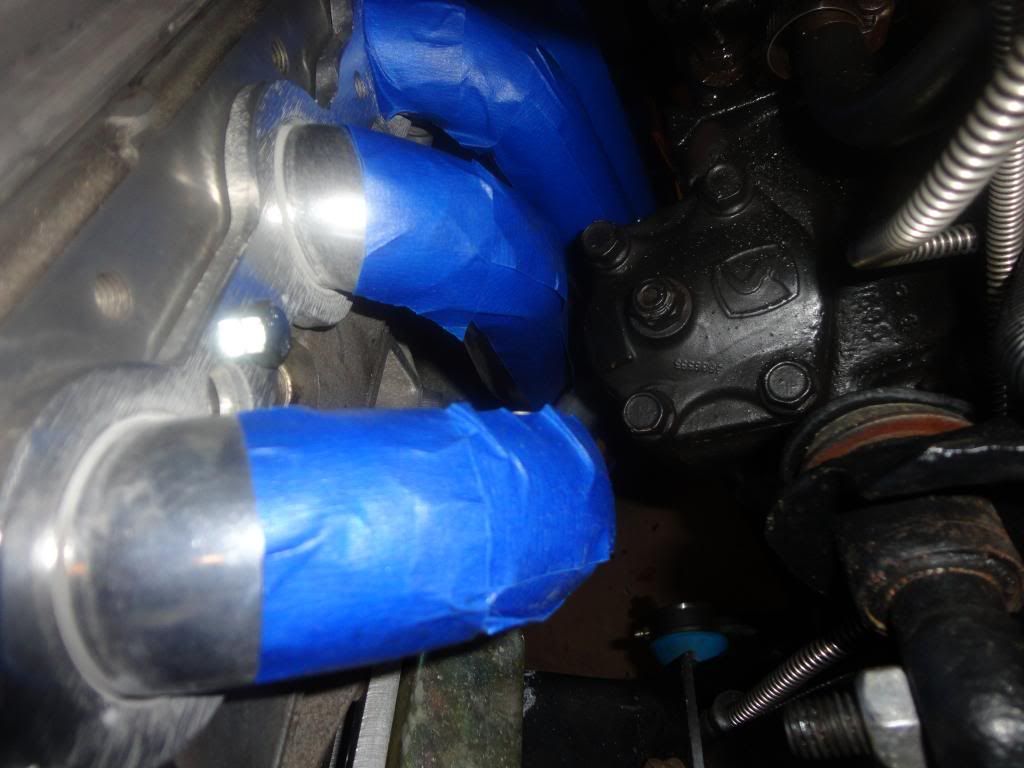
Driver's side head to firewall clearance.
Passenger side head to firewall clearance.
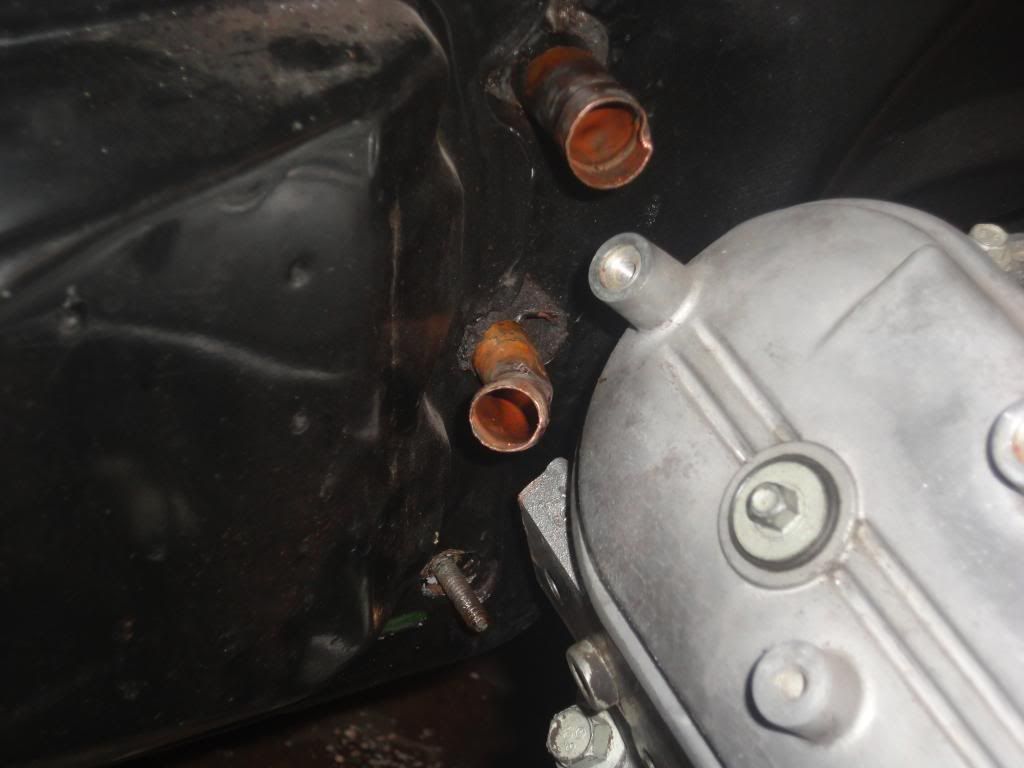
Heater core to head clearance. I think the coils/bracket are definitely going to be in the way. I am probably going to get a big block heater core.
So the plans are to take it back out, attach the tranny to the engine and try again. That way I can detach the hoist and allow the car to sit on all four tires. Then I can get a better idea of how this F-body pan will work. Here are some pics I snapped after I got both motor mount bolts in.
oil pan to cross member clearance
passenger side
Drivers side I'll try these Hooker headers after I get the tranny in.
Here is the center link clearance with the wheels straight and the suspension hanging. Sorry about the bad photography.
Driver's side head to firewall clearance.
Passenger side head to firewall clearance.
Heater core to head clearance. I think the coils/bracket are definitely going to be in the way. I am probably going to get a big block heater core.
I used the same plates in my camaro swap at 3/4" setback. Using an fbody pan it only hits at full lock left/right but mainly turning right. My pitman & idler ar worn out also. I also centered my center link and that helped a bunch. I think if I put it more to the pass side it may barely hit. I think if I've read right, the pitman arm is a little longer than the idler arm wich is why it will hit pass side more. I am gonna grind my center link just a bit also and if it only hits full lock its ok as we don't usually turn full lock anyhow.
What headers did you go with part number? What radiator is that? What tranny Xmember you going to make or buy? Stock won't work.
What headers did you go with part number? What radiator is that? What tranny Xmember you going to make or buy? Stock won't work.
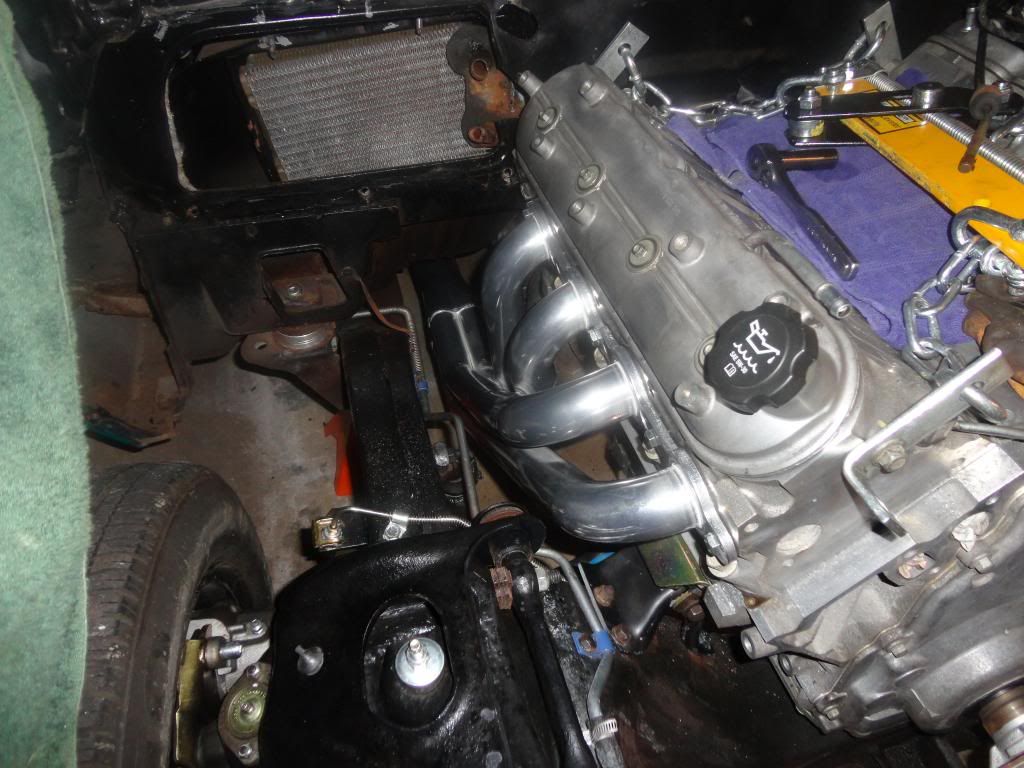
I got these Hooker headers.
I bought this Champion rad
I am not sure what tranny cross member to use I may modify mine or have one made. That is still up in the air at this point.
I bought this Champion rad
I am not sure what tranny cross member to use I may modify mine or have one made. That is still up in the air at this point.
LS1 Tech Stories
The Best V8 Stories One Small Block at Time

Gas Monkey Built a 6-Wheel Ferrari Testarossa With a Corvette LT4 Engine
Verdad Gallardo
7 Most Reliable High-Performance Engines GM Has Ever Built
Verdad Gallardo
Amazing '71 Camaro Restomod Is Modern Muscle Car Under the Skin
Verdad Gallardo
6 Common C5 Corvette Failures and What's Involved In Repairing Them
Pouria Savadkouei
Retro Modern Bandit Pontiac Trans AM Comes With Burt Reynolds' Autograph
Verdad Gallardo
Top 10 Greatest Cadillac V Series Performance Models Ever, Ranked
Pouria Savadkouei
Top 10 Most Powerful Chevy Trucks Ever Made!

Hennessey's New Supercharged Silverado ZR2 Has 700 HP
Verdad Gallardo
Coachbuilt N2A Anteros Is an LS2-Powered C6 Corvette In Italian Clothes
Verdad Gallardo
Have you put the headers in yet?
I had those on my first swap and sent them back as soon as I mocked them up.
For me (and maybe it was my mounts) the rubbed on the steering box and on the bolt for the upper control arm.
In the end, I spent the same money on stainless headers from Kooks....great headers.
Also, after close inspection of the hooker headers, I found that the ceramic coating was not coated evenly and there was small bare spots that I am positive that would have rusted.
Check the headers thoroughly; if the coating is not 100% covered, it is going to condense and rust which just makes those headers look terrible.
Not to scare you or trash hooker, I just had a terrible experience with them (on another occasion too).
Click on the link in my Sig to check out the build on my car and you can see the Kooks headers...
You might want to look at a radiator with a passenger-side inlet and outlet. It will save you immensely on the upper hose, since the LS water pump has both on that side. I hate my over-inlet upper hose setup.
Or, go with an L99 water pump when/if you switch to a car intake. I'd have done so already if they weren't $200.
Or, go with an L99 water pump when/if you switch to a car intake. I'd have done so already if they weren't $200.
Last edited by kirk69nova; Dec 13, 2012 at 01:07 PM. Reason: looked up water pump price
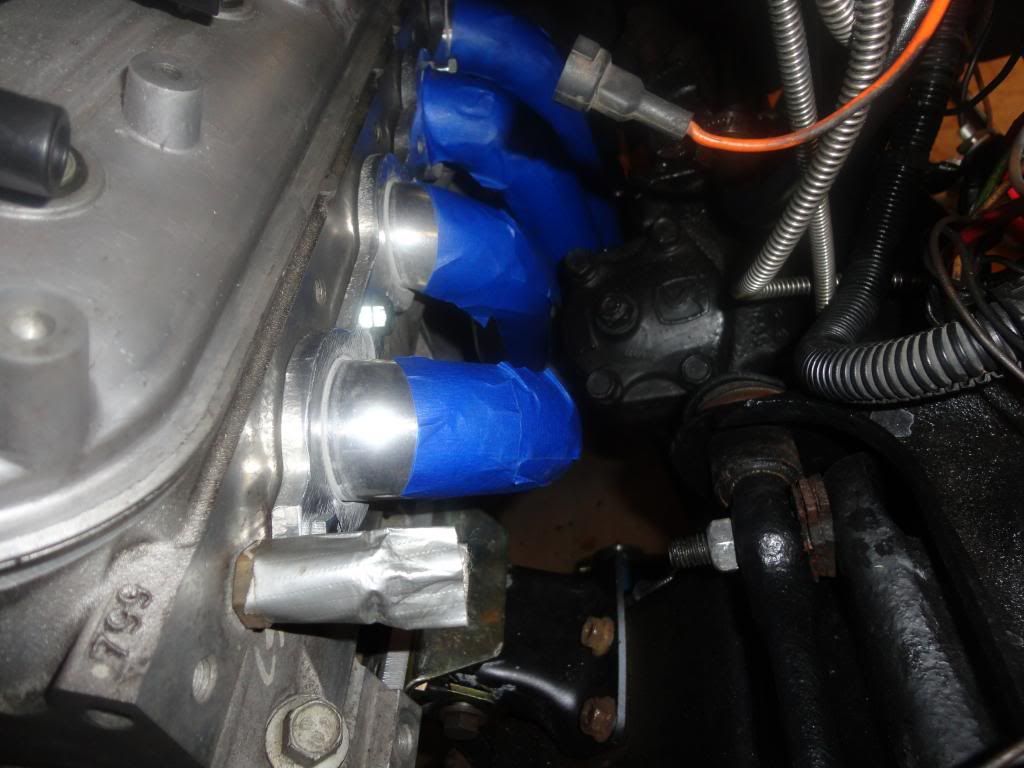
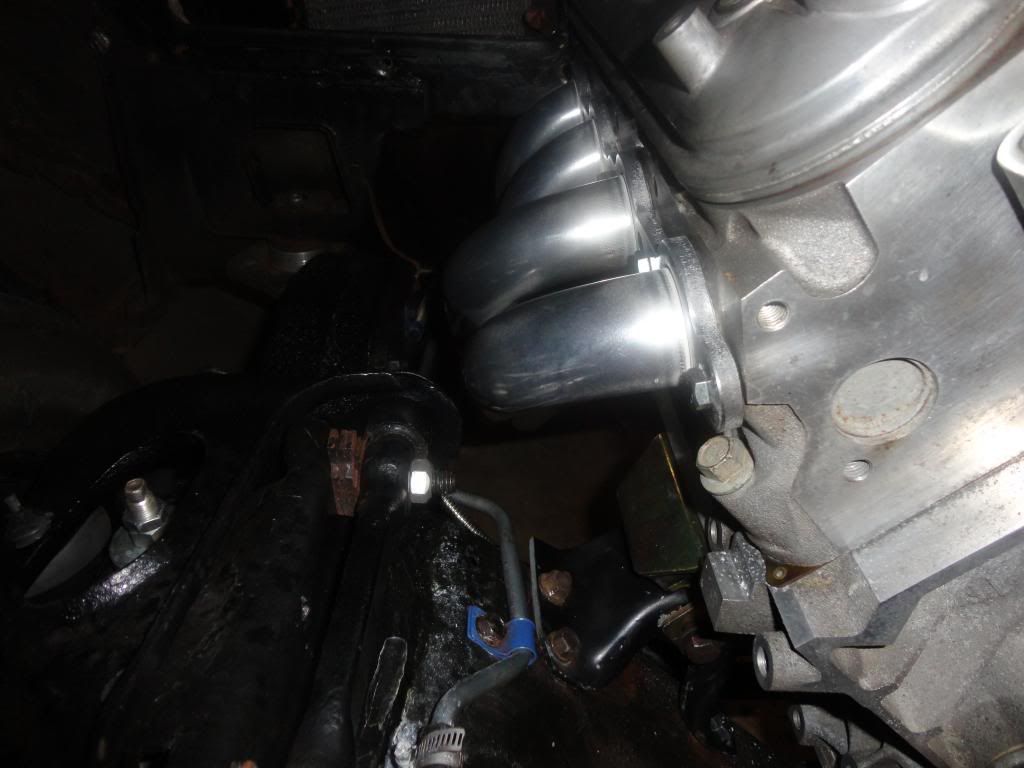
I got the headers in with no problem. Here are some pics. I taped them up on the drivers side thinking I'd be bumping them all around. But to the contrary, I did this myself with no one helping me and had no issues. I have at least 1/4" of clearance around the steering box. A few things on the passenger side. The header collector points a little to the passenger side and the upper control arm is pretty closed to the #2 header. I gotta say this swap has gone really well so far. I was expecting a lot more issues. Of course, I say that and I have not even attempted to figure out the fuel or electronics yet Here are the pics.
headers look great. I bet the L99 water pump would work with the truck intake - it doesn't seem to have anything that could interfere. Hell, if it didn't I'd probably buy it off you for what you paid.
I may try that water pump, but I am just not at that point yet. Next is figuring out the tranny crossmember. I have the original powerglide one in there now. I may try to use it by moving the crossmember back some and drilling new holes in the frame. Just quickly setting it in there it looks like it will work. I still have to get a rubber mount before I can go much further. I stopped by all of the local parts stores today and none of them have a rubber mount in stock. I have been waiting to order from Summit and have been making a list so now might be time to place an order for the tranny mount along with plug wires and fuel line supplies. I just chunked down some cash for a new Hobart handler 140 so spending right now has to be done wisely.

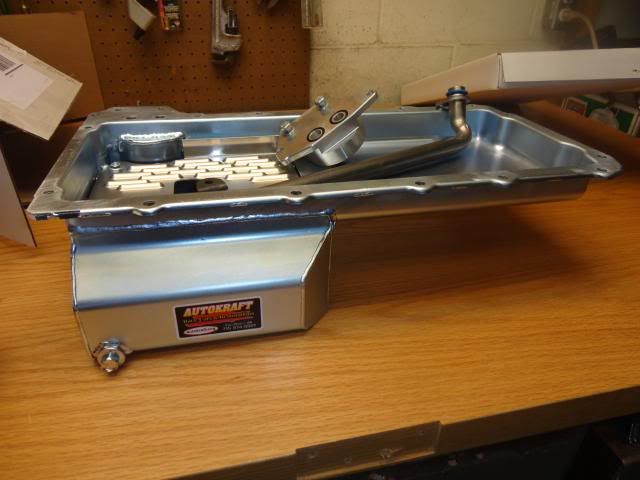
Just a short update here. I got a LS6 intake, TB, fuel rail and injectors off a 2002 Camaro via CL! So truck intake is for sale right now. Also, I took my f-body oil pan to a few local welders and they both wanted almost $200 to notch it and lengthen the pick up. So that is not gonna happen. So my plan was to send my pan to S&P as a core and buy one from them for $250. But then I started to do the math and it just makes sense to sell my f-body pan and buy an Autokraft pan. That is it for now. It is too cold to go out in the garage right now.
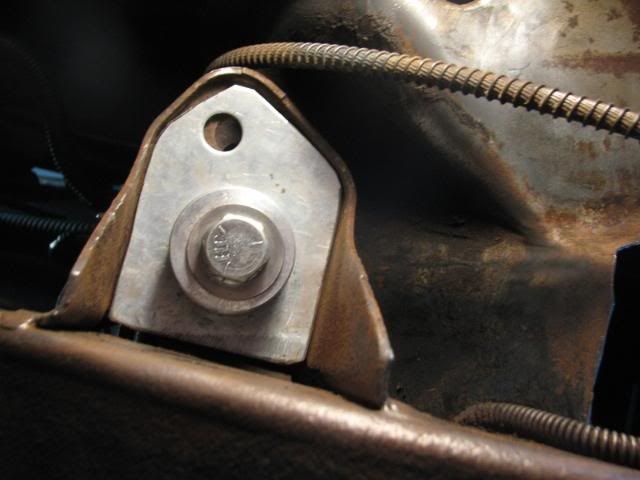
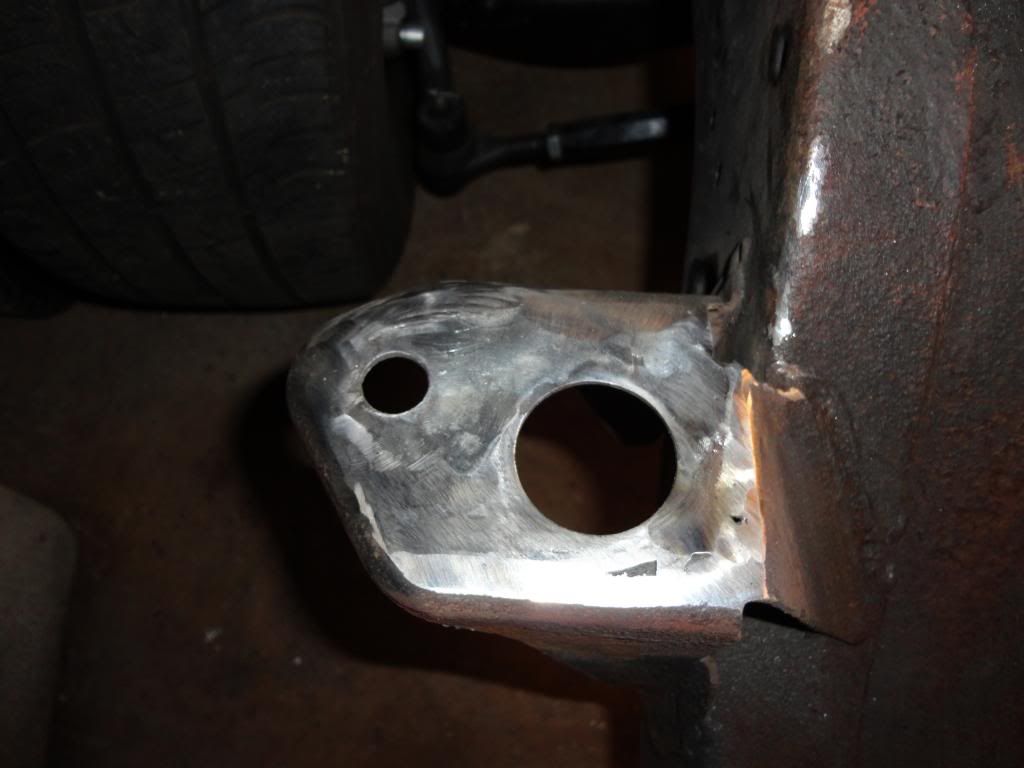
Here are a few updates. I decided to try out my new welder and get the subframe mounts fixed. Here is a pic showing how I drove the car around for about a year. This is a pic looking straight up from the ground into the mount.
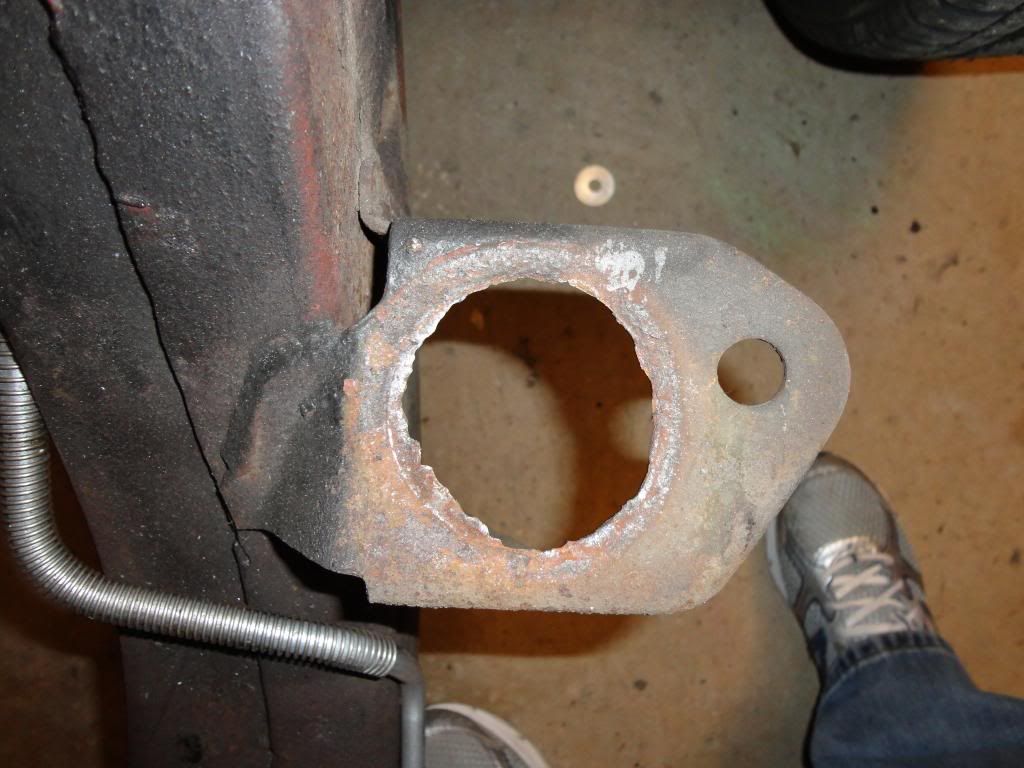
I knew it was bad but I did not know it was this bad! Here is the passenger side.
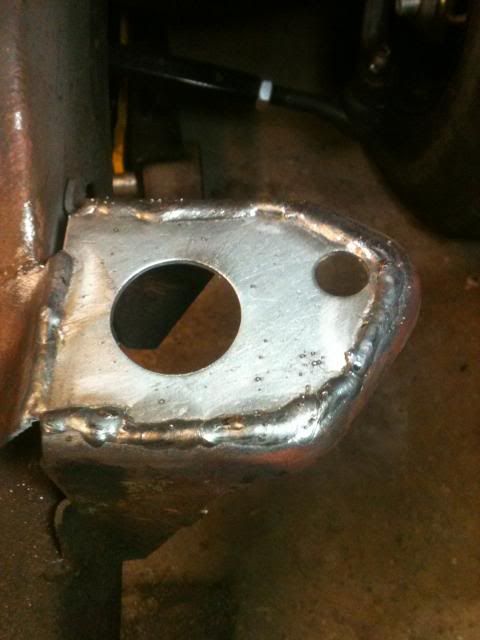
I cut the rust out and made the plate fit inside my cut so I could butt weld it together. Here it is after cutting the rust and welding the new plate in on the passenger side.
After some grinding on the drivers side. I have since filled in the hole on the right side with weld and reground.
I was able to access the drivers mount because I removed the fender, grill, core support and all the other stuff on the front. This was all removed to allow me to get the LS engine in and out when trying to fit it. But it was difficult to get to the passenger side because of how the car sits in the garage. So I took the subframe off! The allowed me to get to the passenger mount and also allow me to clean the subframe and paint it. The mounts are done but I still need to get the frame cleaned up and painted.
Specific swap updates:
New Autokraft oil pan.
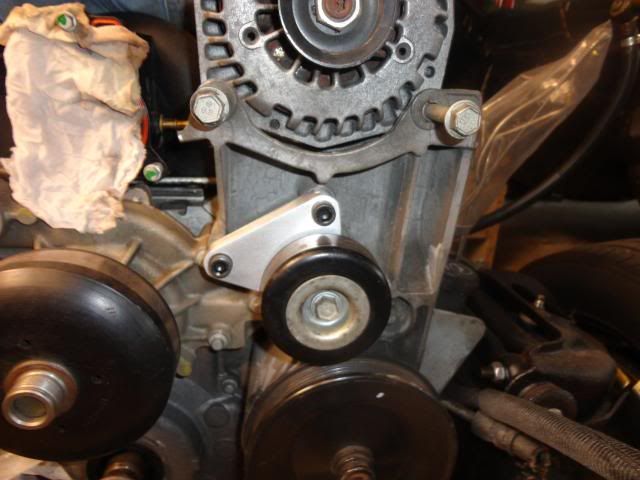
I cut the alt/ps bracket and got a Dirty Dingo idler pully relocation bracket. They have it on sale right now.
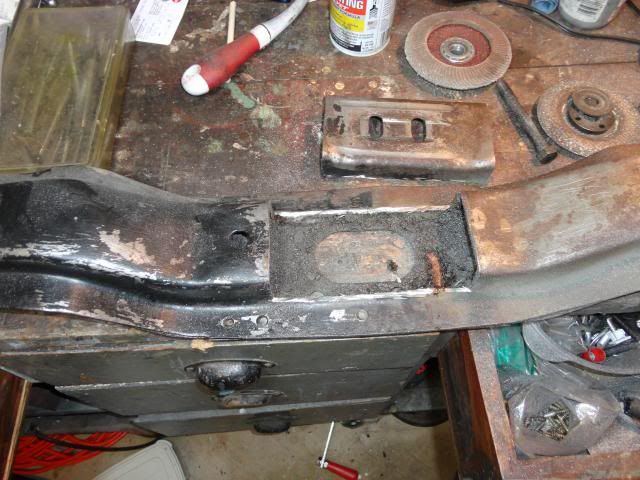
When I had the engine in a few months ago I put the Powerglide tranny crossmember up in there and saw that I could probably use it with a little modification. So when I pulled the subframe I got started on it by chopping the mounting pad out.
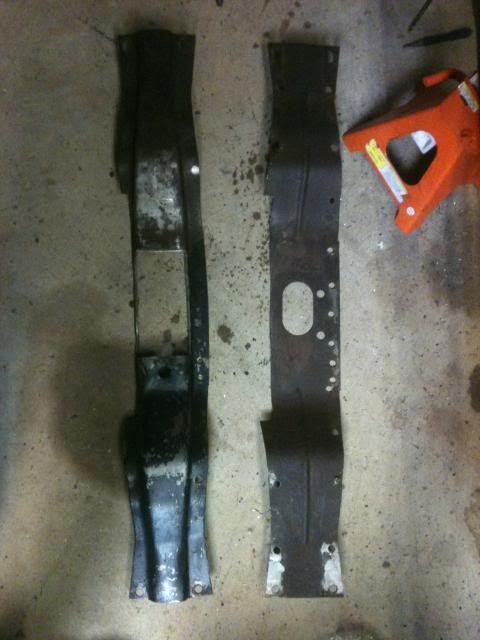
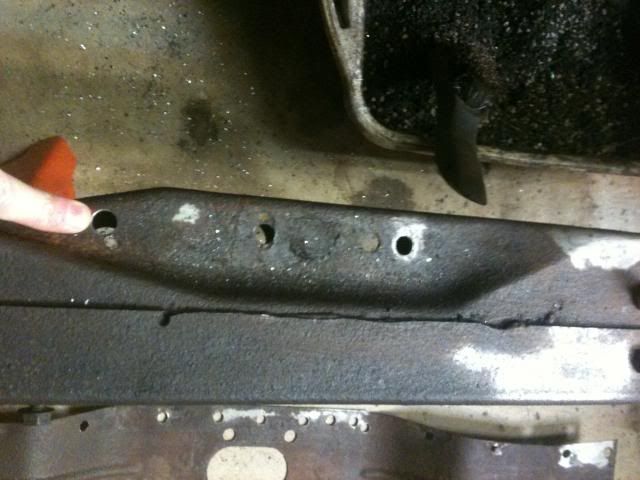
I was gonna weld this back up but I could not get all the grime out of it and I thought welding it with all the oil and grime in there would not help with welds. So I drilled the spot welds out to to take it apart so I could clean it up. This pic also shows where I had to cut out the front of crossmember to clear the rear of the tranny.
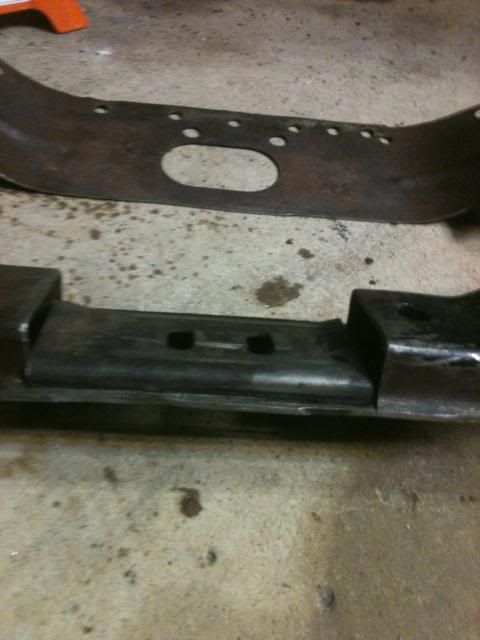
I have since welded it back up but have not taken any pics of it yet. I am probably not going to either, at least until I can grind them down a bit. My welds are bad...I don't know what was wrong but I think the fact I am inexperienced, the different metal thicknesses and me just not having the welder set up correctly made for some bad welds. You can see proof of my welding skills, or lack of, in the above pics of the subframe mounts. Here is a final pic showing where I drilled out the subframe to allow me to slide the crossmember back a bit. I can use the original rear hole for the front mount hole and the hole where my finger is shows where the rear holes of the mount will now be.
I knew it was bad but I did not know it was this bad! Here is the passenger side.
I cut the rust out and made the plate fit inside my cut so I could butt weld it together. Here it is after cutting the rust and welding the new plate in on the passenger side.
After some grinding on the drivers side. I have since filled in the hole on the right side with weld and reground.
I was able to access the drivers mount because I removed the fender, grill, core support and all the other stuff on the front. This was all removed to allow me to get the LS engine in and out when trying to fit it. But it was difficult to get to the passenger side because of how the car sits in the garage. So I took the subframe off! The allowed me to get to the passenger mount and also allow me to clean the subframe and paint it. The mounts are done but I still need to get the frame cleaned up and painted.
Specific swap updates:
New Autokraft oil pan.
I cut the alt/ps bracket and got a Dirty Dingo idler pully relocation bracket. They have it on sale right now.
When I had the engine in a few months ago I put the Powerglide tranny crossmember up in there and saw that I could probably use it with a little modification. So when I pulled the subframe I got started on it by chopping the mounting pad out.
I was gonna weld this back up but I could not get all the grime out of it and I thought welding it with all the oil and grime in there would not help with welds. So I drilled the spot welds out to to take it apart so I could clean it up. This pic also shows where I had to cut out the front of crossmember to clear the rear of the tranny.
I have since welded it back up but have not taken any pics of it yet. I am probably not going to either, at least until I can grind them down a bit. My welds are bad...I don't know what was wrong but I think the fact I am inexperienced, the different metal thicknesses and me just not having the welder set up correctly made for some bad welds. You can see proof of my welding skills, or lack of, in the above pics of the subframe mounts. Here is a final pic showing where I drilled out the subframe to allow me to slide the crossmember back a bit. I can use the original rear hole for the front mount hole and the hole where my finger is shows where the rear holes of the mount will now be.
