



Project 79 ls bu begains...

For the HVAC box you are going to have to fiberglass the hole to close it up.
Not completed with mine but this is the route I went.
Don't mind the paint runs, its just high build primer that needs more sanding before paint.

I also had this big *** hole to patch up, chain some how slipped a little during first test fitting and it did quite the damage, so I cut out this giant hole and had to fill it in.
I know my way around fiberglass work pretty well so this was no problem to repair.


Duraglass aka kitty hair aka reinforced body filler aka just body filler with short strands of fiberglass mixed in. lol


Have more pics as I went along with the patch work but don't want to clutter up your thread.
Not completed with mine but this is the route I went.
Don't mind the paint runs, its just high build primer that needs more sanding before paint.
I also had this big *** hole to patch up, chain some how slipped a little during first test fitting and it did quite the damage, so I cut out this giant hole and had to fill it in.
I know my way around fiberglass work pretty well so this was no problem to repair.
Duraglass aka kitty hair aka reinforced body filler aka just body filler with short strands of fiberglass mixed in. lol
Have more pics as I went along with the patch work but don't want to clutter up your thread.
Now to repair the hole you created. At the time I had my HVAC box already taken apart so I could have went many different ways to repair the hole and make clearance for the valve cover and coil brackets.
I doubt you want to take the HVAC box apart so here is what I suggest you do.
*Note this will probably seem like a lot but its just because I went into detail. Its really not that hard.
1. Remove the motor
2. Use a dremel or any rotary cutting tool of the kind and clean up the hole you made.
3. Just clean it up and make a perfect square hole if you wish.
4. Hand sand with the lowest grit sand paper you can find or die grinder with low grit roloc disc. Sand outward around 2in out, all around the hole.
5. Find a local RC hobby store and buy a small bottle of CA glue + speed activator if they have it. When the fiberglass begins to cure it gets hot, from personal experience any 3m spray glue in a can releases from the heat of the resin, so I use CA glue which I haven't had a issue with releasing.
6. You can use a small piece of a old tshirt here. I actually prefer "Ponte" fabric. It's a 100% polyester stretchy fabric you can probably find at any fabric store.
7. Cut out a piece slightly larger then the hole you cleaned up.
8. Here is the tricky part, I know some custom audio fabricators that have a extremely hard time using CA glue and gluing down fabric. Take a corner of your fabric and CA glue. Press the fabric up against the sanded area you made around the hole and dab on some CA glue. Enough the penetrate through the fabric and onto the HVAC box, use the CA glue activator to speed up the glue drying process. Then Do the opposite corner. Then stretch the fabric out over the hole and glue it, stretch it tight as you glue not not too tight (you will understand in the later steps). If you were making a fiberglass speaker box you would want the fabric to stretch as tight as possible, but here you want a little wiggle room. Especially if you arent using some really stretchy fabric from the start. After everything is glued tape off all around the stretched fabric. You can use a razor blade to cut off any excess fabric that's not glued down.
9. Drop the motor back into the car (with passenger valve cover removed), and continue the prep work, use a garbage bag to cover the rest of the motor you don't want to get fiberglass over everything. IT WILL GET MESSY.
10. With everything prepped, use a small 2in chip paint brush, mix up some fiberglass resin and apply it to the fabric. Don't mix the stuff to hot (putting too much MEKP into the resin). You want a little working time here, follow the mixing directions on the can for the weather temp conditions you will be working with.
11. Now here is why you want to use fabric to patch the hole. Take some masking tape or anything you can think of really. Apply layers and layers of tape to the valve cover. I'd do a 1/4in thick worth of tape or anything you would like to use and apply it to the rear area of the valve cover/coil bracket that would touch the a/c box, whatever thickness you create will determine how much clearance you will have later.. Then put a plastic grocery bag over the valve cover and put it onto the motor. That bulge you made will come in contact with the stretch fabric that you just apply fiberglass resin to. And it will push the fabric inward and make clearance(this is why you don't want the fiberglass to cure too quickly, have the valve cover pre-setup so you can put it on RIGHT after you apply the resin). Let the valve cover sit there and press up against the fabric until the fiberglass resin cures and hardens the fabric..
12. Remove the valve cover, remove the bag, remove the tape or whatever you used to create your clearance. Then place the valve cover back on with coil bracket and look to see how much clearance you have gained.
13. Remove the motor, now you need to reinforce the fabric. Fabric that has been soaked in fiberglass resin and cured is not enough. It is actually very brittle and weak. This is where fiberglass mat comes in, NOT fiberglass cloth dont use that stuff. 3-4 layers of the 3M/BONDO brand mat that comes in a pack at the parts stores or home improvement store will be fine. With the crappy 3M/BONDO brand fiberglass resin you will probably be using that's available at the parts stores and home improvement places it contains wax in the resin for easy sanding. This wax raises to the surface as it cures. So anything you apply on top of the cured resin will not bond correctly, for instance if you applied more resin or body filler. Every time this crap cures you will need to sand the top layer to remove the wax before continuing.
So, sand the cured fabric. You will probably have rough edges from gluing the fabric so knock those edges down with a rough grit sand paper.. Tear up 3-4 large enough pieces of fiberglass chop mat to cover the patch. Mix up some fiberglass resin, apply a thin layer of resin over the patch area, then take a piece of chop mat and lay it over the area, dip the brush back into your mixing cup of resin and start dabbing it into the chop mat (don't paint the resin onto the chop mat, have to dab it in). Work from the top down so you don't trap any air bubble underneath the fabric (you could use a fiberglass roller to remove air bubbles but that's one more tool you would have to purchase and probably never use again, so work carefully and you shouldn't have too many air bubble issues). After you applied one layer you can go right onto the next, Just grab another piece of chop mat and lay it out over the first layer and repeat the process. If its too much you can work one layer at a time, just remember after one layer cures sand it before going to the next. After 3-4 layers are done, sand it with 80 grit or so, then apply body filler, sand and sand and sand and primer, then paint.
Have fun
I doubt you want to take the HVAC box apart so here is what I suggest you do.
*Note this will probably seem like a lot but its just because I went into detail. Its really not that hard.
1. Remove the motor
2. Use a dremel or any rotary cutting tool of the kind and clean up the hole you made.
3. Just clean it up and make a perfect square hole if you wish.
4. Hand sand with the lowest grit sand paper you can find or die grinder with low grit roloc disc. Sand outward around 2in out, all around the hole.
5. Find a local RC hobby store and buy a small bottle of CA glue + speed activator if they have it. When the fiberglass begins to cure it gets hot, from personal experience any 3m spray glue in a can releases from the heat of the resin, so I use CA glue which I haven't had a issue with releasing.
6. You can use a small piece of a old tshirt here. I actually prefer "Ponte" fabric. It's a 100% polyester stretchy fabric you can probably find at any fabric store.
7. Cut out a piece slightly larger then the hole you cleaned up.
8. Here is the tricky part, I know some custom audio fabricators that have a extremely hard time using CA glue and gluing down fabric. Take a corner of your fabric and CA glue. Press the fabric up against the sanded area you made around the hole and dab on some CA glue. Enough the penetrate through the fabric and onto the HVAC box, use the CA glue activator to speed up the glue drying process. Then Do the opposite corner. Then stretch the fabric out over the hole and glue it, stretch it tight as you glue not not too tight (you will understand in the later steps). If you were making a fiberglass speaker box you would want the fabric to stretch as tight as possible, but here you want a little wiggle room. Especially if you arent using some really stretchy fabric from the start. After everything is glued tape off all around the stretched fabric. You can use a razor blade to cut off any excess fabric that's not glued down.
9. Drop the motor back into the car (with passenger valve cover removed), and continue the prep work, use a garbage bag to cover the rest of the motor you don't want to get fiberglass over everything. IT WILL GET MESSY.
10. With everything prepped, use a small 2in chip paint brush, mix up some fiberglass resin and apply it to the fabric. Don't mix the stuff to hot (putting too much MEKP into the resin). You want a little working time here, follow the mixing directions on the can for the weather temp conditions you will be working with.
11. Now here is why you want to use fabric to patch the hole. Take some masking tape or anything you can think of really. Apply layers and layers of tape to the valve cover. I'd do a 1/4in thick worth of tape or anything you would like to use and apply it to the rear area of the valve cover/coil bracket that would touch the a/c box, whatever thickness you create will determine how much clearance you will have later.. Then put a plastic grocery bag over the valve cover and put it onto the motor. That bulge you made will come in contact with the stretch fabric that you just apply fiberglass resin to. And it will push the fabric inward and make clearance(this is why you don't want the fiberglass to cure too quickly, have the valve cover pre-setup so you can put it on RIGHT after you apply the resin). Let the valve cover sit there and press up against the fabric until the fiberglass resin cures and hardens the fabric..
12. Remove the valve cover, remove the bag, remove the tape or whatever you used to create your clearance. Then place the valve cover back on with coil bracket and look to see how much clearance you have gained.
13. Remove the motor, now you need to reinforce the fabric. Fabric that has been soaked in fiberglass resin and cured is not enough. It is actually very brittle and weak. This is where fiberglass mat comes in, NOT fiberglass cloth dont use that stuff. 3-4 layers of the 3M/BONDO brand mat that comes in a pack at the parts stores or home improvement store will be fine. With the crappy 3M/BONDO brand fiberglass resin you will probably be using that's available at the parts stores and home improvement places it contains wax in the resin for easy sanding. This wax raises to the surface as it cures. So anything you apply on top of the cured resin will not bond correctly, for instance if you applied more resin or body filler. Every time this crap cures you will need to sand the top layer to remove the wax before continuing.
So, sand the cured fabric. You will probably have rough edges from gluing the fabric so knock those edges down with a rough grit sand paper.. Tear up 3-4 large enough pieces of fiberglass chop mat to cover the patch. Mix up some fiberglass resin, apply a thin layer of resin over the patch area, then take a piece of chop mat and lay it over the area, dip the brush back into your mixing cup of resin and start dabbing it into the chop mat (don't paint the resin onto the chop mat, have to dab it in). Work from the top down so you don't trap any air bubble underneath the fabric (you could use a fiberglass roller to remove air bubbles but that's one more tool you would have to purchase and probably never use again, so work carefully and you shouldn't have too many air bubble issues). After you applied one layer you can go right onto the next, Just grab another piece of chop mat and lay it out over the first layer and repeat the process. If its too much you can work one layer at a time, just remember after one layer cures sand it before going to the next. After 3-4 layers are done, sand it with 80 grit or so, then apply body filler, sand and sand and sand and primer, then paint.
Have fun
Few pics for you of where the pacsetter headers hit the frame on the passenger side.


Member samckitt actually posted in the gbody swap thread that he cut the tubes at the flange and bent the headers away from the frame for clearance, then all you would need to do is weld the cut back up.
I'm going to attempt the same. I personally didn't want to dent the tube.
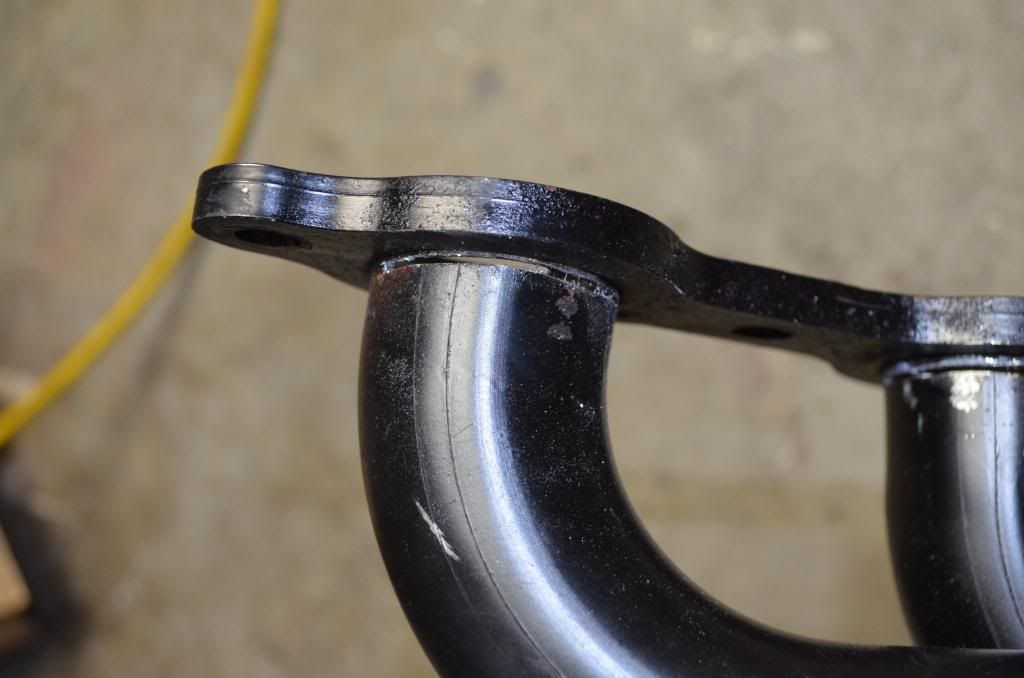
That or you can dent the tube.
Member samckitt actually posted in the gbody swap thread that he cut the tubes at the flange and bent the headers away from the frame for clearance, then all you would need to do is weld the cut back up.
I'm going to attempt the same. I personally didn't want to dent the tube.
That or you can dent the tube.
Last edited by BOXCHEV; Apr 26, 2013 at 01:05 AM.
LS1 Tech Stories
The Best V8 Stories One Small Block at Time

Gas Monkey Built a 6-Wheel Ferrari Testarossa With a Corvette LT4 Engine
Verdad Gallardo
7 Most Reliable High-Performance Engines GM Has Ever Built
Verdad Gallardo
Amazing '71 Camaro Restomod Is Modern Muscle Car Under the Skin
Verdad Gallardo
6 Common C5 Corvette Failures and What's Involved In Repairing Them
Pouria Savadkouei
Retro Modern Bandit Pontiac Trans AM Comes With Burt Reynolds' Autograph
Verdad Gallardo
Top 10 Greatest Cadillac V Series Performance Models Ever, Ranked
Pouria Savadkouei
Top 10 Most Powerful Chevy Trucks Ever Made!

Hennessey's New Supercharged Silverado ZR2 Has 700 HP
Verdad Gallardo