


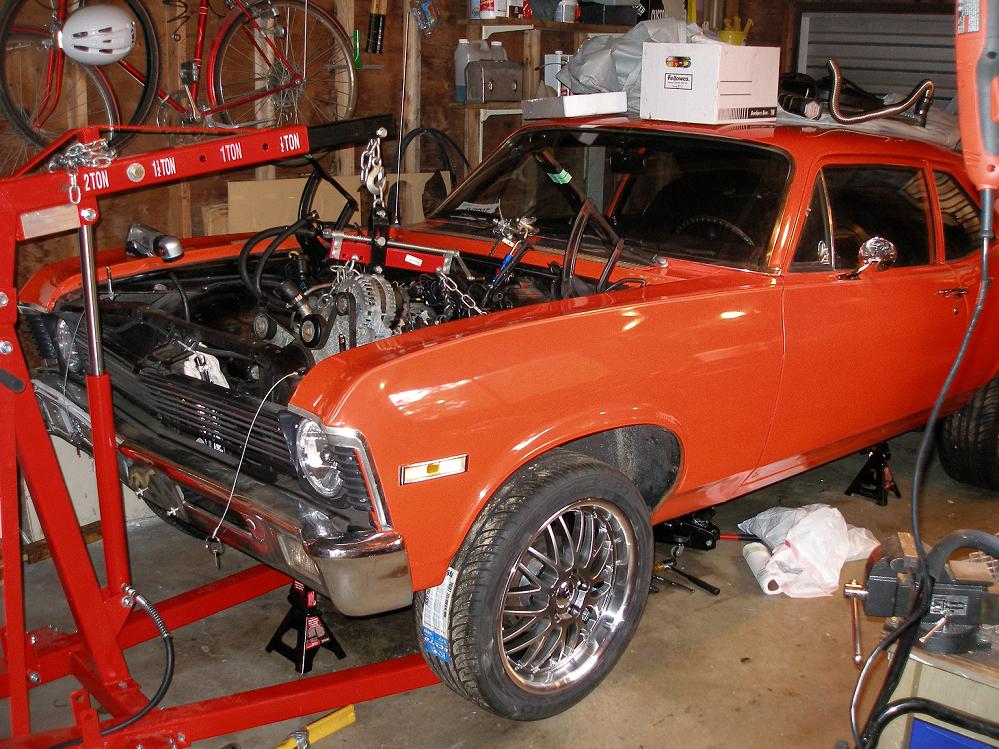
LQ4 into a 3rd Gen/1972 Nova
Many of the oil related problems are from the Oil pickup tube to Oil Pump O-Ring not seating flush.. You might be able to take the front cover off and check and correct it (yeah, its tight, but many have been able to do it without taking the engine out and apart).
Good luck..
Good luck..
Thread Starter
Joined: May 2007
Posts: 1,806
Likes: 46
From: Vancouver BC, Canada
I just got back into the same town as my car tonight, so I'm gonna get crackin on pulling the engine and pan tomororw and report back with my findings hopefully sometime within the next couple days...
On The Tree
Joined: Jan 2007
Posts: 116
Likes: 0
From: Florida

Thread Starter
Joined: May 2007
Posts: 1,806
Likes: 46
From: Vancouver BC, Canada
The very first times I started it before this, it was getting next to no pressure, so I figured o-ring. I was lazy and just wedged the engine up, pulled the pan, awkwardly inspected the oil pickup/pump with engine still in car, pulled the o-ring, and it was fine, not pinched or anything. I carefully put it back together and bolted down the tab to the oil pump, but then noticed that the pickup still slid in and out maybe 1/8" of an inch or so. I had also noticed that it did this the very first time I assembled everything way back when, so I decided this time around to throw in some high-temp silicone sealant to "safeguard" against any possible future leaks.
My thinking is 1) that was a horrible idea and I wish I wasn't so lazy and had pulled the engine in the first place. 2) I think that the sealant held pressure fine at idle but when I drove it and it heated up, the bond between sealant and metal pooped and it started slowly sucking air instead of oil.
It's also good to note that I had to chop up and weld the stock truck pickup to fit my modified pan, so I thought maybe during welding the pickup warped, so when I bolted the pickup support strut to the windage tray, it would twist the oil pickup and not let the pickup/o-ring to mate into the oilpump properly.
I'm tired so I only unhooked 90% of things, but I will tomorrow pull it, flip it, and really investigate how well the pickup seals like I really should have done in the first place. Of course I will report back with my findings!!
Thread Starter
Joined: May 2007
Posts: 1,806
Likes: 46
From: Vancouver BC, Canada
Update:
Oil pressure problem is still up in the air. I ran out of time and socket extensions to be able to unbolt the bellhousing from the engine, so I wasn't able to pull the engine and closely check the pickup o-ring/oil pump mating issues.
However, here are some pics I snapped
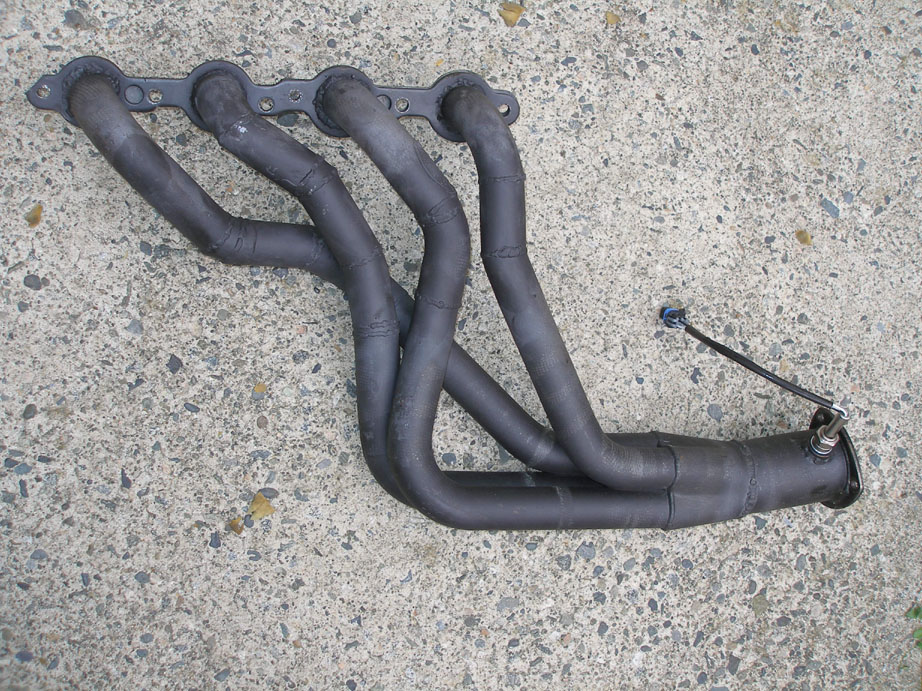
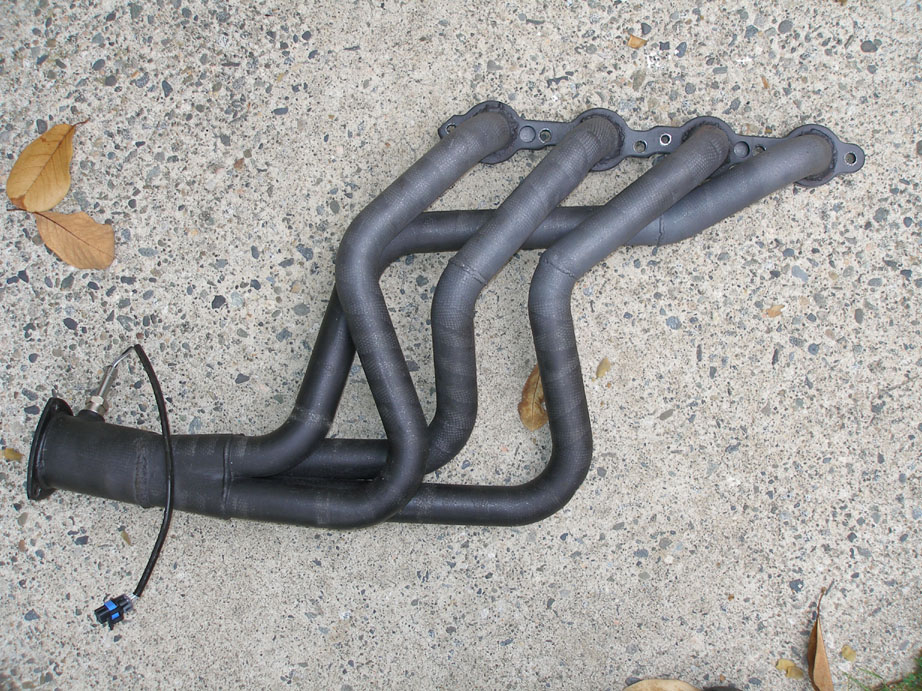
The headers I made. They're pretty rough, at this point I was still using innershield mig welding, put hey they work, and they cost me a total of.... $30 for the LS1 flanges
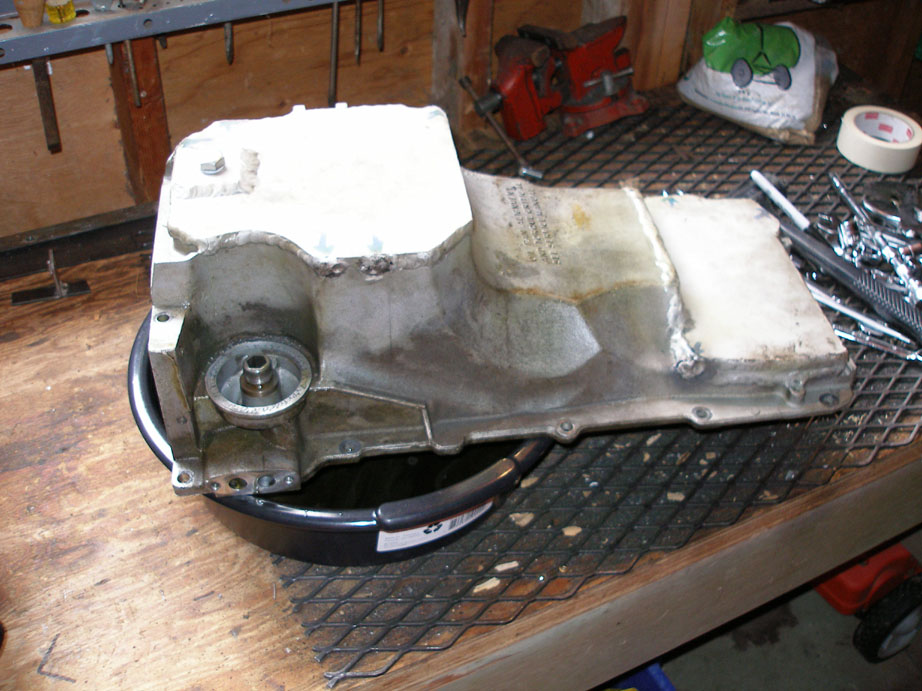
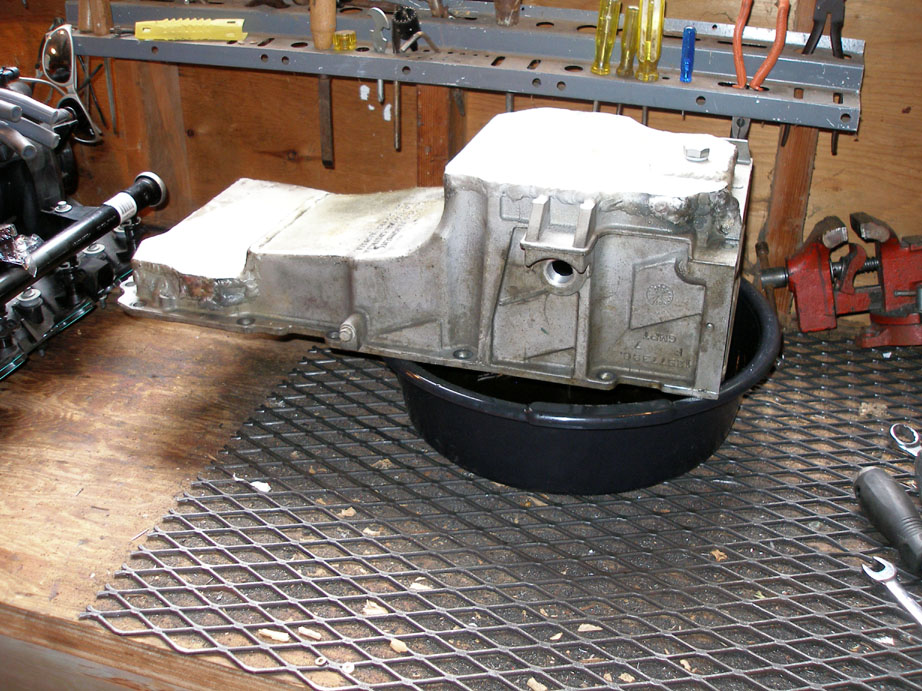
Here are some closeups of the oil pan mods to clear the cross-member and speedbumps. Again the welds are pretty rough, but it cost me a total of 18 beers and there are no leaks. I had 3" milled off the bottom of the pan and another inch milled off of the first 5 or so inches of the front of the pan, then got 1/4" 6061 welded on. The welder went ahead and put the drain plug in a HORRIBLE place if the pan were to hit the ground, so I'm going to have it filled up and re-tapped in the side of the pan.
And ghetto bucket seat improvments.. you could slide off the old buckets before you even turned in the car, so the new (free) ones should be a good improvement. They're from a Toyota Tercel (sacralige) but they're surprisingly firm and grabby.

Oil pressure problem is still up in the air. I ran out of time and socket extensions to be able to unbolt the bellhousing from the engine, so I wasn't able to pull the engine and closely check the pickup o-ring/oil pump mating issues.
However, here are some pics I snapped
The headers I made. They're pretty rough, at this point I was still using innershield mig welding, put hey they work, and they cost me a total of.... $30 for the LS1 flanges
Here are some closeups of the oil pan mods to clear the cross-member and speedbumps. Again the welds are pretty rough, but it cost me a total of 18 beers and there are no leaks. I had 3" milled off the bottom of the pan and another inch milled off of the first 5 or so inches of the front of the pan, then got 1/4" 6061 welded on. The welder went ahead and put the drain plug in a HORRIBLE place if the pan were to hit the ground, so I'm going to have it filled up and re-tapped in the side of the pan.
And ghetto bucket seat improvments.. you could slide off the old buckets before you even turned in the car, so the new (free) ones should be a good improvement. They're from a Toyota Tercel (sacralige) but they're surprisingly firm and grabby.
So here's a question: the TH350 torque converter bolted right up to the LQ4 with no modification, special flexplate, or spacer required (other than massaging the bolt holes on the 6.0L flexplate, of course)? I may bolt my TH350 to the LQx I'm building in the interim before doing the T56 swap at a later date.
-TW
-TW
LS1 Tech Stories
The Best V8 Stories One Small Block at Time

Gas Monkey Built a 6-Wheel Ferrari Testarossa With a Corvette LT4 Engine
Verdad Gallardo
7 Most Reliable High-Performance Engines GM Has Ever Built
Verdad Gallardo
Amazing '71 Camaro Restomod Is Modern Muscle Car Under the Skin
Verdad Gallardo
6 Common C5 Corvette Failures and What's Involved In Repairing Them
Pouria Savadkouei
Retro Modern Bandit Pontiac Trans AM Comes With Burt Reynolds' Autograph
Verdad Gallardo
Top 10 Greatest Cadillac V Series Performance Models Ever, Ranked
Pouria Savadkouei
Top 10 Most Powerful Chevy Trucks Ever Made!

Hennessey's New Supercharged Silverado ZR2 Has 700 HP
Verdad Gallardo
Coachbuilt N2A Anteros Is an LS2-Powered C6 Corvette In Italian Clothes
Verdad Gallardo Thread Starter
Joined: May 2007
Posts: 1,806
Likes: 46
From: Vancouver BC, Canada
This is the exact same thing as me, it's most definitely a temporary thing.
Thread Starter
Joined: May 2007
Posts: 1,806
Likes: 46
From: Vancouver BC, Canada
It did. On my front subframe, there were an extra set of holes about an inch in front of the holes that the crossmember was originally bolted to, so I bolted the x-member to those holes and it worked out (because Carshop/S&P motor mount adapter plates I used moved the engine/tranny forward ~1 inch).
I'm back in town this weekend so hopefully I'll update some more pics and progress on the engine pull/investigation of oil pressure problem, and also on the seat install, steering wheel adjust, and pedal relocation (they're positioned awkwardly for my 6'2" height).
I'm back in town this weekend so hopefully I'll update some more pics and progress on the engine pull/investigation of oil pressure problem, and also on the seat install, steering wheel adjust, and pedal relocation (they're positioned awkwardly for my 6'2" height).
Thread Starter
Joined: May 2007
Posts: 1,806
Likes: 46
From: Vancouver BC, Canada
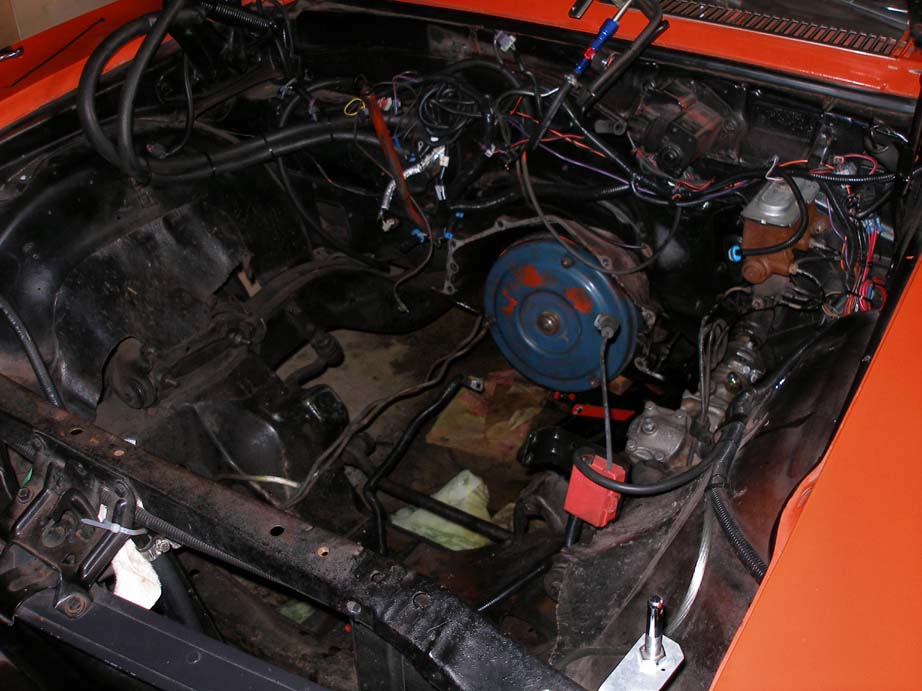
Arg stupid engine comes back out...
Oh man I forgot how narsty the engine bay looks, like things usually go, putting the engine back in might be delayed to make this situation look a little more decent..
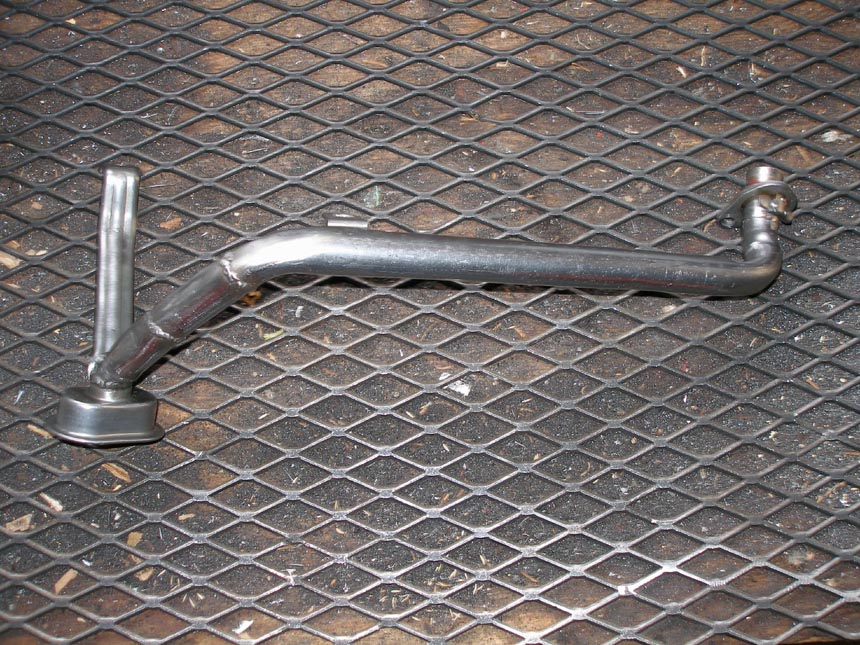
A shot of my modified oil pickup tube..
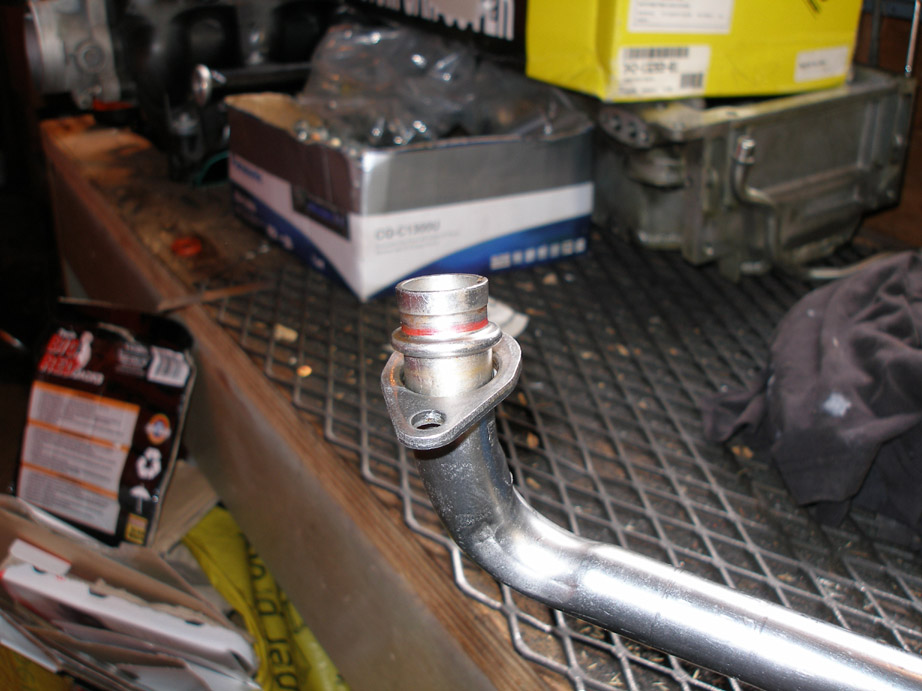
So I pulled the oil pickup, and I first thought this nick in the tube might've been the pressure-loss culprit...

..but then from the side it doesn't gouge into the tube, it's only on the inside surface, so back to square 1..
Oh man I forgot how narsty the engine bay looks, like things usually go, putting the engine back in might be delayed to make this situation look a little more decent..
A shot of my modified oil pickup tube..
So I pulled the oil pickup, and I first thought this nick in the tube might've been the pressure-loss culprit...
..but then from the side it doesn't gouge into the tube, it's only on the inside surface, so back to square 1..
Last edited by frojoe; Mar 15, 2009 at 11:05 PM.
Thread Starter
Joined: May 2007
Posts: 1,806
Likes: 46
From: Vancouver BC, Canada
...So I measured the depth of the oil pump outer face to the mating surface that's supposed to compress the o-ring...
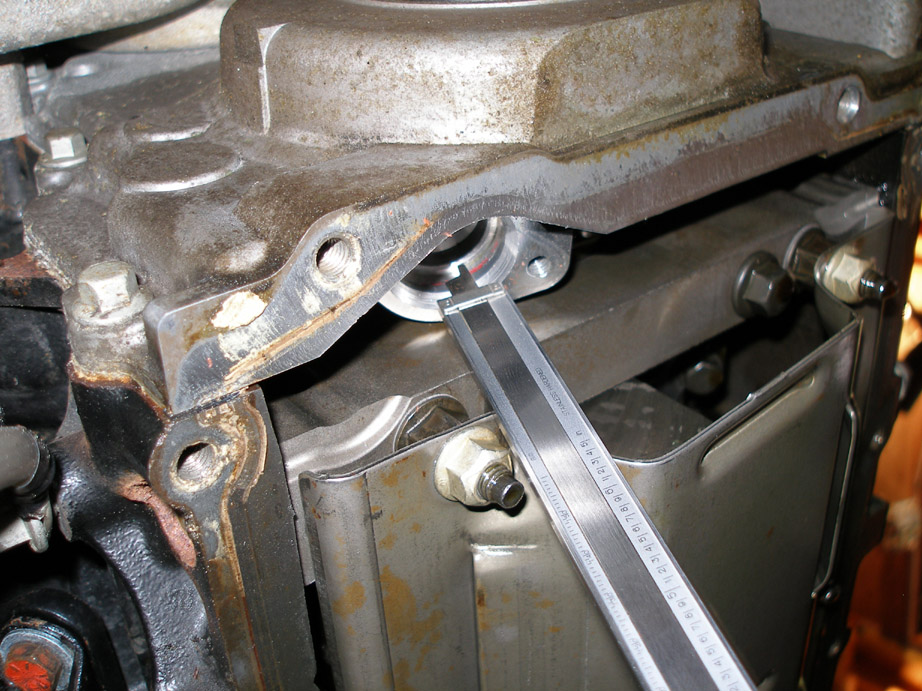
..and after multiple measurements I came up with a .390" depth..

and that same depth compared to the pickup shows that the o-ring doesn't even come close to the surface it's supposed to be compressed against!..
The first time I took the pickup off I fashioned a setup for the 2nd (unused) tapped hole, to double-bolt the pickup flange to the oil pump. I didn't like the idea that with a normal bolt/washer, it would only be pressuring against the washer at one point of the bolt head, but with this setup (off of a mountain bike brake pad retainer!) it allows full bolt head pressure to engage the off-angle washer..

..and after multiple measurements I came up with a .390" depth..
and that same depth compared to the pickup shows that the o-ring doesn't even come close to the surface it's supposed to be compressed against!..
The first time I took the pickup off I fashioned a setup for the 2nd (unused) tapped hole, to double-bolt the pickup flange to the oil pump. I didn't like the idea that with a normal bolt/washer, it would only be pressuring against the washer at one point of the bolt head, but with this setup (off of a mountain bike brake pad retainer!) it allows full bolt head pressure to engage the off-angle washer..
Last edited by frojoe; Oct 14, 2008 at 12:15 AM.
Thread Starter
Joined: May 2007
Posts: 1,806
Likes: 46
From: Vancouver BC, Canada
Another idea I've conjured up while bored in class is a way to guarantee fuel delivery.
Since I used the stock non-baffled, non-sumped tank, I didnt want to risk fuel starvation due to corners, acceleration, or hills (lots of them around here).
This is an idea which apparently euro/import autocrossers and racers have had for a while, so why not in an old american car?
A low-pressure carb pump will push fuel to the front of the car, into a skinny, tall canister from which the EFI pump will feed from the bottom. At 1G cornering, the gas level would be at 45*, and the only way there'll be no gas at the bottom of the canister is if the car is upside down or I hit a HUGE bump...
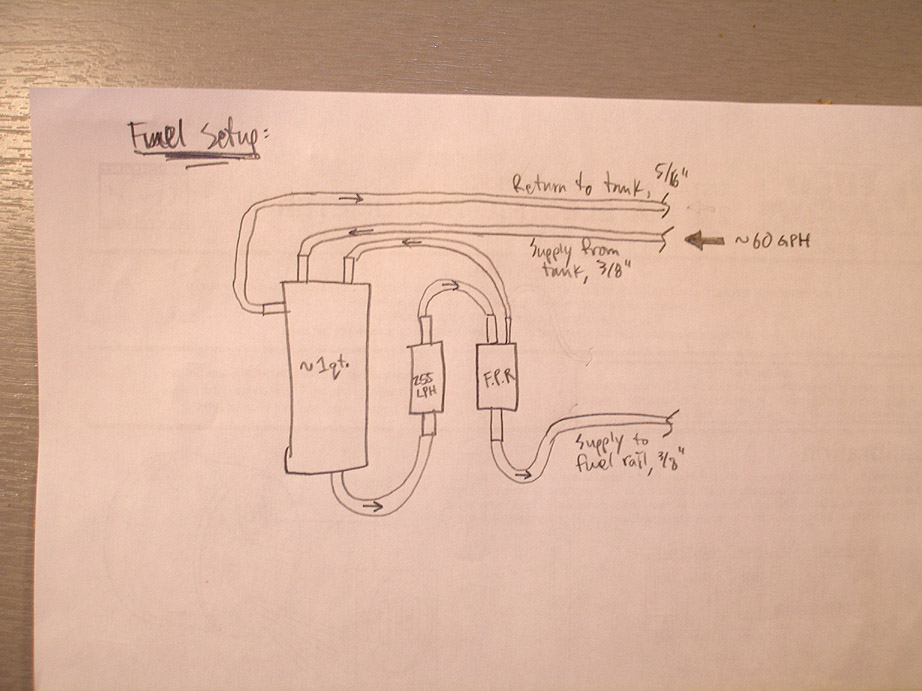
PS.. I've also done some calc's and with a 1qt canister, and 35lb injectors running WOT at 80% duty cycle (is this approx. correct??) the whole canister will drain in 28seconds if the pump at the back of the car fails.
_
Since I used the stock non-baffled, non-sumped tank, I didnt want to risk fuel starvation due to corners, acceleration, or hills (lots of them around here).
This is an idea which apparently euro/import autocrossers and racers have had for a while, so why not in an old american car?
A low-pressure carb pump will push fuel to the front of the car, into a skinny, tall canister from which the EFI pump will feed from the bottom. At 1G cornering, the gas level would be at 45*, and the only way there'll be no gas at the bottom of the canister is if the car is upside down or I hit a HUGE bump...
PS.. I've also done some calc's and with a 1qt canister, and 35lb injectors running WOT at 80% duty cycle (is this approx. correct??) the whole canister will drain in 28seconds if the pump at the back of the car fails.
_
Last edited by frojoe; Oct 14, 2008 at 12:17 AM.
just make sure you don't do any stunt-man **** like take your nova off one of those twisty ramps to make it do a barrell roll. i love novas, and i WILL hunt you down if you try that 
and just you wait until i move back up to washington. a quick drive and IT'S OVER!!! jk - good engineering work
and just you wait until i move back up to washington. a quick drive and IT'S OVER!!! jk - good engineering work
Thread Starter
Joined: May 2007
Posts: 1,806
Likes: 46
From: Vancouver BC, Canada
just make sure you don't do any stunt-man **** like take your nova off one of those twisty ramps to make it do a barrell roll. i love novas, and i WILL hunt you down if you try that
and just you wait until i move back up to washington. a quick drive and IT'S OVER!!! jk - good engineering work
and just you wait until i move back up to washington. a quick drive and IT'S OVER!!! jk - good engineering work
I used to downhill mountain bike so watch out, I might have the upper hand when it comes to getting air off sweet jumps!!
But seriously, I still think I could jump further in my car than you in yours.
...So I measured the depth of the oil pump outer face to the mating surface that's supposed to compress the o-ring...
..and after multiple measurements I came up with a .390" depth..
and that same depth compared to the pickup shows that the o-ring doesn't even come close to the surface it's supposed to be compressed against!..
The first time I took the pickup off I fashioned a setup for the 2nd (unused) tapped hole, to double-bolt the pickup flange to the oil pump. I didn't like the idea that with a normal bolt/washer, it would only be pressuring against the washer at one point of the bolt head, but with this setup (off of a mountain bike brake pad retainer!) it allows full bolt head pressure to engage the off-angle washer..
The problem is your O-ring, it's not supposed to be torn up and look anything like that. It's supposed to actually be round, not flat. The depth of your pump is not a problem at all as the metal end does not have to seat. The O-ring just has to compress between the rip on the pickup, the flat plate on teh pickup, and teh machined bottom of the oil pump. Replace the O-ring and bolt it back together like it normally would be.
Thread Starter
Joined: May 2007
Posts: 1,806
Likes: 46
From: Vancouver BC, Canada
The problem is your O-ring, it's not supposed to be torn up and look anything like that. It's supposed to actually be round, not flat. The depth of your pump is not a problem at all as the metal end does not have to seat. The O-ring just has to compress between the rip on the pickup, the flat plate on teh pickup, and teh machined bottom of the oil pump. Replace the O-ring and bolt it back together like it normally would be.
Before (when it was original and perfect, not ripped/pinched/mangled in any way) it was not sealing properly either.
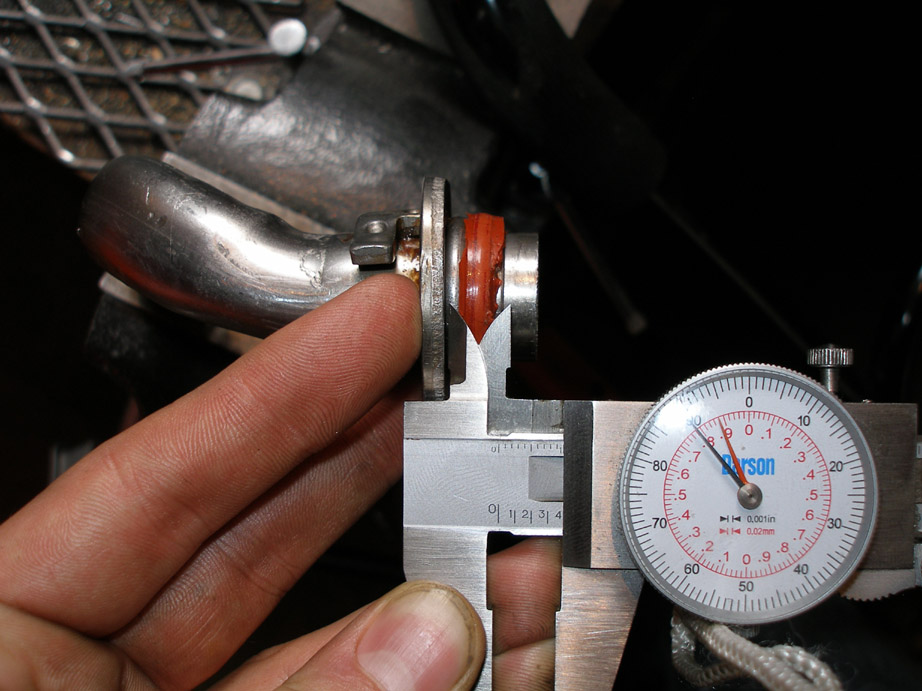
Even with this now added bulk the o-ring, as you can see it still doesn't come close to the surface it's supposed to get compressed against. Now I just assumed it is supposed to contact that surface in order to squish the o-ring and make it expand radially, after all that is how an o-ring is supposed to work...
Oh sorry I forgot to mention this, that is the right o-ring. This is the o-ring after I added some hi-temp silicone sealant on it that makes it look all mangled.
Before (when it was original and perfect, not ripped/pinched/mangled in any way) it was not sealing properly either.
Even with this now added bulk the o-ring, as you can see it still doesn't come close to the surface it's supposed to get compressed against. Now I just assumed it is supposed to contact that surface in order to squish the o-ring and make it expand radially, after all that is how an o-ring is supposed to work...
Thread Starter
Joined: May 2007
Posts: 1,806
Likes: 46
From: Vancouver BC, Canada
In this case not exactly. Measure the inside diameter of your machined hole and then the outside diameter of your o-ring once it has been installed on the pickup tube. The o-ring should be larger of course. Was this a GM o-ring made from blue rubber? I know the newer o-rings are slightly larger than the old ones and this may help solve your problem.
My thought at the time that there is only one LS o-ring size, so maybe get two and stack them, because it's not a tiny bit of play, there's actually quite a lot.
Next time I'm in town I will measure the inner and outer diameters of the pump/tube as well as the o-ring dia. and thickness to see if it 1) comes close to fitting diameter-wise, and 2) if two o-rings will be too thick to fit in stacked.
Any of this make sense? This is all confusing because this is supposedly a stock engine, so how would any of this worked before?