When you click on links to various merchants on this site and make a purchase, this can result in this site earning a commission. Affiliate programs and affiliations include, but are not limited to, the eBay Partner Network.
Well it�s taken a couple of false starts and too much time overall to get to this point, but I�ve begun the process of trying to LS swap my old Pontiac. In some respects, I�m glad I waited, because I now have the funds to build the car exactly how I want unlike three years ago. So! The car was originally a 389ci 10.5:1 high-compression mated to a TH400, and a rear differential of 2.41 or 2.52. I�m unsure which differential- the tag ripped off years ago and I�m not willing to open it up just yet for the stampings, but I used my Mark 1 eyeball to watch the wheel while rotating the driveshaft. Either way, the differential is the only thing I�m really keeping of the original drivetrain. Odometer reads 66,000 miles, and I�m certain it has rolled over at least once because the seller�s brother (the original owner) used it for 50 years as a daily driver.
The new drivetrain is a 2004 LS1 5.7 mated to a T56 from a GTO that was rear-ended, purchased over eBay. The seller included the gauge cluster (gods of Pontiac, forgive me, I love the sweep speedo but I want a tach. Modifications may ensue) and pedal assembly for a very fair price. Odometer showed 67,000 miles.
If anyone wants a boat anchor, I still have the 389 block.
The car currently sits outside a friend�s workshop, and unfortunately I will have to do the engine swap in the parking lot, with his help and forklift. To assist in this, I have 3D printed a 1:1 mock-up of the engine and transmission, to ensure clearance, and (with help from said mechanical deities) I will shove the engine into the bay without too much trouble.
My current goal is only to get this machine driving reliably as a cruiser, the remainder of the restomodding will take place later (projects including; air suspension, air conditioning, steam engine whistle, CRT monitor running on a Raspberry Pi with dozens of period-correct TV shows, etc). I have no interest in super/turbocharging, massively raising/lowering, drag racing, etc, because I am superstitious about crashing it immediately after. Okay, maybe just a little stitious.
At present moment, I am printing a model of the Holley 302-1 oil pan to check fitup, with the engine and frame mounts I designed and printed. Is it overkill? Yeah probably, but I�m new to this whole �thinking� thing, and I�m hoping it can save what�s left of my back, hearing, vision and maybe, just maaaaaaaaaybe, money.
Probably not, it�s a chrome-blue-black hole of funds and time.
I sincerely hope this thread will help someone else, and I intend to accomplish this by documenting everything thoroughly. I�ve never done anything like this, but I�m good at fabricating, machining, welding, and terrible at wiring. Plus, I have more stubbornness and tools than common sense. Advice, suggestions of threads/articles/books for reading, jokes, questions, are all very welcome and appreciated. Especially advice about the wiring harness and computers, my understanding of electronics stops ~1973.
Progress updates soon!
-Mistakes
Engine/trans mock-up, sans shifter and oil pan. Looks like the shifter might pop out right under the bench seat? Needed to massage the tunnel, to stretch two inches immediately back from the firewall, up and/or out. Thank Leland for solid American steel, I did NOT want to cut/fab/weld a new tunnel in. More massaging may be done later, to be determined.
As she sat, just before repairing the leak in the back window. Mock-up sitting next to the real deal. My most expensive purchase to date (this is not a brag, my wallet is crying)
You must have pretty large printer to print parts that. I bet you could make a few bucks selling printed parts like this for LS swaps. I know they make plastic LS blocks but not T56's.
I know you don't like wiring but I would replace all the wiring from places like Painless or American Auto wiring.
Good luck with your project.
I'm DEFINITELY gonna' follow this build!! I'm in the deciding process for buying a 70 Pontiac Catalina convertible. I love the 3D printed engine and transmission parts and I have a quick word of advice - don't publish your STL file to Thingaverse!! It'll be quickly copied, stolen and used by somebody to profit from your efforts.
Small update, been fighting some wood inlay projects in the between. I modeled the Holley pan, and after more gentle persuasion of the transmission tunnel, it looks like it�ll fit.
The basic frame side mount I designed was way off, but provided a nice reference of what�ll be needed. So I CADed a new design, incorporating the angle of the wishbone (25� for any curious)
Should have it test-fit tomorrow. Engine mockup with Holley 301 pan. I like to call this �The Space Between Us� You may spot a slight discrepancy between the original mount and where the new one needs to go. Model in Onshape. And the print itself, hot off the Ender 5.
Impressed with the amount of 3D printing on this project. Maybe I've been watching too much Roadkill, but hoping you never paint it (just a cut and buff).
Impressed with the amount of 3D printing on this project. Maybe I've been watching too much Roadkill, but hoping you never paint it (just a cut and buff).
Thanks! But I do plan on painting it, sorry. There�s too much cancer to be ignored, and I want this to (eventually) be my Sunday cruiser. You know, the kind you keep a shotgun and shovel in the trunk
One thing you may wish to consider is late 70's Pontiac/Olds clamshell lower mounts. These can be fit towards the center of the block, unlike the Chevy style which are forward. If you pull the trans the motor will balance on the mounts - Chevy's will not, something useful when changing clutches.
Ok, you got my attention. 3d printing a dummy block... wow. I once 3D printed a 6" model of an LS engine... it ran for an entire week.
Also I like the Raspberry Pi TV.
I can't believe your 3D printing and doing Raspberry pi and not into wiring. I think by the time you're done with this you'll be a wiring wiz.
Thanks. Though to be honest, I printed the block at ~5% infill/6 walls, it�s mostly air inside to save on filament costs. I have progress pics if you�re interested on that part.
I actually don�t know how to program an rPi, I only got the barest of self-educations when I flashed an interface onto a Pi 3B, because my brother had given me a touchscreen kit for Christmas. It was one of those gifts where, �well, this is neat, I guess I�ll try it for ten minutes� and now I feel guilty because it�s sitting on a shelf.
Originally Posted by Scarebird
Hello fellow old Pontiac owner.
One thing you may wish to consider is late 70's Pontiac/Olds clamshell lower mounts. These can be fit towards the center of the block, unlike the Chevy style which are forward. If you pull the trans the motor will balance on the mounts - Chevy's will not, something useful when changing clutches.
Difficulty of swapping clutches is something I had not even thought of. The main reasoning I have for my current placement is simply because I want the weight distribution as far back to the rear as physically possible. Additionally, as this is my first swap and I�m unsure about a lot of things, giving myself forward clearance for fans, radiators, accessories seemed like a solid idea.
Edit: and also because close to the original locations was �well this is how the original ones worked, better copy it!�
...I�m unsure about a lot of things, giving myself forward clearance for fans, radiators, accessories seemed like a solid idea.
I can understand that. One thing I tried to do in 2 swaps I did was keep the engine/trans parting line the same - so fitting shifters, oil pans, exhaust and the like are more like the OEM did it. Chevys always seem to put the mounts way forward while Olds and Pontiac were mid-block. One reason I did not use the Holley mounts is they used SBC architecture.
No using the OEM mechanical clutch linkage here...
This is a Gen V L84 so things will be a bit different...
One thing you may wish to consider is late 70's Pontiac/Olds clamshell lower mounts. These can be fit towards the center of the block, unlike the Chevy style which are forward. If you pull the trans the motor will balance on the mounts - Chevy's will not, something useful when changing clutches.
Following, as I too have a 66 Catalina I plan to LS swap this winter and I'm trying to gather all the info I can before diving in. If you plan to run an auto trans (4l80e), would you go with different mounts since I won't have to worry about servicing a clutch?
Been a hot minute since I updated� a robin put its nest in the battery tray and I didn�t have the heart to throw it away� so now that they�re all grown up (or dead, it�s not a fox-free zone) and away, the work continues!
I split the engine/trans apart, mostly to swap the oil pan but also to check the clutch. It wasn�t awwwwwfuuuuullll� but hey, if I�m already years behind schedule and thousands over budget in the project, what�s another week and $300 for a new one?
I reattached the plastic �shifter� back onto the transmission, and when I did, the engine angle went from an acceptable 5� downwards to a disappointing 12�. So. What�s a guy with an angle grinder, a mig welder, and less common sense than self reliance to do? Yep. Build a new wishbone. Gotta push the engine down.
Oh and for bonus points, wanna guess where the shifter will land? Directly, and without any possibility of avoiding, in the middle of the front bench. *sigh* Guess the fix will be a milk crate, the solution will be period-correct GTO seats. Maybe I can add air conditioning to the lower back.
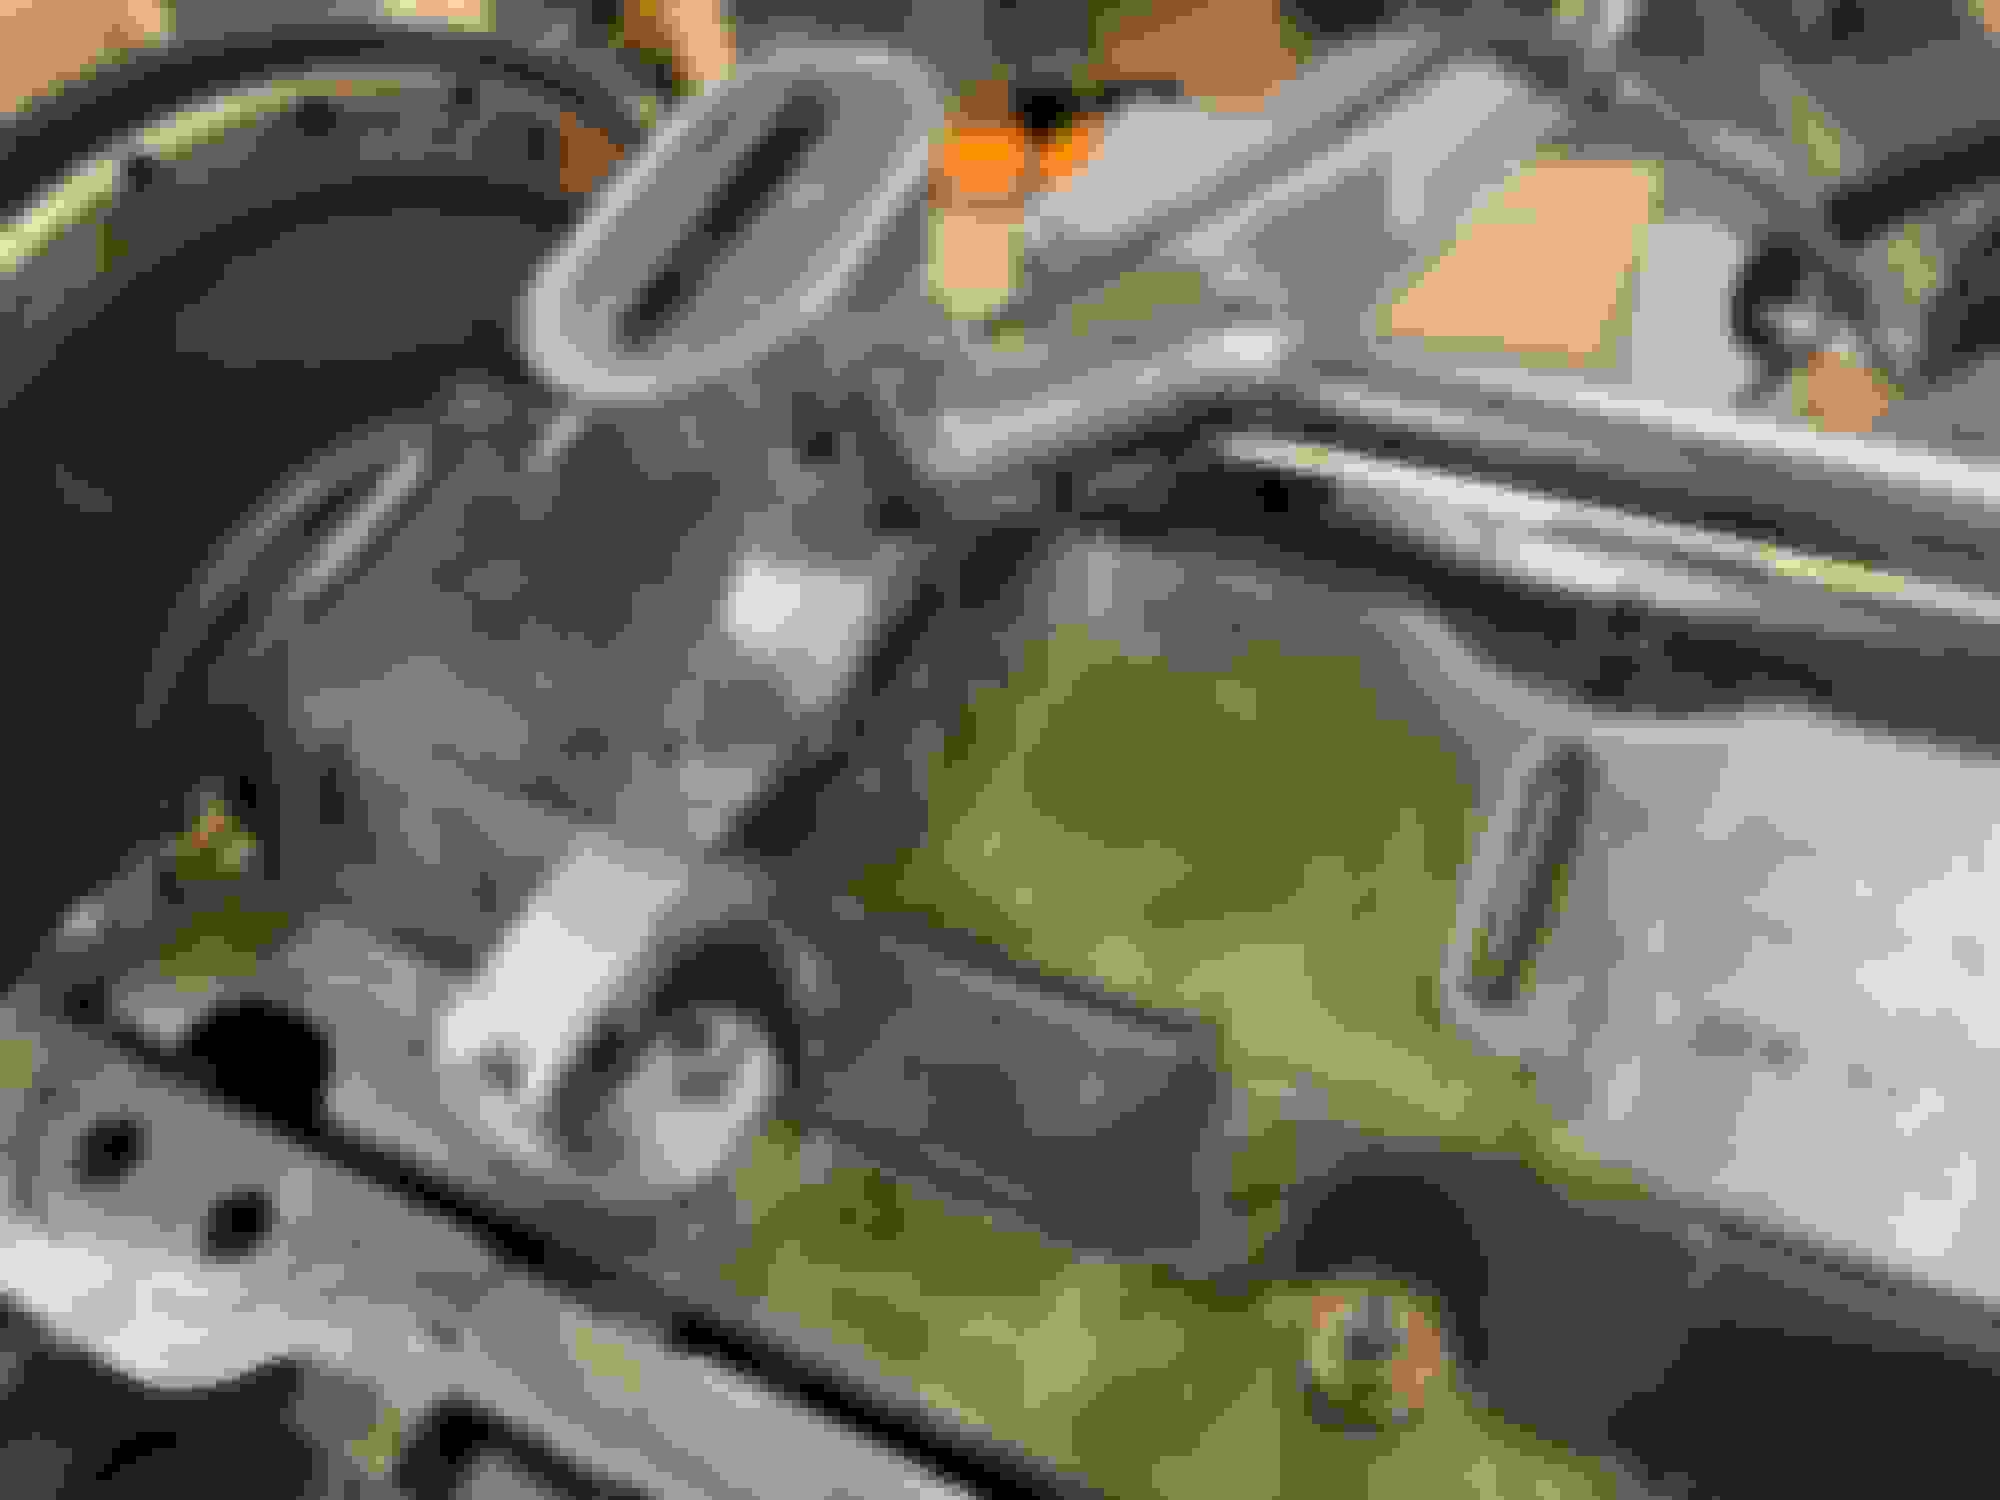
On a more serious note, the Holley 302-1 oil pan kit- specifically the pickup tube mounting bracket- did not fit. I wish I had taken �before� pictures, but to summarize, the backside of said bracket did not have clearance for the recesses on the baffle. So they clashed, and although I attempted to use Ye Olde Forge and Anvil, the solution was to cut-and-fab a new bracket end.
But as my username states- mistakes will be made. Sometimes, they�re not even mine. Engine, with original front sump. Also a very classy drip pan. My friend who was helping me, accidentally ripped out a spark plug wire, and then said �congratulations, upgrading your wiring is always a good idea, glad you thought of it.� But he did injure himself while helping to load it, so it�s not like I have too much room to complain. Haven�t tigged in probably a year. The massive tack weld on the left side is due to a brain fart on machine amperage settings. Yes, I did test fit the pan overtop, and yes, the tube was thoroughly cleaned before I bolted it into place.
Well, I�m back with an update. Not sure how many weeks I�ve been beefing with this pilot bearing, but it�s out now. I tried a puller, hydraulic pressure, even tried welding the damn thing. A hacksaw and moderate chisel violence worked, in the end. Time for reassembly. Gotta try to put this thing in before snowfall.
I didn�t trust myself with a pneumatic file. This only took an hour. I should cast this into some epoxy and make a paperweight. A monument to tenacity. Before anyone asks, the seat on the crankshaft is untouched, totally perfect.
I'm very curious what you will wind up with for a pinion angle with this engine and trans combo. I think I will be around two degrees down on my 70 Pontiac Catalina, but I had to snip some floor tin to achieve that number to go with my 4L60E - more cutting than I had hoped. I'm using the ICT Billet "Builder's Kit" for engine mounts on my LM7 LS engine and the legs on those mounts land right in the middle of the engine cradle - leaving plenty of space for the water pump and E-fans. I initially tried going with a Series 1350 drive shaft yoke but that would have required an even bigger cut - a Series 1310 is much smaller and will be no problem in this application.
I should be ready to cover up my floor pan hole next week.
I installed a LS3 in my 68 catalina, I move my motor very close to the fire wall (for center weight) and had to notch both front corners of the oil pan because the street column was hitting it at full turn lock to lock.
Been a second since I updated this thread, my bad. I came to the conclusion the engine/ transmission would sit at too high of an angle (pinion?) because the wishbone would force the new oil pan (or any pan) up higher than ideal. So, what�s the logical solution? Modify and weld up the oil pan you say! Nah, that makes sense. Better just design and build a new wishbone, that way the motor mounts will be easier to fabricate. Modeled in Onshape, made angle estimations easy when it came to fabrication. Mat�l was 2x4x1/4�.
I love it when angles go together.
Mmmmmmm tiiiiiiig
Look at that heat affected zone. Isn�t it beautiful?
And there she sits, 6oz heavier with weld. Tacked up using the 3DP-LS1 as a jig, with a 1/4� plate between the �pan� and the wishbone to provide clearance. Meant to get a picture of it but, oh well. Overshot on the gussets because I thought �I don�t need to CAD this, I can accurately fabricate with my brain!� Which was later determined to be a lie. Will remedy before install.
6 Common C5 Corvette Failures and What's Involved In Repairing Them
Slideshow: From wobbling harmonic balancers to failed EBCMs, these are the issues that define long-term C5 ownership and what repairs typically involve.
Retro Modern Bandit Pontiac Trans AM Comes With Burt Reynolds' Autograph
Slideshow: A modern Camaro transformed into a retro icon, this limited-run "Bandit" build blends nostalgia with brute force in a way few revivals manage.
Top 10 Greatest Cadillac V Series Performance Models Ever, Ranked
Slideshow: Cadillac didn't just crash the high-performance luxury vehicle party, it showed up loud, supercharged, and occasionally a little unhinged...
Coachbuilt N2A Anteros Is an LS2-Powered C6 Corvette In Italian Clothes
Slideshow: A one-off sports car that looks like a vintage Italian exotic-but hides a C6 Corvette underneath-just sold for the price of a new mid-engine Corvette.