


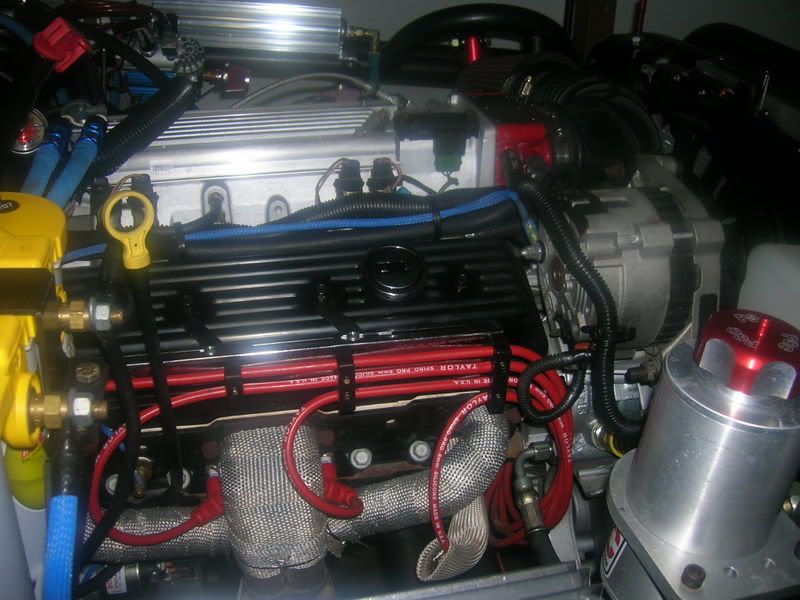
plug wires
i got mine from auto zone for 37$ 7mil stockers and it took about 2hr #2 is a bia had to pull the alt and finally got that one done 4,6,8 are easy i didnt put them back inside of the stock clips because it was too frustrating so i used regular seperators then 1,3,5 are simple and 7 takes a few min to get the new one to go back threw the hole no to bad if your gonna do it i'd change the plugs as well oh if you do decide to drop the starter try not to break the power lug off lol that was a 200$ mistake i made
Chnaging plug wires on an LT1 is a real pain. It could take anywhere from 2 to 10 hours.
Don't be afraid to remove stuff that is in the way, like alt and starter.
Cheap wires are NOT the way to go; I like MSD, but another great option is the Thunder over the valve cover kit. Using the stock brackets is important, unless you want to replace burned wires frequently. There is a reason the #7 goes all the way to the back of the block and back to the plug.
Wires MUST be secured against any contact with the manifold/headers. If you skip this or 'just use regular separators' you'll be doing it all over again soon.
FWIW, I believe the Mitchell's guide calls for somewhere between 4 and 6 hours.

On The Tree
Joined: Jul 2005
Posts: 155
Likes: 0
From: Portsmouth, Ohio
Jeg's Pow'r Wires $29.99 I actually bought a set of those and MSD 8.5mm S/C. The Jeg's brand are my backup set of wires. They are a bit of a pain. Take your time with them. It'll be an experience, if it's a pleasent one, that's up to you.
Trending Topics
LS1 Tech Stories
The Best V8 Stories One Small Block at Time

Gas Monkey Built a 6-Wheel Ferrari Testarossa With a Corvette LT4 Engine
Verdad Gallardo
7 Most Reliable High-Performance Engines GM Has Ever Built
Verdad Gallardo
Amazing '71 Camaro Restomod Is Modern Muscle Car Under the Skin
Verdad Gallardo
6 Common C5 Corvette Failures and What's Involved In Repairing Them
Pouria Savadkouei
Retro Modern Bandit Pontiac Trans AM Comes With Burt Reynolds' Autograph
Verdad Gallardo
Top 10 Greatest Cadillac V Series Performance Models Ever, Ranked
Pouria Savadkouei
Top 10 Most Powerful Chevy Trucks Ever Made!

Hennessey's New Supercharged Silverado ZR2 Has 700 HP
Verdad Gallardo
Coachbuilt N2A Anteros Is an LS2-Powered C6 Corvette In Italian Clothes
Verdad Gallardo


I put on some stock replacement ones from Advanced for my car. I looked everything over carefully to make sure none were touching the headers. I refuse to use the thunder racing kit and will NEVER reccomend it to anyone. I will NEVER custom make a set of those wires ever again. They are absolute crap.

Teching In
Joined: Oct 2007
Posts: 15
Likes: 0
The problem that I have found with the MSD SC wire are the Spark Plug boots are a little too thick or at least in my case. I am running block hugger headers and I had to replace them after my second trip out. FWIW the Taylor wires are pretty nice and this time I routed them over the headers. It looks nice and seems to be working well.

TECH Fanatic
Joined: May 2006
Posts: 1,230
Likes: 0
From: Lexington,MO
Since you have headers get some wrap for your wires especially if there not coated. Also I really like my MSD 8.5 SC wires. Also what plugs are you running? If your running a a stock plug you might want to switch to a NGK TR55 the overall length of the plug is shorter and helps with clearance.

Launching!
Joined: Sep 2007
Posts: 245
Likes: 1
From: Clover, South Carolina
I did mine for the first time on an LT1 in an fbody, yesterday, and man what a PITA! Took about 6 hours or so I think. I could definitely do them quicker next time. I can give some suggestions based off my experience of doing them once, so take it for what its worth.
1. Remove the alternator.
2. Do cylinder 1,3,5, and 7 from the bottom.
3. Do cylinders 2,4, and 6 from the top. With the alternator removed, this is possible and much easier than doing it with the alternator in place.
4. Do cylinder 8 from the bottom.
5. A 15-18" breaker bar with a swivel head is VERY useful. I'm not sure I'd be done yet if I didn't have that tool.
That's what I learned the first time out. I would guess it would take about 2 hours if I had to do it again. I used a standard 3/8" drive, a spark plug socket, a 3 inch 3/8" extension, and the breaker bar I mentioned. (of course other tools to remove the alternator) For me, it was time very well spent. Whoever had this car before me wasn't the most intelligent person in the world, and that's being nice. This 95 bird is a project car for me, and most of what I've worked on so far is undoing or fixing things the previous owners did wrong. (or who they had work on it). Some examples, cylinder 8's spark plug was half threaded. 2 other plugs were not tight. Cylinder 8's plug wire was the OEM stock plug wire. Obviously someone decided it was just too hard. I will admit, cylinder 8 was a pain. I would say, this is the toughest car I've ever changed plugs and wires on. I was physically worn out from just doing this job.

TECH Resident
Joined: Feb 2006
Posts: 934
Likes: 0
From: Panama City Florida
It took me 8 to 10 hours the 1st time I changed the plugs and wires. It was a real pain to do so I would suggest using good wires when you do it. I made the mistake of cheaper wires and had to do it again. I used MSD super conductors and boot protectors the last time and took my time doing them. Routing is very important as well as zip ties came in handy! Just know it will be tough the 1st time and have some patience!


Teching In
Joined: Jun 2007
Posts: 19
Likes: 0
From: Fort Myers, FL
TECH Resident
Joined: Feb 2006
Posts: 934
Likes: 0
From: Panama City Florida