


How To Install PS LT's...Write-up!
Thread Starter
10 Second Club
iTrader: (66)
Joined: Mar 2007
Posts: 1,378
Likes: 0
From: Indianapolis, IN
Ok! So I just installed my Pacestter Long-Tubes and they are awesome. I went with a set or "RACE" style ceramic coated LT's and an ORY! I was gonna hook it up to my Hooker Catback, but instead I just hooked it up to a Moroso Spiral Flow Muffler and dumped it before the rear axle. And before someone asks  YES- It's LOUD.
But anyways; I just wanted to start this thread to let the newbies know that this mod is a GREAT mod to put on the to-do-list! I noticed quite a bit of difference in mid range and top-end power. Not any in Low end but it didn't hurt it none at all.
Anyways Just so people also know. I see ALOT of threads about the "Famous O2 extensions" and how PS LT's comes with wire to extend your factory wires...... Screw that!
I'll let everyone here in on a little secret on what to do. I went to the junkyard and found a 95-96 style s10 Chevy Blazer with the 4.3L v6 in it and if you go to the Passenger side and look in the wheel well you can see where the o2 wiring harness runs. NOW you can do this either way....Start at the o2 sensors and cut the wires off at the base of the o2's or you can start at the Connector up by the HVAC box and unplug the harness there or you can do what I did and cut the harness between the wheel well, You'll need BOTH Male and Female Connector Ends and the whole harness to make the extensions. Then once you get the WHOLE harness out of the Blazer (which cost me $15.00) I took them home and turned the Male and Female ends away from each other and measured 12" and 24" and then soldered the 2 4-way plugs and wires back together. I just hooked up the 2 ends and followed the colors of the wires and soldered them together as they would be when they were connected....The colors of the wires don't match the colors on the connectors. They worked like a charm when I got them installed. I have not thrown any codes what so ever.
NEXT: I know someone is always wondering what to do about the EGR and AIR when installing "RACE" style headers that eliminate them. Well Here is what I did.....
First I took the EGR Tube off of the factory Exhaust Manifold and I plugged it off with a rubber cap that you can buy at ANY Parts Store in the help section. It's originally used for radiator hose block off's but hell it worked. Then I went to the EGR valve and just un hooked the vacuum port on the drivers side of the Intake manifold and Plugged it with another rubber cap. After that I took the other end of the vacuum hose from EGR and just plugged it with a screw since it still had the rubber piece on it that slid onto the port on the manifold. Ok thats all I did about that and since my install I have not had any Service Engine Soon lights come on or anything and what really messes with me is my computer isn't even tuned yet for NO EGR and it has yet to set a code and I know the Bulb isn't out b/c I see it come on when I start the car....So I dunno about that but hey it's cool with me
Next if your planning on installing the PS LT's and you need some help with what all is involved then I can also help out a little bit......
1) Disconnected the Battery
2) I removed the Y-pipe from the car
3) Removed the starter
4) Took the EGR tube loose from the Passenger side Exhaust Manifold
5) Removed all of the Spark Plugs and Wires
6) Took out the Oil Level Sensor, Oil Filter, and Took out the Drivers side Motor Mount Bolt to allow me to jack up the Drivers side of the engine to slide the header in.
7) Then I removed the 6 bolts on each side of the heads that held the Manifolds on... Keep in mind you need to take your time with this or you'll break some bolts off in your heads and you'll have to drill them and extract them out. It will suck trust me BTW Penetrant is your friend.... Soak all of the bolts you can more than once if possible.
8) Once I got the manifolds out of the car I removed the steering linkage. Then I slid the drivers side header in through the top. It won't fit through the bottom. If you can make it But I couldn't, and it was easy from the top. Bolt in down and your done...
9) Then for the Passenger side, you'll want to slide it up from the bottom and it will Damn near fall into place. Took me 30 seconds HONEST! Then bolt them down and your done there....
10) Next I put back the steering linkage so I didn't have to worry about turning the wheels or Steering column, Although I suggest Locking the steering wheel in place as I did!
11) Then re-install the Oil Level Sensor, Oil Filter (NEW), starter, and the plugs and wires as well. Be sure to tie EVERY wire and Plug Wire away from the headers...I used Zip Ties and they worked great. Don't forget about the Motor mount bolt you took out!
12) Next install the Y-Pipe (Some cars require you to lower the transmission crossmember to allow for the Y-Pipe to slide on. Mine did not though.
13) Put in the o2 sensors and now you can run the Extensions... I ran my Passenger side extension along the trans. lines and zip tied them there. My drivers side Extensions I ran along my Transmission where the Converter shield is and zip tied it up there.
14) Next I went to the exhaust and hooked that up...Just put on a Spiral Flow Muffler, But this is where you'd Cut your catback to fit into the Y-pipe...
15) After thats done you can take care of the EGR and AIR and anything else you had to unhook and thats pretty much it! I took the A/C compressor loose to help gain access to the #2 plug but it wasn't really necessary. And I also cut out the AIR tube that ran along the bottom and top of both sides of the manifolds and threw it away.
16) Hook up the Battery, Start up the car and check for exhaust leaks.
17) Now.... Your done!
18) Take it for a spin and enjoy!!!
Well thats how I did my header install and how I got rid of the AIR, EGR, and Catback So I hope this helps someone out. I know when it came to me looking up info on how to do this I couldn't find it ANYWHERE so I just thought It may help someone out.... Good Luck and Thanks for reading. 

James
And P.S.) if anyone needs to ask me any questions about the install feel free to PM me and I'll get back to you!
YES- It's LOUD. But anyways; I just wanted to start this thread to let the newbies know that this mod is a GREAT mod to put on the to-do-list! I noticed quite a bit of difference in mid range and top-end power. Not any in Low end but it didn't hurt it none at all.
Anyways Just so people also know. I see ALOT of threads about the "Famous O2 extensions" and how PS LT's comes with wire to extend your factory wires...... Screw that!
I'll let everyone here in on a little secret on what to do. I went to the junkyard and found a 95-96 style s10 Chevy Blazer with the 4.3L v6 in it and if you go to the Passenger side and look in the wheel well you can see where the o2 wiring harness runs. NOW you can do this either way....Start at the o2 sensors and cut the wires off at the base of the o2's or you can start at the Connector up by the HVAC box and unplug the harness there or you can do what I did and cut the harness between the wheel well, You'll need BOTH Male and Female Connector Ends and the whole harness to make the extensions. Then once you get the WHOLE harness out of the Blazer (which cost me $15.00)
I took them home and turned the Male and Female ends away from each other and measured 12" and 24" and then soldered the 2 4-way plugs and wires back together. I just hooked up the 2 ends and followed the colors of the wires and soldered them together as they would be when they were connected....The colors of the wires don't match the colors on the connectors. They worked like a charm when I got them installed. I have not thrown any codes what so ever. NEXT: I know someone is always wondering what to do about the EGR and AIR when installing "RACE" style headers that eliminate them. Well Here is what I did.....
First I took the EGR Tube off of the factory Exhaust Manifold and I plugged it off with a rubber cap that you can buy at ANY Parts Store in the help section. It's originally used for radiator hose block off's but hell it worked. Then I went to the EGR valve and just un hooked the vacuum port on the drivers side of the Intake manifold and Plugged it with another rubber cap. After that I took the other end of the vacuum hose from EGR and just plugged it with a screw since it still had the rubber piece on it that slid onto the port on the manifold. Ok thats all I did about that and since my install I have not had any Service Engine Soon lights come on or anything and what really messes with me is my computer isn't even tuned yet for NO EGR and it has yet to set a code and I know the Bulb isn't out b/c I see it come on when I start the car....So I dunno about that but hey it's cool with me
Next if your planning on installing the PS LT's and you need some help with what all is involved then I can also help out a little bit......
1) Disconnected the Battery
2) I removed the Y-pipe from the car
3) Removed the starter
4) Took the EGR tube loose from the Passenger side Exhaust Manifold
5) Removed all of the Spark Plugs and Wires
6) Took out the Oil Level Sensor, Oil Filter, and Took out the Drivers side Motor Mount Bolt to allow me to jack up the Drivers side of the engine to slide the header in.
7) Then I removed the 6 bolts on each side of the heads that held the Manifolds on... Keep in mind you need to take your time with this or you'll break some bolts off in your heads and you'll have to drill them and extract them out. It will suck trust me
BTW Penetrant is your friend.... Soak all of the bolts you can more than once if possible.8) Once I got the manifolds out of the car I removed the steering linkage. Then I slid the drivers side header in through the top. It won't fit through the bottom. If you can make it
But I couldn't, and it was easy from the top. Bolt in down and your done...9) Then for the Passenger side, you'll want to slide it up from the bottom and it will Damn near fall into place. Took me 30 seconds HONEST! Then bolt them down and your done there....
10) Next I put back the steering linkage so I didn't have to worry about turning the wheels or Steering column, Although I suggest Locking the steering wheel in place as I did!
11) Then re-install the Oil Level Sensor, Oil Filter (NEW), starter, and the plugs and wires as well. Be sure to tie EVERY wire and Plug Wire away from the headers...I used Zip Ties and they worked great. Don't forget about the Motor mount bolt you took out!
12) Next install the Y-Pipe (Some cars require you to lower the transmission crossmember to allow for the Y-Pipe to slide on. Mine did not though.
13) Put in the o2 sensors and now you can run the Extensions... I ran my Passenger side extension along the trans. lines and zip tied them there. My drivers side Extensions I ran along my Transmission where the Converter shield is and zip tied it up there.
14) Next I went to the exhaust and hooked that up...Just put on a Spiral Flow Muffler, But this is where you'd Cut your catback to fit into the Y-pipe...
15) After thats done you can take care of the EGR and AIR and anything else you had to unhook and thats pretty much it! I took the A/C compressor loose to help gain access to the #2 plug but it wasn't really necessary. And I also cut out the AIR tube that ran along the bottom and top of both sides of the manifolds and threw it away.
16) Hook up the Battery, Start up the car and check for exhaust leaks.
17) Now.... Your done!
18) Take it for a spin and enjoy!!!
Well thats how I did my header install and how I got rid of the AIR, EGR, and Catback
So I hope this helps someone out. I know when it came to me looking up info on how to do this I couldn't find it ANYWHERE so I just thought It may help someone out.... Good Luck and Thanks for reading. James
And P.S.) if anyone needs to ask me any questions about the install feel free to PM me and I'll get back to you!
Thread Starter
10 Second Club
iTrader: (66)
Joined: Mar 2007
Posts: 1,378
Likes: 0
From: Indianapolis, IN
I do have a few pics.... I'll try and post them up as soon as I get home tonight. I'm at work right now and will be till about 8 ish....
Ground clearance is excellent BTW. The only thing I've scraped on was a HUGE speed bump in an apartment complex....Hell I probably would've damn near scraped my catback with the factory y pipe on it.
Ground clearance is excellent BTW. The only thing I've scraped on was a HUGE speed bump in an apartment complex....Hell I probably would've damn near scraped my catback with the factory y pipe on it.
Nice writeup. I prefer buying actual extensions, i dont like cutting wires.
The install is a snap when you unmount the engine. From now on i wont even bother trying to slide one in, the mounts are so easy.
The install is a snap when you unmount the engine. From now on i wont even bother trying to slide one in, the mounts are so easy.
Trending Topics
LS1 Tech Stories
The Best V8 Stories One Small Block at Time

Gas Monkey Built a 6-Wheel Ferrari Testarossa With a Corvette LT4 Engine
Verdad Gallardo
7 Most Reliable High-Performance Engines GM Has Ever Built
Verdad Gallardo
Amazing '71 Camaro Restomod Is Modern Muscle Car Under the Skin
Verdad Gallardo
6 Common C5 Corvette Failures and What's Involved In Repairing Them
Pouria Savadkouei
Retro Modern Bandit Pontiac Trans AM Comes With Burt Reynolds' Autograph
Verdad Gallardo
Top 10 Greatest Cadillac V Series Performance Models Ever, Ranked
Pouria Savadkouei
Top 10 Most Powerful Chevy Trucks Ever Made!

Hennessey's New Supercharged Silverado ZR2 Has 700 HP
Verdad Gallardo
Coachbuilt N2A Anteros Is an LS2-Powered C6 Corvette In Italian Clothes
Verdad Gallardo
I have problems withmy pacesetters, the passenger side sits like 1/4" away fromt he floorboard and on the driver side it doesn't line up right, idk what im gonna do about the D side b/c its about 1/2" too high, what i mean is if you tried to hook up an exhaust you wouldn't be able to on the D side b/c the subframe is in the way, its hard to explain im going to get pictures and make a post about it...
Thread Starter
10 Second Club
iTrader: (66)
Joined: Mar 2007
Posts: 1,378
Likes: 0
From: Indianapolis, IN
Personally, I would've ordered the O2 extensions too, but a friend of mine was wondering if you could just cut a harness off of a another car and if it would work.... And since I'm a do-it-your-self-er, I tried it and it works. But I just thought I'd share that with everyone b/c if it helps hey....Why Not!
Thread Starter
10 Second Club
iTrader: (66)
Joined: Mar 2007
Posts: 1,378
Likes: 0
From: Indianapolis, IN
I have problems withmy pacesetters, the passenger side sits like 1/4" away fromt he floorboard and on the driver side it doesn't line up right, idk what im gonna do about the D side b/c its about 1/2" too high, what i mean is if you tried to hook up an exhaust you wouldn't be able to on the D side b/c the subframe is in the way, its hard to explain im going to get pictures and make a post about it...
I know on the drivers side that the header aims upwards and thats why in the ORY Pipe from Pacesetter, they actually bend the pipe inwards a little to clear the car. Thats the only way to hook up a exhaust to them as far as I know. Just buy the ORY from PS or you can get a custom exhaust thats bent right there at the subframe. Post a few pics and I'll check them out and see If I can't help you a little more......
James


well I really want/have to run true duals b/c they're cheaper and its so close of a clearance issue its not gonna make a difference, I can't get pics until the weekend, I'll try explaining it better. you know how on the bottom of the car there is the subframe running front to back right? well there is also a frame part about 10 inches behind that that runs perpendicular to it (it runs right and left) and what happened is the collector comes down and is high so what happens is that 2nd frame part is in the way of being able to put an exhaust on, ok heres what i'll do, I'll try and draw a picture of it in paint lol and post it in here thanks dude.
https://ls1tech.com/forums/lt1-lt4-modifications/783145-my-new-exhaust-dyno-numbers.html
Thread includes pictures and all.
Thread includes pictures and all.
Thread Starter
10 Second Club
iTrader: (66)
Joined: Mar 2007
Posts: 1,378
Likes: 0
From: Indianapolis, IN

Thread Starter
10 Second Club
iTrader: (66)
Joined: Mar 2007
Posts: 1,378
Likes: 0
From: Indianapolis, IN
Here are a few pics of what it looks like for now, thinking about running some pipes over the rear end or I may just wait till my 383 is done and do the X-Pipe with TD's....
http://i275.photobucket.com/albums/j...s/P3080023.jpg
http://i275.photobucket.com/albums/j...s/P3080020.jpg
http://i275.photobucket.com/albums/j...s/P3080032.jpg
http://i275.photobucket.com/albums/j...s/P3080030.jpg
http://i275.photobucket.com/albums/j...s/P3080024.jpg
http://i275.photobucket.com/albums/j...s/P3080026.jpg
Thread Starter
10 Second Club
iTrader: (66)
Joined: Mar 2007
Posts: 1,378
Likes: 0
From: Indianapolis, IN
well I really want/have to run true duals b/c they're cheaper and its so close of a clearance issue its not gonna make a difference, I can't get pics until the weekend, I'll try explaining it better. you know how on the bottom of the car there is the subframe running front to back right? well there is also a frame part about 10 inches behind that that runs perpendicular to it (it runs right and left) and what happened is the collector comes down and is high so what happens is that 2nd frame part is in the way of being able to put an exhaust on, ok heres what i'll do, I'll try and draw a picture of it in paint lol and post it in here thanks dude.
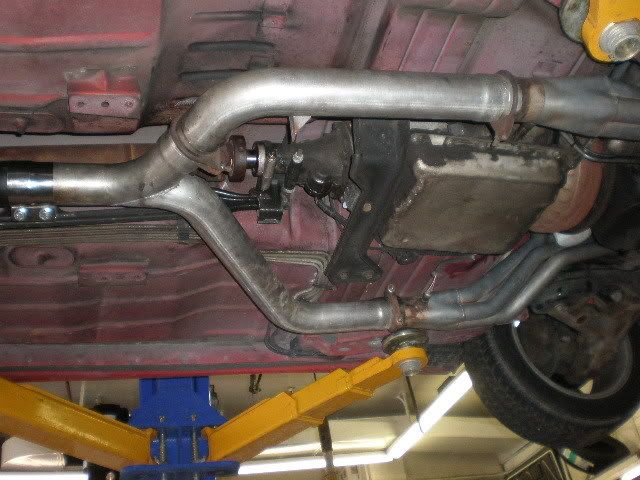
Hey buddy, Look at this picture, and tell me if the part where the Y-Pipe connects on the drivers side, (just before that; where the Transmission Crossmember also connects to), are you talking about the frame rail that runs from side to side where the fuel lines all run along??? If so thats what I was talking about. The only real way to run an exhaust there would be to have an exhaust put on where they'd have to put some kind of pipe that angled down first and then went upwards...or run the y-pipe like I was saying earlier....Or you could put a pipe in a vice to flatten it there where the frame rail is and then weld up an exhaust pipe or something on the other side of that...LMK if I can help anymore...And if this helps, Good Luck with it....
James
Ya man thats EXACTLY what im talking about!!!!!!!!!!!!!!!!!!!!!
wow I can't believe you understood my bad explanation, okay heres the thing, the collector is only like 1/4" high and i'd probably have to bend in the pipe like you said just a touch more than that maybe 3/8". to have a little clearance I have rock hard prothane poly E/T mounts. so ya I guess I'll just do what you did and bend in the pipe to my 2.5" true duals a little, thats probably the best/easiset way don't you think.
wow I can't believe you understood my bad explanation, okay heres the thing, the collector is only like 1/4" high and i'd probably have to bend in the pipe like you said just a touch more than that maybe 3/8". to have a little clearance I have rock hard prothane poly E/T mounts. so ya I guess I'll just do what you did and bend in the pipe to my 2.5" true duals a little, thats probably the best/easiset way don't you think.
Thread Starter
10 Second Club
iTrader: (66)
Joined: Mar 2007
Posts: 1,378
Likes: 0
From: Indianapolis, IN
Your explanation wasn't too bad, it could have been alot worse. LOL
Definentely the easiest way to do it. Like I said in the PM, use a vice if it helps to make the indention in the tube and then hook it up to the LT's. A band clamp is probably the easiest way to install an exhaust system and I don't hear any leaks from mine.... Although I forgot to mention I used a pipe expander to open up the Y-Pipe a little more to help get it to slide onto the Headers. Although my Headers and Y-pipe were both used.....If it helps try it. Glad I could help you out. If you have any more questions please feel free to ask. I don't mind helping people out when it comes to these cars. I love F-Bodies and hell just about all of my friends I hang out with I've met b/c they drive a F-Body or a muscle car of some kind. I met most of them at local hangouts on the southside where we all cruise on the weekends. Well Hope you get it straight and shoot me a PM when it's done. And take some pics.....
Later Man!
James
ya man I'm really bankin on gettin everything buttoned up this weekend (hopefully lol) but ya I was gonna ask you, you think just a regular U exhaust band clamp is the best?
The thing with mine is I plan on running 2.5" TD's (haven't bought yet) so what would you recommend as far as connecting them to the bigger header collector ?
The thing with mine is I plan on running 2.5" TD's (haven't bought yet) so what would you recommend as far as connecting them to the bigger header collector ?