


Stock Shock and Suspension Travel Specs
Thread Starter
Joined: Sep 2004
Posts: 6,814
Likes: 3
From: Hou. TX.
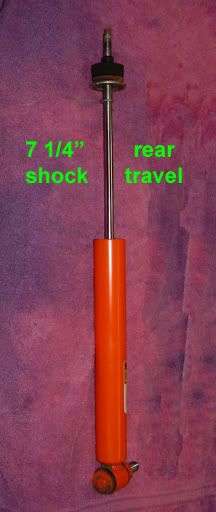
The stock rear shock travel is 7 1/4". This equals 8" of travel at the wheel.
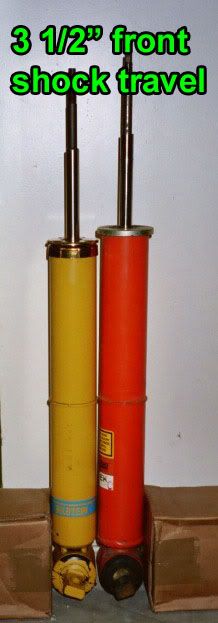
The stock front shock travel is 3 1/2". This equals 6" of travel at the wheel.
PART 1: THE REAR
This section is all about the axle moving up and down equally like going through a dip in the road. Extreme rear axle twist is in Section 3.
I have a 99 T/A that had the stock rear springs and stock DeCarbon shocks.
A while back I completely removed the rear bumpstops and cut most of it's lip off so my 11' rims won't come in contact.
I put it on a "drive on" lift and started measuring.
Unlike what is commonly believed, the rear axle will contact the exhaust going over the top before there is metal to metal contact where the bumpstops were. It will also hit it before the shocks will bottom out. (Based on both sides moving together, Cornering is a different story. See Part 3)
I never noticed my car bottoming out on the metal bumpstop tabs like everyone thought it would. Now it may be different under a cornering load, check Part 3. The shock bottoms out (3/4") before it can make metal to metal contact on the bumpstop tabs and will hit the exhaust pipe 1/4 inch before that. Very interesting stuff (to me at least).
From what I've concluded, if I were to take out my rear springs and lowered the car straight down:
1. The passenger side axle would hit the exhaust and the drivers side would bottom the shock.
2. The exhaust would move up 1/4" due to it's rubber mounts and then the passenger side shock would bottom out.
3. There would be 3/4" before the axle would hit the body. Also keep in mind that the shock has rubber mounting bushings top and bottom. If you were to compress them hard enough, you might just make contact between axle and body.
__________________________________________________ __
PART 2: THE FRONT
On the front, the shock travel is not directly related to the wheel travel. There is what's called a motion ratio. For every inch the shock moves, the wheel moves 1.7 inches. So it's a motion ratio of 1.7 to 1. (The back has a motion ratio too, but it's tiny.)
The shock piston shows 2 3/4" travel from full extension to the factory bumpstop (which is 1 3/8" thick of foam looking stuff). I figure that bumpstop will compress about 3/4" total. So total shock travel is about 3 1/2". Without the bumpstop, actual shock travel is 3 5/8".
I want to mention the most interesting thing I tested. I set some zip ties low on the piston shaft and did a quick stop from about 35mph. The front compressed all the way down to the bumpstops. Man, that surprised me. No wonder the nose dive is so bad. I think those DeCarbon shocks just plain suck.
I also did a little normal driving, avoiding any dips to get a real world idea of how much the front was compressing. All I can say is that it hit the bumpstops. Man that sucks, too.
__________________________________________________ ___
PART 3: REAR UNDER CORNER LOAD
For these measurments I removed the spring on the drivers side and unbolted the driverside lower shock bolt. I left the spring and shock in on the passenger side and let it drop down as far as the shock would allow. I then raised the drivers side of the axle all the way until it stopped. This is close to what it would be like under maximum cornering. Remember, the bumpstops are removed. I chose this side so the exhaust wouldn't be a limiting factor.
The limit on my car was the tire. The wide 315 moved up and tilted inward (like strong negative camber) and the inside top of the tire rubbed against the inner fender well. I long suspected it would rub the outer lip but the increased tilt allowed it to go right past it. That was a nice surprise to me. Here are the measurements from this position.
There was still 1 1/2 inches between the axle and bumpstop mounting tab.
I pushed the shock up and it still had 1" on compression travel left.
So I don't think my car, in it's present state, could ever have metal to metal contact by the bumpstop tabs. Now a car with 245 or 275 tires my be very different. The shock could bottom out and the rubber shock bushings could compress enough that there may very well be metal contact during a hard right hand corner. A left hand corner would hit the exhaust (I'm assuming, I didn't measure that side due to it being a pain in the rear to get these cornering measurements).
__________________________________________________
LT1 Z28 FOR COMPARISON
I was able to get a few rear measurements from an LT1 Z28.
The distance from the ground to top of rear fender lip was 27". I also measured the distance from the body side LCA arm bolt (center of it) to the ground. 7 3/8 inches. Note, this is exactly 19 5/8" which is the same for my LS1 T/A. So the fender heights are directly comparable, in the rear at least.
From the metal bumpstop mounting tab to the axle was 4 7/8".
It had a thick 2 7/8" tall, tapered bumpstop.
There was 2 inches of travel between the axle and bumpstop.
I measured the distance from axle to first thing it would hit. The exhaust pipe. Distance about 3 1/2". Note it is hard to measure exactly between 2 arched pieces. This shows that the bumpstop would have to compress 1 1/2 inches on both sides before it would lightly touch the exhaust pipe. That seems like a lot. This person could probably shorten the stop by 3/4" (while maintaining the original bumpstop taper) and still not have any problems. An extra 3/4" of compression travel could make a big difference in ride quality. This is the type of thing I was talking about by maximizing the avaliable suspension travel.
I think that covers all the stuff I'm able to. If anyone else has some measurements from an aftermarket spring or shock setup, please share. If my math is wrong or you see a mistake, let me know. I'll share whatever knowledge I can with you guys.
Jason
Link to Bumpstop Spring Rates
Last edited by JasonWW; May 24, 2009 at 12:33 PM.
Thread Starter
Joined: Sep 2004
Posts: 6,814
Likes: 3
From: Hou. TX.
If I could find some kind of wire frame CAD drawing of the suspension from the side I could fill in all the various travel dimensions which would make it all easier to understand. Anyone seen such a thing?
Thread Starter
Joined: Sep 2004
Posts: 6,814
Likes: 3
From: Hou. TX.
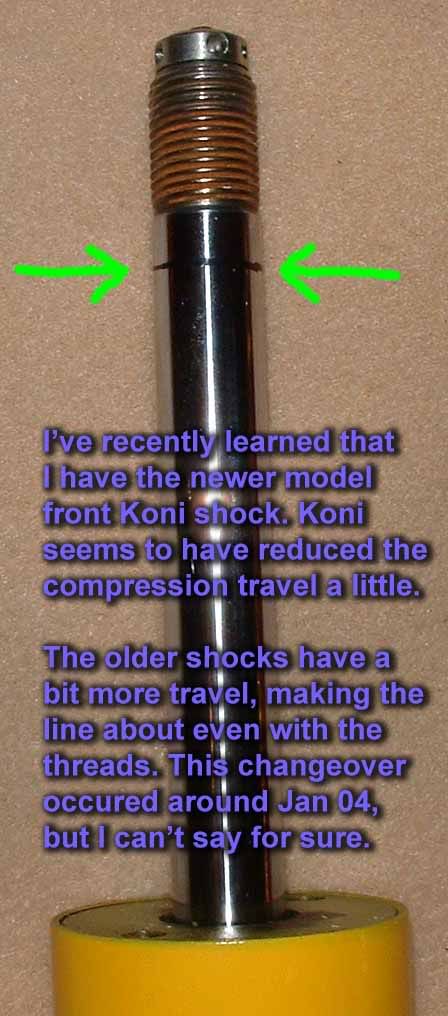
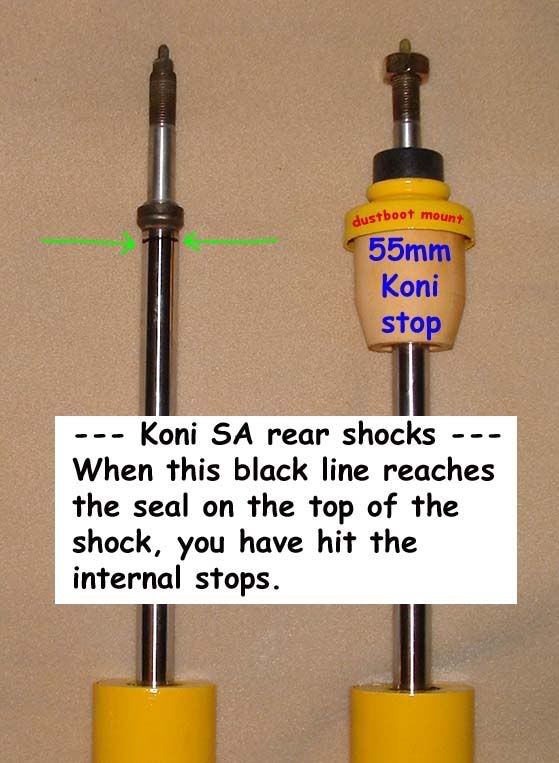
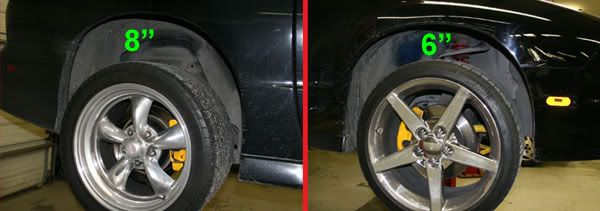
Why the stock DeCarbon shocks suck for lowered cars. I still have 1 1/2" from the tire to the metal above it.
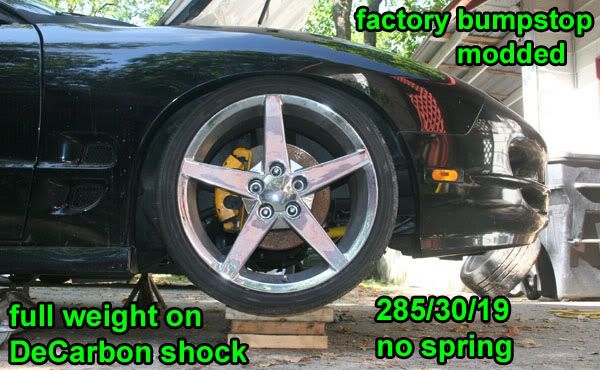
I'll show my Koni SA's next. They let the tire tuck up higher.
I'll show my Koni SA's next. They let the tire tuck up higher.
Last edited by JasonWW; May 24, 2009 at 01:03 PM.
Thread Starter
Joined: Sep 2004
Posts: 6,814
Likes: 3
From: Hou. TX.
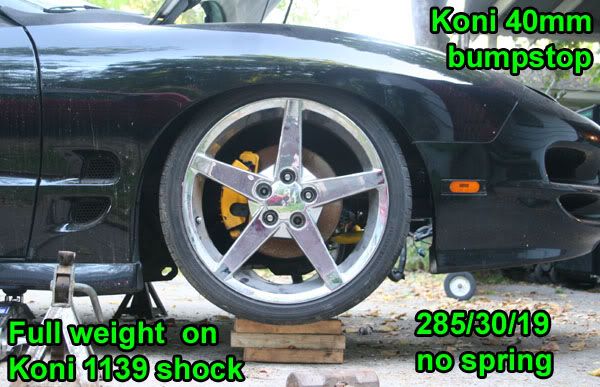
Can you see the extra compression travel the Koni shock gives you?
I also reworked the first post just to simplify things.
I also reworked the first post just to simplify things.
Last edited by JasonWW; May 24, 2009 at 01:10 PM.
Trending Topics

Staging Lane
Joined: Jan 2006
Posts: 96
Likes: 0
From: Greenville, SC
I was just looking into this idea of travel myself. My car is modded as explained in my signature.
Here is the most important background:
Most importantly for this discussion is I have Hypercoil Springs and inadequate Bilstein shocks. The distance between my bump stop and axle is about 1/2". For visualization, if I slide my middle finger between the two, both sides of my finger contact (axle and bump stop) right infront of my middle knuckle. That is SO LITTLE TRAVEL!
Now, I have been fighting a loose condition in high speed corners (65-70mph), especially those with a decreasing radius. When I first noticed this, I had a 32mm front bar and a 22mm rear bar. With that setup, the rear side-step was unpredictable and abrupt.
After talking with Sam, I have switched to a stock 19mm rear bar and the side-step is more predictable and progressive, but still there.
I know the shocks are part of the problem and this is evident when going over a dip in the road at speed (45mph or so) as the rear will hit the bump stops HARD. It is jaring and audible.
Koni's will definitely help this problem some, but frankly, with as stiff as the Hypercoil springs are, I am surprised it has this much compression in the rear.
I feel like this side-step problem is occurring when the bump stops compress enough such that the spring rate changes abruptly (gets very stiff) in the middle of the turn. The side-step occurs right at the decrease in the turn radius, which seams to support this.
Idea/question:
With the stock suspension setup having 2" of travel between the bottom of the bump stop and axle, I was wondering if it would be beneficial to trim about 1/2 to 3/4" off the bottom of the bump stops and then reshape them to match the stock taper. This way the progressive nature of the bump stops would be unchanged. The hope is that they would function as designed, but be more correctly sized for a Camaro with lowered suspension.
Thoughts?
LS1 Tech Stories
The Best V8 Stories One Small Block at Time

Topdon ONE vs. Artidiag 800 BT2: Which is the Diagnostic Tablet For You?
Pouria Savadkouei
Gas Monkey Built a 6-Wheel Ferrari Testarossa With a Corvette LT4 Engine
Verdad Gallardo
7 Most Reliable High-Performance Engines GM Has Ever Built
Verdad Gallardo
Amazing '71 Camaro Restomod Is Modern Muscle Car Under the Skin
Verdad Gallardo
6 Common C5 Corvette Failures and What's Involved In Repairing Them
Pouria Savadkouei
Retro Modern Bandit Pontiac Trans AM Comes With Burt Reynolds' Autograph
Verdad Gallardo
Top 10 Greatest Cadillac V Series Performance Models Ever, Ranked
Pouria Savadkouei
Top 10 Most Powerful Chevy Trucks Ever Made!

Hennessey's New Supercharged Silverado ZR2 Has 700 HP
Verdad Gallardo


Jason, first you are using coilovers on the front, correct? Have you compressed the fronts with stock and lowering springs? Did the springs coilbind at the point of the shock hitting the upper shock mount bumbpstop? I'm wondering if trimming the front bumpstop may introduce a coilbind situation upon compression?
I think to accurately measure the wheel travel at the front and rear, springs need to be in place. When the spring fully compresses suspension travel stops but it is entirely possible that the shock may have more compression available.
I think to accurately measure the wheel travel at the front and rear, springs need to be in place. When the spring fully compresses suspension travel stops but it is entirely possible that the shock may have more compression available.
Last edited by wannafbody; Jun 30, 2009 at 08:20 PM.
Thread Starter
Joined: Sep 2004
Posts: 6,814
Likes: 3
From: Hou. TX.
Most importantly for this discussion is I have Hypercoil Springs and inadequate Bilstein shocks. The distance between my bump stop and axle is about 1/2". For visualization, if I slide my middle finger between the two, both sides of my finger contact (axle and bump stop) right infront of my middle knuckle. That is SO LITTLE TRAVEL!
With the stock suspension setup having 2" of travel between the bottom of the bump stop and axle, I was wondering if it would be beneficial to trim about 1/2 to 3/4" off the bottom of the bump stops and then reshape them to match the stock taper. This way the progressive nature of the bump stops would be unchanged. The hope is that they would function as designed, but be more correctly sized for a Camaro with lowered suspension.
Thoughts?
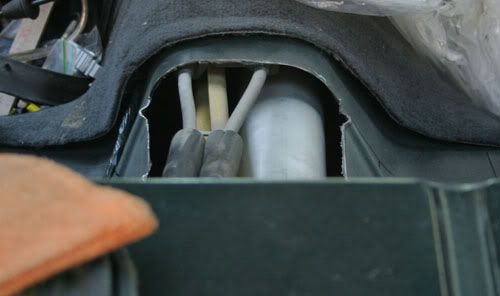
You can usually squeeze an extra 3/4" of travel out of the rear before your torque arm touches the E-brake bracket or squishes the cables. Hopefully your aftermarket arm will give you some more room. See pic below.
If you want to double check everything, put the rear of the car on jack stands, pull the springs and jack up the rear and make notes of anything that may get in the way.
Adding as little as 1/2" will make it ride and handle better. Just raising the ride height is the easist fix, but I don't know if you want to do that. If not, then trimming down the bumpstops and maybe lifting the exhaust should do the trick. Any more lowering than that and you run into many obstacles such as the gas tank, wheel wells, trans tunnel, etc...
I hope that helps.
Last edited by JasonWW; Jul 1, 2009 at 02:02 AM.
Thread Starter
Joined: Sep 2004
Posts: 6,814
Likes: 3
From: Hou. TX.
Right now I'm in the process of tubbing the rear so I can set the ride height lower than it used to be and have it ride even better.
 Just to show off:
Last edited by JasonWW; Jul 1, 2009 at 02:15 AM.
Staging Lane
Joined: Jan 2006
Posts: 96
Likes: 0
From: Greenville, SC
Yes, that is what I tell people to do all the time with their rear bumpstops. Even with the taper they ramp up in stiffness pretty fast. Just make sure you don't over compress the shocks. Different brands and models of shocks vary in compressed legnth. If the shock looks like it will be a problem, you can have a shop lower the bottom mounting hole about an inch. That will take care of that. The exhaust may touch next, but is not a big deal.
You can usually squeeze an extra 3/4" of travel out of the rear before your torque arm touches the E-brake bracket or squishes the cables. Hopefully your aftermarket arm will give you some more room. See pic below.
You can usually squeeze an extra 3/4" of travel out of the rear before your torque arm touches the E-brake bracket or squishes the cables. Hopefully your aftermarket arm will give you some more room. See pic below.
So, if the shocks on a lowered car are already compressed say 1.5" more than they would be on a stock ride height car, the shocks have less available travel before bottoming out. That is definiely a concern.
You mentioned lowering the bottom shock mounting hole. I have not looked at that area recently, but my immediate concern is if there is enough material in that area to provide adequate strength. It may be fine in daily driving, but there may be some concern on the track. I highly doubt the GM engineers just threw a bunch of wasted and useless material around the lower shock mount.
Thread Starter
Joined: Sep 2004
Posts: 6,814
Likes: 3
From: Hou. TX.
You don't have to worry about shocks being over compressed with lowering springs. It's only when you shorten the bumpstop that the shocks are allowed to compress more.
Lowering the lower shock mount hole will require cutting and welding new metal to extend it's length. I have some pics if your interested.
Lowering the lower shock mount hole will require cutting and welding new metal to extend it's length. I have some pics if your interested.
Thread Starter
Joined: Sep 2004
Posts: 6,814
Likes: 3
From: Hou. TX.
No, the metal piece that holds the dust boot should slide right off. Then I slowly worked the bumpstop over that welded piece on the rod.
Hmmm...any chance of a redesign of the shocks by Koni, because the metal piece won't come off. I've got the 3rd Gen rear Koni yellows and it looks as though this piece is welded or pressed on. Do these pics look anything like yours?
Thread Starter
Joined: Sep 2004
Posts: 6,814
Likes: 3
From: Hou. TX.
Yeah, mine are 4th gen. The basic design looks the same except that they added a weld. You should be able to cut or grind that weld so you can remove the dust boot cover.
On my car I don't use dust boots. The only reason I kept that stock dust boot bracket was to provide a strong flat surface for the bumpstop to compress against. If you want, I bet you could cut the stock brackets off and slip some thick washers to perform the same function.
No sweat.
On my car I don't use dust boots. The only reason I kept that stock dust boot bracket was to provide a strong flat surface for the bumpstop to compress against. If you want, I bet you could cut the stock brackets off and slip some thick washers to perform the same function.
No sweat.
lol...yeah you're right. I might have considered it until I took the other shock off a little while ago and found a problem. I'm adjusting them back to factory soft settings because I am changing over to some Strano springs and I noticed the adjuster button stayed depressed and wouldn't pop back and release. I kept spinning the rod and pressing the adjuster to make it release. I depressed the shock several times while pushing on the adjuster button and it finally popped back to normal. But now I can keep adjusting it counterclockwise and it never stops. I can feel the indents each time, but I can keep going forever. And when adjusting it clockwise, I get no indents, just spins. And if the shock is fully compressed by hand and released, it comes up slowly the first 3/4 of the way like normal and releases quickly the last 1/4 of travel. The other shock isn't doing this. Crap, looks like I'll have to deal with the Koni warranty. No cutting on these shocks I'm afraid. I may get it repaired and sell them and buy some 4th Gens.