Chevrolet Camaro 2010-2015: How to Adjust Parking Brake
It is well known that the parking brakes on the 5th generation Camaro has a higher than desired engagement point. With a little bit of time and effort, you can easily adjust your Camaro's parking brake to become more useful.
This article applies to the Chevrolet Camaro (2010-2015).
Parking brakes are very important for all cars, and they have to work when you need it to. Parking brakes are used mostly in cars with manual transmissions, due to the fact that there is no "park" gear like with an automatic, and you want to make sure it works properly so your car does not roll. If your parking brake engages too high, you can run the risk of it not fully engaging. If you are unhappy with your Camaro's parking brake engagement, learn how to adjust it with ease.

Materials Needed
- Jack
- Jack stands
- Wheel chocks, blocks of wood, or bricks
- Impact gun or breaker bar with extension
- 22mm, 14mm, 16mm sockets
- T30 Torx bit
Step 1 – Chock the front wheels
The first step in performing this job is to chock off the front wheels. The best way we could do this is by using blocks of wood, bricks, or purchasing wheel chocks at a local car parts store.
Pro Tip
Chocking the front wheels keep the car from rolling while the back tires are off the ground.
Step 2 – Loosen rear lug nuts
After you have chocked the front wheels, get your 22mm socket, extension, and breaker bar or impact gun to break the lug nuts loose on both rear wheels before jacking the car up.
Pro Tip
Loosening the lug nuts while the car is on the ground is easier than if it were off the ground.
Step 3 – Jack up rear of the car
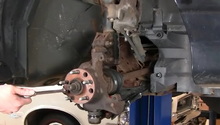
After you have loosened the lug nuts on both rear wheels, you can begin jacking up the rear of the car. The best place to put your jack is under the rear differential. After you jack up the rear of the car high enough, place your jack stands on both sides of the car on the frame. It is also a good idea to keep the jack positioned underneath the rear differential as an added safety precaution.
Pro Tip
Do not rely on just the jack to keep the car in the air; jack stands are a much safer method of keeping the car off the ground.
Step 4 – Prepare to take the brakes off
After the car is secure on the jack stands, you can finish removing the rear lug nuts and take off both wheels. Before moving any further, now would be a good time to make sure the car is in neutral and the parking brake is off (down) so you can move the rear axles freely. After you have made sure the car is in neutral, you can start talking off the rear calipers and rotors.
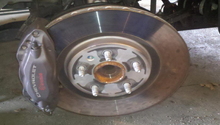
Step 5 – Remove brakes
There are two ways to remove the brakes: the first is to remove both the caliper and bracket individually, and the other is to remove the caliper and bracket as one unit. The calipers are held to the bracket by two 14mm bolts, and the bracket is held on by two 16mm bolts. To make the job quicker, you can remove the caliper and bracket all at once and simply move it out it out of the way.

Pro Tip
Never let a brake caliper hang freely by the brake line, as the weight of the caliper can cause damage to the rubber brake line.
Step 6 – Remove rotor
Once the caliper assembly is safely secured out of the way, we can begin to remove the rotor. The rotor is held on by one T30 Torx head bolt, so once you remove this, the rotor is able to be removed.
Pro Tip
If you have to use a hammer to get a stuck rotor free, use a rubber dead blow type mallet so you do not cause any damage to the rotor.
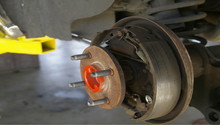
Step 7 – Adjust parking brake shoes
Once the rotor is off, you will see the parking brake assembly. To adjust the assembly, turn the adjuster nut located in the middle of the brake shoes. The best way to do this is by using a flat head screwdriver or small pry bar. Turn the adjuster upwards until the shoes are adjusted properly. To check if the shoes are adjusted properly, put the rotor back on and spin it. If the rotor spins with minimal resistance, then the parking brake shoes are adjusted properly. If you have a hard time getting the rotor to spin, take it back off and turn the adjuster downwards a couple clicks until it is easier to rotate. Repeat this on procedure on the other side and pull up on the parking brake until the desired parking brake resistance is found.
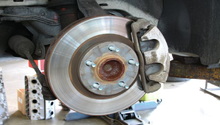
Step 8 – Reassembly
After having completed Step 7, your parking brake should be properly tension. Pull up the handbrake, grab one of the wheel studs and attempt to rotate the hubs. If they stand still, your handbrake is properly setup. From here, all that is required is reassembly.
- Reinstall the rear rotors and secure in place with the T30 locating screw.
- Fit the calipers back onto the rotors.
- Fit the wheels back to the hubs and reinstall lug nuts.
- Lower the car down and remove wheel chocks.
- Torque wheel lug nuts to 90 ft/lbs.
Featured Video: Adjusting Parking Brake on 2010+ Camaro
Related Discussions
- E-Brake Using Line Lock - LS1Tech.com
- CTS-V Calipers on 2010+ SS Rotors - LS1Tech.com