
I tryed the whistler today on my tail lights
 03-29-2008, 10:25 PM
#1
TECH Fanatic
Thread Starter
iTrader: (59)
Join Date: Jan 2007
Location: Pittsburgh,Pa
Posts: 1,736
Likes: 0
Received 0 Likes
on
0 Posts
LOL!!!I thought I was the man today guys, I thought i was on to somthing good like that whistler guy did his first time out! I sanded all the numbers & stuff off the back of one of my extra tail lights and started thinking how cool it would be to throw my tail lights in the oven ,seperate it into two halfs and paint that night shade stuff in from the back side and i wouldnt have to clear coat the outsides  I thought i was the man. LOL!! This mother f%#$@^$%# melted before it would even think !!!! of coming apart. LOL Anyways, Why is it theres so many ugly *** ,aftermarket taillights out there for our cars and not one cool set out of the bunch Not One!!!!!It pisses me off. Why cant HALO do a tail light with the lighted rings for the rear,or somthing thats copmparable to the vette?that doesnt look cheap?!LOL Sorry guys LOL!!I dont know if im pissed at the aftermarket for putting me in the spot to bake my tail light LOL!!Or at myself for doing it before asking LOL!! Screw it, Im voting the first one. LOL!!Good night BARNAT
I thought i was the man. LOL!! This mother f%#$@^$%# melted before it would even think !!!! of coming apart. LOL Anyways, Why is it theres so many ugly *** ,aftermarket taillights out there for our cars and not one cool set out of the bunch Not One!!!!!It pisses me off. Why cant HALO do a tail light with the lighted rings for the rear,or somthing thats copmparable to the vette?that doesnt look cheap?!LOL Sorry guys LOL!!I dont know if im pissed at the aftermarket for putting me in the spot to bake my tail light LOL!!Or at myself for doing it before asking LOL!! Screw it, Im voting the first one. LOL!!Good night BARNAT Last edited by barnat; 03-31-2008 at 08:29 PM. Reason: cleaned up


 03-29-2008, 11:57 PM
#4
Ok well I guess im the only one who knows what exactly he is talking about. He tried to do the Whistler mod on his tail lights and the lenses melted before they seperated. Barnat I seen a few threads about that happening.
You are stuck with stockers unless you like rice lol.
You are stuck with stockers unless you like rice lol.
03-30-2008, 12:51 AM
#5
TECH Fanatic
iTrader: (6)
Join Date: Jan 2007
Location: Calabasas, CA
Posts: 1,327
Likes: 0
Received 0 Likes
on
0 Posts
the best looking aftermarket tails ive seen are the LED ones on ebay. they would be 1000x better tho if they were more like the 93-96 tails, instead of having the t/a reverse light.
in summation, deal with the stockers. you have a muscle car anyways, no need to mess with every removable part of your car.
in summation, deal with the stockers. you have a muscle car anyways, no need to mess with every removable part of your car.


Trending Topics


 03-31-2008, 07:52 PM
#16
TECH Fanatic
Thread Starter
iTrader: (59)
Join Date: Jan 2007
Location: Pittsburgh,Pa
Posts: 1,736
Likes: 0
Received 0 Likes
on
0 Posts
03-31-2008, 08:10 PM
#18
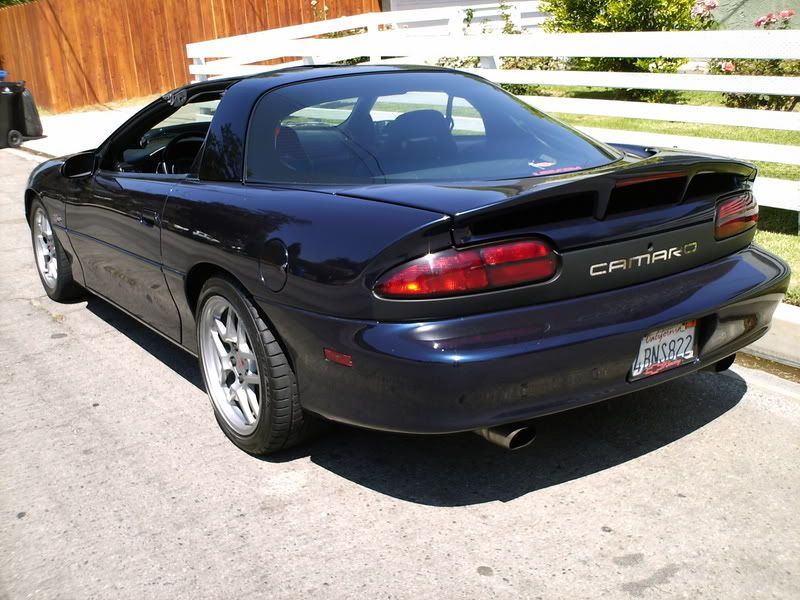
I painted them from the OUTSIDE... Here's what I did:
Take them off, tape off the area you want to paint (everything INSIDE the black lines)...
Clean it with rubbing alcohol...
Scuff it with a scotch brite pad...
Clean it with rubbing alchol (again)...
Spray thin, but COVERING, layers of translucent red paint on it one at a time...
Hold it up to the light between the layers to make sure coverage was even...
When you hold it up to the light and just see pure red (not amber or pink) you are done...
Let it dry...
Spray it with clear coat (first time I skipped this step and it looked the same, don't do this step if you've never sprayed clear coat from a can, much thicker and harder to get right) you have to keep spraying this while it is wet. If it drys between clear coats you will get a haze. Spray thick enough so that it looks WET, too little it will look dusty too much it will run...
Let it dry...
I then used a little PlastX and a cloth to "buff" it which took out any orange peel and made it look like factory.
Mine hasn't haded or anything. Sorry for the thread hi-jack
03-31-2008, 08:35 PM
#19
TECH Fanatic
Thread Starter
iTrader: (59)
Join Date: Jan 2007
Location: Pittsburgh,Pa
Posts: 1,736
Likes: 0
Received 0 Likes
on
0 Posts
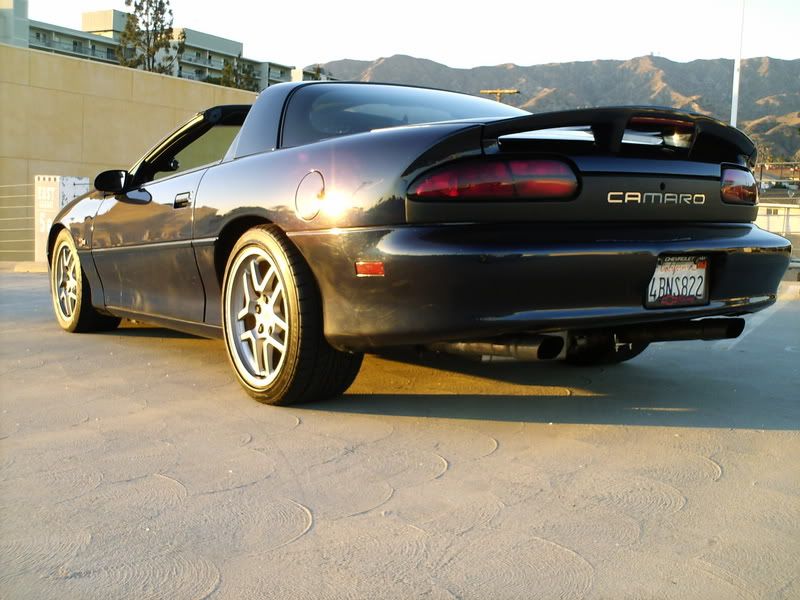
Sorry about the messed up typing guys ,The secretarys been out all week Anyways,this is the look I was trying to get from my tail lights!! and am going to get !!Now that i've seen em ,I thinkl they look better then the exports in my book. Thanks for the info and pics guy You rock LOL!! And for the guy that say this is ugly LOL!!We cant help it you got no style my man !!!!Thats your bad ,Not ours LOL!!!
Anyways,this is the look I was trying to get from my tail lights!! and am going to get !!Now that i've seen em ,I thinkl they look better then the exports in my book. Thanks for the info and pics guy You rock LOL!! And for the guy that say this is ugly LOL!!We cant help it you got no style my man !!!!Thats your bad ,Not ours LOL!!!
03-31-2008, 09:29 PM
#20
I painted them from the OUTSIDE... Here's what I did:
Take them off, tape off the area you want to paint (everything INSIDE the black lines)...
Clean it with rubbing alcohol...
Scuff it with a scotch brite pad...
Clean it with rubbing alchol (again)...
Spray thin, but COVERING, layers of translucent red paint on it one at a time...
Hold it up to the light between the layers to make sure coverage was even...
When you hold it up to the light and just see pure red (not amber or pink) you are done...
Let it dry...
Spray it with clear coat (first time I skipped this step and it looked the same, don't do this step if you've never sprayed clear coat from a can, much thicker and harder to get right) you have to keep spraying this while it is wet. If it drys between clear coats you will get a haze. Spray thick enough so that it looks WET, too little it will look dusty too much it will run...
Let it dry...
I then used a little PlastX and a cloth to "buff" it which took out any orange peel and made it look like factory.
Mine hasn't haded or anything. Sorry for the thread hi-jack
Take them off, tape off the area you want to paint (everything INSIDE the black lines)...
Clean it with rubbing alcohol...
Scuff it with a scotch brite pad...
Clean it with rubbing alchol (again)...
Spray thin, but COVERING, layers of translucent red paint on it one at a time...
Hold it up to the light between the layers to make sure coverage was even...
When you hold it up to the light and just see pure red (not amber or pink) you are done...
Let it dry...
Spray it with clear coat (first time I skipped this step and it looked the same, don't do this step if you've never sprayed clear coat from a can, much thicker and harder to get right) you have to keep spraying this while it is wet. If it drys between clear coats you will get a haze. Spray thick enough so that it looks WET, too little it will look dusty too much it will run...
Let it dry...
I then used a little PlastX and a cloth to "buff" it which took out any orange peel and made it look like factory.
Mine hasn't haded or anything. Sorry for the thread hi-jack
