

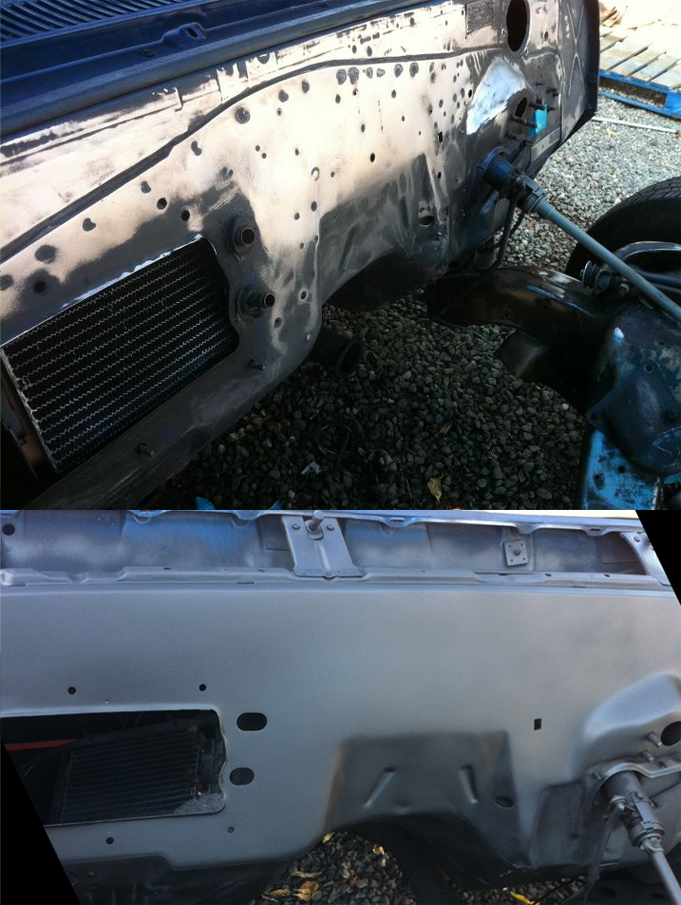
before/after FIREWALL picture - my first attempt at bodywork
 10-20-2011, 01:49 AM
#1
Launching!
Thread Starter
Join Date: Jun 2011
Posts: 213
Likes: 0
Received 0 Likes
on
0 Posts
thanks for all the help guys - here is my progress so far.
im 20 and this is my first time ever doing any kind of body work. this is the first car ive ever owned(1965 4 Door Chevelle - ive had it less than a year) and while doing a engine swap(also my first time) i thought i should smooth out the firewall while the engine was out.
the car is my DD and i worked on the firewall a few hours every friday, saturday, and sunday for the last couple weeks
i didnt really know what i was doing/getting into but my steps basically went as:
1 paint stripper
2 lots and lots of sanding until the firewall was all bare metal (bought a new orbital sander for $20 at truevalue, its badass - http://www.truevalue.com/product/35-...nder/31770.uts )
3 i took a strip of sheet metal and cut it into small pieces, then took a 5 min epoxy and glued the strips to all the holes in the firewall from inside the car (i dont know how to weld)
4 i used metal2metal by evercoat(this stuff feels hard as steel when cured) - after learning how to use it, i applied it to my firewall.
5 lots and lots of sanding
6 until everything was perfect with the evercoat(good enough where i could paint it and call it a day) - i took some bondo filler and put a thin layer all over
7 sanded almost all bondo down
8 figured out what bondo glazing was and used that a few places
9 used primer and sanded
10 repeated step 9 a few times lol
11 then i hit it all with X-O Rust Flat Black
12 i sprayed from too far away(got a uneven texture coating), so i had to sand it back down a little and hit it with the paint again
i know made a bunch of mistakes - but this is how it turned out:
Last edited by SIKHS 5; 10-20-2011 at 03:02 PM.


 10-20-2011, 08:39 AM
#4
Launching!

Join Date: Jun 2011
Location: Walnut Creek, ca
Posts: 244
Likes: 0
Received 0 Likes
on
0 Posts

Is this going to be a show car? I am shaving my firewall on my '64 Impala and I'm shaving my heater box as well. I think it looks better if it's going to be a show/driver. I am putting a vintage air under dash heater/defrost to take it's place.
10-20-2011, 02:42 PM
#6
Launching!
Thread Starter
Join Date: Jun 2011
Posts: 213
Likes: 0
Received 0 Likes
on
0 Posts
10-20-2011, 02:44 PM
#7
Launching!
Thread Starter
Join Date: Jun 2011
Posts: 213
Likes: 0
Received 0 Likes
on
0 Posts
yeah the main reason i bought the car/took on the project is because instead of just going out and buying a car thats done. id rather invest that money and my time and have something thats fast - and i can be proud to have built in the end.
Trending Topics
10-20-2011, 02:55 PM
#8
Launching!
Thread Starter
Join Date: Jun 2011
Posts: 213
Likes: 0
Received 0 Likes
on
0 Posts
hopefully i can save up enough for a Strange S60 and some slicks before summer hits
then next winter and summer save up for a 12 psi Turbo kit(KB Racing), injectors, another walbro 255, methanol injection kit(snow stage 2), and a tune.
stock wheels, fairly quiet exhaust and just a rattle can paint job when done - hopefully surprise some people at the track lol


Last edited by SIKHS 5; 10-20-2011 at 08:25 PM.


 10-21-2011, 10:15 AM
#13
TECH Enthusiast
iTrader: (6)

Join Date: Aug 2002
Location: Readsboro, VT
Posts: 529
Likes: 0
Received 0 Likes
on
0 Posts
It looks great. Just don't be too disappointed if it doesn't stay that way. Over time you may find that the materials you used expand and contract differently than the steel, and eventually may become visible. It's also possible that over time your primer may shrink, leaving "outlines" of the modified areas.
