
1969 Nova L33 swap
 04-02-2013, 02:01 PM
#41

Kirk.. been watch your Nova and the other guys threads.. Mine has been a slow progress as other things keeps getting in the way of completing my 71 Nova... but it give me time to see what the other Nova swap are doing and either use or change things that I learn from you guys. Hopefully I will get mine done or at lease running this summer.
Looking at your before picture and the 250/pg setup.. it was just like mine ! LOL.
Keep up the good work..
BC
Looking at your before picture and the 250/pg setup.. it was just like mine ! LOL.
Keep up the good work..
BC
 04-08-2013, 11:56 AM
#42
TECH Apprentice
Great updates Kirk! I know how difficult it can be to find time to get these things done but keep it up. I hope to get more progress pics/updates on my build in the coming months.
06-04-2013, 01:37 PM
#44
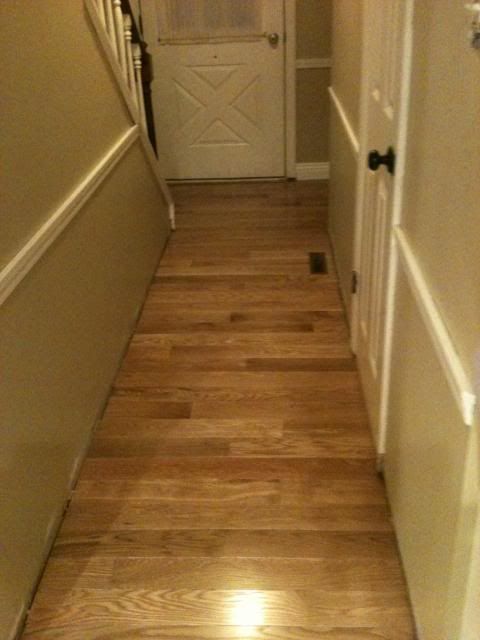
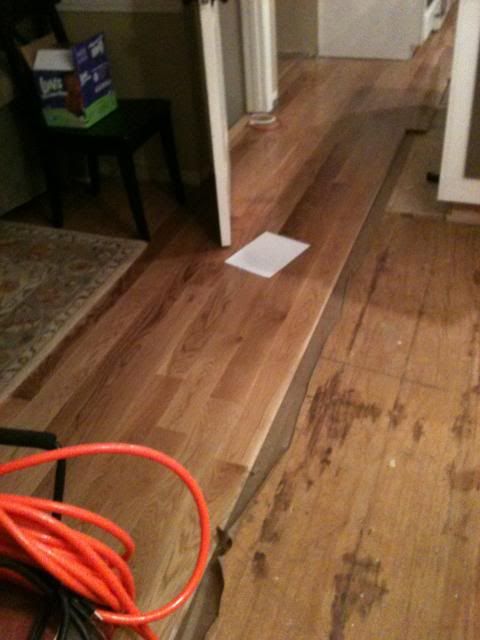
I have been watching your updates Taylor and I am definitely jealous of your progress. You are doing a great job. Me...no progress. In the garage anyway. Since April I have ripped up 1000 square feet of tile, carpet and hardwood floor and and put down new 4" white oak hardwood throughout our first floor. The same thing that happens to us with our cars happens with house projects too. You know how one thing leads to another??? So a new floor also means a new patio french door and a rebuilt deck. So as much as I would love to be out in the garage welding, grinding and painting I have been successful checking stuff off the honeydo list. Here are a few pics of the floors.

 06-10-2013, 11:43 AM
#46
TECH Apprentice
Floors look great Kirk! I completely know the feeling. We just bought our first home 1.5 years ago. I still need to put in the baseboards in our kitchen/bath that we remodeled, my knees and lower back have not been the same since laying all that tile but it was worth it. Never over... Working on the car is actually my break/therapy from all the house work.
 01-12-2014, 05:59 PM
#50
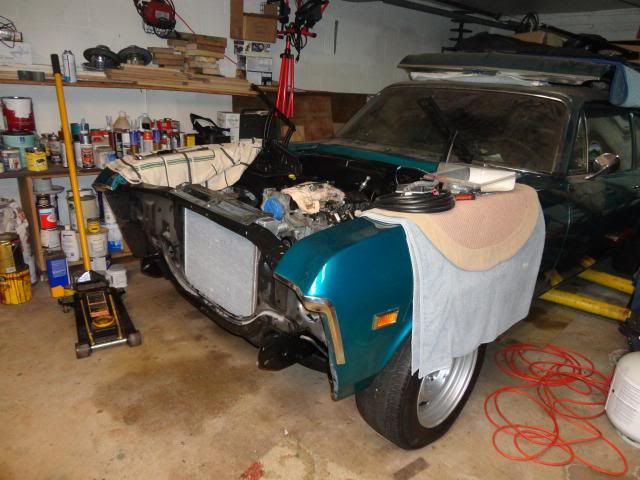
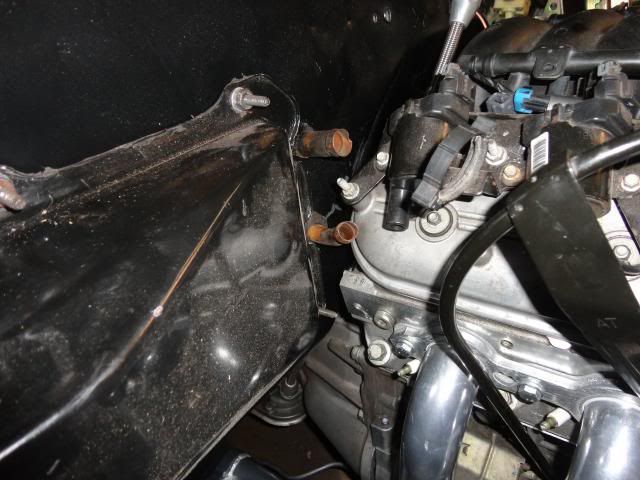
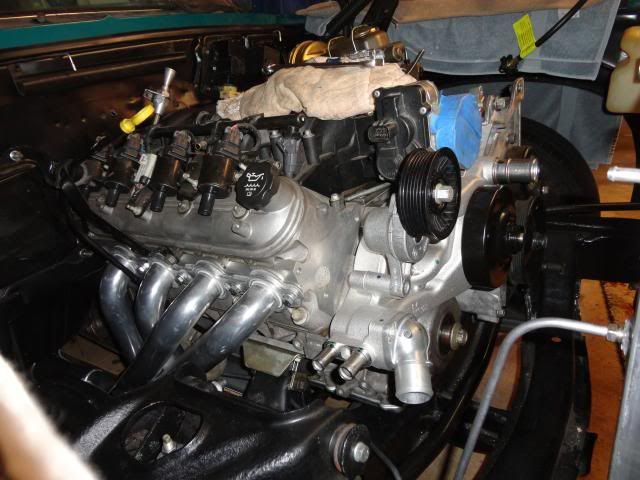
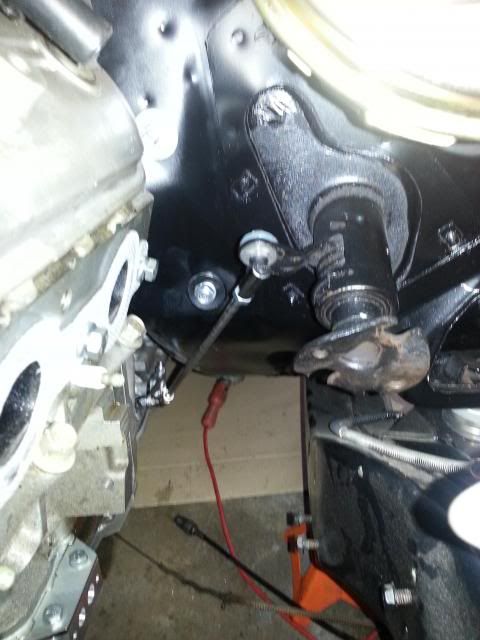
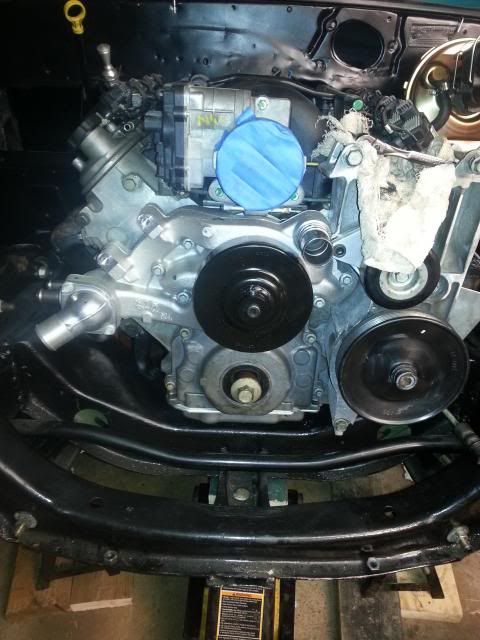
Alright, so it is official...I suck at documenting this swap. Sorry. However, I have taken a few pics and can add to the thread, a little. As the car sits now the engine is in (hopefully for the last time) and I have the fenders back on. They are not completely bolted on but I'll wait for that when I am convinced the engine will not have to come back out. When I put the subframe back on and lined it up properly and then put the engine back in the engine sat a little too far back. So I had to drill and tap out my adapter plates to bring the engine forward about 1/2" from where I originally had it.
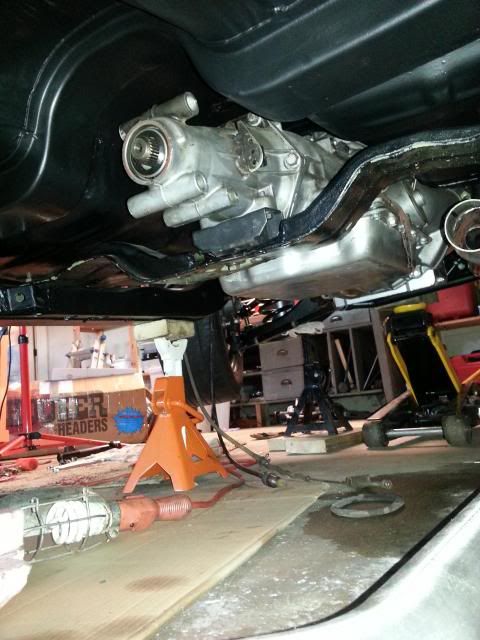
Here is my modified trans mount. I just took out a about 1 1/4" to lower the trans. When it is all said and done I may have to put some spacers to raise the back of the trans a little to correct too much of a driveline angle.
I think I can get away with using the SBC/6 cyl heater core.
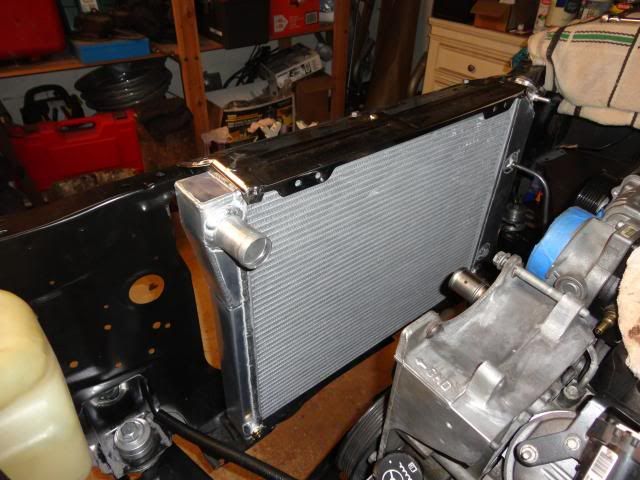
The Champion rad fits great. I'll be painting the chrome rad cover. That is a "new" used rad support from Goodmark. I was a little leery about buying it but I got it used from a guy local who only used it for mock up. So far it seems to fit...I am keeping my fingers crossed as I get further into adjusting the fenders. Mine is pretty rusty where it mounts to the frame.
The Kugel Komponents column shifter connection works great.
I got a L99 water pump that works great with truck accessories.
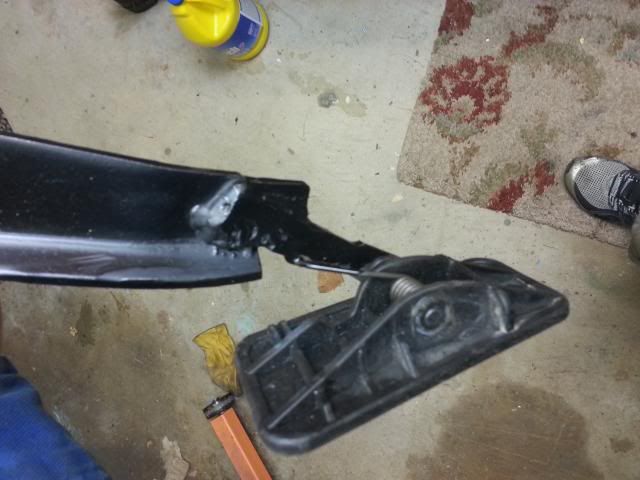
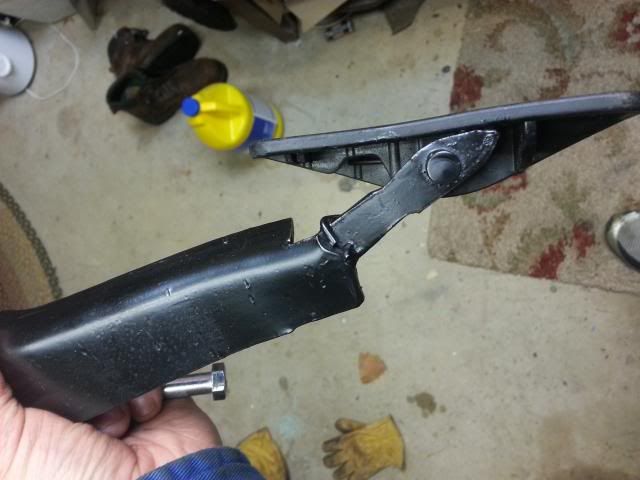
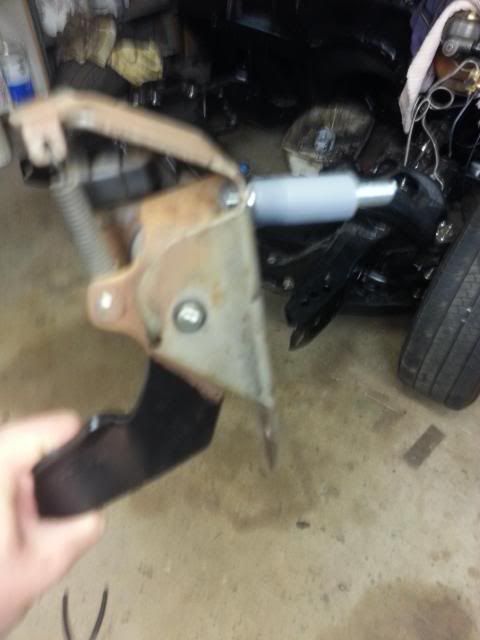
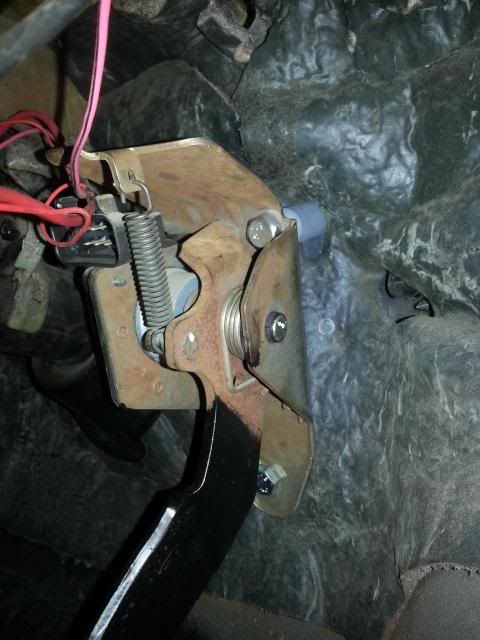
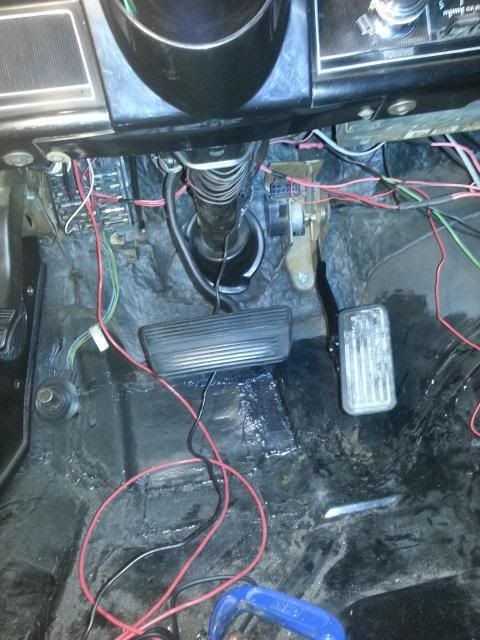
I also got my truck pedal modified to fit in the Nova. I had to cut it in half then fit it so it would allow a full movement without hitting the floor. There are two bolt hole for the truck pedal. The way it fits is the bottom bolt hole of the pedal is bolted directly to the floor. The top bolt hole needs to sit away from the about firewall about 1 1/2" in order to make its orientation correct. I used 3/8" bolts and a 1/2" iron pipe that I cut down to act as a spacer. The spacer is the grey piece in these pics.
Finally, I sent my PCM to PSI Conversions to have them reprogram it, ordered a harness, brake switch and PCM bracket. That should be here next week.
After that, I gotta get the fuel system done and then I can start it! I am gonna wait for tanks to get their 3rd gen Nova tank done. I will use their tank and pump module. I will also get a corvette filter/regulator from Tanks and some -6 fuel lines and fittings from the local speed shop, Jegs or Summit. That's it for another year!!!
Hopefully not. I can see the light at the end of the tunnel!

Here is my modified trans mount. I just took out a about 1 1/4" to lower the trans. When it is all said and done I may have to put some spacers to raise the back of the trans a little to correct too much of a driveline angle.

I think I can get away with using the SBC/6 cyl heater core.


The Champion rad fits great. I'll be painting the chrome rad cover. That is a "new" used rad support from Goodmark. I was a little leery about buying it but I got it used from a guy local who only used it for mock up. So far it seems to fit...I am keeping my fingers crossed as I get further into adjusting the fenders. Mine is pretty rusty where it mounts to the frame.

The Kugel Komponents column shifter connection works great.

I got a L99 water pump that works great with truck accessories.

I also got my truck pedal modified to fit in the Nova. I had to cut it in half then fit it so it would allow a full movement without hitting the floor. There are two bolt hole for the truck pedal. The way it fits is the bottom bolt hole of the pedal is bolted directly to the floor. The top bolt hole needs to sit away from the about firewall about 1 1/2" in order to make its orientation correct. I used 3/8" bolts and a 1/2" iron pipe that I cut down to act as a spacer. The spacer is the grey piece in these pics.


Finally, I sent my PCM to PSI Conversions to have them reprogram it, ordered a harness, brake switch and PCM bracket. That should be here next week.
After that, I gotta get the fuel system done and then I can start it! I am gonna wait for tanks to get their 3rd gen Nova tank done. I will use their tank and pump module. I will also get a corvette filter/regulator from Tanks and some -6 fuel lines and fittings from the local speed shop, Jegs or Summit. That's it for another year!!!
Hopefully not. I can see the light at the end of the tunnel!
01-13-2014, 06:10 AM
#51
Good update.
I bought the from Amazon, if you have prime it is much cheaper than anybody else.
I then got the fittings from Summit which I added to my usual weekly order so as not to pay shipping.
I am in the same boat as you waiting for Tanks to get their EFI tank production in for the Novas. What are you using for the fuel line and how are you routing it?
 Glad the Nova is coming along. Keep hauling and you'll be ready for summer!
01-13-2014, 04:41 PM
Glad the Nova is coming along. Keep hauling and you'll be ready for summer!
01-13-2014, 04:41 PM
#53
Very happy to see progress!
Is it just the photo or do you have the radiator support cut out wider than your radiator on the driver's side? You may need to fill that gap in to prevent air flow around the radiator. I think the wider cutout is for big block radiators, though I'm not sure.
Is it just the photo or do you have the radiator support cut out wider than your radiator on the driver's side? You may need to fill that gap in to prevent air flow around the radiator. I think the wider cutout is for big block radiators, though I'm not sure.
01-20-2014, 01:22 PM
#54

I have a question about your DBW setup.
Which TAC model are you using? I was told the TAC module has to match the pedal and TB or the car won't even start. I bought an almost identical engine to yours, 06 L33 with 65k miles. Got the ECU and wiring harness with it. I can redo the wiring no problem so I took the stock harness.
What did you do for the pedal and TAC? I see LOTS of 03-06 truck pedal assemblies/w TAC on ebay for ~$150, but none with TAC 12590008 (which I was told I would need).
Just so confused on this DBW stuff since everyone has been telling me that 06 is one-year specific stuff and I need all of the stuff from that year to match.
01-20-2014, 08:13 PM
#55
Very happy to see progress!
Is it just the photo or do you have the radiator support cut out wider than your radiator on the driver's side? You may need to fill that gap in to prevent air flow around the radiator. I think the wider cutout is for big block radiators, though I'm not sure.
Is it just the photo or do you have the radiator support cut out wider than your radiator on the driver's side? You may need to fill that gap in to prevent air flow around the radiator. I think the wider cutout is for big block radiators, though I'm not sure.
The Goodmark rad support is wider than the Champion radiator. If I use this rad support that gap will definitely have to be filled. If the fenders and hood fit well with this core support, I'll use it. If not, I'll be trying out an AMD core support. I am not going to do any cutting or welding on it before I definitely know I'll be using it.
I have a question about your DBW setup.
Which TAC model are you using? I was told the TAC module has to match the pedal and TB or the car won't even start. I bought an almost identical engine to yours, 06 L33 with 65k miles. Got the ECU and wiring harness with it. I can redo the wiring no problem so I took the stock harness.
What did you do for the pedal and TAC? I see LOTS of 03-06 truck pedal assemblies/w TAC on ebay for ~$150, but none with TAC 12590008 (which I was told I would need).
Just so confused on this DBW stuff since everyone has been telling me that 06 is one-year specific stuff and I need all of the stuff from that year to match.
Which TAC model are you using? I was told the TAC module has to match the pedal and TB or the car won't even start. I bought an almost identical engine to yours, 06 L33 with 65k miles. Got the ECU and wiring harness with it. I can redo the wiring no problem so I took the stock harness.
What did you do for the pedal and TAC? I see LOTS of 03-06 truck pedal assemblies/w TAC on ebay for ~$150, but none with TAC 12590008 (which I was told I would need).
Just so confused on this DBW stuff since everyone has been telling me that 06 is one-year specific stuff and I need all of the stuff from that year to match.
Speaking of PSI, I got my harness and reprogramed PCM from them. It looks great! I gotta figure out where to mount my PCM and then I can figure out the best routing for the harness.
On another note, I am adding some natural gas lines to my house. My wife and I want a gas stove/oven and I am going to install a ventless heater to my garage. Even though it is an attached garage it still gets pretty cold out there with this winter we have had. But I need to add a branch to the main gas line first.
01-20-2014, 09:08 PM
#58
Awesome! 90% of the pedal/TAC combos on ebay are TAC 125730059. If he says they will work, I'm going to trust it and get one as well. I heard that the ECU can be reflashed to work with different TAC modules anyway, so I can't go too wrong I guess.
Thanks for the info!
Thanks for the info!
02-13-2014, 03:14 PM
#59
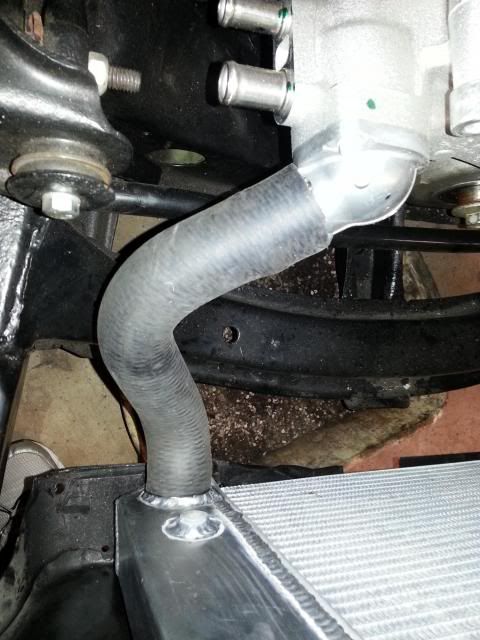
I have been researching rad hoses and ironically our 2002 Chrysler Voyager with a 3.3 V6 has been leaking antifreeze. So I was out in the garage one even this past week trying to find the leak and noticed the upper rad hose looked like it might work for my swap. I went to the parts store and grabbed one and to my surprise it fit perfectly with a little trimming. I took about 4 inches off the water pump side and about 1/4 inch off the rad side. The hose is a 1 5/16", perfect for the water pump nipple and the rad side is
1 1/2", perfect for my Champion rad!
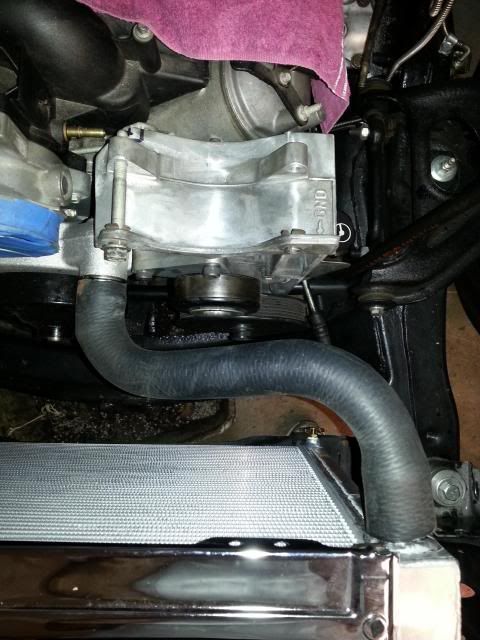
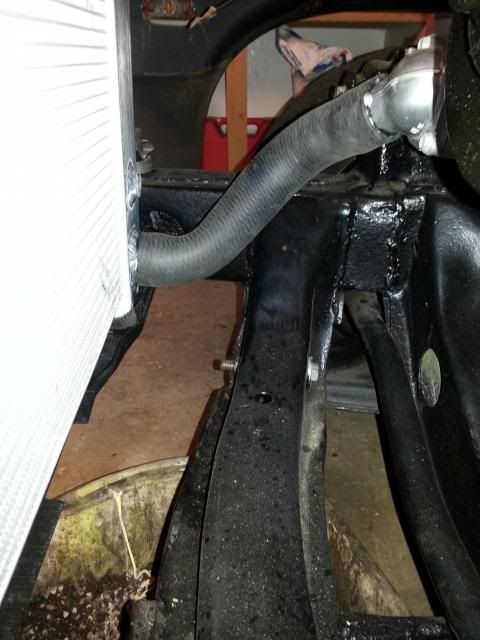
I had some trouble finding a lower hose but I found a thread today that suggested a 2005 Silverado V8 lower rad hose. It is 1 1/2" the whole length which works great considering my rad has a 1 1/2" nipple and the water pump has a 1 1/2" nipple too. This hose works great with some trimming. Both ends needed to be cut a little to make it work, but the "S" in the middle is what I needed.
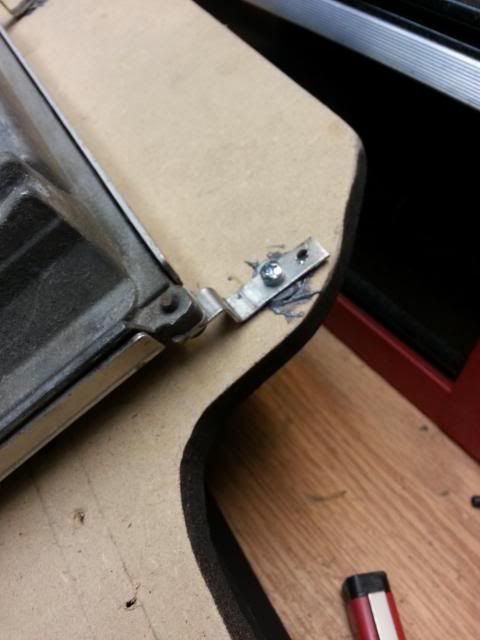
I also decided to mount my PCM behind my glove box door. My glove box will no longer be functional though. When you open the glovebox you will just see a black panel. I may decide to mount the fuse panel here too. I used 1/2" MDF and just trimmed until it fit using the original glovebox liner as a guide. I used furniture nuts to mount the new MDF box to the dash. You can see in this pic the nuts that I JB welded into the MDF. This will attach to the top portion of the glovebox with 1/4" bolts and holes originally used to mount the cardboard glovebox. For the sides I shaped some thin sheetmetal the same shape as the glovebox liner sides and bolted this to the MDF as well. I don't have a pic of this yet.
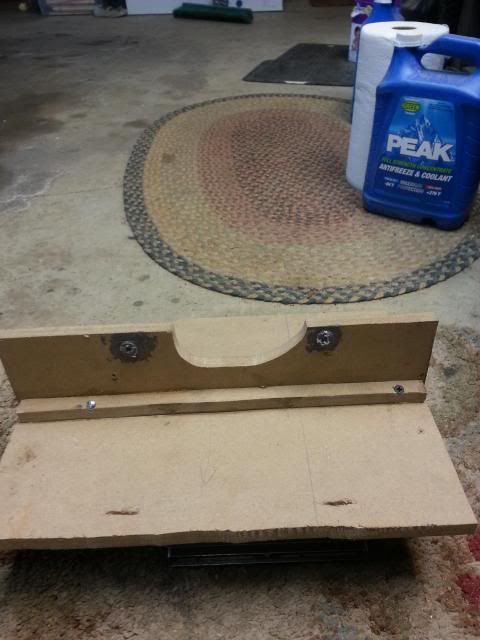
The PCM mounts to the back with similar furniture nuts JB welded into the MDF.
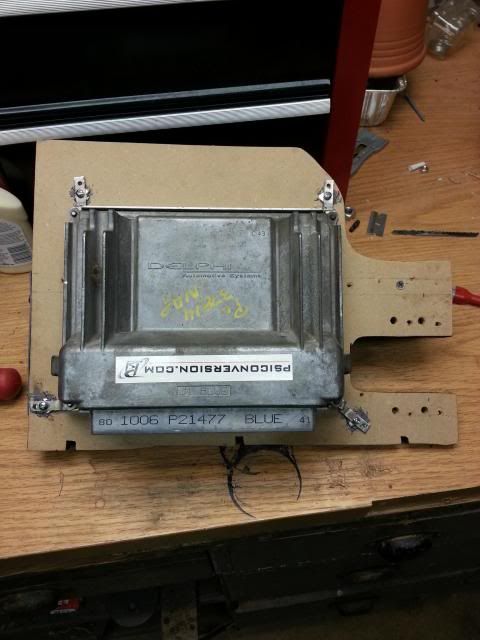
This is my first draft of this PCM mount and I did try to put the fuse box in the cutout channel you can see in the above pic. However, the glove box door hits the relays when you shut it. This still may work I just have to figure out how to get the fusebox to sit further back. I decided to leave it for now and mess with it after I get the car running.
1 1/2", perfect for my Champion rad!


I had some trouble finding a lower hose but I found a thread today that suggested a 2005 Silverado V8 lower rad hose. It is 1 1/2" the whole length which works great considering my rad has a 1 1/2" nipple and the water pump has a 1 1/2" nipple too. This hose works great with some trimming. Both ends needed to be cut a little to make it work, but the "S" in the middle is what I needed.


I also decided to mount my PCM behind my glove box door. My glove box will no longer be functional though. When you open the glovebox you will just see a black panel. I may decide to mount the fuse panel here too. I used 1/2" MDF and just trimmed until it fit using the original glovebox liner as a guide. I used furniture nuts to mount the new MDF box to the dash. You can see in this pic the nuts that I JB welded into the MDF. This will attach to the top portion of the glovebox with 1/4" bolts and holes originally used to mount the cardboard glovebox. For the sides I shaped some thin sheetmetal the same shape as the glovebox liner sides and bolted this to the MDF as well. I don't have a pic of this yet.

The PCM mounts to the back with similar furniture nuts JB welded into the MDF.


This is my first draft of this PCM mount and I did try to put the fuse box in the cutout channel you can see in the above pic. However, the glove box door hits the relays when you shut it. This still may work I just have to figure out how to get the fusebox to sit further back. I decided to leave it for now and mess with it after I get the car running.