

2007 Kia Sorento - 6.0L Ly6 Vortec

 03-02-2015, 12:24 PM
#122
On The Tree
Thread Starter
iTrader: (1)

Join Date: Dec 2013
Location: Cleveland, Ohio
Posts: 105
Likes: 0
Received 0 Likes
on
0 Posts
Thanks guys. I am really looking forward to getting her finished. Got the torpedo heater repaired (nee fuel and air pump hoses). Also got some new light ballasts for my garage lighting. The ones on the garage are shot. Went with T8 4 bulb ballasts so i can run each fixture on one ballast rather then 2 (whats in it now). Great bright white light!! So the Sorento work should begin soon. Unfortunately with doing even moderate work it puts stress on my cyst and irritates it. This morning after doing the ballasts and the heater yesterday i feel like crap today. My leg is killing me right through my meds and i feel pretty dizzy. Thankfully my 11 year old daughter is really looking forward to helping me on this project so she may be doing a lot of work along with my brother in law and wife lol.
 03-04-2015, 08:46 PM
#125
On The Tree
Thread Starter
iTrader: (1)
Join Date: Dec 2013
Location: Cleveland, Ohio
Posts: 105
Likes: 0
Received 0 Likes
on
0 Posts
PEPFAB
Yeah this one is solid axle in the rear with independent up front... It also has a fully boxed truck frame. They changed the whole thing in 2010. They went to unibody design.
Yeah this one is solid axle in the rear with independent up front... It also has a fully boxed truck frame. They changed the whole thing in 2010. They went to unibody design.
03-05-2015, 12:18 PM
#126
Registered User

Join Date: Mar 2015
Posts: 2
Likes: 0
Received 0 Likes
on
0 Posts
sub'd. This is sweet. I had an 04 I wanted to do this to. Mine was manual. There was NO information on one being swapped. I was going to tackle it anyway. But as luck had it, it got totaled.
 03-05-2015, 09:48 PM
#128
On The Tree
Thread Starter
iTrader: (1)
Join Date: Dec 2013
Location: Cleveland, Ohio
Posts: 105
Likes: 0
Received 0 Likes
on
0 Posts
It was shockingly a lot easier then i thought. I think the 04 had standard gauges too. Not the CAN-Bus BS i have. Would have made it way easier to get speedo and other ones to work.
03-08-2015, 05:26 PM
#129
On The Tree
Thread Starter
iTrader: (1)
Join Date: Dec 2013
Location: Cleveland, Ohio
Posts: 105
Likes: 0
Received 0 Likes
on
0 Posts
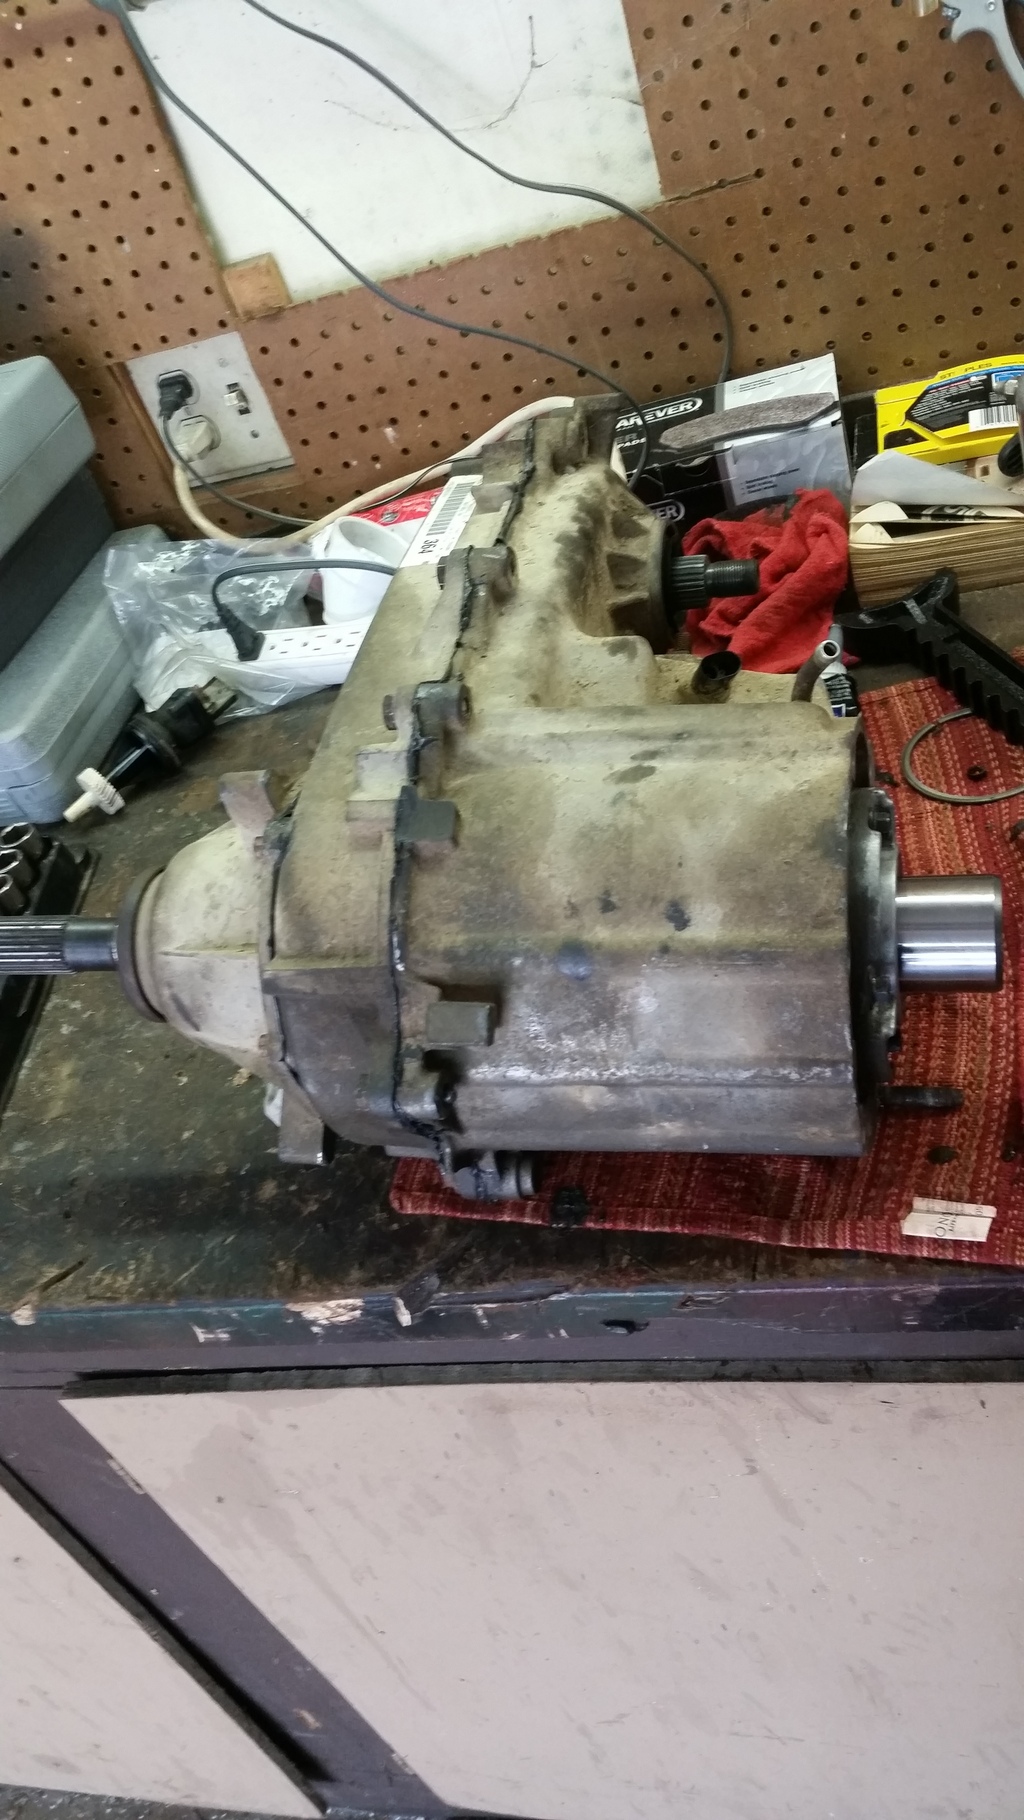
Well, got a transfer case and started the work of putting my new input gear and bearing in. I needed to change these because the Jeep NP231 transfer case doesn't have 31 splines like the GM Trans does.
The new bearing is wider also for more support.
Here is the case split
4
Here are all the internal parts.

The new gear is on the right. Advanced Adapters makes some nice parts.


The new bearing is wider also for more support.
Here is the case split
4
Here are all the internal parts.
The new gear is on the right. Advanced Adapters makes some nice parts.
 03-23-2015, 01:13 PM
#131
On The Tree
Thread Starter
iTrader: (1)
Join Date: Dec 2013
Location: Cleveland, Ohio
Posts: 105
Likes: 0
Received 0 Likes
on
0 Posts
Thanks! The support from you guys that aren't normally Import fans means a lot. I get a lot of "what a waste of an engine" comments on my Facebook page for the swap and on my videos. Its my engine... my car... my money. LoL. It is nice to have such great feedback from such a respected community of people.

 05-01-2015, 10:03 PM
#134
On The Tree
Thread Starter
iTrader: (1)
Join Date: Dec 2013
Location: Cleveland, Ohio
Posts: 105
Likes: 0
Received 0 Likes
on
0 Posts
Well... Here is a little update for you guys... Well its a pretty decent sized update.
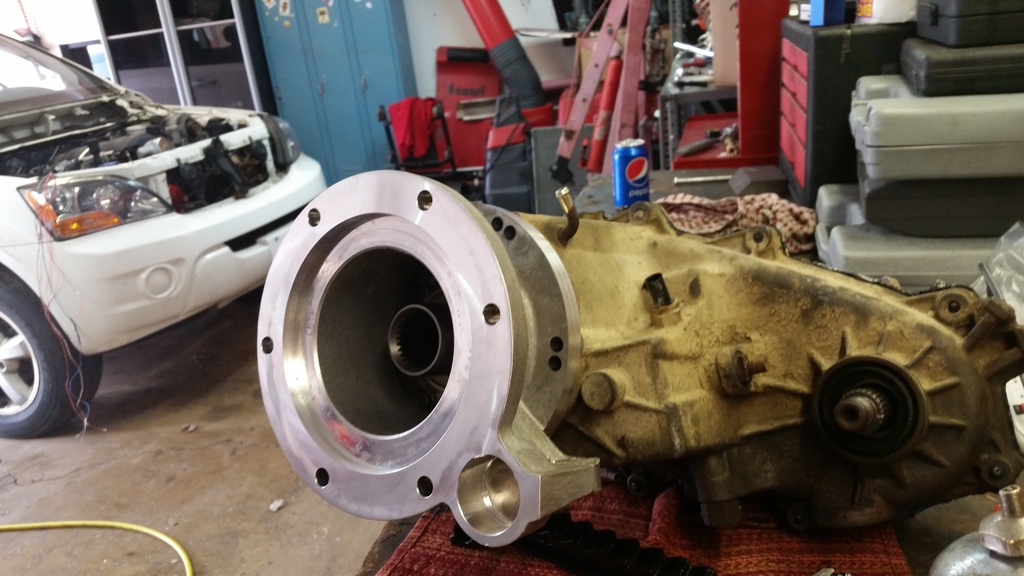
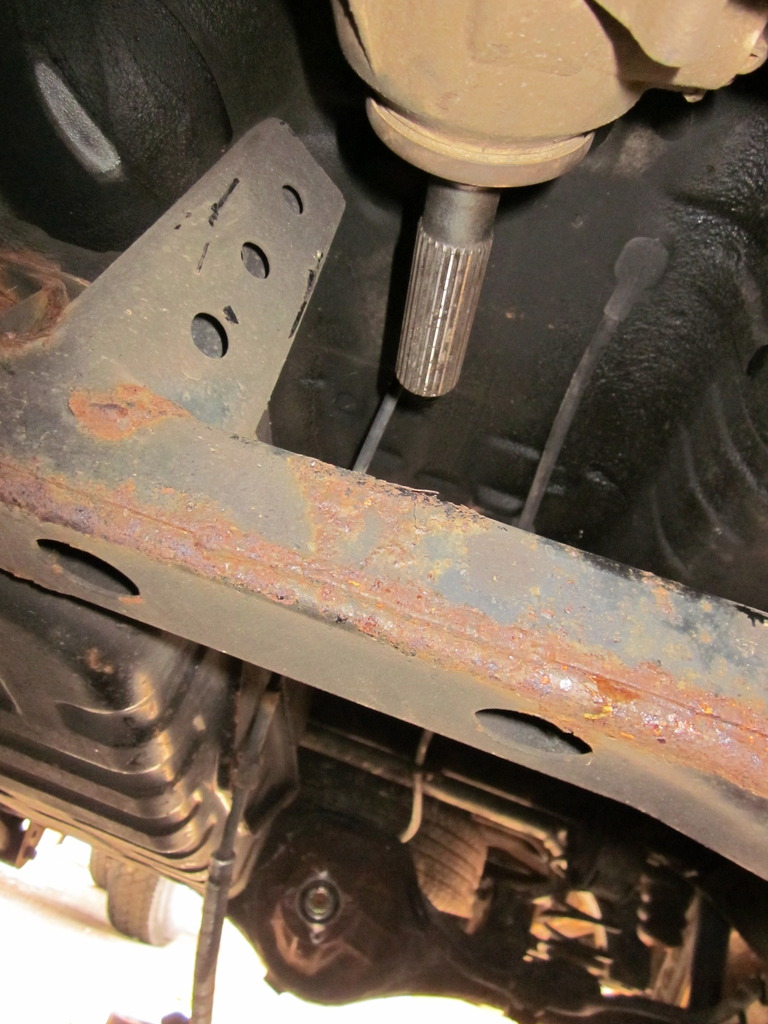
I got the transfer case parts changed over (the input shaft for the GM6L90e trans and the new input bearing). Then got the transfer case put back together. I pulled off the factory 4x4 adapter from the trans and bolted on the one from Advance Adapters. I then put the transfer case in and bolted it to the adapter. It worked perfect. The input and output of the transfer case line up perfect with the differentials. I then bolted on the GM trans mount. It falls SLIGHTLY behind the factory Kia cross member. I will make a small plate adapter to bolt it down.
After all that I then put my order in to GmPartsNow for the 2010 Camaro water pump and the pickup tube for the GTO pan. I also had to make a new template for the oil pan welding modification. The old setup I had did not leave clearance for the oil tubes inside the oil pan. The GTO pan has the oil filter up front and the other LSx pans have the filter in the rear. To get the oil to the front of the pan they put tubes inside the pan to bring it to the front mount.
I will be installing the water pump SOON and my buddy is gonna let me weld the pan up at his shop. As soon as that is done i can start this beast!!
Now for some pics...
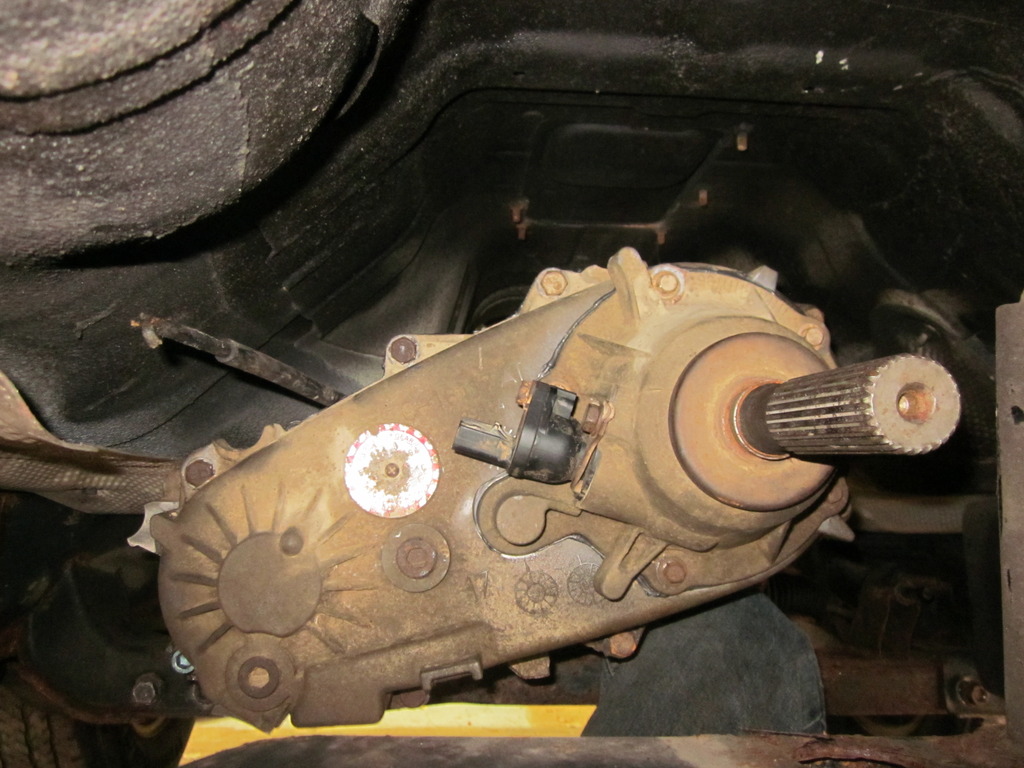
Here is the transfer case all assembled...
Here is the new adapter from Advance Adapters

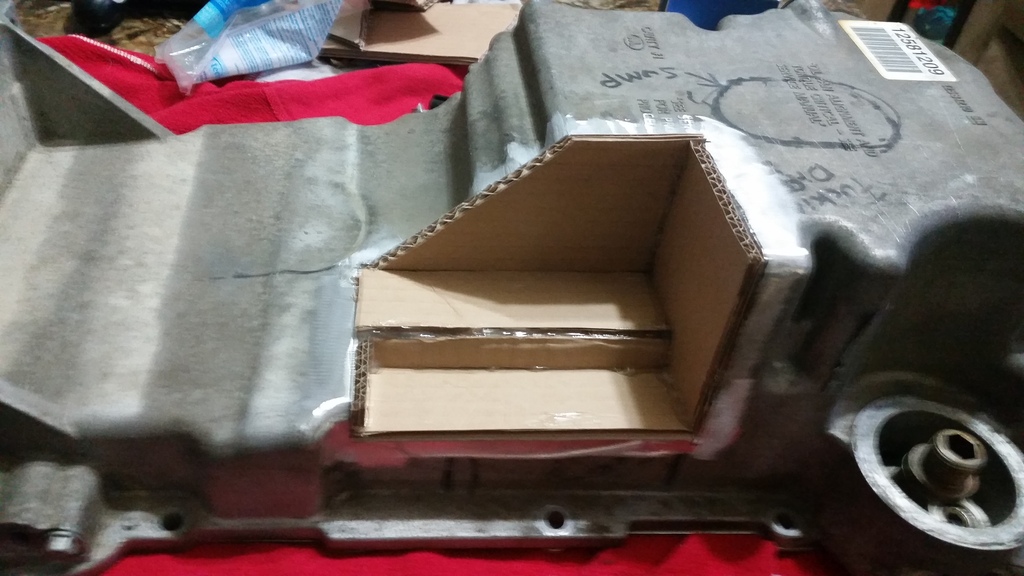
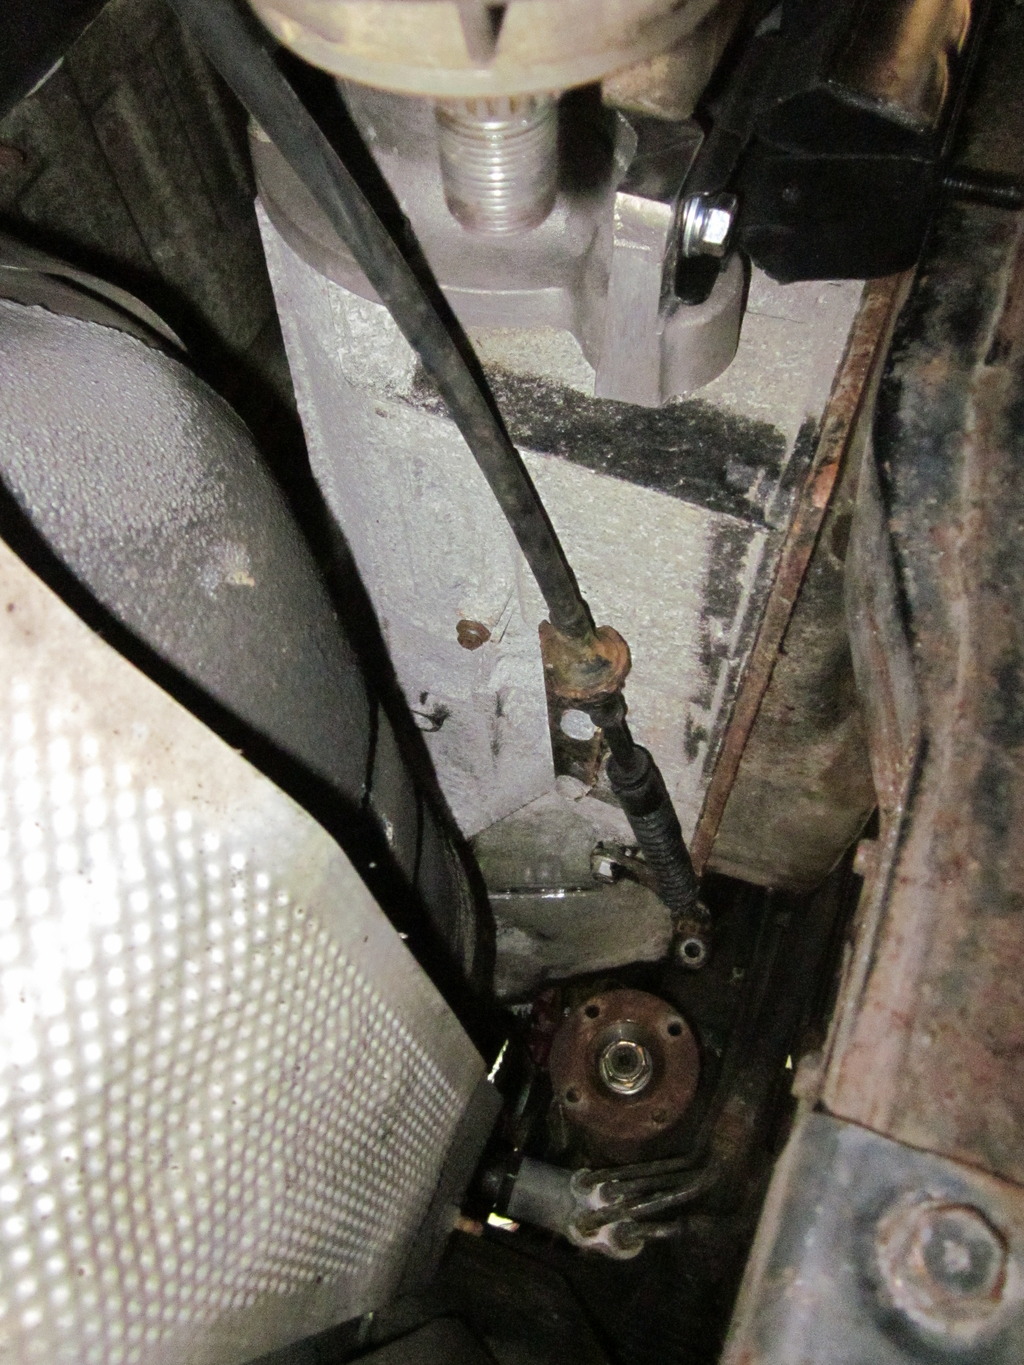
Here are the shots of the new oil pan design to clear the differential you can see the oil tubes in some of the shots...

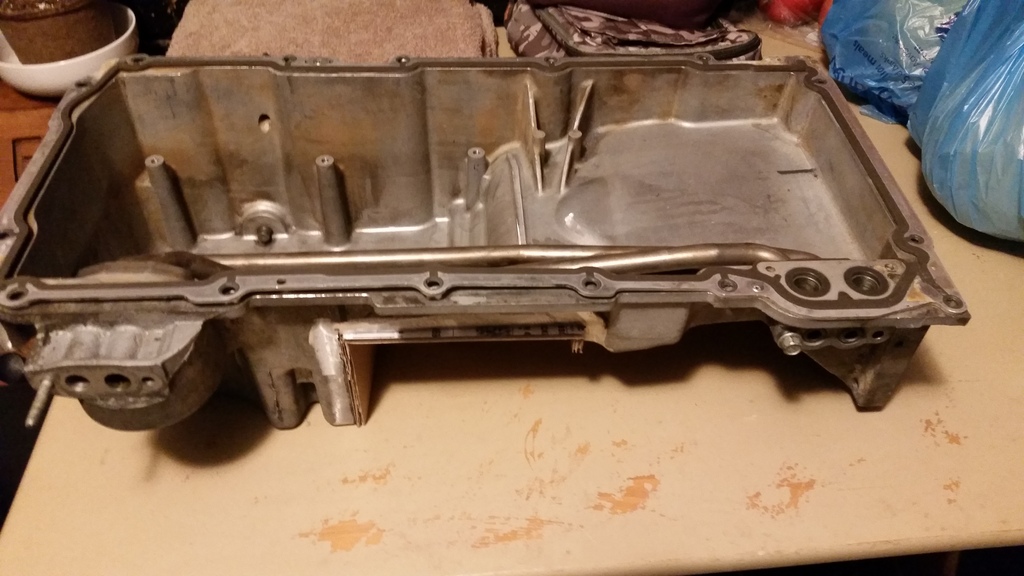
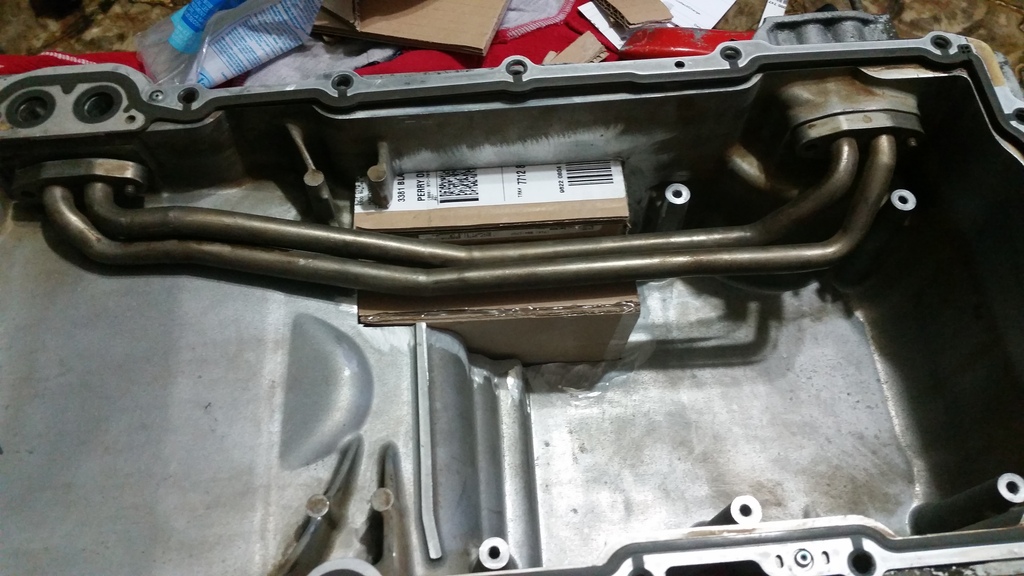
The new water pump and oil pick up tube

Here is the adapter on the trans
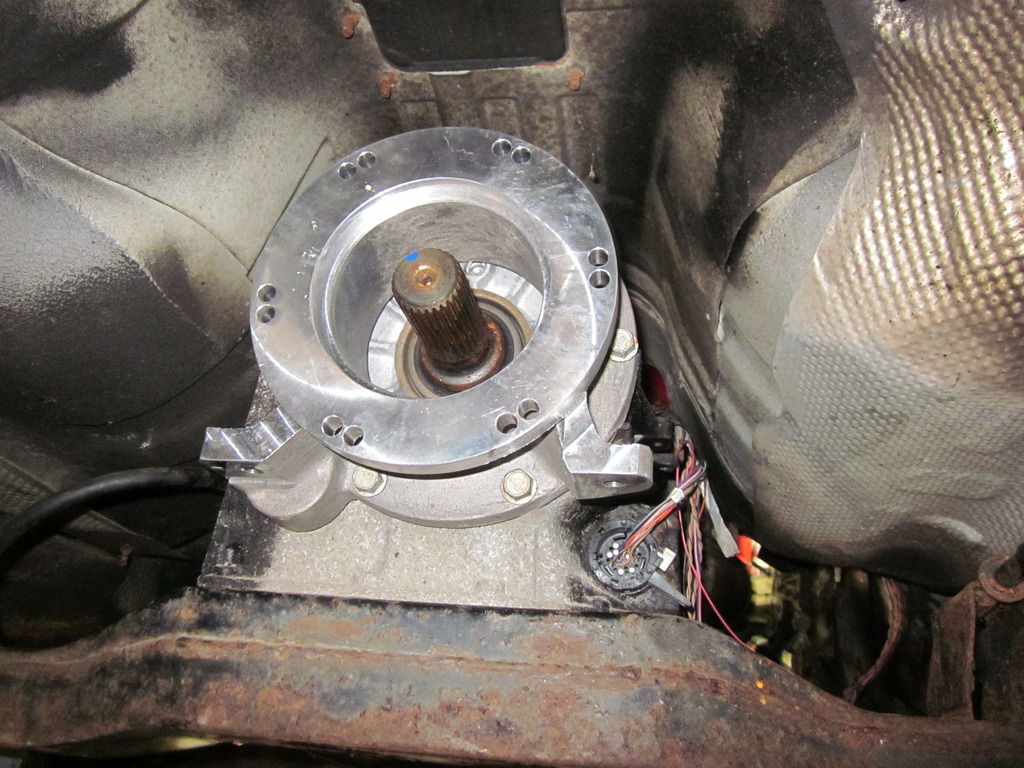
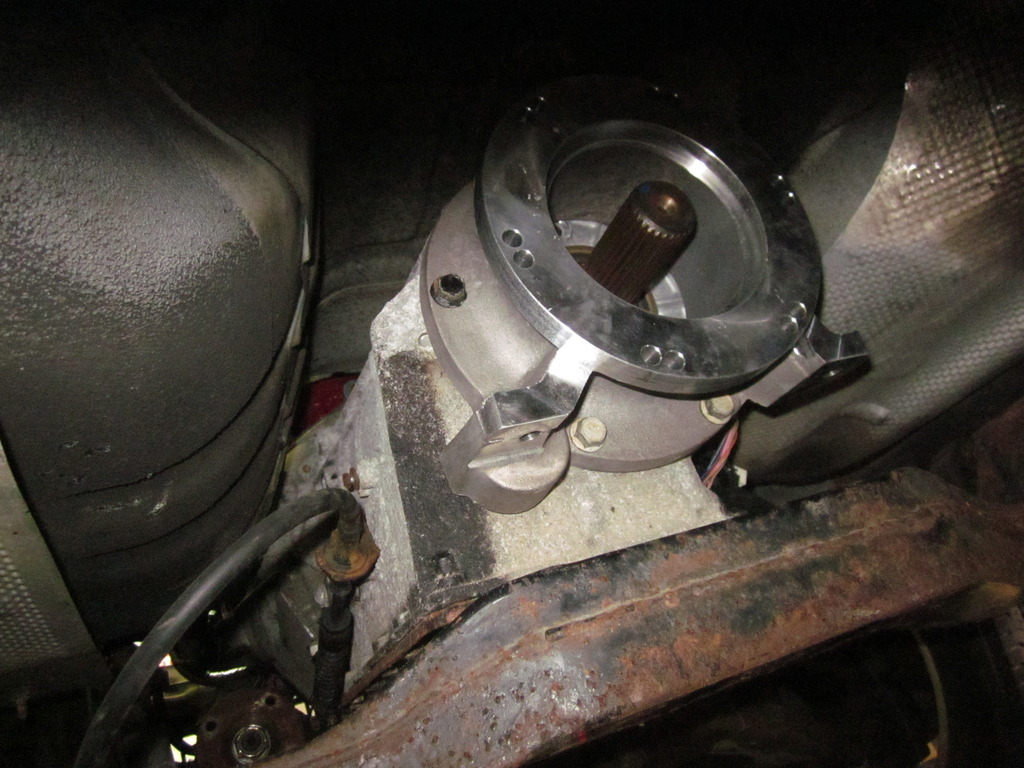
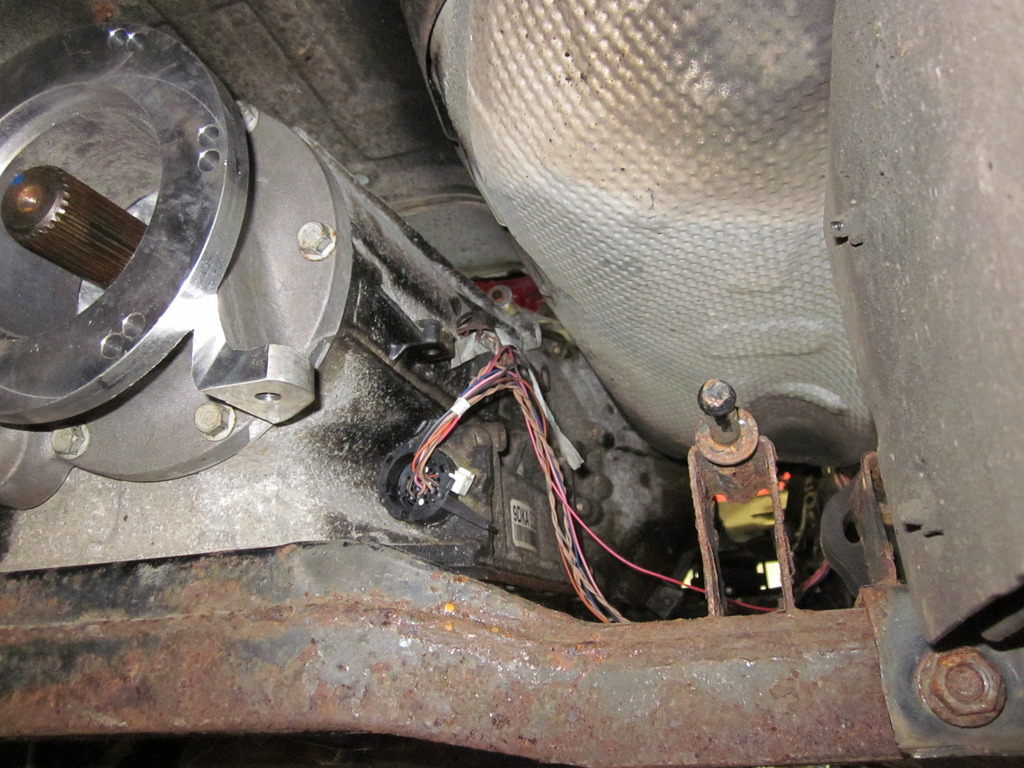
The icing on the cake... The transfer case bolted on. You can see the clearance i have and the driveline alignment in these pics...


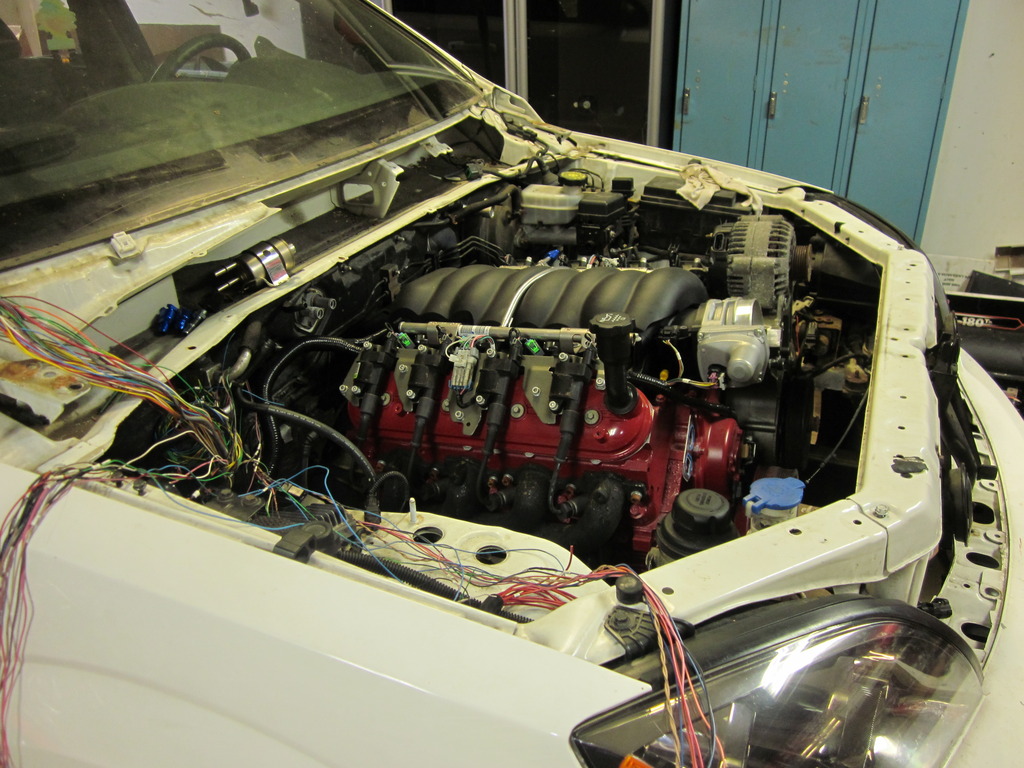
The last of the pics... This shows you the final angle of the engine in the engine bay and the fact that I might have to lower the front end. I only have under 100# more of parts and fluids to add to this thing and even if i stand and bounce on the front end I can barley get it 1/2 inch lower.


Hope you guys enjoy. Will be putting the pump on asap.
I got the transfer case parts changed over (the input shaft for the GM6L90e trans and the new input bearing). Then got the transfer case put back together. I pulled off the factory 4x4 adapter from the trans and bolted on the one from Advance Adapters. I then put the transfer case in and bolted it to the adapter. It worked perfect. The input and output of the transfer case line up perfect with the differentials. I then bolted on the GM trans mount. It falls SLIGHTLY behind the factory Kia cross member. I will make a small plate adapter to bolt it down.
After all that I then put my order in to GmPartsNow for the 2010 Camaro water pump and the pickup tube for the GTO pan. I also had to make a new template for the oil pan welding modification. The old setup I had did not leave clearance for the oil tubes inside the oil pan. The GTO pan has the oil filter up front and the other LSx pans have the filter in the rear. To get the oil to the front of the pan they put tubes inside the pan to bring it to the front mount.
I will be installing the water pump SOON and my buddy is gonna let me weld the pan up at his shop. As soon as that is done i can start this beast!!
Now for some pics...
Here is the transfer case all assembled...

Here is the new adapter from Advance Adapters


Here are the shots of the new oil pan design to clear the differential you can see the oil tubes in some of the shots...


The new water pump and oil pick up tube

Here is the adapter on the trans


The icing on the cake... The transfer case bolted on. You can see the clearance i have and the driveline alignment in these pics...


The last of the pics... This shows you the final angle of the engine in the engine bay and the fact that I might have to lower the front end. I only have under 100# more of parts and fluids to add to this thing and even if i stand and bounce on the front end I can barley get it 1/2 inch lower.


Hope you guys enjoy. Will be putting the pump on asap.
 05-04-2015, 01:45 AM
#136
On The Tree
Join Date: Jan 2015
Location: New Zealand
Posts: 102
Likes: 0
Received 0 Likes
on
0 Posts
Awesome build and thread to read through. Love how you have stuck at it through thick and thin.
Almost more excited to see you finish this, than my own LS Honda project. I have a special place in my heart for absolutely unassuming sleepers like this. Cheers
Almost more excited to see you finish this, than my own LS Honda project. I have a special place in my heart for absolutely unassuming sleepers like this. Cheers
 05-27-2015, 12:33 PM
#140
On The Tree
Thread Starter
iTrader: (1)
Join Date: Dec 2013
Location: Cleveland, Ohio
Posts: 105
Likes: 0
Received 0 Likes
on
0 Posts
Well the oil pan is now in the hands of my buddy Mark. I have to get 2 relays to run the fuel pump and the main power relay in the fuse center. The Kia ECU grounds them to turn them on but the GM ECU uses 12v+ to turn them on. No big deal. I also still have to do something with the fuel line. Although for now i will just run some temporary rubber hose so I can finally get a start up video for you all!! Oh those open manifolds are gonna be DEAFENING!