

Porsche 996 V8 Conversion
 01-14-2015, 06:10 PM
#21


http://www.ebay.com/itm/Billet-Aluminum-water-pump-spacers-for-LS1-Camaro-Truck-Swap-w-steam-port-/201109614789?pt=Motors_Car_Truck_Parts_Accessories&hash=item2ed31130c5&vxp=mtr
I drilled and taped the top of my water block.
 01-14-2015, 06:38 PM
#22
 01-14-2015, 08:05 PM
#23
Teching In
Thread Starter

Join Date: Aug 2014
Posts: 33
Likes: 0
Received 0 Likes
on
0 Posts
I have a similar spacer kit..but am tapping a spot in the top of the water pump housing for cooling system bleed as well as return for the steam tubes. Will try the silicone hose..it is rated for very high heat and pressure. Thanks guys..
01-14-2015, 09:50 PM
#25
Teching In
Thread Starter
Join Date: Aug 2014
Posts: 33
Likes: 0
Received 0 Likes
on
0 Posts
Looks like I am going to have to do a little more research on this hood latching situation. No matter..lots more to do. Speaking of which...
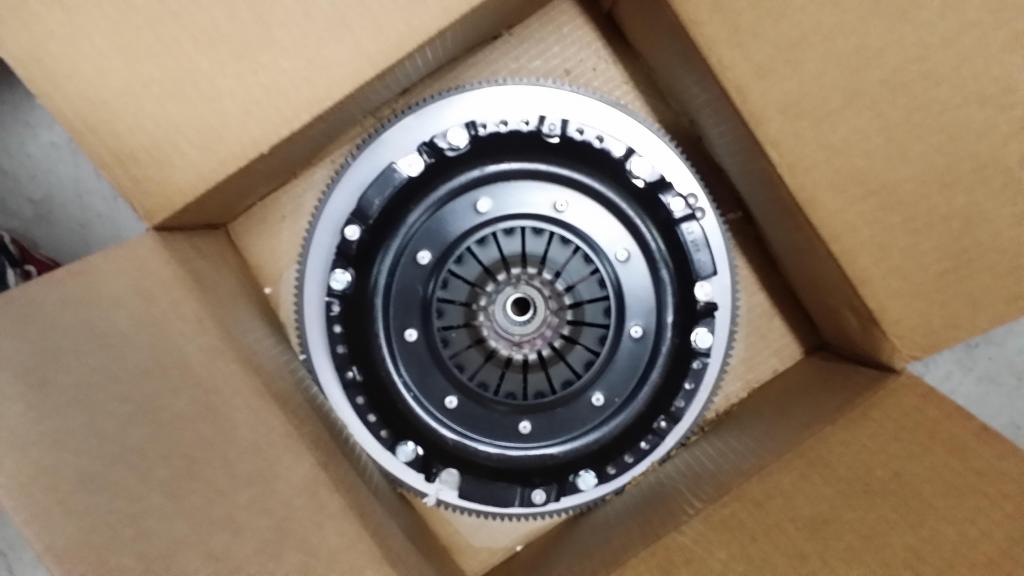
I got my RH kit. It did arrive ahead of schedule! First impression, of the kit.. only � is made by RH..the transmission adapter is clearly marked �Kennedy Engineering�, which is fine because Kennedy has been at this a long time and I must say..the piece is simply gorgeous, clutch, flywheel, adapter..even the packaging is nicely done..my clutch disc alignment tool was broken, but I have a universal one so no big deal.
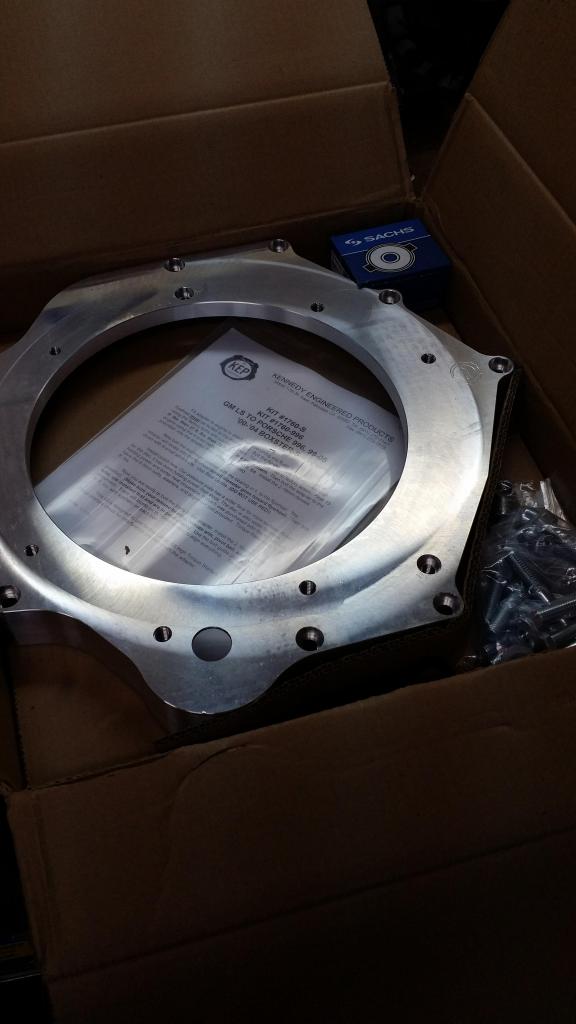
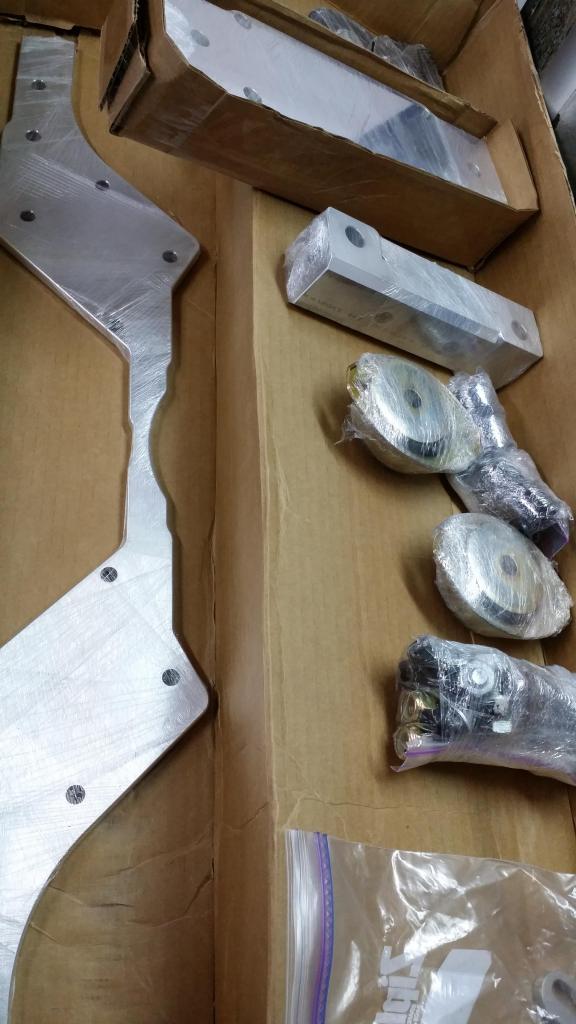
The part of the kit that RH makes, which includes the engine plate and spacer, motor mounts, front engine water manifold (which I�ll not be using), alt bracket and bushing, also beautifully machined, reasonable hardware provided, well packaged.
My only complaint so far..is the lack of instructions. I�ve read this commented on in other threads and even called/emailed RH prior to ordering to discuss and I get their point that there are so many different ways you can do the build that instructions �won�t help��my feelings on this, they should have instructions. Plus, they will sell waaaaaay more kits if they have paper instructions/youtube vid/downloadable pdf/email/private forum something to just cover the basics. Now all that being said, whenever I email with tech questions they do send pictures/intel and help as best they can. The team at RH seem like very nice people and if I had to do it over..I would probably still buy this kit from them...just for the time savings.
I test fit the engine plate to the engine and had to make some changes, I have an aftermarket throttle body which hits the engine plate� flapper disc on the grinder, a soft hand, 5 mins later� cleared. Then however, the bolt holes did not line up perfectly..no big deal, drilled them all up 2 sizes.. everything fits.
I got my RH kit. It did arrive ahead of schedule! First impression, of the kit.. only � is made by RH..the transmission adapter is clearly marked �Kennedy Engineering�, which is fine because Kennedy has been at this a long time and I must say..the piece is simply gorgeous, clutch, flywheel, adapter..even the packaging is nicely done..my clutch disc alignment tool was broken, but I have a universal one so no big deal.


The part of the kit that RH makes, which includes the engine plate and spacer, motor mounts, front engine water manifold (which I�ll not be using), alt bracket and bushing, also beautifully machined, reasonable hardware provided, well packaged.

My only complaint so far..is the lack of instructions. I�ve read this commented on in other threads and even called/emailed RH prior to ordering to discuss and I get their point that there are so many different ways you can do the build that instructions �won�t help��my feelings on this, they should have instructions. Plus, they will sell waaaaaay more kits if they have paper instructions/youtube vid/downloadable pdf/email/private forum something to just cover the basics. Now all that being said, whenever I email with tech questions they do send pictures/intel and help as best they can. The team at RH seem like very nice people and if I had to do it over..I would probably still buy this kit from them...just for the time savings.
I test fit the engine plate to the engine and had to make some changes, I have an aftermarket throttle body which hits the engine plate� flapper disc on the grinder, a soft hand, 5 mins later� cleared. Then however, the bolt holes did not line up perfectly..no big deal, drilled them all up 2 sizes.. everything fits.
01-15-2015, 06:50 PM
#26
Teching In
Thread Starter
Join Date: Aug 2014
Posts: 33
Likes: 0
Received 0 Likes
on
0 Posts
Another night in the garage..I am starting to map out the cooling system..question, someone was kind enough to remake the RH cooling system diagram. In the setup I am going to assemble, I am going to have my heater feed and return lines tapped into the feed and return runs for the rad hoses. Now that being said, can I not just plug off port "3" on bottom of the coolant bucket? Thanks..
01-16-2015, 05:18 PM
#27
On The Tree

Join Date: Nov 2014
Location: Las Vegas, NV
Posts: 198
Likes: 0
Received 0 Likes
on
0 Posts
Another night in the garage..I am starting to map out the cooling system..question, someone was kind enough to remake the RH cooling system diagram. In the setup I am going to assemble, I am going to have my heater feed and return lines tapped into the feed and return runs for the rad hoses. Now that being said, can I not just plug off port "3" on bottom of the coolant bucket? Thanks..
I put that modified coolant diagram together. I would run the heater lines the way GM intended them to be ran to the water pump. I would be concerned that "T" ing them into the radiator lines could mess with the flow to the radiators. remeber the water pump is pushing coolant 20-25 feet through this cooling system. Port "3" is needed to feed water back to the engine as line "2" feeds it from the radiators. the expansion tank is needed for a fill point and for pressure to be released. there is no radiator cap on this cooling system if you take the tank out of the cooling loop. I did a bit of research on this and took the RH diagram that they said worked the best, took the electric WP out and replaced it with the LS3 WP flow wise. The diagram is set up to work the most like the stock Porsche cooling system with the correct flow plumbing for the LS3 WP.
Last edited by 4LUX; 01-16-2015 at 05:29 PM.
 01-18-2015, 08:09 AM
#29
Monkey, Just read your post on my ECU's question, thought I'd bring up a question about the subject here. I haven't been driving mine lately cause of weather and my exhaust is still in work. One of my unsolved problems is that for some unknown reason the Porsche ECU does a random check that will shut down the water temp gage at an undetermined interval. I've been disconnecting the battery to reset, mostly cause I don't trust my cooling system YET, the problem is this also resets all the learning process going on with the GM ECU, I've talked to RH and they are trying to find a fix by installing certain P sensors trying to stop the P ECU from doing this random check. Not sure if your year model will have this problem, but maybe you have some connections that could help. Thanks Much, Michael
01-18-2015, 12:05 PM
#30
Teching In
Thread Starter
Join Date: Aug 2014
Posts: 33
Likes: 0
Received 0 Likes
on
0 Posts
"I put that modified coolant diagram together. I would run the heater lines the way GM intended them to be ran to the water pump. I would be concerned that "T" ing them into the radiator lines could mess with the flow to the radiators. remeber the water pump is pushing coolant 20-25 feet through this cooling system. Port "3" is needed to feed water back to the engine as line "2" feeds it from the radiators. the expansion tank is needed for a fill point and for pressure to be released. there is no radiator cap on this cooling system if you take the tank out of the cooling loop. I did a bit of research on this and took the RH diagram that they said worked the best, took the electric WP out and replaced it with the LS3 WP flow wise. The diagram is set up to work the most like the stock Porsche cooling system with the correct flow plumbing for the LS3 WP."
Very good point about the rad cap..had not considered that..will be sure to use that bottom port. As for the "T'ing" into the rad hoses, not a big deal and will not impact the flow of the water. The RH ewater pump kit "T's" in and additionally the water will always take the path of least resistance..which in this case will be the flow direction the water pump dictates.
"Is there any concerns about removing metal from the structure? Is this not going to effect the handling of the car once finished?"
I gave that side of the build a great deal of consideration prior to even acquiring the car..I was very apprehensive about the impact of removing material. However, after quite a few different conversations and picture reviews with an engineer friend of mine..it was determined the material removed was not significant enough for concern at the power levels I will be running. The saving grace here is the massive aluminum bumper structure that ties both sides of the car together. If I was building a 750 or 800hp car..this would be a different conversation. Now that being said, upon completion of this project..I will be fabricating a brace for the area where I removed metal to provide me some additional mental comfort
"Monkey, Just read your post on my ECU's question, thought I'd bring up a question about the subject here. I haven't been driving mine lately cause of weather and my exhaust is still in work. One of my unsolved problems is that for some unknown reason the Porsche ECU does a random check that will shut down the water temp gage at an undetermined interval. I've been disconnecting the battery to reset, mostly cause I don't trust my cooling system YET, the problem is this also resets all the learning process going on with the GM ECU, I've talked to RH and they are trying to find a fix by installing certain P sensors trying to stop the P ECU from doing this random check. Not sure if your year model will have this problem, but maybe you have some connections that could help. Thanks Much, Michael"
That Pcar ecu is quite the complex piece...I expect to run into similar issues. To avoid this shutting off of the Engine management ecu, I will be running the ecu for my engine completely separately from my Pcar ecu and the rest of the car. It sounds to me like your ecu and the pcar ecu are co-wired to some extent? Whenever I install engine management systems I always make it a point to feed the power it needs directly from the battery (Via an aftermarket circuit breaker) this way regardless of what happens on the chassis wiring or previous ecu side of things..my engine will always run. Also, if I need to kill power to other systems, I can then do so (via toggle swtich, circuit breaker, power key) without disrupting my engine management ecu. I am sure having to physically disconnect your battery to get a temp gauge back is a pain. I would run new power from the battery just for the GM ecu....then identify the power source wire on the Pcar ecu (near the connector after the relays) and just toss a toggle switch in there while you try to identify the real issue. This way if you are driving and the temp gauge quits...you can just flip the switch off and then on allowing the PCar ecu to see a power interruption but without disrupting you GM ecu. I have some UFC plans tonight...this will no doubt now be a topic of conversation. My 2 cents...
01-18-2015, 12:15 PM
#31
Teching In
Thread Starter
Join Date: Aug 2014
Posts: 33
Likes: 0
Received 0 Likes
on
0 Posts
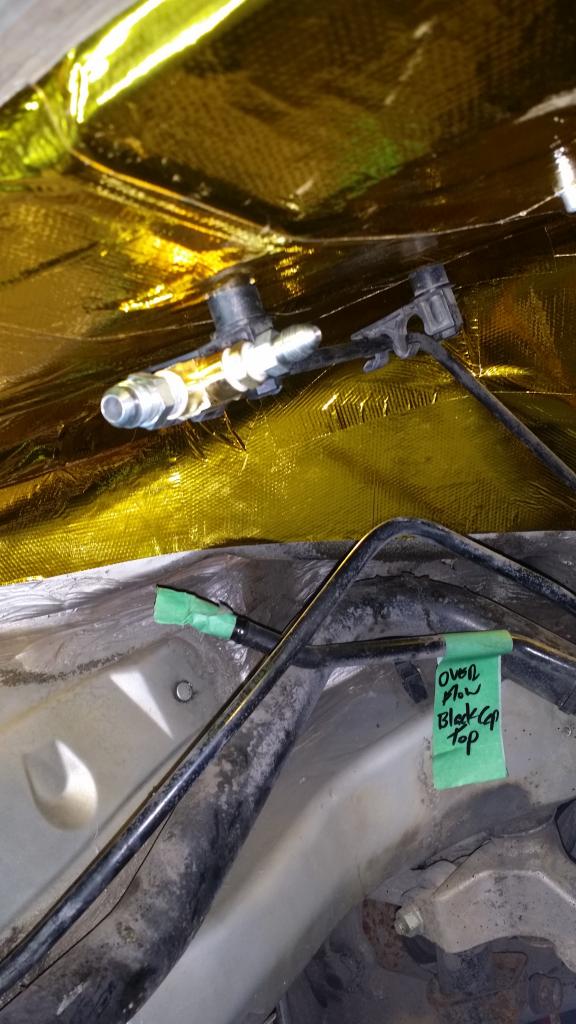
Stripped and cleaned the engine bay of all the sound deadening material in preparation for install, I am still a little concerned about engine to "roof" clearance in the engine bay. Then the �golding� of the engine bay occurred. I must say, I love this stuff..it is not very forgiving once on, but reasonably nice to work with. Good for protection up to 2000 degrees apparently..

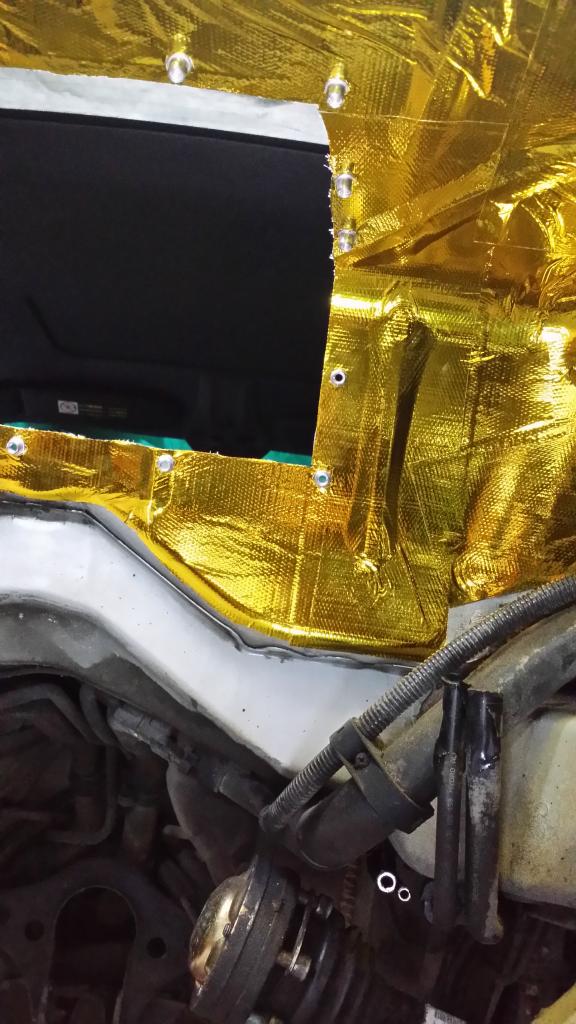
Also fabbed up the access panel cover. I used rivnuts and �-20 hardware to secure everything. I�m framing the opening in 1/8th flatbar then welding it to the cut out piece� These tools were a must have for this job. Once cleaned up the hole in the car is trimmed and �� weather seal will go on the cover.


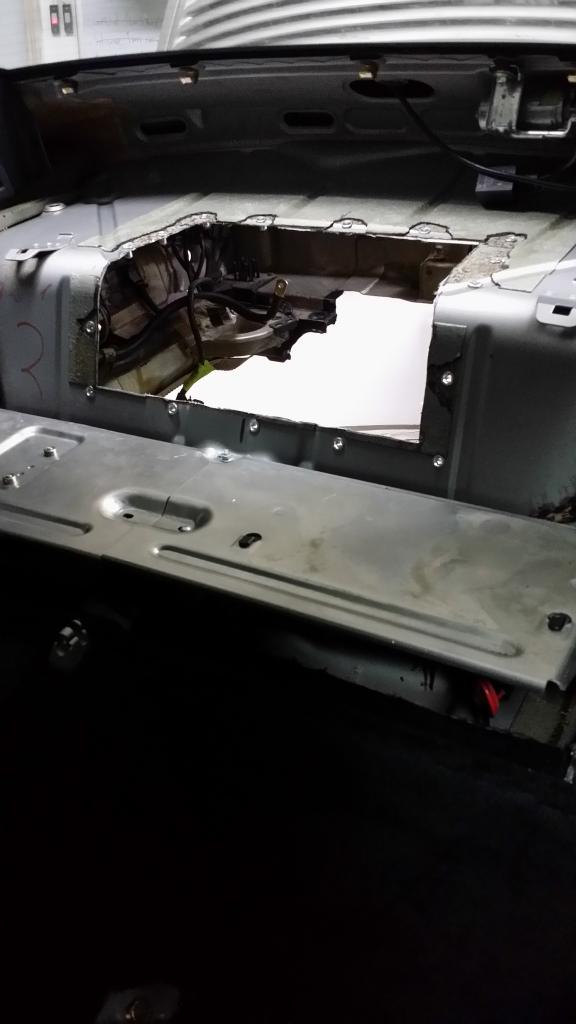


Also fabbed up the access panel cover. I used rivnuts and �-20 hardware to secure everything. I�m framing the opening in 1/8th flatbar then welding it to the cut out piece� These tools were a must have for this job. Once cleaned up the hole in the car is trimmed and �� weather seal will go on the cover.


 01-19-2015, 08:52 PM
#32
Teching In
Thread Starter
Join Date: Aug 2014
Posts: 33
Likes: 0
Received 0 Likes
on
0 Posts
2 main things remain at this point that are stopping me from putting up engine. I need to plumb the fuel system and need to fix my transmission. For the fuel system I am running the C5 regulator/filter, but in the stock 996 filter location. I will also be running braided line and AN fittings forward from the filter/reg to the engine.
My trans I found has a crack in the bell housing and both my output shaft seals are leaking. So there is some "tigging" in my future and i have new output shaft seals, a new slave and line all coming. Once complete..trans goes on..then everything can go up.
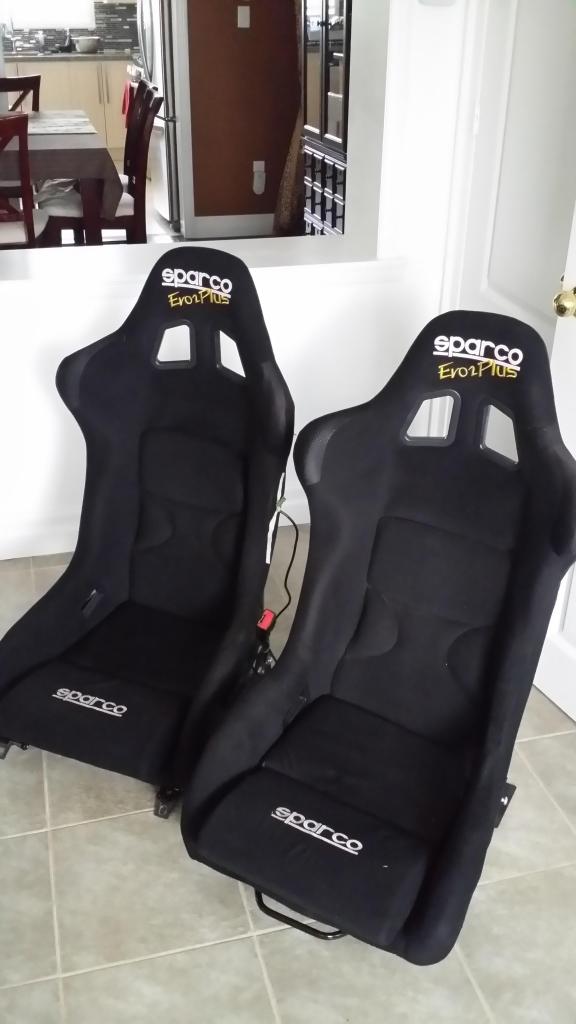
When removing the original seats from the car I could not believe how heavy they were..I read some where over 60lbs each!?!?! Mine where not in great shape, so they aren�t going back in�got these replacements, already on 996 rails...bolt in and go.
My trans I found has a crack in the bell housing and both my output shaft seals are leaking. So there is some "tigging" in my future and i have new output shaft seals, a new slave and line all coming. Once complete..trans goes on..then everything can go up.
When removing the original seats from the car I could not believe how heavy they were..I read some where over 60lbs each!?!?! Mine where not in great shape, so they aren�t going back in�got these replacements, already on 996 rails...bolt in and go.

 01-20-2015, 12:22 AM
#34
On The Tree

Join Date: Nov 2012
Posts: 152
Likes: 0
Received 0 Likes
on
0 Posts
another amazing thread. When I first read Canada, I was hoping you would be in Vancouver so I could come see it and lend a hand, but then you said Toronto......anyways, you have another canuck cheering you on.
01-20-2015, 11:21 AM
#35
Teching In
Thread Starter
Join Date: Aug 2014
Posts: 33
Likes: 0
Received 0 Likes
on
0 Posts
I could not be happier with the way the gold looks..totally changes the engine bay...the fact that it is super functional..icing on the cake.
As for the comment about Vancouver, believe me...I wish I was out there too. Was -31C with wind on the weekend.
As for the comment about Vancouver, believe me...I wish I was out there too. Was -31C with wind on the weekend.
01-20-2015, 11:03 PM
#36
Teching In
Thread Starter
Join Date: Aug 2014
Posts: 33
Likes: 0
Received 0 Likes
on
0 Posts
Also got my fuel system together...pressure test happening shortly.
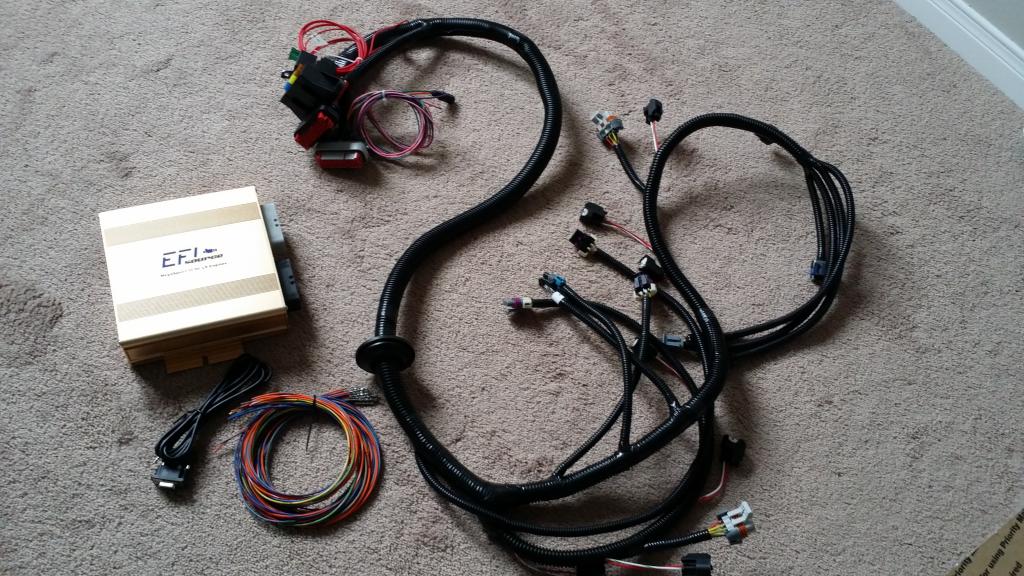
My Standalone Engine Management arrived..drool. It is an EFI Source, LSx series plug and play harness and ecu. This. Thing. Is. Awesome. Is an MS3 (Megasquirt) unit that has been upgraded with weather pack and amp seal connectors, all the necessary fuse boxes and relays are prewired and a pre-built LSx specific harness..there is even a start-up map already configured for my engine. This company has customer service figured out, I had an "engine consult call" where I literally went over my specific engine components (injectors, sensors etc..) then they customized to my specific powerplant..and even shipped that day. Blown away. Plus..using a true standalone gives me the freedom to tune when ever I want, in real-time with nothing more than a laptop..all the software is open source so you buy the unit..download the software and you are off to the races.

Next on my hit list is-
- Changing my crank pulley to the fbody pulley to match my waterpump and spacers (thank you Whiteout)
- Dealing with my transmission "situation"
- Assembling the adapter kit, mating the engine and trans
- A big trip to the parts store to take a bite out of my ever growing parts list

My Standalone Engine Management arrived..drool. It is an EFI Source, LSx series plug and play harness and ecu. This. Thing. Is. Awesome. Is an MS3 (Megasquirt) unit that has been upgraded with weather pack and amp seal connectors, all the necessary fuse boxes and relays are prewired and a pre-built LSx specific harness..there is even a start-up map already configured for my engine. This company has customer service figured out, I had an "engine consult call" where I literally went over my specific engine components (injectors, sensors etc..) then they customized to my specific powerplant..and even shipped that day. Blown away. Plus..using a true standalone gives me the freedom to tune when ever I want, in real-time with nothing more than a laptop..all the software is open source so you buy the unit..download the software and you are off to the races.


Next on my hit list is-
- Changing my crank pulley to the fbody pulley to match my waterpump and spacers (thank you Whiteout)
- Dealing with my transmission "situation"
- Assembling the adapter kit, mating the engine and trans
- A big trip to the parts store to take a bite out of my ever growing parts list
01-21-2015, 10:38 AM
#37
On The Tree
iTrader: (1)
Join Date: Dec 2014
Location: Toronto, Canada
Posts: 142
Likes: 0
Received 0 Likes
on
0 Posts
Nice to see someone in my area doing the conversion. I'd love to stop by when its done to check it out. I will be attemting my own Boxster S LSx conversion soon.
01-21-2015, 08:17 PM
#38
Teching In
Thread Starter
Join Date: Aug 2014
Posts: 33
Likes: 0
Received 0 Likes
on
0 Posts
Sure thing..I am in the East end. Plans are to have it on the road by May 24 weekend. LSx engine in a boxster would make for such a fun car.
01-21-2015, 08:42 PM
#39
Teching In
Thread Starter
Join Date: Aug 2014
Posts: 33
Likes: 0
Received 0 Likes
on
0 Posts
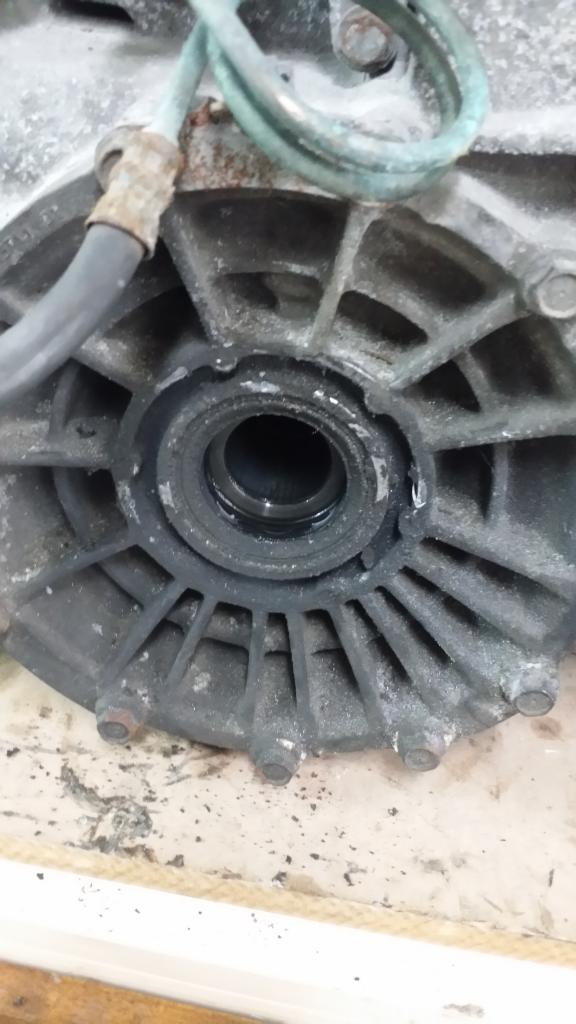
Transmission woes. So...the crack I found in the trans bell housing� has now been V�d out and welded up on both sides..not nearly my nicest tig work, but the material was so dirty even after a thorough cleaning.. was tricky to do.
Also, got my new seals, C clips, slave, release bearing and line in.... output shaft job was easier than expected. Use bolts with nuts and washers to drive the shafts out..then after the seals go in...hammer fit them back in. Done.


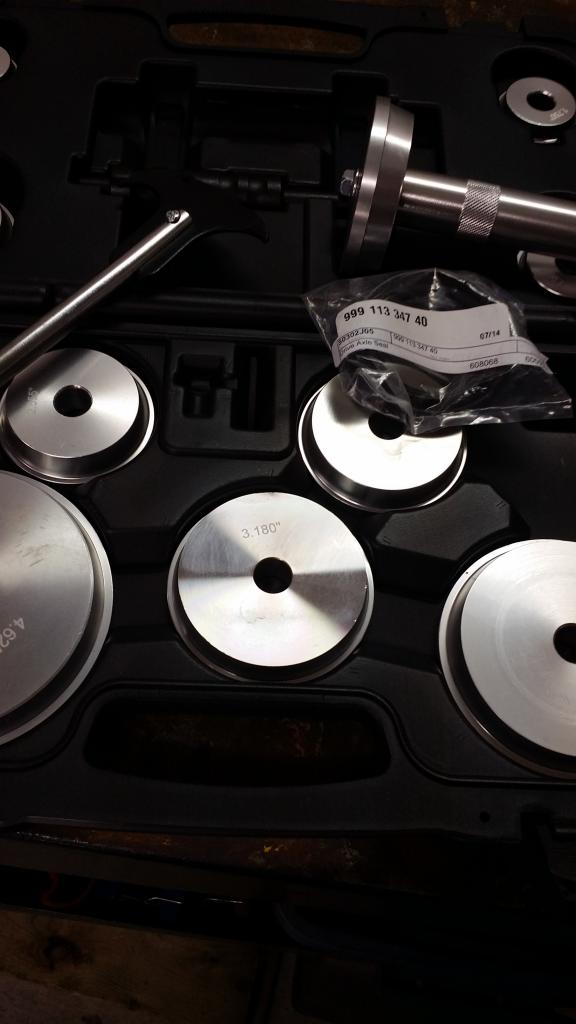
The job also gave me a chance to buy a new seal driver set..
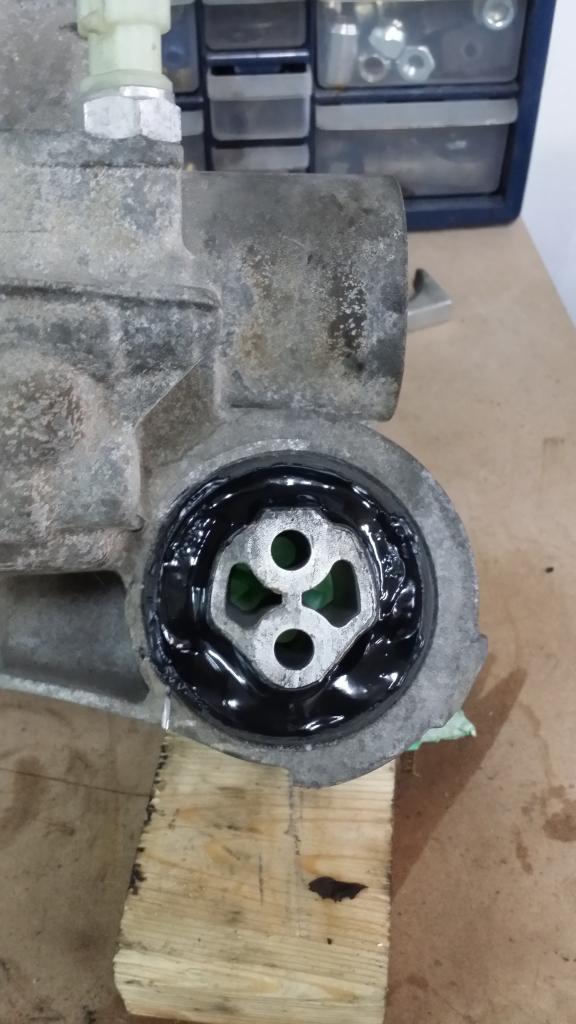
I also did the popular transmount urethane treatment..although I understand there is a vendor on the forum that makes very "insert" to stiffen the transmount also..
Also, got my new seals, C clips, slave, release bearing and line in.... output shaft job was easier than expected. Use bolts with nuts and washers to drive the shafts out..then after the seals go in...hammer fit them back in. Done.


The job also gave me a chance to buy a new seal driver set..

I also did the popular transmount urethane treatment..although I understand there is a vendor on the forum that makes very "insert" to stiffen the transmount also..
 01-22-2015, 12:59 AM
#40
On The Tree
Join Date: Jun 2014
Posts: 118
Likes: 0
Received 0 Likes
on
0 Posts
This is the only downside i see to this swap....that damn g96.00-01 transmission!! We dont really know the limits and if they do take a **** its about $5500 for a used one. Also, i've scoured the internets and it looks like no one offers an upgraded built model. Looks to be the only mod is the cheap ring/pinion swap *sarcasm* $3k plus installn
And to top it off if one does decide to upgrade to a turbo model transmission, a whole new adapter plate kit will have to be used since the g96.00-01 has nothing in common with g96-50's.
But i do love the swap i just fear the day my trans lets loose! I dont even drive it like i really want to because of that fear! lol