

BRP Kit + LQ4/4L60E + '72 A-Body = ?
 10-15-2007, 07:04 PM
#1
Teching In
Thread Starter

Join Date: Sep 2007
Posts: 12
Likes: 0
Received 0 Likes
on
0 Posts
I am interest in the BRP mounting “kit” for my ’72 Chevelle convertible, but wanted to get a couple things verified from someone who has used the BRP setup without modification (hopefully).
Is the Motor Mount and Cross member a true bolt in with the following setup?
• Pullout LQ4/4L60E
• F-Body Oil Pan/Windage Tray/ Dipstick
• Stock truck accessories and exhaust manifolds
• Notched Frame for AC Compressor (or some sort of relocation kit)
Most of the BRP installs I have found seem to involve relocating the engine mounts once things are mocked up. I would like to know how things fit when you just bolt on the mounts and try to set the engine on the factory GM SBC stands. I would like to find a reasonably-priced solution that doesn't involve a lot of trial-and-error fabrication. Hoping that is not too much to ask...
Thanks!
 10-15-2007, 07:07 PM
#2
TECH Regular
iTrader: (15)

Join Date: Feb 2005
Location: East Freetown, MA
Posts: 458
Likes: 0
Received 0 Likes
on
0 Posts
You should call BRP and ask them what front accessory drive they used when they mocked up their kit. I am 99.999% certain they didn't use the truck setup..
10-15-2007, 10:35 PM
#3
TECH Fanatic
iTrader: (9)
Join Date: Mar 2004
Location: CANADA!
Posts: 1,347
Likes: 0
Received 0 Likes
on
0 Posts

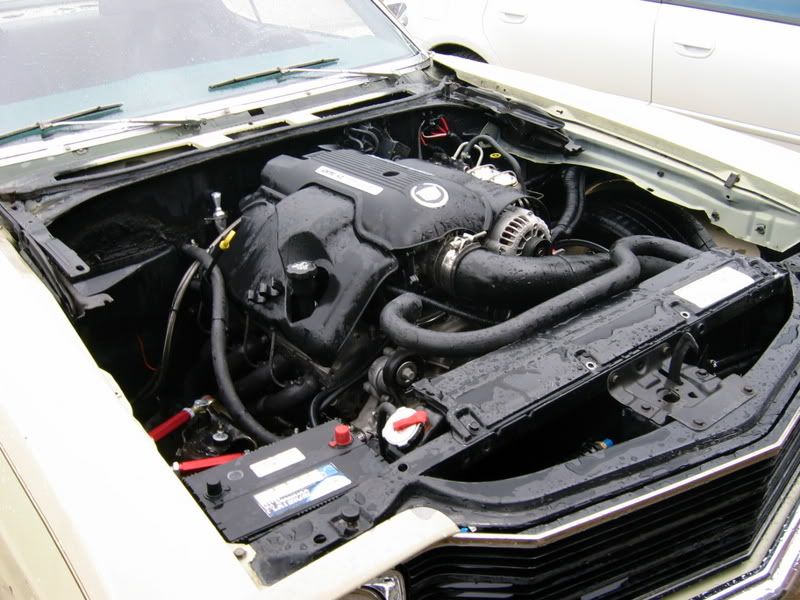
I am running the BRP mounts with a LQ4/4l80e...
The BRP mounts are not a bolt in affair, but they didn't claim to be in the instructions...
-You bolt the engine mounts onto the engine, get the engine/tranny in with the crossmember in(which bolts in to existing holes)
-get the engine level
-then I tacked the engine mounts to the frames
-pulled the 2 bolts that bolt to the mounts that stay on the engine
-pulled everything out
-drilled the 8 new holes for the clam shells
-bolted them in and put the engine back in.
Now with the 4l80e I had to cut my whole tranny tunnel out, the 4l60e I think requires you to atleast T cut the tunnel. Cut the tunnel down the center, spead it 2 inches and put new metal in the 2 inch space. Their instructions show how to do it.
Then I had to notch my firewall for the truck intake. The BRP mounts put the engine very close to the firewall. My passenger head is 3/8" from the firewall.
I am not running a/c so you would have to ask them but I believe its a notching affair.
If you have any other questions feel free to ask.
You can kind of see the firewall mod here. If you need a better pic ask away.
10-16-2007, 12:45 AM
#4
Teching In
Thread Starter
Join Date: Sep 2007
Posts: 12
Likes: 0
Received 0 Likes
on
0 Posts
ls1_chevelle, thanks a lot for your response.
I didn't understand the procedure for installing with BRP-style mounts (although I have corresponded with BRP on the subject). Sounds like I would have to notch my frame, modify the firewall, and cut the tunnel.
I am a little surprised, I guess, that guys comfortable doing this much cutting and welding would buy plates from someone rather than fab their own. I still haven't decided which way I will go (I don't own a welder but maybe I need to look into buying one).
I will certainly research the S&P/ ATS style mounting plates as well.
10-16-2007, 06:05 AM
#5
TECH Regular
iTrader: (15)
Join Date: Feb 2005
Location: East Freetown, MA
Posts: 458
Likes: 0
Received 0 Likes
on
0 Posts
I have a post or two about the ATS plates. I didn't have to cut the firewall or trans tunnel, but I did have to notch the front of the crossmember slightly for the AC.
I can get you another set of the spacers I needed to get the engine to clear the centerlink.
I can get you another set of the spacers I needed to get the engine to clear the centerlink.
10-16-2007, 09:36 AM
#6
Yes the BRP sells a complete engine and trans kit that should bolt up with the exception of the Trans Tunnel for 4L80e and T56 trans. And Frame notching for a Stock LS1 Compresor. Phill states that he has designed it with the correct engine/trans till angle.
I Fab'd up my own BRP Style Adapter Plates, tool a few hours of just using hand tools (Drill, cutting wheels, grinder, tap), some Beer and TV. I powder coated them and I was done.
I didn't have any problem with the Centerlink, what I did have problem is making sure the Power Steering Box and the Pump Pulley had enough room. Also if you have an AC/Heater box, be carefull, I banged a hole in mine dropping the engine in.
I use a combination of Tall and Narrow Energy Suspension engine mounts and narrowing my Short and Wide Frame mount and relocated them.
I used a Viper T56 so I had to do so Trans tunnel reconstruction. And since I wanted to use the LS1 AC Compressor, I did have to notch the front of the X-Member to clear the lines. Flipped over the tap on the Trans X-Member and welded it back on. Done deal there.
I am using a CTS-V Oil Pan, I could have gotten away with using a stock F-Body Pan, but I figure that the CTS-V pan had just a bit more room.
The ATS and S&P style plates will use the stock location of the engine frame mounts, but you give up the option of using the Stock AC Compressor. Notching the frame is not required with these style plates because they require the compressor be relocated. This is due to the Adapter Plates coming into contact with the Stock Compressor.
I don't know why some state that the S&P move the engine more backwards as compared to the BRP... If the Pan clears the X-member with BRP plates and you have to notch the Oil Pan cause it comes in contact with the S&P style, that tells me the engine is more forward..??? But by moving the engine / trans forward also give more room in the trans tunnel and may not require reconstruction on the tunnel.
10-16-2007, 11:20 AM
#7
Teching In
Thread Starter
Join Date: Sep 2007
Posts: 12
Likes: 0
Received 0 Likes
on
0 Posts
I would seem that you would want to place the crank centerline in the same position relative the frame, and the back of the engine in the same plane as our OE engines. My guess is that with our A-Body crossmembers the LSx-style blocks can't sit low enough to make this happen?
I agree that it sounds like the BRP plates place the engine futher back, than the S&P/ATS plates (are the S&P/ATS/eBay plates all the same?). Do all these plates place the engine at approximately the same height?
I really wish there was an A-Body sticky here for this stuff (like the 67-69 F-Body guys have)....
Trending Topics
10-16-2007, 11:42 AM
#8
I would say all of them are about the same height, but will change from swap to swap, depending oh who is doing it and what they are encountering to cause the engine to either sit lower or higher (steerring cross link, Alternator pully, steering box, etc). If you check some of the A-Body threads for pictures.. you will find some different setups on mounting, but like you said, in general they are about the same height give or take an 1" or so.
In general, the bottom of the F-Body oil pan sit about the same as the bottom of the X-member, my CTS-V is about 1" lower than the X-Member.
You can see my project on cardomain, the link is in my sig.. also checl out Stealth71, his is still ongoing. JohnB has a web site with some very good info.
In general, the bottom of the F-Body oil pan sit about the same as the bottom of the X-member, my CTS-V is about 1" lower than the X-Member.
You can see my project on cardomain, the link is in my sig.. also checl out Stealth71, his is still ongoing. JohnB has a web site with some very good info.
10-16-2007, 11:52 AM
#9
TECH Regular
iTrader: (15)
Join Date: Feb 2005
Location: East Freetown, MA
Posts: 458
Likes: 0
Received 0 Likes
on
0 Posts
The ATS and S&P style plates will use the stock location of the engine frame mounts, but you give up the option of using the Stock AC Compressor. Notching the frame is not required with these style plates because they require the compressor be relocated. This is due to the Adapter Plates coming into contact with the Stock Compressor.
Not true with the ATS setup. The F-body AC compressor and bracket will fit. You can also use the truck setup, but the bracket will need to be trimmed to fit.
10-16-2007, 06:00 PM
#10
Teching In
Thread Starter
Join Date: Sep 2007
Posts: 12
Likes: 0
Received 0 Likes
on
0 Posts
Lot's of great info here. It seems that this is one of those swaps with so many variables that it is hard to plan it all out before you actually start mocking stuff up.
I am starting to think I might be better off buying some of the $40 ebay plates as a starting point, then taking my car, engine/tranny, and fuel tank to a automotive machine shop for a day of fabrication
If I come armed with all the right parts, and several good drawings & plans maybe I can get all that done for less $$$ than buying custom stuff from someone else.
10-16-2007, 06:23 PM
#11
TECH Regular
iTrader: (15)
Join Date: Feb 2005
Location: East Freetown, MA
Posts: 458
Likes: 0
Received 0 Likes
on
0 Posts
Doubt it. Byu the time you get done paying for fuel, your time, their time, etc...
ATS plates plus 1/2 spacers and I'm good so far...
Not really sure why that's such a big deal. It hasn't been a bolt in deal, but its not out of anyone's scope for fabrication. If you can draw a fairly straight line, you can do this stuff.
ATS plates plus 1/2 spacers and I'm good so far...
Not really sure why that's such a big deal. It hasn't been a bolt in deal, but its not out of anyone's scope for fabrication. If you can draw a fairly straight line, you can do this stuff.