

clean block for new headgaskets, best way??

 01-09-2007, 11:34 PM
#2
Launching!
iTrader: (2)
Join Date: Dec 2006
Location: Goose Creek, SC
Posts: 285
Likes: 0
Received 0 Likes
on
0 Posts
Originally Posted by mvvette97
I used the plastic ice scraper but it's not working the best. Any pointers?
Hammer


 01-10-2007, 06:30 AM
#7
Do not repeat DO NOT use scotchbrite. The aluminum oxide ends up in the bottom end and destroys bearings. GM had a TSB out about this because the dealer tech were using scotchbrite to clean up intake manifold surfaces on v6s and the bottom ends were failing right after service due to aluminum oxide contamination of the bearing surfaces. I know everyone uses it and it works great and u put rags in the bores etc but some still gets in.
Trending Topics
01-10-2007, 07:29 AM
#9
Originally Posted by 454mag
Do not repeat DO NOT use scotchbrite. The aluminum oxide ends up in the bottom end and destroys bearings. GM had a TSB out about this because the dealer tech were using scotchbrite to clean up intake manifold surfaces on v6s and the bottom ends were failing right after service due to aluminum oxide contamination of the bearing surfaces. I know everyone uses it and it works great and u put rags in the bores etc but some still gets in.
Well mine is running mint.... never heard that...i used the purple fine metal finishing type pad from 3m...any particles would be so small they'd disintigrate upon combustion if for some reason any got in... you have to make sure you clean/prep well
01-10-2007, 07:57 AM
#10
quote " any particles would be so small they'd disintigrate upon combustion if for some reason any got in.."
Aluminum oxide does not "disintigrate upon combustion" it flows with your oil until it finds a nice soft bearing surface to embed itself into. Ive seen the pictures including SEM and it aint pretty.
ymmv
Aluminum oxide does not "disintigrate upon combustion" it flows with your oil until it finds a nice soft bearing surface to embed itself into. Ive seen the pictures including SEM and it aint pretty.
ymmv
 01-10-2007, 09:07 AM
#12
10 Second Club
iTrader: (35)

Join Date: Feb 2005
Location: Indiana boy
Posts: 4,174
Likes: 0
Received 0 Likes
on
0 Posts

I just did mine with wax and grease remover and a shop rag. I got it really clean. But I think i'm gonna lightly wet sand it with 1000 grit paper.
Now I'm awaiting parts. Bummer.

Now I'm awaiting parts. Bummer.
01-10-2007, 11:57 AM
#13

i used the old 3m roloc discs on the air grinder to do my block and to do my g/f firehawk when i had the heads off worked perfect no leaks on her car and my block looks mint, i have done it that ways on tons of engines and never a problem


 01-10-2007, 12:04 PM
#15
TECH Enthusiast
Join Date: May 2006
Location: south jersey
Posts: 644
Likes: 0
Received 0 Likes
on
0 Posts
i used a razor scraper and pulled it across, worked good, but took extreamly long, and had to be delicate with the razor to not take any aluminum with the gasket.
01-10-2007, 12:06 PM
#16
TECH Enthusiast
Join Date: May 2006
Location: south jersey
Posts: 644
Likes: 0
Received 0 Likes
on
0 Posts
oops forgot to add used brakecleaner and a vacume- dont do this in a closed area, (the vacum acclerates the fume production) as i learned the hard way. almost passed out/felt like **** the rest of the day..
 01-10-2007, 01:25 PM
#19
LS1 Tech Veteran
iTrader: (1)

Join Date: Oct 2003
Location: Wichita, Ks
Posts: 1,170
Likes: 0
Received 0 Likes
on
0 Posts
I have a couple of additional suggestions:
1. Make a scraper out of a copper tube about 8 inches long. Flatten about three inches of the tube with a hammer and a flat surface or flatten in the jaws of a vice. Think of this tool as a copper chisel. Then place the round (handle) in a vice and sharpen the end of the flat part to 45 degrees or so. The copper is harder than plastic, but way more forgiving than steel. Take your time and scrape the main gasket residue off.
2. Any solvent that you have used for cleaning can wash off the oil coating of the cylinder walls. When you have finished cleaning the gasket material off the deck surfaces of the block, vacuum any residue. Then rotate the crank until one piston is at bottom dead center. Coat your clean hand lightly with oil and use your palm and fingers as an applicator to spread the oil on the cylinder wall. Now repeat for the seven remaining cylinders in the same manner. This way, you don't score the pistons and cylinder walls on your next start.
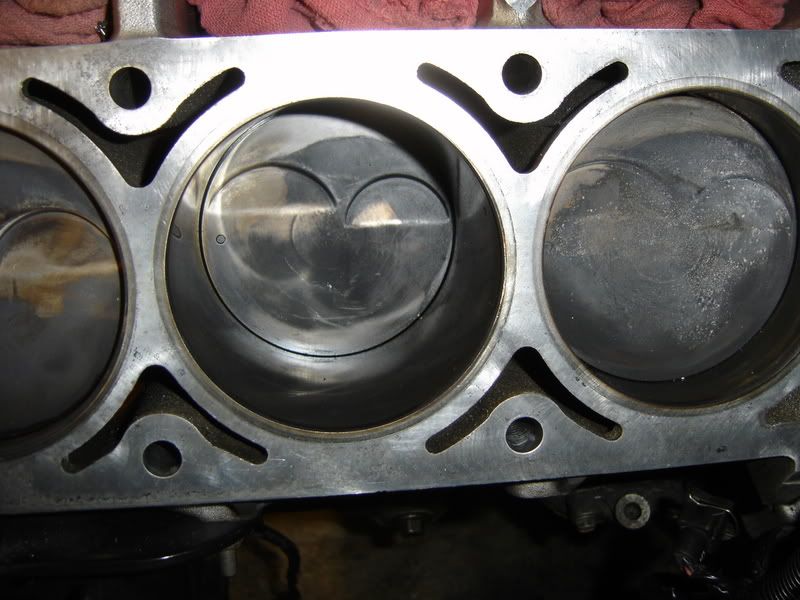
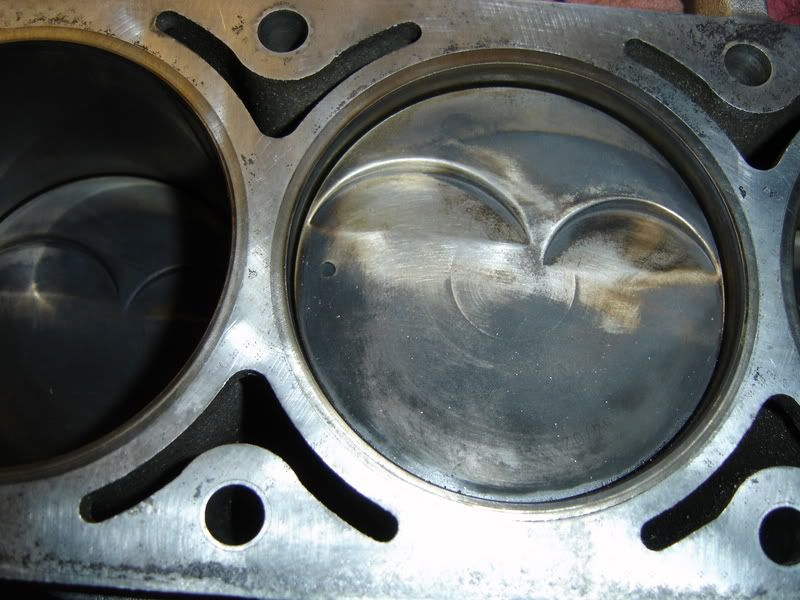
It's important to note that the deck surface of the block (and cylinder head for that matter) don't have to look pristine without a smudge or stain. What is important is that the surface is reasonably clean and flat so that the gasket can seal to the deck surfaces of the head and block.
Steve
1. Make a scraper out of a copper tube about 8 inches long. Flatten about three inches of the tube with a hammer and a flat surface or flatten in the jaws of a vice. Think of this tool as a copper chisel. Then place the round (handle) in a vice and sharpen the end of the flat part to 45 degrees or so. The copper is harder than plastic, but way more forgiving than steel. Take your time and scrape the main gasket residue off.
2. Any solvent that you have used for cleaning can wash off the oil coating of the cylinder walls. When you have finished cleaning the gasket material off the deck surfaces of the block, vacuum any residue. Then rotate the crank until one piston is at bottom dead center. Coat your clean hand lightly with oil and use your palm and fingers as an applicator to spread the oil on the cylinder wall. Now repeat for the seven remaining cylinders in the same manner. This way, you don't score the pistons and cylinder walls on your next start.
It's important to note that the deck surface of the block (and cylinder head for that matter) don't have to look pristine without a smudge or stain. What is important is that the surface is reasonably clean and flat so that the gasket can seal to the deck surfaces of the head and block.
Steve
01-10-2007, 08:24 PM
#20
well i spend damn near all afternoon cleaning it. I used brake cleaner with a scratch pad. Took FOREVER but I got it done. And yes, I'm going to put some oil on the cylinders because they are dry looking now. I also spent a long time cleaning the bolt holes. I ended up getting some of them long Q tips to get the coolant out of the holes.