

Remote Oil Adaptor Options


Thread Starter
Staging Lane
Joined: Oct 2011
Posts: 90
Likes: 2
From: Adelaide, Australia
Hello, I am in Australia and am using a Canton forward sump on an LSx454.
The problem is the adaptor that fits to the rear of the pan/block to take the lines out to a remote filter.
On my car the steering rack is directly under them. The Canton adaptor takes the lines straight down but there isnt enough room to fit a -12AN 90 degree fitting onto it without hitting the rack.
If the fittings were taken out sideways, I could then fit the 90 degree fititngs.
Does anybody know of this part being available form anyone, or do i have to custom fabricate it.
Or does anyone else have any suggestions for a solution?
This is a sketch, on the left is the standard Canton part, on the right is what would possibly work.

Thread Starter
Staging Lane
Joined: Oct 2011
Posts: 90
Likes: 2
From: Adelaide, Australia
Thanks, but no, the part I am talking about is at the rear of the block, before it goes off to the filter. I will try and post some actual pictures of the issue in the next day or, thanks anyways.
Thread Starter
Staging Lane
Joined: Oct 2011
Posts: 90
Likes: 2
From: Adelaide, Australia
The Canton block is about 1" deep, then it has straight 1 1/16" to -12AN straight adaptors screwed up from underneath into it. They have the hex to tighten them up, that adds about another 1/4".
One of the those is literally directly over the steering rack. If you look at my diagram (the one on the left) its pretty much exactly to scale.
Imagine even a tight radius 90* fitting on there, it just wont work. What I need is for the fittings to come out the side (like my diagram on the right side) then the 90 degree fittings are "flat" if you know what I mean to bring the hoses forward over the rack
In the next day or so I will post some actual photos.
TECH Enthusiast
Joined: May 2005
Posts: 689
Likes: 0
From: Perth, Australia
You'll need something with a swivel because you'll never rotate a fixed 90 deg fitting to tighten it up, without the outlet end hitting the sump.
Bottom of page 37, or bottom of 38, or bottom of 39.
FULL SWIVEL MALE FLARE TO O-RING BOSS FITTINGS
or DRY SUMP BANJO FITTINGS
Available in size 12 only. Low Profile.
http://www.xrp.com/xrp_catalog.pdf
Bottom of page 37, or bottom of 38, or bottom of 39.
FULL SWIVEL MALE FLARE TO O-RING BOSS FITTINGS
or DRY SUMP BANJO FITTINGS
Available in size 12 only. Low Profile.
http://www.xrp.com/xrp_catalog.pdf
Thread Starter
Staging Lane
Joined: Oct 2011
Posts: 90
Likes: 2
From: Adelaide, Australia
This is the issue I have to make it a little clearer, you can see the fitting, is right over the rack, there is no way to get a fitting on there.


This is the overall height, I only have about 2" to play with

Thanks very much for posting that link, maybe I can make these work

This is the overall height, I only have about 2" to play with
Thanks very much for posting that link, maybe I can make these work
Trending Topics
I would copy that block but make it 2 or 3times as thick, and dont drill the passenger holes coming out the bottle of it like that. Make them come out at 45* of side by side more, too the side away form the block, or spred them one forward one backwards (and away). to get the fitting setup out of the way. This is what you said, for adding fittings to that block, do you know that the thread is on the block???
I would avoid using a tight 90* fitting like that or a banjo. Or if you use a 90* fitting round in inside corner better if it comes square. And thouse are the Oring style (ORB) That I bet is different then the fitting that are on the oil pan block now, (probally NPT)??
Another thing is since that block bolts to the oil pan rail. You don't have to, get a wrench to the fitting installed in that tight space. You can take out those strait NPT (?) to AN, and out to 45* (maybe just the front one under the rack more) Your gona have to mess with what fitting to install 1st so it dosnt block the other to tighten them, and get the hose end fitting on. But then, put a strait fitting or a 45 hose end fitting on, just mock it up what will work. Then you can build the hoses with the ends that work, tighten everything what way that fits on the alum block. THEN put the alum block on with the fitting and lines tight already on the oil pan.
And FYI the -12 is overkill for a stock pump style running it thu all the stock block passages like that. -10 would be fine.
Or you can just weld some alum tubing (curved, or strait with some offset) on that block and weld some alum male AN fitting on the ends, getting them out of the way.
Thread Starter
Staging Lane
Joined: Oct 2011
Posts: 90
Likes: 2
From: Adelaide, Australia
Thanks for that. Unfortunately the passages in the block are not tapped, so whatever you do it has to be a plate that bolts up over them. I have seen pictures of Moroso pans where they weld on tubes with fittings directly to the holes in the pan, I could do that, but it would mean I would have to drop the pan and that is a pain now that it is all fitted up in the car.
I could though as you say make up curved tubes with AN fittings and weld them to an adaptor plate, to do the same thing, and I may still do that.
I also could design up an aluminium billet adaptor block, I was thinking as you suggest with one fitting going straight forward, then the back one coming out at 90*, then using a nice swept 90* bend to take it forward.
Thanks re the 12AN being overkill, I wasn't sure, and it would all be way easier if I went 10AN, everything is just that little bit more compact and easier to deal with.
http://www.jegs.com/p/Russell/Russel...48914/10002/-1
check out these if it is NPT
45*
http://www.jegs.com/i/Russell/799/61...rentProductId=
http://www.jegs.com/i/Russell/799/61...rentProductId=
90*
http://www.jegs.com/i/Russell/799/61...rentProductId=
http://www.jegs.com/i/Russell/799/61...rentProductId=
http://www.jegs.com/i/Earl%26%23039%...49012/10002/-1
If its ORB, look them up for a drysump oil system, Jones, barnes petterson, makes them.
https://www.pegasusautoracing.com/pr...oduct=3228-012

Thread Starter
Staging Lane
Joined: Oct 2011
Posts: 90
Likes: 2
From: Adelaide, Australia
Thanks for everyones help, I have designed up a block a friend is going to mill up for me. It will take two 45 degree angled fittings, should be neat.

Can I ask a dumb question though....
I can get 10AN flare fittings, that are 10AN thread the other side with an O ring, but what is -10AN thread equivalent too, is it 1/2" NPT? I need to know so I can tell my machinist what to size to tap the holes.

Thanks in advance.
Can I ask a dumb question though....
I can get 10AN flare fittings, that are 10AN thread the other side with an O ring, but what is -10AN thread equivalent too, is it 1/2" NPT? I need to know so I can tell my machinist what to size to tap the holes.
Thanks in advance.


Correct me if I'm wrong, but a 10 should be a 7/8"-14 thread.
And the 10 is a reference ot 10/16, or 5/8.
A 6 is 6/16, or 3/8.
So an 8, would be the reference for the 1/2 size, (8/16).
http://en.wikipedia.org/wiki/AN_thread
So the answer to the question, to tell your machininst, should be 7/8"-14.
But are these pointing towards the rack/front of the engine?
I thought the 'L' leg was at the rear of the engine?
If so, shouldn't the angled ports be pointed to the rear of the engine in order to come out of that area you have in your photo?
Last edited by PontiacFan; Feb 7, 2013 at 10:12 AM.
Thread Starter
Staging Lane
Joined: Oct 2011
Posts: 90
Likes: 2
From: Adelaide, Australia
Thanks for that, interesting, so the table on the link you provided says its an SAE thread.
You are correct that the "L" leg is at the rear of the engine. That is my problem, I need the hoses to come to the front of the engine (ie head to the left in the photo over the steering rack) , pretty much the only place I have to mount the remote oil filter is onto the chassis rail in the space between the radiator and the engine. So I need the hoses to run alongside the side of the sump up to that area. It also gives me the ability to take the hoses to the front of the car for an engine oil cooler if I want.
Thanks for your help.
Thread Starter
Staging Lane
Joined: Oct 2011
Posts: 90
Likes: 2
From: Adelaide, Australia
Hi guys, finally got all this sorted today, so thought i would post it up in case anyone at some stage has a similar problem, really appreciate everyone's help.
I designed up a stainless steel adaptor plate, bought some off the shelf 90 degree elbows, cut them all and then had it TIG welded. I used a full sump gasket and cut off the corner for the adaptor, I also used a smear of good gasket cement top and bottom, should be sweet. It took a lot of messing around but I am really pleased with how neat it looks. I also had a bit of trouble working out what the flow direction is out of the ports, its important to get it right through the remote filter the correct way, I ended up finding this diagram courtesy of another forum member, so thought I might post it for anyone's future reference too.

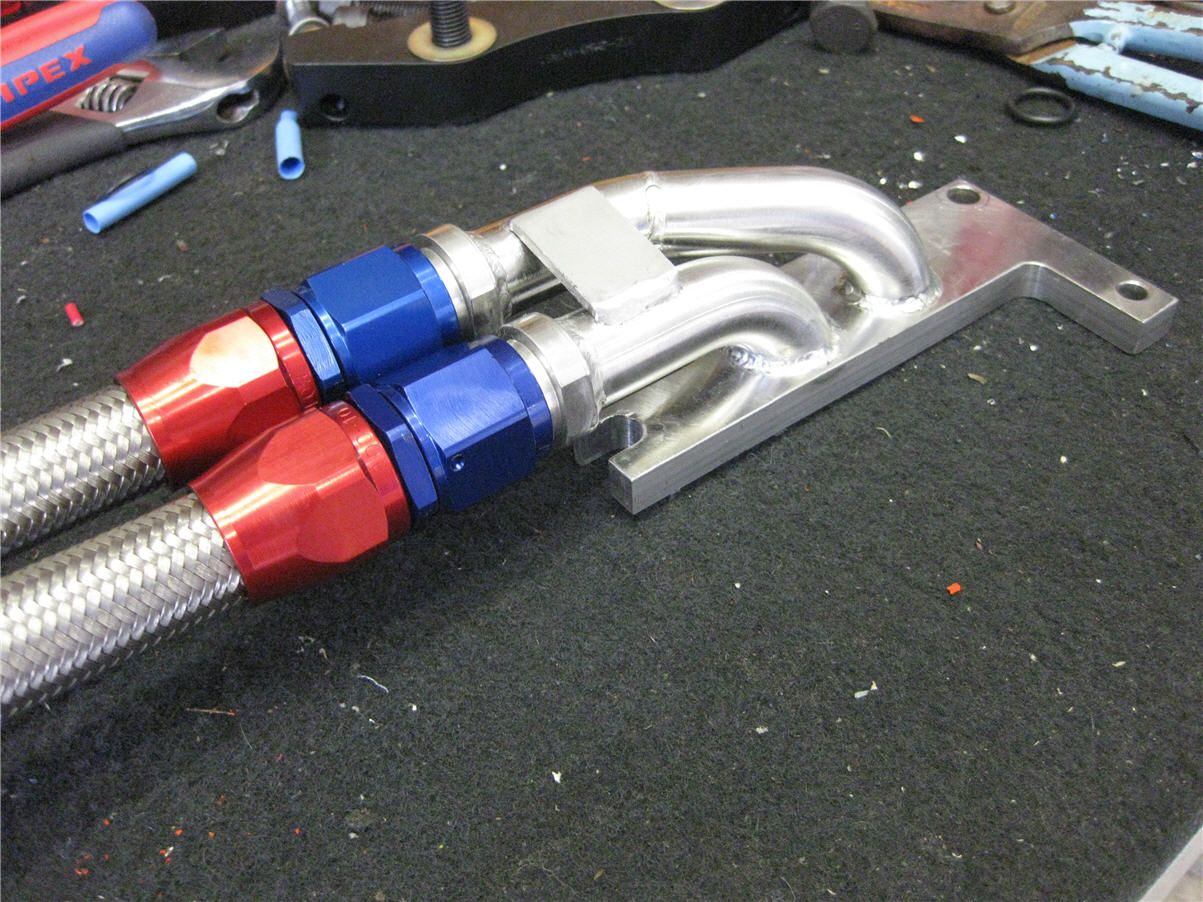


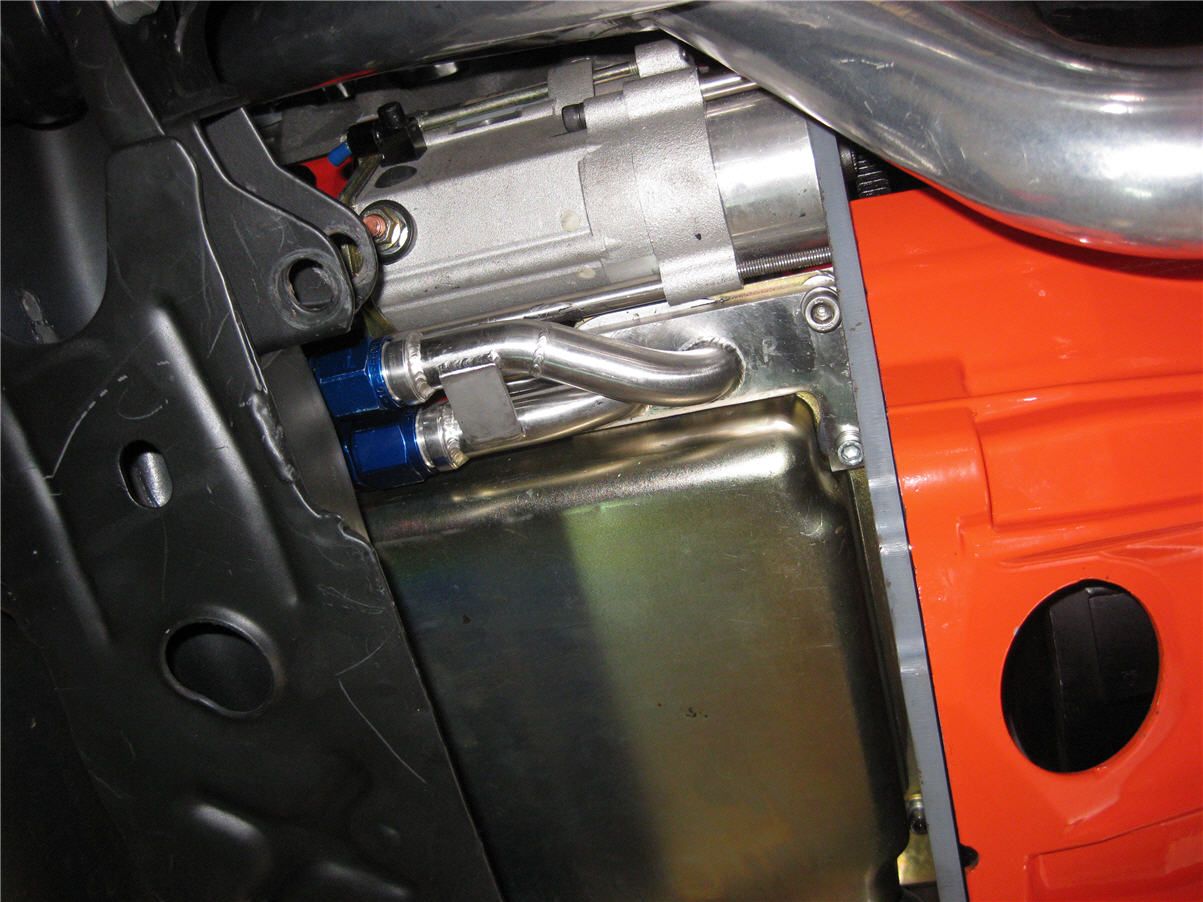

I designed up a stainless steel adaptor plate, bought some off the shelf 90 degree elbows, cut them all and then had it TIG welded. I used a full sump gasket and cut off the corner for the adaptor, I also used a smear of good gasket cement top and bottom, should be sweet. It took a lot of messing around but I am really pleased with how neat it looks. I also had a bit of trouble working out what the flow direction is out of the ports, its important to get it right through the remote filter the correct way, I ended up finding this diagram courtesy of another forum member, so thought I might post it for anyone's future reference too.
that came out great!
if you ever needed the flow direction, there on the moroso site. they list it under the descriptions for the alum billet rail street/strip LS oil pan. and in the ptf instruction file
if you ever needed the flow direction, there on the moroso site. they list it under the descriptions for the alum billet rail street/strip LS oil pan. and in the ptf instruction file

Teching In
Joined: Nov 2005
Posts: 31
Likes: 1
Hi guys, finally got all this sorted today, so thought i would post it up in case anyone at some stage has a similar problem, really appreciate everyone's help.
I designed up a stainless steel adaptor plate, bought some off the shelf 90 degree elbows, cut them all and then had it TIG welded. I used a full sump gasket and cut off the corner for the adaptor, I also used a smear of good gasket cement top and bottom, should be sweet. It took a lot of messing around but I am really pleased with how neat it looks. I also had a bit of trouble working out what the flow direction is out of the ports, its important to get it right through the remote filter the correct way, I ended up finding this diagram courtesy of another forum member, so thought I might post it for anyone's future reference too.
I designed up a stainless steel adaptor plate, bought some off the shelf 90 degree elbows, cut them all and then had it TIG welded. I used a full sump gasket and cut off the corner for the adaptor, I also used a smear of good gasket cement top and bottom, should be sweet. It took a lot of messing around but I am really pleased with how neat it looks. I also had a bit of trouble working out what the flow direction is out of the ports, its important to get it right through the remote filter the correct way, I ended up finding this diagram courtesy of another forum member, so thought I might post it for anyone's future reference too.
Thread Starter
Staging Lane
Joined: Oct 2011
Posts: 90
Likes: 2
From: Adelaide, Australia
Hey mate, thanks for that!! It took quite a bit of thinking to come up with what I think is a pretty neat solution. Happy to report the cars been running since the start of the year and the adapter is working perfectly, no leaks or whatever. Glad it helps 