
wtf!!! How do you break an oil pump?
 04-24-2013, 10:19 AM
#1


Biult an ls3 for a guy and he took it out and it ran great for over three hours of racing in an endurance application. The while warming up for the next leg. oil pressure was at 55 2 sec latter it was at 0 and he shut it down. Pulled it apart and the oil pump gearotor is broken in three peices and jamed. Oil pump housing is fine and not even worn. What the heck happened? completely stock ct525.
 04-25-2013, 05:35 AM
#2
GM pumps suck, they have been since 1997! The housing And rotors are two different cheap materials. The only good oil pump that GM has that's ~ok has been the pump in the L99's.
But if you want a good pump to replace it with get the melling 10296 and don't look back.
But if you want a good pump to replace it with get the melling 10296 and don't look back.
 04-25-2013, 01:40 PM
#6

Can someone explain the shimming process? I am going back together with my LS3 after a cam swap next week and am a little suspect of my pump as it is. My oil pressure was a little low for my liking after my first cam swap( brand new crate LS3 never run before the swap). Now that it is apart I want to make sure all my bases are covered before it goes back together.
My oil pressure was 35-40 cold idle, 25-30 warm at idle. The oil pressure climbs with RPM like it should. A quick rev gets to 50psi hot. Am I OK?
My oil pressure was 35-40 cold idle, 25-30 warm at idle. The oil pressure climbs with RPM like it should. A quick rev gets to 50psi hot. Am I OK?
Trending Topics
04-25-2013, 03:06 PM
#9
What shims are you talking about in the pump. From what I have been told is the rotors and housing have a low strength compound in between them that sets the clearnace in the pump when installing it and once the engine it turned over it breaks this and the oil disolves it.
Tim
Tim
04-25-2013, 04:18 PM
#10
I thought there was a thin round shim between the crank gear and the pump, but I just walked to the garage and looked at the pump and gear and there is not.
What is all this talk about shimming about then? Are we talking about centering the pump on the crank snout? Isnt it good enough to just eyeball center it? Or are you talking about using stacks of feeler gauges to check around the pump gear to center it in the housing?
Im looking for clarification on what the shimming talk is. I know the pumpgear/housing has to be centered, but I thought you all were talking about something I didnt already know.
04-25-2013, 04:31 PM
#11
usually needs to be .002. put the pump on, do not fully tighten. but tighten it enough so you can move the housing and center it while using the feeler gauges. then tighten when its aligned.
the purpose of this is so the housing is lined up so the gyrator doesnt destroy the inner walls of the pump (or itself) by being misaligned in any particular direction.
04-25-2013, 06:13 PM
#13
If being perfectly centered is what we want, I can do that with feeler gauges. Thanks for the input guys. i feel comfortable with what I have to do now.
If the pump I have now was off a few thousandths for a couple hundred miles will I need to replace it? It was a little low on oil pressure. but worked well, as in building pressure as RPM increased.
If the pump I have now was off a few thousandths for a couple hundred miles will I need to replace it? It was a little low on oil pressure. but worked well, as in building pressure as RPM increased.
Last edited by newschool72; 04-25-2013 at 06:21 PM.
04-26-2013, 01:25 AM
#15
Here is what I do:
First, disassemble the pump. Pull the cover off, take out the rotors, take out the plug, spring, and plunger for the bypass. Clean everything.
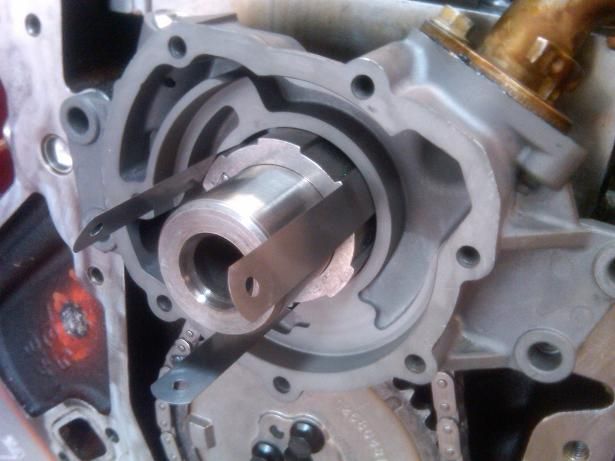
Next, line up the bare pump housing on the pump drive on the crank with three .002" feeler gauges or three strips of paper if you're in a pinch. Center the housing so that each of the three strips will pull right out from between the pump drive on the crank and the pump housing, but tighten the bolts before removing the strips.
Then lube the rotors with assembly lube and reinstall in the housing. Reinstall the pump cover bolts with medium strength loctite and torque to spec. Lube the bypass plunger and install, then the spring, and finally the threaded plug and torque the plug to spec.. In the cast aluminum housing, over torquing the plug could cause the plunger to bind.
I do this on every install hundreds of times now and no problems whatsoever. Usually, if you don't center the pump housing, you will see a nice scar around the circumference of the pump drive.
First, disassemble the pump. Pull the cover off, take out the rotors, take out the plug, spring, and plunger for the bypass. Clean everything.
Next, line up the bare pump housing on the pump drive on the crank with three .002" feeler gauges or three strips of paper if you're in a pinch. Center the housing so that each of the three strips will pull right out from between the pump drive on the crank and the pump housing, but tighten the bolts before removing the strips.
Then lube the rotors with assembly lube and reinstall in the housing. Reinstall the pump cover bolts with medium strength loctite and torque to spec. Lube the bypass plunger and install, then the spring, and finally the threaded plug and torque the plug to spec.. In the cast aluminum housing, over torquing the plug could cause the plunger to bind.
I do this on every install hundreds of times now and no problems whatsoever. Usually, if you don't center the pump housing, you will see a nice scar around the circumference of the pump drive.
04-26-2013, 11:57 AM
#16

Here is what I do:
First, disassemble the pump. Pull the cover off, take out the rotors, take out the plug, spring, and plunger for the bypass. Clean everything.
Next, line up the bare pump housing on the pump drive on the crank with three .002" feeler gauges or three strips of paper if you're in a pinch. Center the housing so that each of the three strips will pull right out from between the pump drive on the crank and the pump housing, but tighten the bolts before removing the strips.
Then lube the rotors with assembly lube and reinstall in the housing. Reinstall the pump cover bolts with medium strength loctite and torque to spec. Lube the bypass plunger and install, then the spring, and finally the threaded plug and torque the plug to spec.. In the cast aluminum housing, over torquing the plug could cause the plunger to bind.
I do this on every install hundreds of times now and no problems whatsoever. Usually, if you don't center the pump housing, you will see a nice scar around the circumference of the pump drive.
 04-28-2013, 08:13 AM
#20
I looked at the back half of my housing last night and have a slightly shiny spot about an inch long, so I guess my eyeball was pretty close the last time I lined it up. This time I will use the feeler gauges to get it just right. Thanks for the education, guys! I may wind up knowing a thing or two about this LS stuff before too long ,LOL.