
Question about changing valve seals
 02-18-2009, 03:53 PM
#1
On The Tree
Thread Starter
iTrader: (1)

Join Date: Jun 2004
Location: SF Bay Area
Posts: 122
Likes: 0
Received 0 Likes
on
0 Posts
I've got a set of AFR 205cc heads. I am changing the valve seals and have a question about the new seals.
The valve guide is externally threaded. I'm having a very hard time getting the seals all the way down into place with just my hands. I don't want to mash them into place for fear of damaging the seal, so I was curious if there is a better way to do this.
I looked at this thread: http://www.ls1howto.com/index.php?article=23
But it looks like they used a hammer and socket to push the new seal into place. Is this the correct method? Do GM (or other aftermarket) heads have threaded valve guides? I've got blisters on my thumb from trying to push and rotate the new seal into place.
I put oil on both the seal and the guide to make things easier, but it's a real pain. Any help would be appreciated!
-ch
 02-18-2009, 06:26 PM
#3
There is a tool to do this, but most just use a sprocket. Contact Tony and get his input, he put them on all the time. I just installed them on a set of Darts but they were the combined seal/seat and the guides were threaded. I used a large socket to put them down all the way.
02-18-2009, 11:15 PM
#4
TECH Fanatic
iTrader: (6)

Join Date: Nov 2001
Location: NV
Posts: 1,224
Likes: 0
Received 0 Likes
on
0 Posts

I put a 1/2" drive 15mm over the seal. Then I put a 21mm over the 15mm. Then I just tap till the seal is all the way down. No chance of messing up the seal doing it that way.
 02-20-2009, 02:47 PM
#6
On The Tree
Thread Starter
iTrader: (1)
Join Date: Jun 2004
Location: SF Bay Area
Posts: 122
Likes: 0
Received 0 Likes
on
0 Posts
Well, this is frustrating.
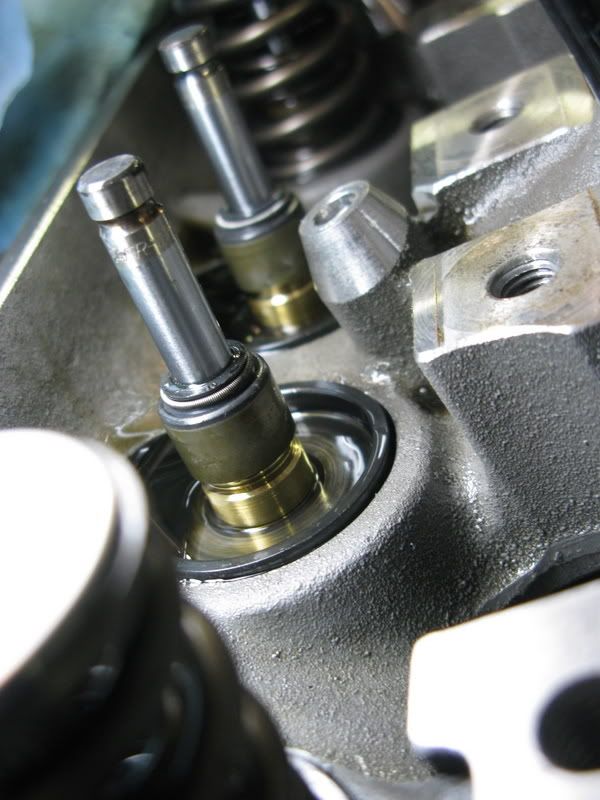
First, the seals that I received from AFR are shorter than the original ones by about 1.5 mm. Second, the metal part of the seal does not interface with anything, so there's no way to know how far down the seal should go.
After a few good taps with a dead-blow hammer and a 12mm socket, here's where the new seals sit:
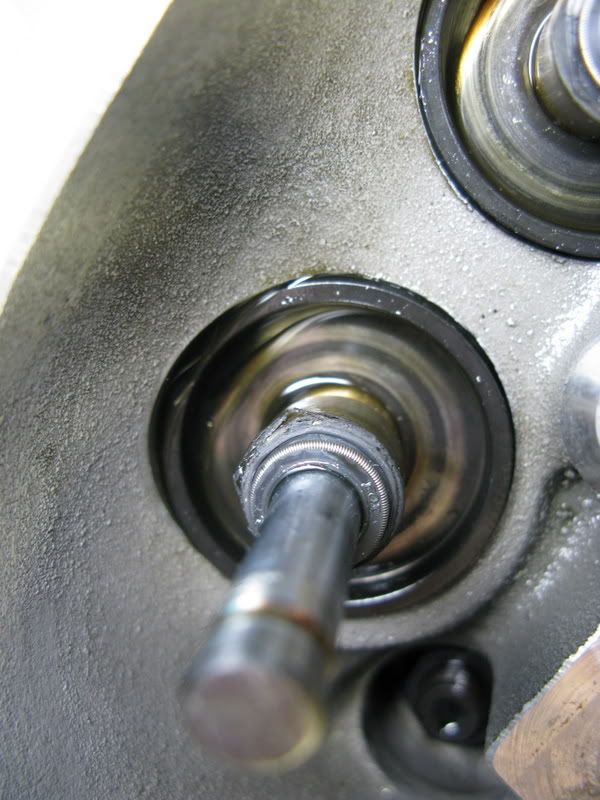
I used a 13mm on the first one and struck a bit harder and this happened:
The guy I talked to at AFR said that I should be able to push the seals down with my hands. I have no idea what he's talking about. Without the hammer and socket I'd never get these on...but I have no way of knowing how far down they should go. Gah!
-ch
First, the seals that I received from AFR are shorter than the original ones by about 1.5 mm. Second, the metal part of the seal does not interface with anything, so there's no way to know how far down the seal should go.
After a few good taps with a dead-blow hammer and a 12mm socket, here's where the new seals sit:
I used a 13mm on the first one and struck a bit harder and this happened:
The guy I talked to at AFR said that I should be able to push the seals down with my hands. I have no idea what he's talking about. Without the hammer and socket I'd never get these on...but I have no way of knowing how far down they should go. Gah!
-ch