99 Z28 FBody, Interior flooding with water.
 01-04-2015, 01:28 PM
#1


I honestly wasnt sure where to put this so I just stuck in here.
This doesn't always happen and I am clueless as to how or where this water is coming from... but my car is collecting water in 3 different areas.
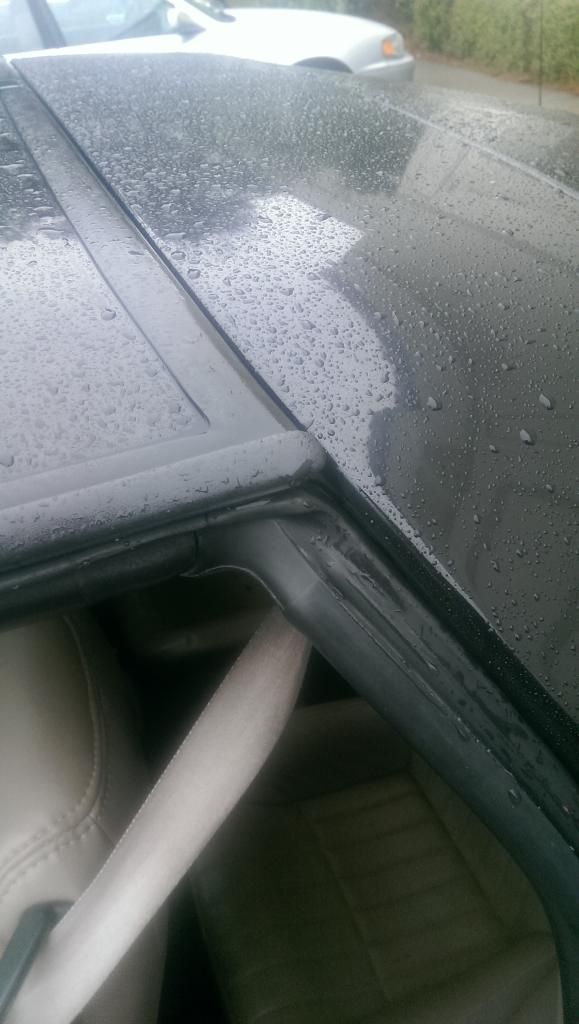
#1 The Hatch is POOLING with water, even when it's just sitting still. I am making SURE the hatch is properly closed but after it rains, SOMETIMES, not always, but sometimes it is just FILLED with so much water I could drown a cat inside of it, no exxaguration its bucket filled with water and I have to use a shop vac to get it all out. This happened in Spring and I put Vaseline all over the weather stripping and it stopped for a moment but I once again have NO indication as to where this water is coming from.
#2 My back seat floor is SOAKED with water...ALSO the driver side seat is aswell yet the T-Tops and T-Top lining / headliner are COMPLETELY dry. I am 100% clueless as to HOW water is getting into my drivers seat...the water on the floor is MOSTLY damp with some mild pools here and there.
#3 The Driverside front seat is ALSO soaking up with water, along with water along the fuse panel DOOR on the drivers side door. I was beginning to think weather stripping so I V-Jellied my weather stripping again. My car is no spring chicken so maybe it is all just bad weather stripping? I just am afraid of having all the weather stripping on this car replaced $$$ and still have leaks.
Back Seat...

Front Seat... You can't tell but its also soaked.

I wiped it down before taking the photo but this was also drenched with water and I know it didnt happen when I opened the door.

The kick panel was also soaked.

I vacuumed most of the water out, alot of water UNDER the seat aswell, bad news.. I am unsure where its all coming from. When I run a garden hose over it, nothing leaks...Im puzzled.
This doesn't always happen and I am clueless as to how or where this water is coming from... but my car is collecting water in 3 different areas.
#1 The Hatch is POOLING with water, even when it's just sitting still. I am making SURE the hatch is properly closed but after it rains, SOMETIMES, not always, but sometimes it is just FILLED with so much water I could drown a cat inside of it, no exxaguration its bucket filled with water and I have to use a shop vac to get it all out. This happened in Spring and I put Vaseline all over the weather stripping and it stopped for a moment but I once again have NO indication as to where this water is coming from.
#2 My back seat floor is SOAKED with water...ALSO the driver side seat is aswell yet the T-Tops and T-Top lining / headliner are COMPLETELY dry. I am 100% clueless as to HOW water is getting into my drivers seat...the water on the floor is MOSTLY damp with some mild pools here and there.
#3 The Driverside front seat is ALSO soaking up with water, along with water along the fuse panel DOOR on the drivers side door. I was beginning to think weather stripping so I V-Jellied my weather stripping again. My car is no spring chicken so maybe it is all just bad weather stripping? I just am afraid of having all the weather stripping on this car replaced $$$ and still have leaks.
Back Seat...

Front Seat... You can't tell but its also soaked.

I wiped it down before taking the photo but this was also drenched with water and I know it didnt happen when I opened the door.

The kick panel was also soaked.

I vacuumed most of the water out, alot of water UNDER the seat aswell, bad news.. I am unsure where its all coming from. When I run a garden hose over it, nothing leaks...Im puzzled.
 01-04-2015, 02:15 PM
#2

Drown a cat....you have something against cats.....LOL.......
Listen, most likely your water problem in the back hatch area is the urethane glue that holds the back glass in place all around the edges. My t-top holding area in the back filled with water a few times and I went nuts trying to figure out how the hell water can get in that area without getting anything wet around it up top on the carpet.
The glue at the 6'oclock position....rear of the glass near the spoiler....was just coming loose. So the rain was landing on the back glass, running down the back glass and some of it was getting into the car through the black rubber moulding.
I went and bought a $7.00 tube of urethane at an auto glass shop, a tube gun at Home Depot for like $3.00. Took off the interior pieces all around the hatch and ran a new bead of urethane all the way around.
No leaks........
****Sometimes on real bad ones.....you can open the hatch and then push on the glass from the inside and see it move away from the picnchweld that its glued to.
Also......remove the rubber/plastic plug from the bottom of that hatch t-top area and the water will at least drain out and it wont fill up......no drowning cats......LOL
As for the front.......man, its hard to figure those out without seeing the car. Get inside when everything inside is bone dry. Have a friend do the water test and let water land on it simulating rain fall.....not a direct hit with a stream of water. Just spend the time tracking down the source of the leak.
.
01-04-2015, 04:42 PM
#3
TECH Addict
iTrader: (1)

Join Date: Apr 2012
Location: Ellijay, GA
Posts: 2,769
Likes: 0
Received 0 Likes
on
0 Posts
+1 on what LS6427 said, had a buddy with a 96 bird that I had put a sub box in the t-top area that developed water stains on the top of the box and when he removed it the bottom half the box was covered in black mold, I noticed even with the hatch closed I could push on the lower section of the glass and see the glass and black seal move independently of the hatch.
I had a leak like this once, tho not as bad. if you remove the interior plastics (specifically the sail panels, a-pillars and headliner) it will help you locate it. if you remove the t-tops you will see the plastic pieces held in by a small bolt that are part of the door/t-top opening weather stripping, for me water was getting around that bolt and leaking inside, a mess of RTV later and the leak is stopped, I can try to get some pictures if it ever stops raining here.
I had a leak like this once, tho not as bad. if you remove the interior plastics (specifically the sail panels, a-pillars and headliner) it will help you locate it. if you remove the t-tops you will see the plastic pieces held in by a small bolt that are part of the door/t-top opening weather stripping, for me water was getting around that bolt and leaking inside, a mess of RTV later and the leak is stopped, I can try to get some pictures if it ever stops raining here.
01-04-2015, 05:59 PM
#4
Drown a cat....you have something against cats.....LOL.......
Listen, most likely your water problem in the back hatch area is the urethane glue that holds the back glass in place all around the edges. My t-top holding area in the back filled with water a few times and I went nuts trying to figure out how the hell water can get in that area without getting anything wet around it up top on the carpet.
The glue at the 6'oclock position....rear of the glass near the spoiler....was just coming loose. So the rain was landing on the back glass, running down the back glass and some of it was getting into the car through the black rubber moulding.
I went and bought a $7.00 tube of urethane at an auto glass shop, a tube gun at Home Depot for like $3.00. Took off the interior pieces all around the hatch and ran a new bead of urethane all the way around.
No leaks........
****Sometimes on real bad ones.....you can open the hatch and then push on the glass from the inside and see it move away from the picnchweld that its glued to.
Also......remove the rubber/plastic plug from the bottom of that hatch t-top area and the water will at least drain out and it wont fill up......no drowning cats......LOL
As for the front.......man, its hard to figure those out without seeing the car. Get inside when everything inside is bone dry. Have a friend do the water test and let water land on it simulating rain fall.....not a direct hit with a stream of water. Just spend the time tracking down the source of the leak.
.
Listen, most likely your water problem in the back hatch area is the urethane glue that holds the back glass in place all around the edges. My t-top holding area in the back filled with water a few times and I went nuts trying to figure out how the hell water can get in that area without getting anything wet around it up top on the carpet.
The glue at the 6'oclock position....rear of the glass near the spoiler....was just coming loose. So the rain was landing on the back glass, running down the back glass and some of it was getting into the car through the black rubber moulding.
I went and bought a $7.00 tube of urethane at an auto glass shop, a tube gun at Home Depot for like $3.00. Took off the interior pieces all around the hatch and ran a new bead of urethane all the way around.
No leaks........
****Sometimes on real bad ones.....you can open the hatch and then push on the glass from the inside and see it move away from the picnchweld that its glued to.
Also......remove the rubber/plastic plug from the bottom of that hatch t-top area and the water will at least drain out and it wont fill up......no drowning cats......LOL
As for the front.......man, its hard to figure those out without seeing the car. Get inside when everything inside is bone dry. Have a friend do the water test and let water land on it simulating rain fall.....not a direct hit with a stream of water. Just spend the time tracking down the source of the leak.
.
+1 on what LS6427 said, had a buddy with a 96 bird that I had put a sub box in the t-top area that developed water stains on the top of the box and when he removed it the bottom half the box was covered in black mold, I noticed even with the hatch closed I could push on the lower section of the glass and see the glass and black seal move independently of the hatch.
I had a leak like this once, tho not as bad. if you remove the interior plastics (specifically the sail panels, a-pillars and headliner) it will help you locate it. if you remove the t-tops you will see the plastic pieces held in by a small bolt that are part of the door/t-top opening weather stripping, for me water was getting around that bolt and leaking inside, a mess of RTV later and the leak is stopped, I can try to get some pictures if it ever stops raining here.
I had a leak like this once, tho not as bad. if you remove the interior plastics (specifically the sail panels, a-pillars and headliner) it will help you locate it. if you remove the t-tops you will see the plastic pieces held in by a small bolt that are part of the door/t-top opening weather stripping, for me water was getting around that bolt and leaking inside, a mess of RTV later and the leak is stopped, I can try to get some pictures if it ever stops raining here.
 ... I'm kidding, I still love my Z28 I just really need to fix this water leak.
I dodged a bullet with it earlier when a shop shot my PCM and BCM - luckily was able to get it fixxed without it being totaled.
01-04-2015, 07:09 PM
#5
TECH Addict
iTrader: (1)
Join Date: Apr 2012
Location: Ellijay, GA
Posts: 2,769
Likes: 0
Received 0 Likes
on
0 Posts
I noticed you're in GA too? yeah the rain here has been excessive and pretty strange for this time of year. Thunderstorms in December / January. My car has been driving through non-stop rain and its not liking it. Always having to feather the gas around corners on cold wet ground and water piling up in my interior... the joys of owning an FBody. ... I'm kidding, I still love my Z28 I just really need to fix this water leak.
I dodged a bullet with it earlier when a shop shot my PCM and BCM - luckily was able to get it fixxed without it being totaled.
... I'm kidding, I still love my Z28 I just really need to fix this water leak.I dodged a bullet with it earlier when a shop shot my PCM and BCM - luckily was able to get it fixxed without it being totaled.
01-04-2015, 07:27 PM
#6
On The Tree
Join Date: Dec 2014
Location: Mesa, AZ
Posts: 131
Likes: 0
Received 0 Likes
on
0 Posts
Did you take it through a touch less carwash? The windows seals are famous for getting a few drips on the inside of the door windows, but not as much as your pictures show, check your hatch alignment maybe?
01-05-2015, 11:01 AM
#7
How long have you had this car and have the problems recently appeared? Or are we digging in to issues you bought the car with?
Are the front and rear leaks only on the driver's side? With the window shut, take a look at how the glass engages the weatherstripping. Then, take the same look on the passenger side. Do you see any differences?
Are the front and rear leaks only on the driver's side? With the window shut, take a look at how the glass engages the weatherstripping. Then, take the same look on the passenger side. Do you see any differences?
Trending Topics
01-08-2015, 10:02 AM
#9
Launching!
iTrader: (1)
Join Date: Jul 2012
Location: Chicago
Posts: 246
Likes: 0
Received 0 Likes
on
0 Posts
This is a very frustrating issue. This happened to my car in a way. Except it was mainly the floor in front of the back seats that was getting soaked. Turns out the weather stripping that goes along the pillar that is on the side of the windshield was a little bit loose. Make sure it's pushed in all the way and pushed in properly. It may not be the root of your problem but its worth checking on both sides.
01-09-2015, 08:42 AM
#10
How long have you had this car and have the problems recently appeared? Or are we digging in to issues you bought the car with?
Are the front and rear leaks only on the driver's side? With the window shut, take a look at how the glass engages the weatherstripping. Then, take the same look on the passenger side. Do you see any differences?
Are the front and rear leaks only on the driver's side? With the window shut, take a look at how the glass engages the weatherstripping. Then, take the same look on the passenger side. Do you see any differences?
The weather stripping on the passenger side seems to seal much better than the drivers side. The passenger side window literally folds against the weather stripping where you can see the weather stripping bind against the window and itself. The drivers side, there's almost no binding, the window just sits "against" the stripping.
This is a very frustrating issue. This happened to my car in a way. Except it was mainly the floor in front of the back seats that was getting soaked. Turns out the weather stripping that goes along the pillar that is on the side of the windshield was a little bit loose. Make sure it's pushed in all the way and pushed in properly. It may not be the root of your problem but its worth checking on both sides.
I am having ABRA come out to patch urthane my rear window. I'm hoping this fixes it. I'm not going to have them remove it as there's a chance of breaking it and they don't make that window anymore.
01-13-2015, 09:11 AM
#11
I found two leaks that appear to be responsible for my wet carpet... But I don't think they have anything to do with the trunk.
The first one is on at the rear corner of the T-Top, Driver side Window, and the interior. It seems to be funneling under the rubber and INSIDE my plastic interior to the frame under my carpet where it collects and soaks. It appears to be an area of rubber right where the T-Top latch is where water can tunnel directly behind the back seat panels and down to the ground which is why I can't see it dripping
The second one is the driversside A-Piller. It seems to travel down the weather stripping to the rear view mirror and begins seeping inside from there..
Now the million dollar question... How do I fix them? Weather stripping need to be replaced?
The first one is on at the rear corner of the T-Top, Driver side Window, and the interior. It seems to be funneling under the rubber and INSIDE my plastic interior to the frame under my carpet where it collects and soaks. It appears to be an area of rubber right where the T-Top latch is where water can tunnel directly behind the back seat panels and down to the ground which is why I can't see it dripping

The second one is the driversside A-Piller. It seems to travel down the weather stripping to the rear view mirror and begins seeping inside from there..

Now the million dollar question... How do I fix them? Weather stripping need to be replaced?
01-13-2015, 06:16 PM
#12
For the T-Top Seal, there is a metal bracket behind the plastic trim that the T-Top pin engages. It might be as easy as bending/adjusting that bracket so the T-Top presses against the weatherstripping more.
For the front A-Pillar, you can solve that by adjsuting the window front stop. (You need to take off the door panel for that.) You can let the window come up a bit higher to press tighter against the seal. (You can confirm the need by viewing the reveal with the window and door shut and comparing your driver and passenger sides.)
Before you adjust the window, you'll want to make sure your regulator rivets are NOT loose and that you do NOT have this problem developing. (This problem requires a more radical fix.) https://ls1tech.com/forums/general-m...-included.html
01-15-2015, 07:30 AM
#13
For the T-Top Seal, there is a metal bracket behind the plastic trim that the T-Top pin engages. It might be as easy as bending/adjusting that bracket so the T-Top presses against the weatherstripping more.
For the front A-Pillar, you can solve that by adjsuting the window front stop. (You need to take off the door panel for that.) You can let the window come up a bit higher to press tighter against the seal. (You can confirm the need by viewing the reveal with the window and door shut and comparing your driver and passenger sides.)
Before you adjust the window, you'll want to make sure your regulator rivets are NOT loose and that you do NOT have this problem developing. (This problem requires a more radical fix.) https://ls1tech.com/forums/general-m...-included.html
For the front A-Pillar, you can solve that by adjsuting the window front stop. (You need to take off the door panel for that.) You can let the window come up a bit higher to press tighter against the seal. (You can confirm the need by viewing the reveal with the window and door shut and comparing your driver and passenger sides.)
Before you adjust the window, you'll want to make sure your regulator rivets are NOT loose and that you do NOT have this problem developing. (This problem requires a more radical fix.) https://ls1tech.com/forums/general-m...-included.html

Upon taking a deeper look it appears my Window isnt sealing properly at the rear view mirror area, thats where the water from the front seems to be coming from. How do I correct this after removing the panel?
01-15-2015, 02:33 PM
#14
Check for the loose regulator rivets - see details in the link I posted. Unless you changed the internals of the door or changed the glass, you probably have the structural problem with the rivet holes, which is a much more involved fix.
01-15-2015, 03:50 PM
#15
Adjusting the front stop upwards will allow the glass to come up and seal better, but if you haven't messed with the door - you should not be out of adjustment.
Check for the loose regulator rivets - see details in the link I posted. Unless you changed the internals of the door or changed the glass, you probably have the structural problem with the rivet holes, which is a much more involved fix.
Check for the loose regulator rivets - see details in the link I posted. Unless you changed the internals of the door or changed the glass, you probably have the structural problem with the rivet holes, which is a much more involved fix.
01-15-2015, 05:10 PM
#16
The factory replacement procedure calls for drilling out the regulator rivets, supporting the window glass, removing the whole regulator, safe-ing the regulator, replacing the motor, and then reinstalling in reverse.
There are a number of things that can go wrong with this procedure, (as opposed to using the shbox method) like not using the special rivets required for the replacement. These things can cause the regulator to tear through the door and throw the window out of alignment.
There are a number of things that can go wrong with this procedure, (as opposed to using the shbox method) like not using the special rivets required for the replacement. These things can cause the regulator to tear through the door and throw the window out of alignment.
01-17-2015, 12:34 PM
#17
The factory replacement procedure calls for drilling out the regulator rivets, supporting the window glass, removing the whole regulator, safe-ing the regulator, replacing the motor, and then reinstalling in reverse.
There are a number of things that can go wrong with this procedure, (as opposed to using the shbox method) like not using the special rivets required for the replacement. These things can cause the regulator to tear through the door and throw the window out of alignment.
There are a number of things that can go wrong with this procedure, (as opposed to using the shbox method) like not using the special rivets required for the replacement. These things can cause the regulator to tear through the door and throw the window out of alignment.
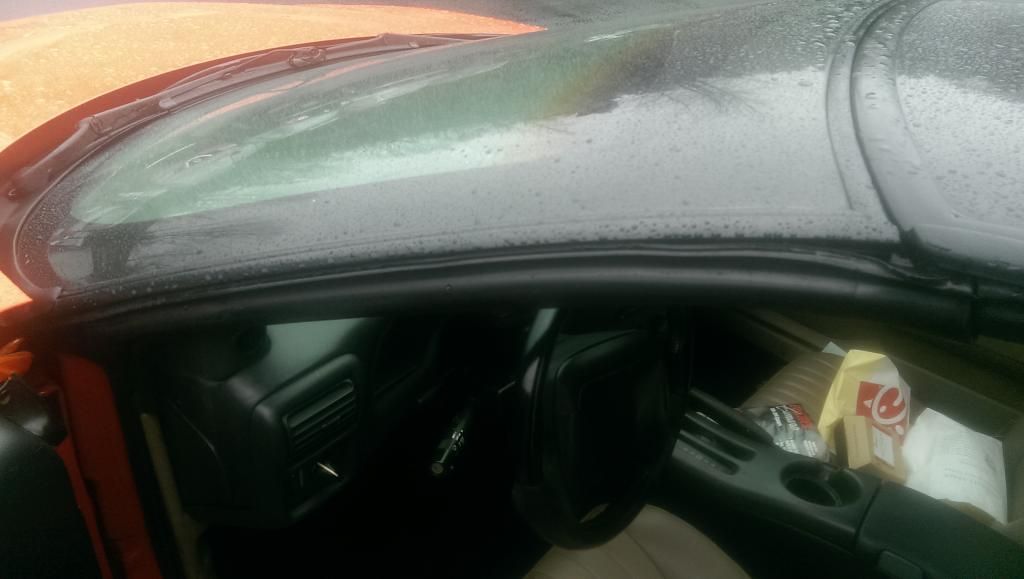
The weird thing is, my window does come all the way up, but it doesnt come all the way "in" which means its not sitting flush with the rubber, it needs to come in toward the car more because as it is, you can squeeze a finger into the car between the rubber weather stripping and the window itself from back of the window (the back as in the end nearest the door handle and the black top roof area ..or basically the photo I showed of the T-Top leak earlier)
This is a photo of my door completely closed on the driver side looking behind me (away from the dashboard, toward the rear of the car) at how the window seals at the back... you can see its not meshing against the rubber at all and the window is rising to the correct height, fully up.

Can you tell me anything about these photos? Im almost pretty certain someone has either replaced or modified the Window Motor but can you address if this repair has caused problems by the mount here?
#1a

#1b

#2

#3
 01-17-2015, 05:05 PM
#18
It should have been riveted in properly with 4 rivets, but they have installed three bolts instead. These are tearing your door panel apart.
First, I'd check your passenger side and see how it is. If it isn't jacked up, you can use it as a guide to see how the driver side should be.
What size are the bolts in the regulator? If they are 1/4", you may be able to save things with the proper rivets and may be a washer or two epoxied to the inside of the door panel. You may have caught this early enough to avoid a full plate for the fix.
Once you have the regulator properly installed and secure, you can follow the shbox window adjustment instructions to cure the in/out and any other problems. http://shbox.com/1/adj_window.html
01-17-2015, 05:45 PM
#19
You've got the door panel problem. Someone took out the regulator hand had no love for this car.
It should have been riveted in properly with 4 rivets, but they have installed three bolts instead. These are tearing your door panel apart.
First, I'd check your passenger side and see how it is. If it isn't jacked up, you can use it as a guide to see how the driver side should be.
What size are the bolts in the regulator? If they are 1/4", you may be able to save things with the proper rivets and may be a washer or two epoxied to the inside of the door panel. You may have caught this early enough to avoid a full plate for the fix.
Once you have the regulator properly installed and secure, you can follow the shbox window adjustment instructions to cure the in/out and any other problems. http://shbox.com/1/adj_window.html
I love my car but there are times I consider throwing down for a 2010 - 2014 Camaro but then I get a glimpse of a 7 year $35,000 loan and it just isnt sitting well with me. Right now she still runs very strong, infact amazingly strong for its age.
I'll check on the bolt size, as for rivets, will I need a rivet gun? (I've never installed them before, when I last did a Window motor on an FBody I used locktite screws.) If the hole size is larger than 1/4th then the only fix is either replacing the entire door or the plate mod?
01-18-2015, 10:15 AM
#20
Another benefit to the plate mod is that the regulator then really attaches to the plate and not so much the door composite. With the plate, you can use bolts instead of rivets. So... if your regulator has been modified such that the holes are too big for rivets, etc. you might save a whole lot of money on a new regulator and a riveter by doing the plate fix and sticking with bolts.