
Replacing turn signal lever / switch
 11-13-2011, 08:45 AM
#1
TECH Enthusiast
Thread Starter

Join Date: Oct 2008
Location: Rochester, NY
Posts: 593
Likes: 0
Received 0 Likes
on
0 Posts

Hey guys,
I have been having an issue with the GXP that has progressively gotten worse over the past month. Whenever I use my turn signals at night (or when the car thinks it is night time) my high beams come on.
They do not turn off easily, either. I have to jiggle the lever to get them to turn off.
I ordered a new lever(switch included) for $90 at my local chevy dealer on Friday. I mentioned the issue I was having to the parts manager and he said that in his Cobalt, sometimes the headlights would completely turn off when he used his turn signal.
WTF GM? Drop that part supplier!
Anyways, the new part will come in Monday. I will swap it out and let you know if it solves the problem. I just hope that I do not get into a fight for flashing somebody before then.

 11-14-2011, 10:37 AM
#4
TECH Enthusiast
Thread Starter
Join Date: Oct 2008
Location: Rochester, NY
Posts: 593
Likes: 0
Received 0 Likes
on
0 Posts
11-15-2011, 06:59 PM
#6
TECH Enthusiast
Thread Starter
Join Date: Oct 2008
Location: Rochester, NY
Posts: 593
Likes: 0
Received 0 Likes
on
0 Posts
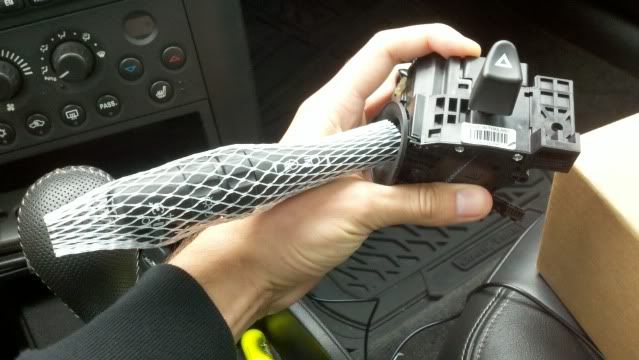
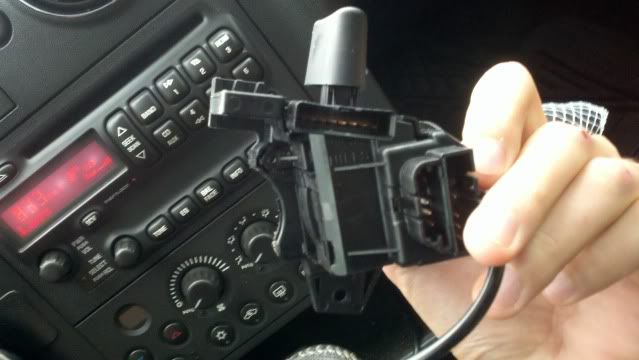
I swapped out the turn signal lever unit tonight. Here is a HOW-TO. Easy job with only one tricky part.
The New Part:
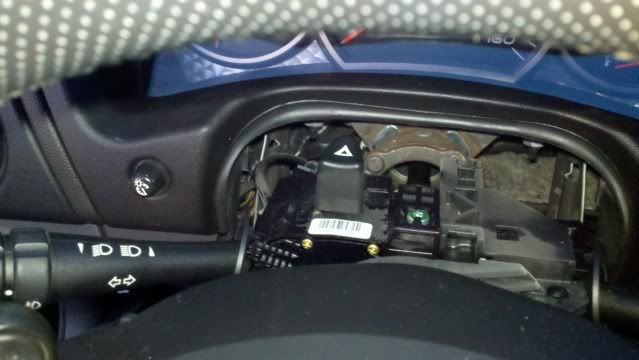
1) Pop off position label ring from around the ignition (Pulls straight out)
2) Pull off center stack trim
3) Remove three screws (philips) to release the knee bolster panel. (One is located behind the driver's side dash cover, one is in front of the ODBII Connector, and the last is near the parking brake pedal)
4) Remove Knee Bolster Panel
5) The cowl that surrounds the steering column separates along the center with some gentle prying. You may have to adjust the tilt through this process to have the top half and bottom half come out easily. The bottom half needs to be rotated to slide off of the tilt lever.
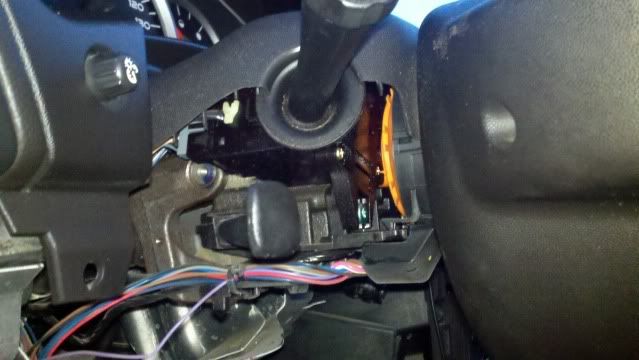
NOTE: You will have to slightly bend the plastic to squeeze it in and out of position. I did not break anything doing my repair, just move slowly and carefully.
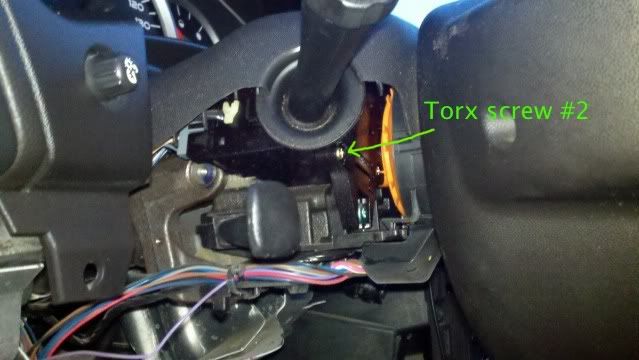
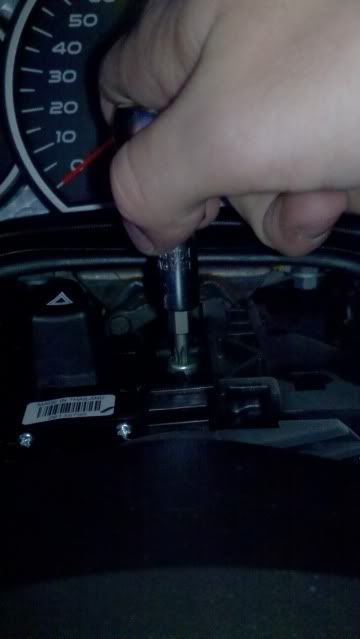
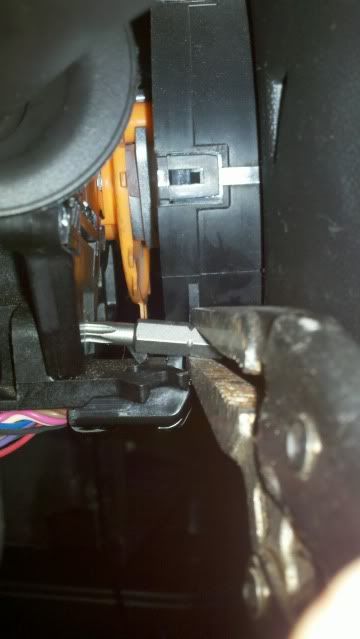
6) You can now easily see the switch unit. It is secured with (2) torx screws, size T-25. The first is on top of the unit, near the hazard switch. The second, is on the bottom front of the unit, positioned horizontally, behind the steering wheel. Remove the screws and the unit can be removed.
7) Undo the harness connectors by lifting the tabs with a small flathead screw driver.
COMPLETE STEPS IN REVERSE FOR INSTALLATION.
This took me 30 minutes without having done it before. It actually took longer to type this up and upload the pictures. There is one tricky part at step 6. There is little clearance for one of the torx screws, and I had to use a needle nose vice grips with the Torx bit to get at it. Not impossible just a warning.
I am happy that now I can use my turn signal without flashing people with my high beams.
The New Part:
1) Pop off position label ring from around the ignition (Pulls straight out)
2) Pull off center stack trim
3) Remove three screws (philips) to release the knee bolster panel. (One is located behind the driver's side dash cover, one is in front of the ODBII Connector, and the last is near the parking brake pedal)
4) Remove Knee Bolster Panel
5) The cowl that surrounds the steering column separates along the center with some gentle prying. You may have to adjust the tilt through this process to have the top half and bottom half come out easily. The bottom half needs to be rotated to slide off of the tilt lever.
NOTE: You will have to slightly bend the plastic to squeeze it in and out of position. I did not break anything doing my repair, just move slowly and carefully.
6) You can now easily see the switch unit. It is secured with (2) torx screws, size T-25. The first is on top of the unit, near the hazard switch. The second, is on the bottom front of the unit, positioned horizontally, behind the steering wheel. Remove the screws and the unit can be removed.
7) Undo the harness connectors by lifting the tabs with a small flathead screw driver.
COMPLETE STEPS IN REVERSE FOR INSTALLATION.
This took me 30 minutes without having done it before. It actually took longer to type this up and upload the pictures. There is one tricky part at step 6. There is little clearance for one of the torx screws, and I had to use a needle nose vice grips with the Torx bit to get at it. Not impossible just a warning.
I am happy that now I can use my turn signal without flashing people with my high beams.
Trending Topics
11-16-2011, 06:45 AM
#8
TECH Enthusiast
Thread Starter
Join Date: Oct 2008
Location: Rochester, NY
Posts: 593
Likes: 0
Received 0 Likes
on
0 Posts
Thanks. Removing the steering wheel is probably the preferred method. I would have had to do that, if not for my vice grip and torx bit technique.
11-16-2011, 03:50 PM
#10
TECH Enthusiast
Thread Starter
Join Date: Oct 2008
Location: Rochester, NY
Posts: 593
Likes: 0
Received 0 Likes
on
0 Posts
08-20-2012, 08:35 PM
#13
Registered User

Join Date: Aug 2012
Location: Catasauqua, PA
Posts: 1
Likes: 0
Received 0 Likes
on
0 Posts
While I realize this thread is dead...I just want to say thanks for this posting. I see I'm not the only one with this problem. Hope you all don't mind an L26 guy hanging out here...hey it makes a darn good commuter on the highway, I'm in no hurry to get TO work afterall...
Based on this I am going to get the part and will finally fix it. Jiggering with the switch is a pain on the highway anymore. Thanks again.
Based on this I am going to get the part and will finally fix it. Jiggering with the switch is a pain on the highway anymore. Thanks again.
08-21-2012, 09:52 AM
#14
Staging Lane

Join Date: Jun 2009
Posts: 63
Likes: 0
Received 0 Likes
on
0 Posts
I agree, this is a great write up. I have to change mine soon too. Don't do much driving at night...but that will soon change once the time goes back again.
It would be nice to have all of these "How To..." write ups in a "How to..." Sticky.
It would be nice to have all of these "How To..." write ups in a "How to..." Sticky.