
LT1 T56 - Output shaft bushing replacement - having trouble!
 03-02-2010, 02:22 PM
#1
TECH Apprentice
Thread Starter
iTrader: (1)

Join Date: Oct 2008
Location: Grand Rapids, MI
Posts: 324
Likes: 0
Received 0 Likes
on
0 Posts

94 LT1 T56, need to replace a very worn output shaft bushing (the one just under the seal, presses into the tail housing).
I sourced 2 from Autozone, screwed up the first due to stupidity (put the bushing in with the seam in one of the gaps, so it puckered).. the second I put in with the seam away from the two openings but I couldn't get it to not pucker outwards into the openings.
So, I took it to a professional. Where they installed 3.. all puckered. So they sent it out to another shop who had rebuilt (or knew a guy that rebuilt one? I dunno) a T56 recently with no issues, who installed 2 more.. also puckered. That's 7 bearings in a row, from 3 different places...
Photo stolen:
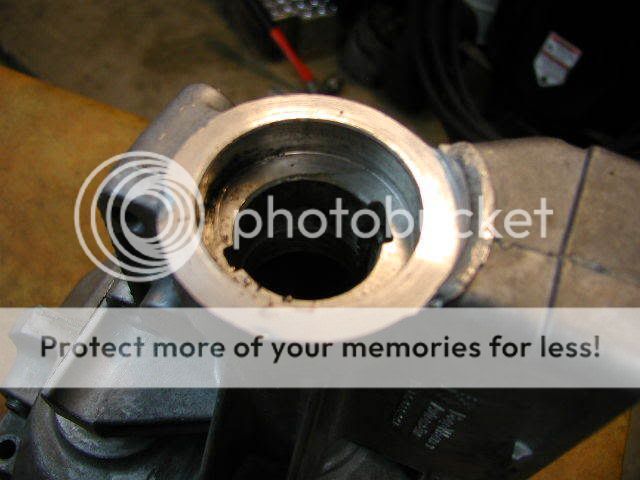
I am talking about the two places in the bearing hole that have gaps, particularly the larger gap. Referred to as "valleys" in this post: https://ls1tech.com/forums/manual-tr...-write-up.html
What is the trick to installing the output shaft bearing into the tail housing so it doesn't pucker into the large opening??? Everyone wants to sell me a new tail housing with bearing installed, which seems assinine (and expensive) for an obviously cheap and replaceable part. I can't find anything that helps me anywhere.... and I'm discouraged. Is there some special tool? Do I need to order a special bushing from soemwhere? Am I just a complete idiot?? (that last one is rhetorical!)
Help!!
Wallyman
p.s. every *&@#$^!! bearing is undersized to boot, so even when I DO get something to go in without distorting, I am going to have to have it machined down as the driveshaft won't fit.. WTF.
I sourced 2 from Autozone, screwed up the first due to stupidity (put the bushing in with the seam in one of the gaps, so it puckered).. the second I put in with the seam away from the two openings but I couldn't get it to not pucker outwards into the openings.
So, I took it to a professional. Where they installed 3.. all puckered. So they sent it out to another shop who had rebuilt (or knew a guy that rebuilt one? I dunno) a T56 recently with no issues, who installed 2 more.. also puckered. That's 7 bearings in a row, from 3 different places...
Photo stolen:
I am talking about the two places in the bearing hole that have gaps, particularly the larger gap. Referred to as "valleys" in this post: https://ls1tech.com/forums/manual-tr...-write-up.html
What is the trick to installing the output shaft bearing into the tail housing so it doesn't pucker into the large opening??? Everyone wants to sell me a new tail housing with bearing installed, which seems assinine (and expensive) for an obviously cheap and replaceable part. I can't find anything that helps me anywhere.... and I'm discouraged. Is there some special tool? Do I need to order a special bushing from soemwhere? Am I just a complete idiot?? (that last one is rhetorical!)
Help!!
Wallyman
p.s. every *&@#$^!! bearing is undersized to boot, so even when I DO get something to go in without distorting, I am going to have to have it machined down as the driveshaft won't fit.. WTF.
 03-02-2010, 03:17 PM
#2
Banned
iTrader: (60)
Join Date: Mar 2005
Location: Adkins - Tx
Posts: 2,693
Likes: 0
Received 0 Likes
on
0 Posts
The bushing for the GM T56 is different than your run of the mill TH350 tailhousing bushing. The OD is smaller on the T56 bushing. When you try to install a GM TH350 bushing in the housing, it crushes it. You can use a TH350 bushing but you have to take some of the material off the outside of it in most cases. Rockland Gear offers a replacement bushing but I have heard they require a little massaging to work as well.
03-02-2010, 06:55 PM
#3
TECH Apprentice
Thread Starter
iTrader: (1)
Join Date: Oct 2008
Location: Grand Rapids, MI
Posts: 324
Likes: 0
Received 0 Likes
on
0 Posts
The bushing for the GM T56 is different than your run of the mill TH350 tailhousing bushing. The OD is smaller on the T56 bushing. When you try to install a GM TH350 bushing in the housing, it crushes it. You can use a TH350 bushing but you have to take some of the material off the outside of it in most cases. Rockland Gear offers a replacement bushing but I have heard they require a little massaging to work as well.
Timken 5200 Seal Kit, per Timken the application list is a mile long and fits every bloody GM thing ever made since the beginning of time. 1942 Biscane to 1954 1 ton truck to my beloved T56, according to Timken. Guess not, eh?
That answers it. I had already spoken to the machinist that did my engine work, he's confident he can take care of it without issue, good to know that this is a known thing. Thanks for the info (that I couldn't find anywhere else)!
Thanks!
Wallyman
03-03-2010, 05:49 AM
#5
TECH Apprentice
Thread Starter
iTrader: (1)
Join Date: Oct 2008
Location: Grand Rapids, MI
Posts: 324
Likes: 0
Received 0 Likes
on
0 Posts
Wallyman

Trending Topics
03-06-2010, 02:45 AM
#8


http://atoztool.com/2200.html
It put a Timken 5200 bushing into a 95 tailhousing perfectly.
It was the 3rd or 4th bushing I had tried, so I know what you're saying.
When I last read up on the Rockwell instructions, I think they had a little bit of "force the yoke in; the bushing will wear-in. Well, with the above tool, the yoke had no problem slipping in.
I always thought I'd want something like the snap-on S8673C1 (like a slip yoke without the yoke) as a driver but with the above tool, you don't need it.
Enjoy.
03-06-2010, 07:58 AM
#9
TECH Apprentice
Thread Starter
iTrader: (1)
Join Date: Oct 2008
Location: Grand Rapids, MI
Posts: 324
Likes: 0
Received 0 Likes
on
0 Posts
Took it to my machinist, he installed it and honed it to fit the yoke, still a very small amount of 'bulge' into the shift turret drain hole, but everything feels nice and tight (but not too tight). No slop on the yoke now like there was before the repair.
Sooo... yeah. Proper tool would be nice, but I hope to never do this repair again! Info for the next guy..
Thanks all! Motor and tranny are going together this morning, hopefully in the car today.
Wallyman
Sooo... yeah. Proper tool would be nice, but I hope to never do this repair again!
Info for the next guy..Thanks all! Motor and tranny are going together this morning, hopefully in the car today.
Wallyman
03-26-2010, 07:38 AM
#11
TECH Apprentice
Thread Starter
iTrader: (1)
Join Date: Oct 2008
Location: Grand Rapids, MI
Posts: 324
Likes: 0
Received 0 Likes
on
0 Posts
I don't know how you would do it. He had to screw around with it to get it to work and I think he ended up hand doing some of it. You'd probably have to pull the tail hosing.
FWIW, this is in a 91 RX7 anyhow, so my tranny tunnel is a little different.
My vibration is almost all gone.. but not quite.
Wallyman
FWIW, this is in a 91 RX7 anyhow, so my tranny tunnel is a little different.
My vibration is almost all gone.. but not quite.
Wallyman
03-30-2010, 08:41 AM
#16

This writeup from the FAQ has some detail on how to remove the extension housing:
https://ls1tech.com/forums/manual-tr...-write-up.html
Its in the section labelled:
Fix Leak Between Tail housing and Main Case
https://ls1tech.com/forums/manual-tr...-write-up.html
Its in the section labelled:
Fix Leak Between Tail housing and Main Case
 06-12-2010, 08:41 PM
#18
TECH Apprentice
Thread Starter
iTrader: (1)
Join Date: Oct 2008
Location: Grand Rapids, MI
Posts: 324
Likes: 0
Received 0 Likes
on
0 Posts
Wallyman