


Taking the plunge: LS3 into '64 Tempest. Need help with shopping list.
.....on the twin-trans cooler installation today.
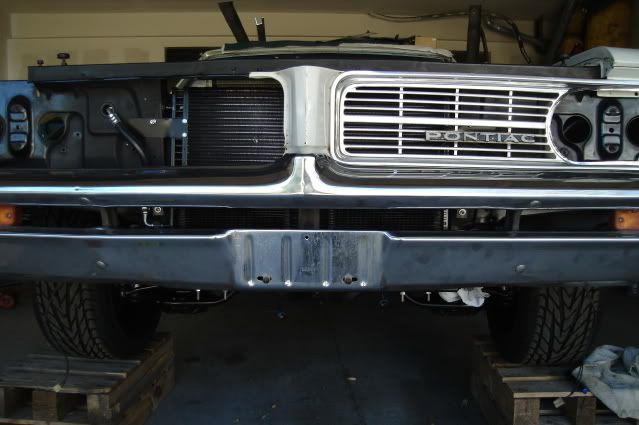
I put the front bumper back on and adjusted it as closely as I could to where it will be on the finished car. After checking the clearance between the coolers and the bumper I found they needed to be shifted upward by one inch. This puts the top of the cooler fins right at the top of bumper slot, a little bit more ideal for catching cooling air and adding some much needed clearance at the bottom of the coolers to the bumper.
I put the driver's side grille in to check for clearance too. The brass fittings and tubing are hidden from view in the grille area.
With the bumper removed again and the various component clearances confirmed it was time to bend up some 3/8" steel hard lines.
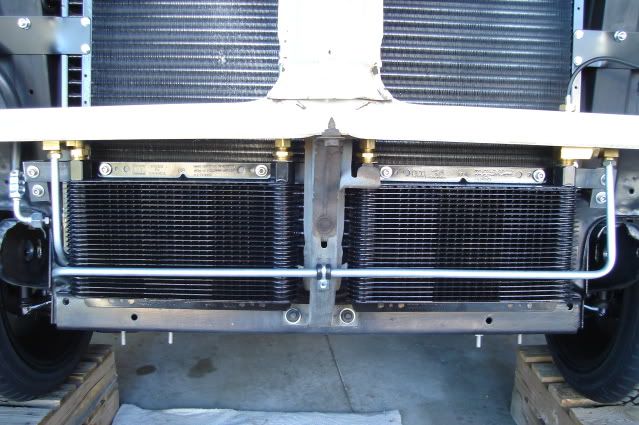
There was a small 'window' of space for both of the cooler lines to pass through the core support at the bottom corner.
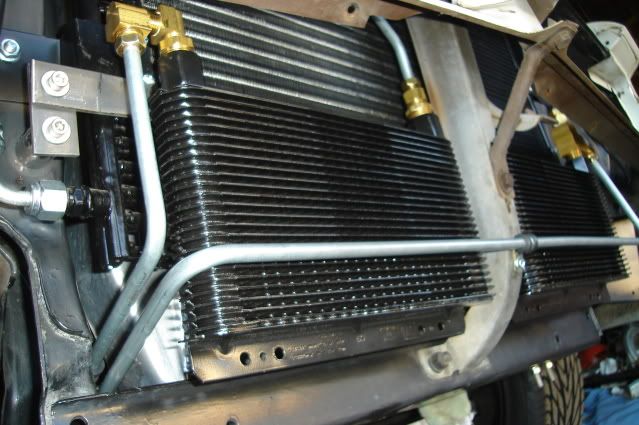
Both lines terminate a few inches past the core support, the 3/8" inverted flare unions were staggered to make it a little easier to swing a line wrench on them. I bent the lines so as to leave access to the hole in the frame for the front bumper bolt.

I still need to make up the bottom support brackets, but I did manage to get all of the plumbing finished on the front end.
Hope everyone had a great Labor Day weekend!
I put the front bumper back on and adjusted it as closely as I could to where it will be on the finished car. After checking the clearance between the coolers and the bumper I found they needed to be shifted upward by one inch. This puts the top of the cooler fins right at the top of bumper slot, a little bit more ideal for catching cooling air and adding some much needed clearance at the bottom of the coolers to the bumper.
I put the driver's side grille in to check for clearance too. The brass fittings and tubing are hidden from view in the grille area.
With the bumper removed again and the various component clearances confirmed it was time to bend up some 3/8" steel hard lines.
There was a small 'window' of space for both of the cooler lines to pass through the core support at the bottom corner.
Both lines terminate a few inches past the core support, the 3/8" inverted flare unions were staggered to make it a little easier to swing a line wrench on them. I bent the lines so as to leave access to the hole in the frame for the front bumper bolt.
I still need to make up the bottom support brackets, but I did manage to get all of the plumbing finished on the front end.
Hope everyone had a great Labor Day weekend!
Thanks guys for the kind words, it really helps me to keep on this thing and not let up on it for too long. 
I pulled the trans out today so I can make up more of the cooling lines.
There will be zero access to the cooling line fittings on the side of the trans with it installed, so I need to make up some short lines that will be considered part of the complete transmission assembly before it gets installed for the final time.
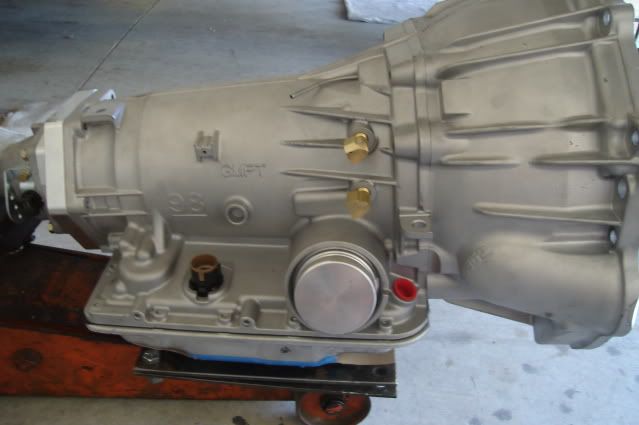
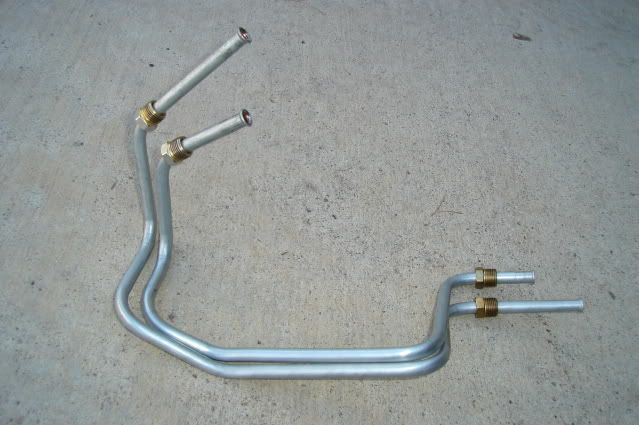
Here's what I have to work with. The 90-degree inverted flare fittings are the key to making this work. The fittings have 1/4 NPT threads but the trans is made for a straight thread fitting.
The thread diameter and pitch is the same for both, but the pipe thread is tapered to make it seal. Before installing the fittings I used a 1/4 pipe tap to try to taper the last couple of threads in an attempt to help out with the sealing for whatever it's worth. I used a little teflon paste on the threads and got 'em good and tight.
A shot of the finished 3/8" steel lines before installation.
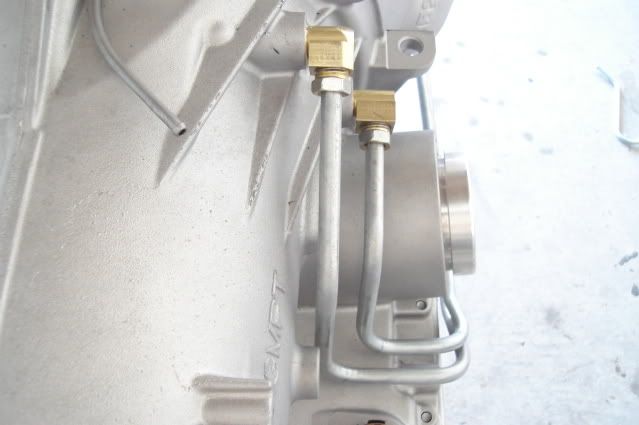
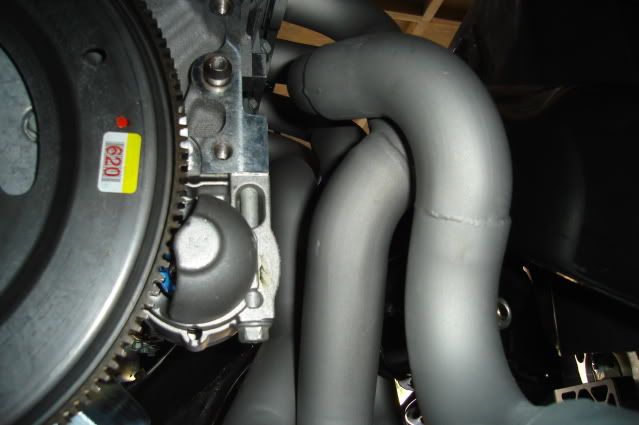
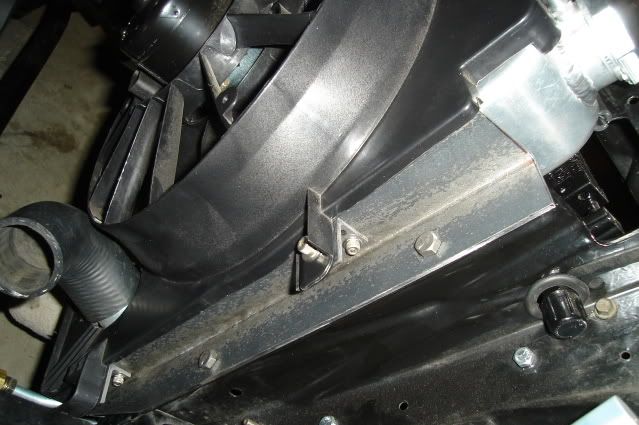
Lines are now installed. I had to run them towards the rear then down and forward because there's no room to run them forward right off the fittings, the trans dipstick tube will be in the way.
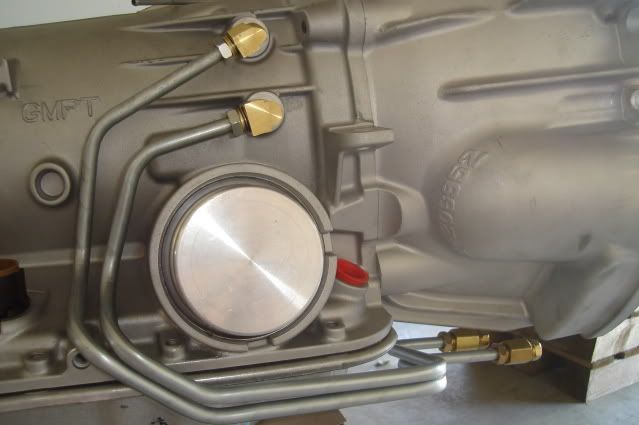
The trans wiring needs to travel right next to the lines and right around the circular servo casting projection before it plugs into the large connector (just to the left of the lines in the above pic), everything is a tight fit in the trans tunnel. Rather than bash the trans tunnel out another inch or two for clearance, I packaged it all tightly to keep the tunnel as small as possible so my stock rubber interior flooring will still work.
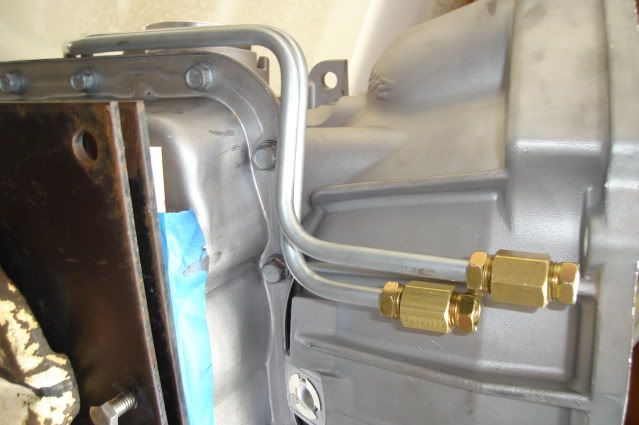
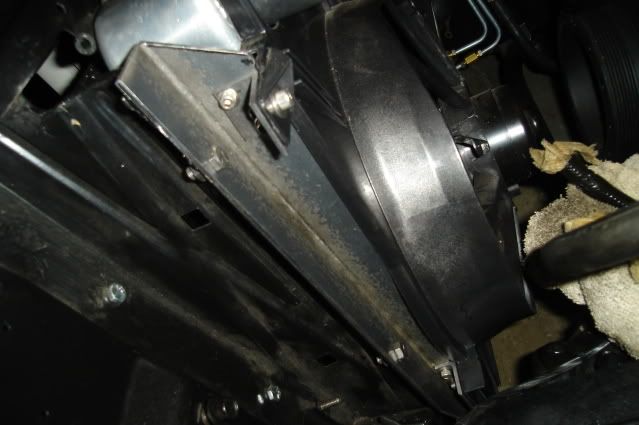
Shot from the bottom where the lines terminate underneath the bellhousing. After the trans goes back in and the headers and starter motor are installed on the engine I can make up the 2 lines that will connect the front twin cooler lines to these short trans lines.
The weather was beautiful today in the mid to low 80s, so I took advantage of that.
Gotta keep moving on this.
I pulled the trans out today so I can make up more of the cooling lines.
There will be zero access to the cooling line fittings on the side of the trans with it installed, so I need to make up some short lines that will be considered part of the complete transmission assembly before it gets installed for the final time.
Here's what I have to work with. The 90-degree inverted flare fittings are the key to making this work. The fittings have 1/4 NPT threads but the trans is made for a straight thread fitting.
The thread diameter and pitch is the same for both, but the pipe thread is tapered to make it seal. Before installing the fittings I used a 1/4 pipe tap to try to taper the last couple of threads in an attempt to help out with the sealing for whatever it's worth. I used a little teflon paste on the threads and got 'em good and tight.
A shot of the finished 3/8" steel lines before installation.
Lines are now installed. I had to run them towards the rear then down and forward because there's no room to run them forward right off the fittings, the trans dipstick tube will be in the way.
The trans wiring needs to travel right next to the lines and right around the circular servo casting projection before it plugs into the large connector (just to the left of the lines in the above pic), everything is a tight fit in the trans tunnel. Rather than bash the trans tunnel out another inch or two for clearance, I packaged it all tightly to keep the tunnel as small as possible so my stock rubber interior flooring will still work.
Shot from the bottom where the lines terminate underneath the bellhousing. After the trans goes back in and the headers and starter motor are installed on the engine I can make up the 2 lines that will connect the front twin cooler lines to these short trans lines.
The weather was beautiful today in the mid to low 80s, so I took advantage of that.
Gotta keep moving on this.

Teching In
Joined: Dec 2008
Posts: 8
Likes: 0
is that an old pioneer original supertuner in there? i still have one in my 63 pontiac catalina.... it is in serious need of resto but i have too many projects so it sits..... love your trempest btw!
So far I've purchased most of the items I'll need to do the swap, I'll try to mention LS1tech.com site sponsors whenever I can.
I'll post a few pics of the engine and parts I've collected so far later next week when the engine arrives. Still trying to decide which auto trans and converter to buy and who to buy from , but I'll figure that out pretty soon.
Parts list with costs:
SPI EFI-ready tank - $429 + $76 ship
GF872 filter/reg - $45 + $7 ship
Autokraft pan kit - $430 + $20 ship
Chevelle repro frame mount brackets, pair - $78 + $14 ship
Edelbrock engine swap headers - $600 + $12 handling fee*
Edelbrock engine mount adapter plates - $65 *
Energy Suspension urethane engine mounts, pair - $72 *
Griffin 25202-X 24" x 19" aluminum universal radiator - $196 *
KWiK Performance A/C brackets (no need to notch frame)- $197 + $9 ship
AC Delco 3231640 remanufactured starter (includes $45 core charge)- $295 + $17 ship*
AC Delco 11588456 starter bolts (2) - $7*
Dorman 620634 Radiator Fan Assy ('98 -'02 F-body) - $156 + $12 ship
GM 19201992 LS3 crate engine - $6,195 + $185 ship (thanks Jesse at Scoggin-Dickey Parts Center)
GM 19155067 Corvette accessory drive kit - $770 + $16 handling
Total cost so far - $9,903
Now, to get started.
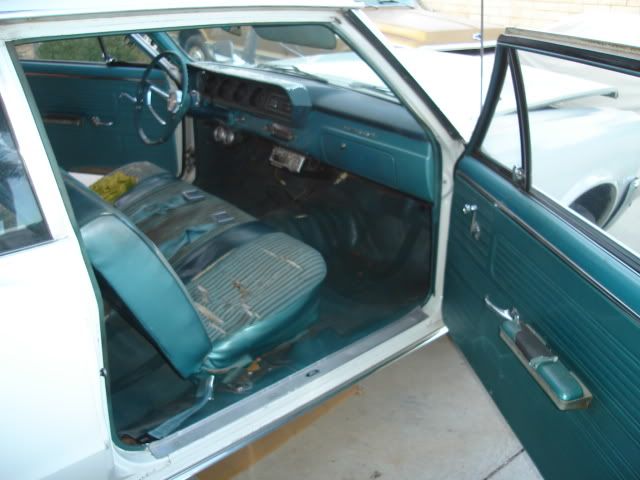
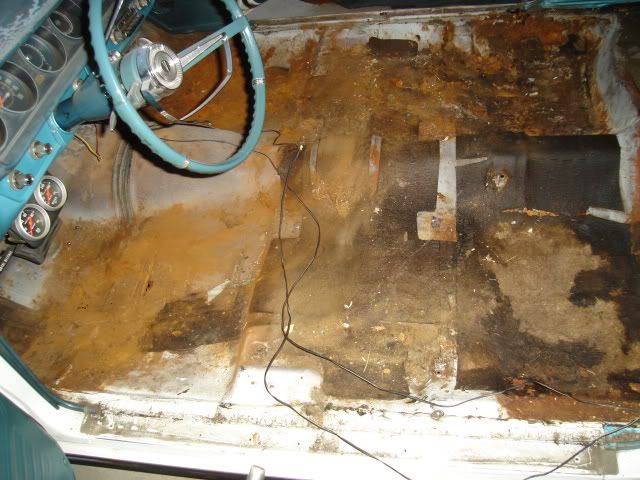
Since the engine and trans are already out of the car, the next task will be to pull the interior out of the car. The front & rear seats and rubber floor mat (the Tempest didn't have carpet from the factory) have to come out so I can get under the dash to install the air conditioning components that I still need to buy. I know that a lot of wiring will need to be done too so the inner firewall will need to be stripped bare. The seats need to be reupholstered and a new headliner installed.
The floorpans need a little attention, they will be coated with POR-15 rust preventive paint to stop the rust that has started underneath the rubber floor mat. Any water that gets underneath the rubber mat can't dry out very fast like wet carpet would so there's more than a bit of rust, all of these early A-body cars have leaky windshields and backlights.
Since the weather's been extra nice (in the mid-80s) the last few days I took the opportunity to do some more badly-needed garage cleaning and remove the interior from the Tempest.
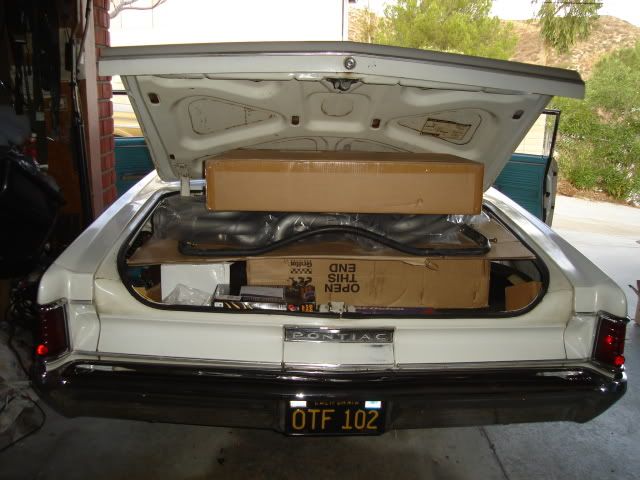
Junk in the trunk. Most of the parts I've collected so far are crammed in the trunk until I have a better place to put them.
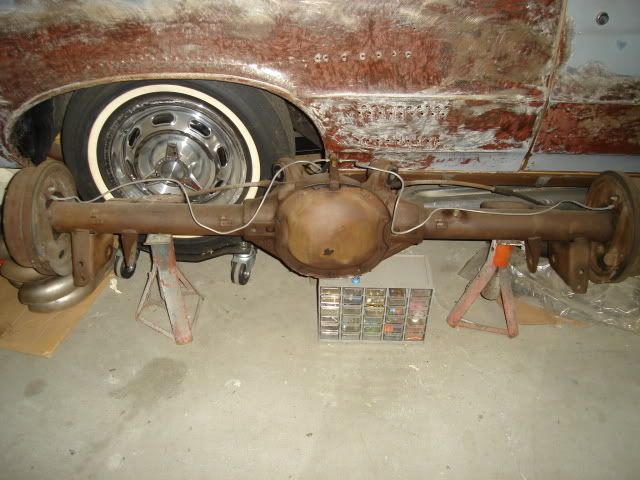
A good used '66 8.2" 3.36 posi rear has been put aside for this project, already scrubbed down with a wire brush and some Simple Green. Two coats of POR-15 semi-gloss black, urethane upper bushings, and some better-fitting brake lines are all it needs. A new charge of GM #1052271 80W-90 axle lubricant and a 4oz bottle of GM #1052358 limited slip axle lubricant additive will be added as well.
Note to self: Do not hammer it too hard out of the hole with this rear end!
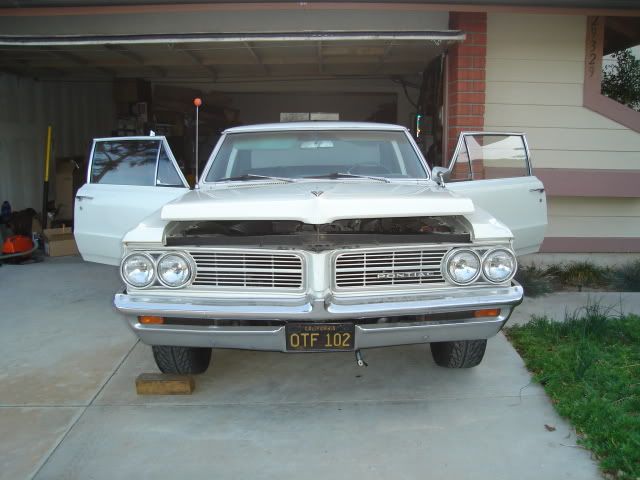
This is the farthest the Tempest has ventured out of the garage in years, just far enough to get the driver's door open to access the front seat bolts. It pushes back inside pretty easily, the driveway slope isn't too severe at this point. The original black CA plates just add to the charm of this once thrifty little beauty.
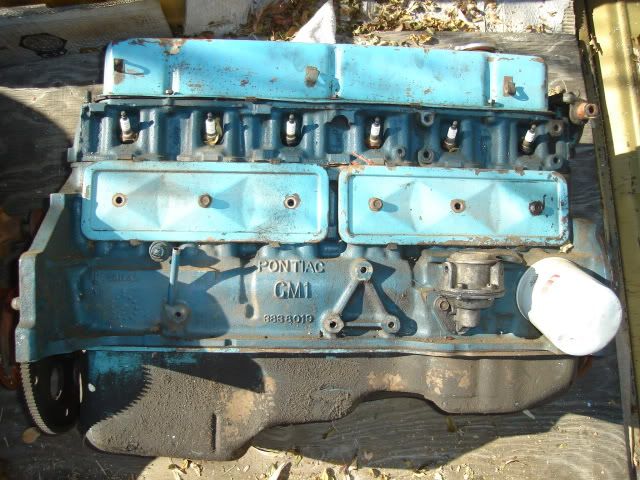
A shot of the original 140 HP 215 straight six that came in this car, it's identical to the 230 Chevy six other than having a smaller bore size (3.750" vs 3.875" for the 230) and having 'PONTIAC' cast into both sides of the block. So yes the little Tempest originally came with a 'corporate' engine of sorts.
The same engine was used for the '65 A-body as the standard engine as well, both the Lemans and Tempest rolled off the assembly line with one of these if you didn't ask for the 326 V8. It's getting a 'corporate' engine again that will get even better gas mileage and have about 4 times the power.
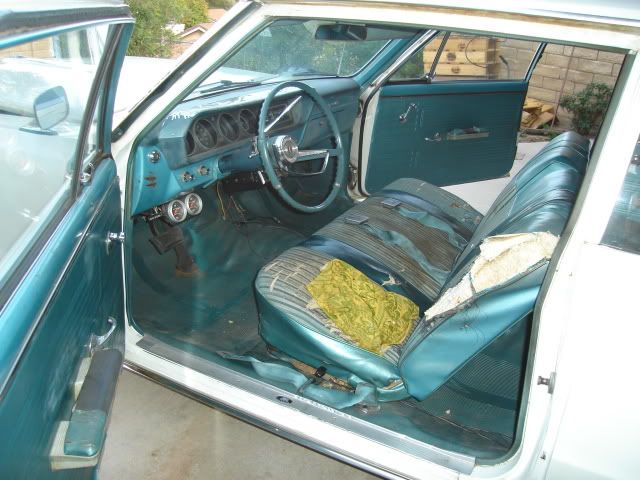
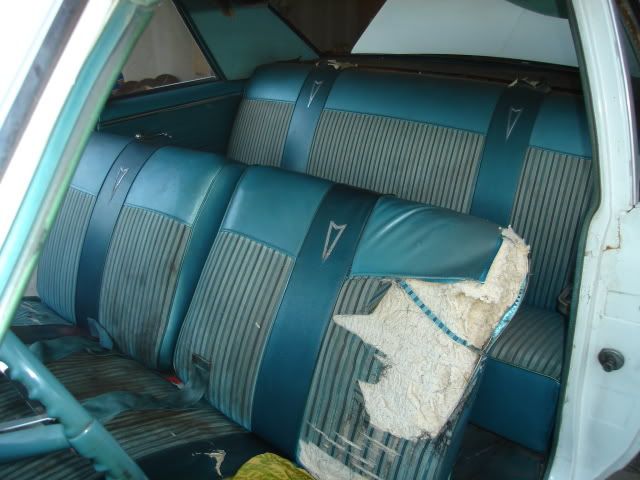
A look inside before the teardown. The seats are in need of attention, especially the front bench. A nice blue indian blanket (already removed here) made the front bench liveable in the past, but now it's time for a decent upholstery job. All of the upholstery pictured is the original issue for this '64 Tempest.
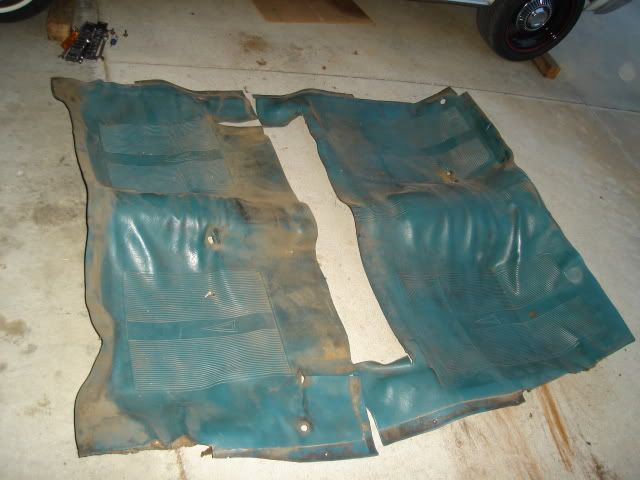
A shot of the original rubber floor mats that came in the low-line Tempest. Easy to clean off with a sponge and soapy water, I kind of prefer these rubber mats to carpet in a daily driver.
What I now have to deal with: Removal of all the old sound deadener and some minor (I hope) rust repair. I do see a few holes that have started under the driver's foot area and one just behind the passenger side of the front bench where it bolts down. All of the bolts holding the seat belts and front seat down came out easily.
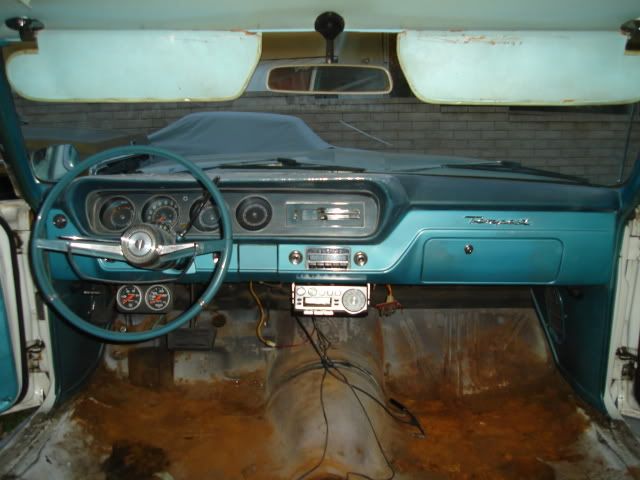
A look at the dash and front floors. Note the original cardboard sun visors that don't attach and pivot off of the rear view mirror, there's no day-night mirror on this base model. Simple and inexpensive, but still a lot of car for the money back in '64.
Seats stashed until I can get them to an upholstery shop.
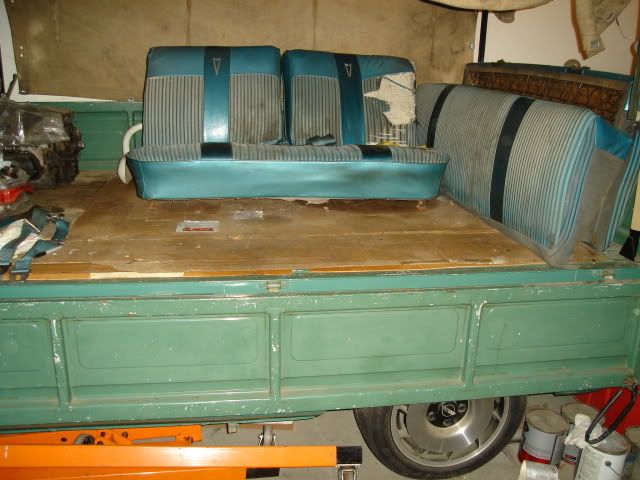
Junk now out of the trunk. I have a '66 VW Type II pickup stashed in the garage, it makes a perfect work bench or storage spot. The completely flat bed on this little one-ton truck is 5' 6" wide and 8' 10" long. The 'covered wagon' canvas top is a unique factory option on this truck.
And if you're wondering, yes it does handle. With a 94.5" wheelbase that's within an inch or two of a C4/C5 'vette, a super-low center of gravity (only the cab itself puts any real weight above the beltline), fully independent suspension and an empty weight of only 2400# it corners like it's on rails.

I put those 16X8.5" 1984 'vette rims and 205/55-16 tires on it back in '86, when all the Corvette guys were dumping them for aftermarket rims or for newer 'vette 16X9.5" rims. Drilled the front discs (off a '71 Type II Bus) and the rear drums (IRS rear suspension/drum brakes off a '70 Type III Squareback) for the Chevy 5 on 4.75" pattern and they bolted right on with no room to spare, but with no cutting on the body.
More to come.....
I'll post a few pics of the engine and parts I've collected so far later next week when the engine arrives. Still trying to decide which auto trans and converter to buy and who to buy from , but I'll figure that out pretty soon.
Parts list with costs:
SPI EFI-ready tank - $429 + $76 ship
GF872 filter/reg - $45 + $7 ship
Autokraft pan kit - $430 + $20 ship
Chevelle repro frame mount brackets, pair - $78 + $14 ship
Edelbrock engine swap headers - $600 + $12 handling fee*
Edelbrock engine mount adapter plates - $65 *
Energy Suspension urethane engine mounts, pair - $72 *
Griffin 25202-X 24" x 19" aluminum universal radiator - $196 *
KWiK Performance A/C brackets (no need to notch frame)- $197 + $9 ship
AC Delco 3231640 remanufactured starter (includes $45 core charge)- $295 + $17 ship*
AC Delco 11588456 starter bolts (2) - $7*
Dorman 620634 Radiator Fan Assy ('98 -'02 F-body) - $156 + $12 ship
GM 19201992 LS3 crate engine - $6,195 + $185 ship (thanks Jesse at Scoggin-Dickey Parts Center)
GM 19155067 Corvette accessory drive kit - $770 + $16 handling
Total cost so far - $9,903
Now, to get started.
Since the engine and trans are already out of the car, the next task will be to pull the interior out of the car. The front & rear seats and rubber floor mat (the Tempest didn't have carpet from the factory) have to come out so I can get under the dash to install the air conditioning components that I still need to buy. I know that a lot of wiring will need to be done too so the inner firewall will need to be stripped bare. The seats need to be reupholstered and a new headliner installed.
The floorpans need a little attention, they will be coated with POR-15 rust preventive paint to stop the rust that has started underneath the rubber floor mat. Any water that gets underneath the rubber mat can't dry out very fast like wet carpet would so there's more than a bit of rust, all of these early A-body cars have leaky windshields and backlights.
Since the weather's been extra nice (in the mid-80s) the last few days I took the opportunity to do some more badly-needed garage cleaning and remove the interior from the Tempest.
Junk in the trunk. Most of the parts I've collected so far are crammed in the trunk until I have a better place to put them.
A good used '66 8.2" 3.36 posi rear has been put aside for this project, already scrubbed down with a wire brush and some Simple Green. Two coats of POR-15 semi-gloss black, urethane upper bushings, and some better-fitting brake lines are all it needs. A new charge of GM #1052271 80W-90 axle lubricant and a 4oz bottle of GM #1052358 limited slip axle lubricant additive will be added as well.
Note to self: Do not hammer it too hard out of the hole with this rear end!
This is the farthest the Tempest has ventured out of the garage in years, just far enough to get the driver's door open to access the front seat bolts. It pushes back inside pretty easily, the driveway slope isn't too severe at this point. The original black CA plates just add to the charm of this once thrifty little beauty.
A shot of the original 140 HP 215 straight six that came in this car, it's identical to the 230 Chevy six other than having a smaller bore size (3.750" vs 3.875" for the 230) and having 'PONTIAC' cast into both sides of the block. So yes the little Tempest originally came with a 'corporate' engine of sorts.
The same engine was used for the '65 A-body as the standard engine as well, both the Lemans and Tempest rolled off the assembly line with one of these if you didn't ask for the 326 V8. It's getting a 'corporate' engine again that will get even better gas mileage and have about 4 times the power.
A look inside before the teardown. The seats are in need of attention, especially the front bench. A nice blue indian blanket (already removed here) made the front bench liveable in the past, but now it's time for a decent upholstery job. All of the upholstery pictured is the original issue for this '64 Tempest.
A shot of the original rubber floor mats that came in the low-line Tempest. Easy to clean off with a sponge and soapy water, I kind of prefer these rubber mats to carpet in a daily driver.
What I now have to deal with: Removal of all the old sound deadener and some minor (I hope) rust repair. I do see a few holes that have started under the driver's foot area and one just behind the passenger side of the front bench where it bolts down. All of the bolts holding the seat belts and front seat down came out easily.
A look at the dash and front floors. Note the original cardboard sun visors that don't attach and pivot off of the rear view mirror, there's no day-night mirror on this base model. Simple and inexpensive, but still a lot of car for the money back in '64.
Seats stashed until I can get them to an upholstery shop.
Junk now out of the trunk. I have a '66 VW Type II pickup stashed in the garage, it makes a perfect work bench or storage spot. The completely flat bed on this little one-ton truck is 5' 6" wide and 8' 10" long. The 'covered wagon' canvas top is a unique factory option on this truck.
And if you're wondering, yes it does handle. With a 94.5" wheelbase that's within an inch or two of a C4/C5 'vette, a super-low center of gravity (only the cab itself puts any real weight above the beltline), fully independent suspension and an empty weight of only 2400# it corners like it's on rails.
I put those 16X8.5" 1984 'vette rims and 205/55-16 tires on it back in '86, when all the Corvette guys were dumping them for aftermarket rims or for newer 'vette 16X9.5" rims. Drilled the front discs (off a '71 Type II Bus) and the rear drums (IRS rear suspension/drum brakes off a '70 Type III Squareback) for the Chevy 5 on 4.75" pattern and they bolted right on with no room to spare, but with no cutting on the body.
More to come.....
Yep, that's a Pioneer Super Tuner that I bought as a refurbished unit back in '78 for $109.00, it puts out 40 watts if I recall correctly.
.....today, my starter won't fit!
Today I was test fitting some things. I put both headers on the engine, at first leaving them loose to help make room to slip the transmission in place between the header collectors. The engine must be tilted forward slightly from it's 'normal' position so the headers will slip into place.
Next I mated up the transmission so I could finish up making my trans cooling lines. The engine must be tilted rearward slightly from 'normal' to mate up the trans, by leaving the 2 engine mount through bolts loose and supporting the engine under the oil pan with a block of wood it's easily done using one of my floorjacks.
With the trans now installed I tried to install the starter and there's absolutely no way to get it in there.
I loosened up the passenger side header and was able to pull it about 1" to the side to try to gain some room, I pulled it as far as it would go because at that point it was resting against the inside of the frame.
After taking a look at things I thought that maybe my Autokraft pan with the side kickouts could be the possible culprit. However I had test fitted the starter previously without the headers in place and it went in fine, although the access to the inside mounting bolt was limited a little by the kickout and I needed to use a flexible extension to get to it.
The way these headers are designed limits access to the outside starter bolt as well. Not that having limited access to that outside bolt makes much difference, I can't even get the starter in there!
The pan kickout is 1-3/8" wide from the side wall of the pan sump itself, but only extends 1/2" past the pan rail on the block:
Promotional pics of the Autokraft pan to help add some perspective:

Milodon 30915 pan that is recommended (but not required) by Edelbrock for use with their engine mount adapter plates that I'm using. The Edelbrock swap headers do mention they highly recommend that they be used with their engine mount adapter plates, but they don't go so far as to tell you which oil pan to use in their header installation instructions.
Note the very similar kickouts on this Milodon pan as compared to the Autokraft pan, I seriously doubt my starter would go in using this pan versus the Autokraft pan:


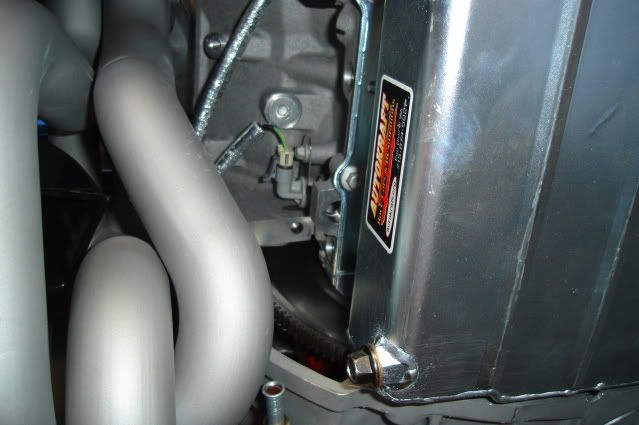
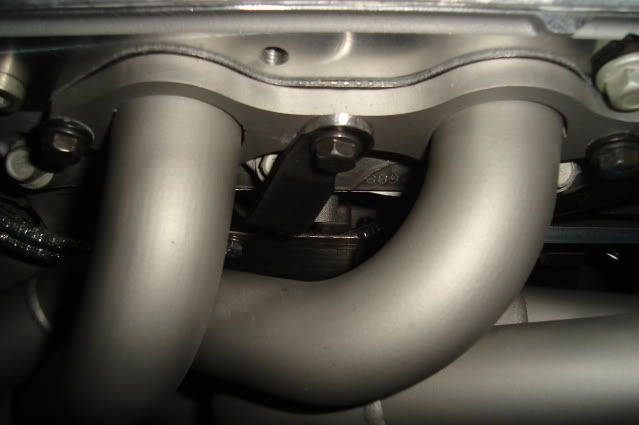
No way is this starter going in, in this shot the starter solenoid is right up against the front crossmember:
Not a lot of room here, keep in mind this shot was taken with the headers loosened up and pulled outward against the frame rail:

Well, I was determined to get that starter in there as I have a lot of money invested in my headers and oil pan. I figured that it might go in if I pulled the trans out, it has to come out right now anyway so I can reconfigure the cooling lines coming out of it.
It fits:

Unfortunately in order to service the starter in the future I will have to take following steps:
1) Drop the 3" X-crossover exhaust between the header collectors and the mufflers.
2) Loosen the passenger side header and pull it against the frame.
3) Remove the driveshaft.
4) Disconnect the trans cooling lines at the trans.
5) Disconnect the Speartech wiring harness on the trans (2 connectors - VSS and trans control) and the passenger side of the engine (3 connectors - crank sensor, knock sensor, O2 sensor + 1 ground lug on back of the cyl head) and pull the harness up out of the way and lay it on top of the engine.
6) Remove the top 2 engine to trans bolts.
7) Disconnect the torque converter from the flexplate.
8) Loosen the two long 7/16-14 engine mount bolts.
9) Support the trans with a trans jack and remove the trans crossmember. Tilt the engine and trans rearward slightly for access to the bottom 4 engine to trans bolts and to gain enough clearance at the firewall to pull the trans off the engine.
10) Support the engine under the oil pan with a floor jack and block of wood while separating the trans from the engine.
11) Remove starter after disconnecting the starter wires and cable.
I'm seriously thinking of running '01 -'02 F-body LS1 exhaust manifolds now. I'll probably take a 30+ HP hit though, but it might be worth it. One of the header tubes is less than 1/4" from from the starter motor with them tightened down.
However I really want to have the added power that the headers will unleash.
I'm guessing that the guys running manual transmissions haven't run into this issue. I do realize that the '64 -'67 A-body swap headers differ in design compared to the '68 -'72, maybe the early cars are the only victims of this issue.
Well anyway, I did find time after scratching my head half the day dealing with this starter nonsense to do a little work on the trans lines.
I knew that my first try with the cooling lines would be a bit of shot in the dark. Now that I have everything in place (trans, headers, starter) I could see they aren't going to work as-is.
I cut them off shorter and redid a couple of the bends:

The trans is now back in the car, tomorrow I'm hoping to make up some lines to connect the trans lines coming off the trans with the ones coming off the front mounted trans coolers.
Thanks for looking, and for any helpful advice you can offer.
Today I was test fitting some things. I put both headers on the engine, at first leaving them loose to help make room to slip the transmission in place between the header collectors. The engine must be tilted forward slightly from it's 'normal' position so the headers will slip into place.
Next I mated up the transmission so I could finish up making my trans cooling lines. The engine must be tilted rearward slightly from 'normal' to mate up the trans, by leaving the 2 engine mount through bolts loose and supporting the engine under the oil pan with a block of wood it's easily done using one of my floorjacks.
With the trans now installed I tried to install the starter and there's absolutely no way to get it in there.
I loosened up the passenger side header and was able to pull it about 1" to the side to try to gain some room, I pulled it as far as it would go because at that point it was resting against the inside of the frame.
After taking a look at things I thought that maybe my Autokraft pan with the side kickouts could be the possible culprit. However I had test fitted the starter previously without the headers in place and it went in fine, although the access to the inside mounting bolt was limited a little by the kickout and I needed to use a flexible extension to get to it.
The way these headers are designed limits access to the outside starter bolt as well. Not that having limited access to that outside bolt makes much difference, I can't even get the starter in there!
The pan kickout is 1-3/8" wide from the side wall of the pan sump itself, but only extends 1/2" past the pan rail on the block:
Promotional pics of the Autokraft pan to help add some perspective:
Milodon 30915 pan that is recommended (but not required) by Edelbrock for use with their engine mount adapter plates that I'm using. The Edelbrock swap headers do mention they highly recommend that they be used with their engine mount adapter plates, but they don't go so far as to tell you which oil pan to use in their header installation instructions.
Note the very similar kickouts on this Milodon pan as compared to the Autokraft pan, I seriously doubt my starter would go in using this pan versus the Autokraft pan:
No way is this starter going in, in this shot the starter solenoid is right up against the front crossmember:
Not a lot of room here, keep in mind this shot was taken with the headers loosened up and pulled outward against the frame rail:
Well, I was determined to get that starter in there as I have a lot of money invested in my headers and oil pan. I figured that it might go in if I pulled the trans out, it has to come out right now anyway so I can reconfigure the cooling lines coming out of it.
It fits:
Unfortunately in order to service the starter in the future I will have to take following steps:
1) Drop the 3" X-crossover exhaust between the header collectors and the mufflers.
2) Loosen the passenger side header and pull it against the frame.
3) Remove the driveshaft.
4) Disconnect the trans cooling lines at the trans.
5) Disconnect the Speartech wiring harness on the trans (2 connectors - VSS and trans control) and the passenger side of the engine (3 connectors - crank sensor, knock sensor, O2 sensor + 1 ground lug on back of the cyl head) and pull the harness up out of the way and lay it on top of the engine.
6) Remove the top 2 engine to trans bolts.
7) Disconnect the torque converter from the flexplate.
8) Loosen the two long 7/16-14 engine mount bolts.
9) Support the trans with a trans jack and remove the trans crossmember. Tilt the engine and trans rearward slightly for access to the bottom 4 engine to trans bolts and to gain enough clearance at the firewall to pull the trans off the engine.
10) Support the engine under the oil pan with a floor jack and block of wood while separating the trans from the engine.
11) Remove starter after disconnecting the starter wires and cable.
I'm seriously thinking of running '01 -'02 F-body LS1 exhaust manifolds now. I'll probably take a 30+ HP hit though, but it might be worth it. One of the header tubes is less than 1/4" from from the starter motor with them tightened down.
However I really want to have the added power that the headers will unleash.
I'm guessing that the guys running manual transmissions haven't run into this issue. I do realize that the '64 -'67 A-body swap headers differ in design compared to the '68 -'72, maybe the early cars are the only victims of this issue.
Well anyway, I did find time after scratching my head half the day dealing with this starter nonsense to do a little work on the trans lines.
I knew that my first try with the cooling lines would be a bit of shot in the dark. Now that I have everything in place (trans, headers, starter) I could see they aren't going to work as-is.
I cut them off shorter and redid a couple of the bends:
The trans is now back in the car, tomorrow I'm hoping to make up some lines to connect the trans lines coming off the trans with the ones coming off the front mounted trans coolers.
Thanks for looking, and for any helpful advice you can offer.
LS1 Tech Stories
The Best V8 Stories One Small Block at Time

Gas Monkey Built a 6-Wheel Ferrari Testarossa With a Corvette LT4 Engine
Verdad Gallardo
7 Most Reliable High-Performance Engines GM Has Ever Built
Verdad Gallardo
Amazing '71 Camaro Restomod Is Modern Muscle Car Under the Skin
Verdad Gallardo
6 Common C5 Corvette Failures and What's Involved In Repairing Them
Pouria Savadkouei
Retro Modern Bandit Pontiac Trans AM Comes With Burt Reynolds' Autograph
Verdad Gallardo
Top 10 Greatest Cadillac V Series Performance Models Ever, Ranked
Pouria Savadkouei
Top 10 Most Powerful Chevy Trucks Ever Made!

Hennessey's New Supercharged Silverado ZR2 Has 700 HP
Verdad Gallardo
Coachbuilt N2A Anteros Is an LS2-Powered C6 Corvette In Italian Clothes
Verdad Gallardo
On The Tree

Joined: Mar 2005
Posts: 125
Likes: 0
This situation brings back some memories of helping a friend with an engine swap. Same problem. We discovered that if we removed the solenoid from the starter and put the starter motor into place, then positioned the motor so we could re-attach the solenoid, it would fit, just barely though!
Give it a shot, maybe you will get lucky.
Give it a shot, maybe you will get lucky.
On the bright side of things, starters often go bad (fingers crossed for ya). By the time it goes out, you can take the time while you are in there to work on other things and do some preventative maintenance.
I would keep the headers.All the best.
I would keep the headers.All the best.


Bart,
Sorry to hear about the starter issues. I had no such troubles, so it much be the difference in the headers. For what its worth, not all LS starters are the same. I used to have an aluminum 5.3L engine a while back and the starter in it was quite a bit smaller then the starter on my LS6. The 5.3L starter was both shorter and smaller in diameter. The engine was out of a 2004 Trailblazer with the 5.3L engine option.
Andrew
.....this weekend despite my troubles and disappointment with the starter motor access.
The one thing I really wanted to get done this weekend was to make up the rest of the transmission cooling lines. I dropped by my local NAPA and picked up a couple more 60" pre-made lengths of 3/8" steel brake line this morning while doing my weekly food shopping.
I started out making up the lower line that will return the cooled fluid to the transmission, starting at the trans since this looked like the easier tubing route to start out with.

I continued working towards the front and made up the final connection. Bending up this first line took the better part of 2 hours, it takes a bit of time to remove and replace the line over and over along with making some minor adjustments of the bends to get things fitting just right. The steel tubing is soft enough that you can tweak it a little by hand to make minor adjustments, you certainly will end up making a lot of small adjustments before it's right.
I used all 60" of the line except for the last 1/2", I had to cut off that last little bit in order to make the last bend in the line as the flare nut would have been in the way of the tubing bender itself. After making the last bend I double flared the end. Making sure to put the flare nut on the line before making up the flare is something that's easy to forget to do sometimes!

Using some short scraps of tubing I made up a pattern to follow to get started. You can't easily manipulate the "60 long line with all of the obstacles in the way, using scraps like this helps you avoid mistakes that will scrap out the longer line you're trying to work with.

Here's the second line that brings the hot trans fluid from the converter to the coolers almost halfway finished.

Bending up the second line will go twice as fast as the first one since I now have a full-length pattern to follow. I'm just about to make the second to last bend here.

Again I had to cut off the flare to get the flare nut out of the way in order to make the the last bend and terminate this one at the trans. I cut off about 1/4" of line which puts the tubing cutter as close to the old flare as possible. The line on the top shown here is the second one I made up.
I just barely had enough tubing length to make up these lines, everything worked out well for me today. I did rethink the routing of the lines a little halfway through making up the first one and eliminated one bend near the front in order to conserve some line length, I could see that I was close to not having enough.

I still need to fasten the lines down in a couple of places using some 3/8" Adel clamps, I did my best to make them run parallel to one another. Without the fender on the car it makes little sense to fasten them down, the inner fender will move a little from where it is now with the fender installed.

Plenty of room between the lines and the header tubes, both lines can easily be removed from the topside without having to tweak them.

Finished for the weekend.

Thanks for looking.
The one thing I really wanted to get done this weekend was to make up the rest of the transmission cooling lines. I dropped by my local NAPA and picked up a couple more 60" pre-made lengths of 3/8" steel brake line this morning while doing my weekly food shopping.
I started out making up the lower line that will return the cooled fluid to the transmission, starting at the trans since this looked like the easier tubing route to start out with.
I continued working towards the front and made up the final connection. Bending up this first line took the better part of 2 hours, it takes a bit of time to remove and replace the line over and over along with making some minor adjustments of the bends to get things fitting just right. The steel tubing is soft enough that you can tweak it a little by hand to make minor adjustments, you certainly will end up making a lot of small adjustments before it's right.
I used all 60" of the line except for the last 1/2", I had to cut off that last little bit in order to make the last bend in the line as the flare nut would have been in the way of the tubing bender itself. After making the last bend I double flared the end. Making sure to put the flare nut on the line before making up the flare is something that's easy to forget to do sometimes!
Using some short scraps of tubing I made up a pattern to follow to get started. You can't easily manipulate the "60 long line with all of the obstacles in the way, using scraps like this helps you avoid mistakes that will scrap out the longer line you're trying to work with.
Here's the second line that brings the hot trans fluid from the converter to the coolers almost halfway finished.
Bending up the second line will go twice as fast as the first one since I now have a full-length pattern to follow. I'm just about to make the second to last bend here.
Again I had to cut off the flare to get the flare nut out of the way in order to make the the last bend and terminate this one at the trans. I cut off about 1/4" of line which puts the tubing cutter as close to the old flare as possible. The line on the top shown here is the second one I made up.
I just barely had enough tubing length to make up these lines, everything worked out well for me today. I did rethink the routing of the lines a little halfway through making up the first one and eliminated one bend near the front in order to conserve some line length, I could see that I was close to not having enough.
I still need to fasten the lines down in a couple of places using some 3/8" Adel clamps, I did my best to make them run parallel to one another. Without the fender on the car it makes little sense to fasten them down, the inner fender will move a little from where it is now with the fender installed.
Plenty of room between the lines and the header tubes, both lines can easily be removed from the topside without having to tweak them.
Finished for the weekend.
Thanks for looking.
.....for a while today and made some decent progress.
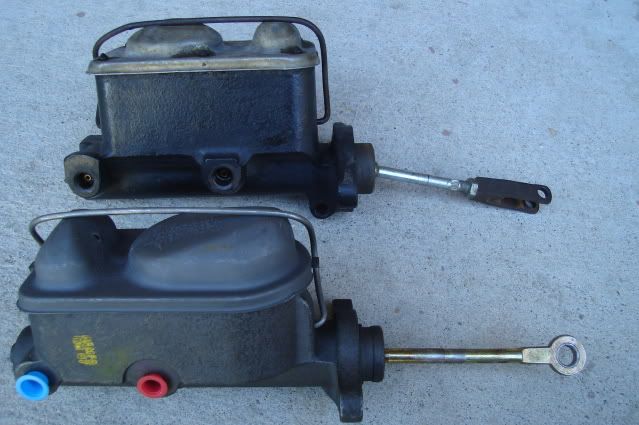
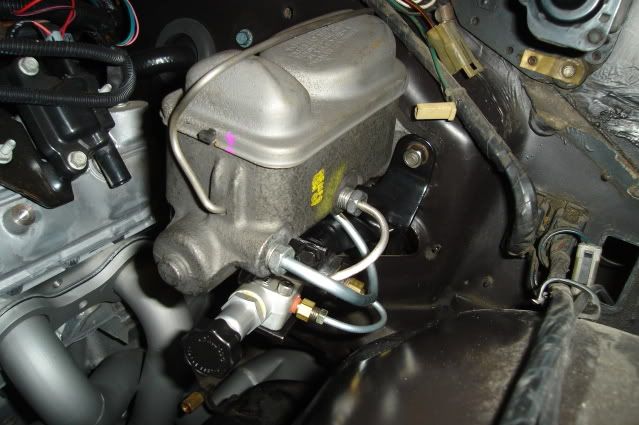
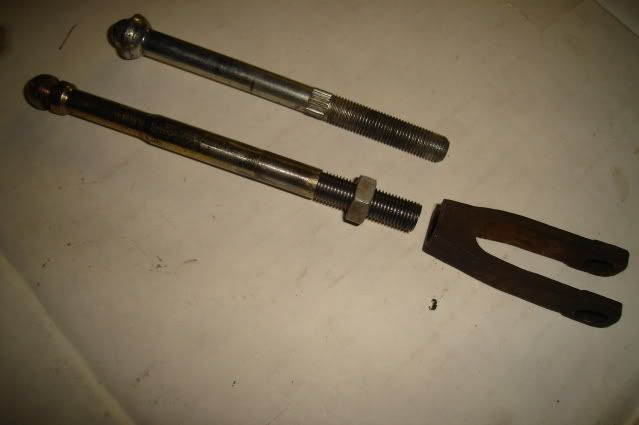
I removed the old master, it's a 1-1/16" bore 2nd-gen F-body disc/drum manual brake unit that worked very well with the single-piston B-body calipers. I'm replacing it with a 15/16" bore 1977 Monte Carlo or Malibu disc/drum manual master that comes complete with the pushrod, a $35 item with an $11 core charge (pictured below in the foreground). That's right, no power brakes.
Of interest is the two masters are configured backward from one another. The F-body master has the front brake reservoir in front, the Monte master has the front brake reservoir located in the rear. This means I will have to remake the lines from the master to the combination valve.
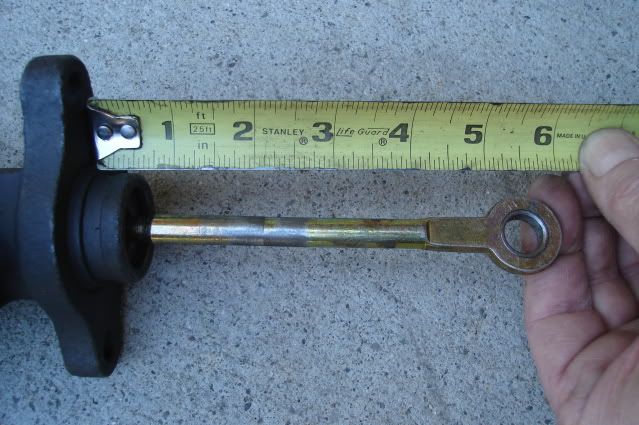
I was able to use the old 1964 Tempest single-master pushrod with the F-body master. For reference I measured from the mounting surface of the master to the center of the pushrod pivot pin, it looks to be right about 6".
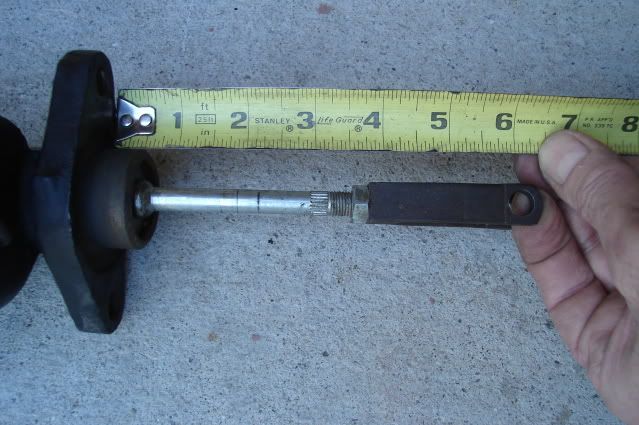
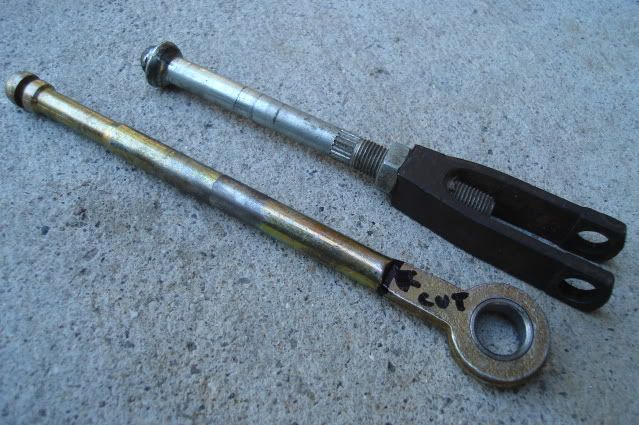
The new Monte Carlo master pushrod won't be quite long enough nor will it fit up to my brake pedal. It fits deep into the piston, by about an inch unlike the F-body master.
I will cut the new pushrod off at the cut line shown and thread it with a 3/8-24 die so it will screw in to the original Tempest brake pushrod clevis. It's just long enough to work.
I will reuse the 2nd-gen F-body combination block and mounting bracket, the bracket has been slightly modified by bending the mounting tabs to tuck the combo valve up close to the master cylinder.
The combo valve has been modified by removing the cartridge and spring (shown next to the end cap), they can be accessed after removing the end cap. The Wilwood adjustable proportioning valve ($42) will connect to the 3/16" brake line adapter fitting in the end cap, it's mounted on a simple angle bracket. I will adjust the front to rear brake bias using the Wilwood prop valve to prevent the rear brakes from locking before the fronts, especially under wet road conditions.

I made up some new lines from the master to the combo valve, plus a short loop to connect the adjusable prop valve to the combo valve. I was able to reuse and reconfigure the original factory 3/16" line from the front brake reservoir to the combo valve, but had to make up a new 1/4" line from the rear brake reservoir to the combo valve. All these lines were bent by hand, the tubing is pretty soft so it's not too hard on your thumbs. There's no way to use a tubing bender on these with the bends so close to the tube nuts.
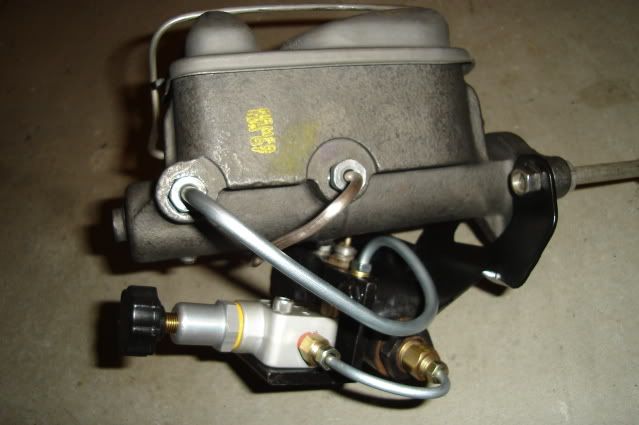
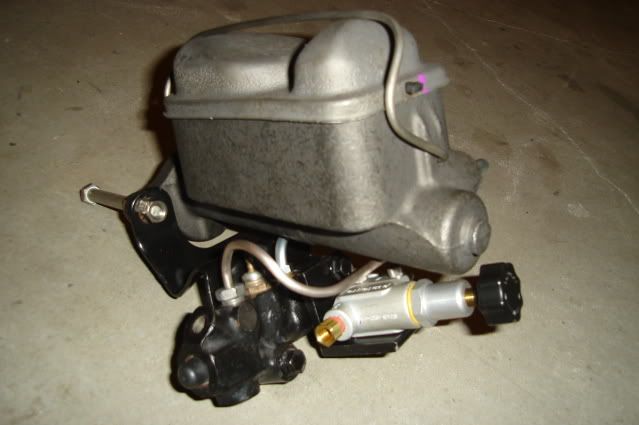
The completed assembly test fitted in place, the short loop from the combo to the prop valve clears the inner fender by about 1/2".
That's all for today.
I removed the old master, it's a 1-1/16" bore 2nd-gen F-body disc/drum manual brake unit that worked very well with the single-piston B-body calipers. I'm replacing it with a 15/16" bore 1977 Monte Carlo or Malibu disc/drum manual master that comes complete with the pushrod, a $35 item with an $11 core charge (pictured below in the foreground). That's right, no power brakes.
Of interest is the two masters are configured backward from one another. The F-body master has the front brake reservoir in front, the Monte master has the front brake reservoir located in the rear. This means I will have to remake the lines from the master to the combination valve.
I was able to use the old 1964 Tempest single-master pushrod with the F-body master. For reference I measured from the mounting surface of the master to the center of the pushrod pivot pin, it looks to be right about 6".
The new Monte Carlo master pushrod won't be quite long enough nor will it fit up to my brake pedal. It fits deep into the piston, by about an inch unlike the F-body master.
I will cut the new pushrod off at the cut line shown and thread it with a 3/8-24 die so it will screw in to the original Tempest brake pushrod clevis. It's just long enough to work.
I will reuse the 2nd-gen F-body combination block and mounting bracket, the bracket has been slightly modified by bending the mounting tabs to tuck the combo valve up close to the master cylinder.
The combo valve has been modified by removing the cartridge and spring (shown next to the end cap), they can be accessed after removing the end cap. The Wilwood adjustable proportioning valve ($42) will connect to the 3/16" brake line adapter fitting in the end cap, it's mounted on a simple angle bracket. I will adjust the front to rear brake bias using the Wilwood prop valve to prevent the rear brakes from locking before the fronts, especially under wet road conditions.
I made up some new lines from the master to the combo valve, plus a short loop to connect the adjusable prop valve to the combo valve. I was able to reuse and reconfigure the original factory 3/16" line from the front brake reservoir to the combo valve, but had to make up a new 1/4" line from the rear brake reservoir to the combo valve. All these lines were bent by hand, the tubing is pretty soft so it's not too hard on your thumbs. There's no way to use a tubing bender on these with the bends so close to the tube nuts.
The completed assembly test fitted in place, the short loop from the combo to the prop valve clears the inner fender by about 1/2".
That's all for today.


Today I finished making up all of the hard lines for the brakes. Again all of the bends were made by hand, making for some pretty sore thumbs by the end of the day.
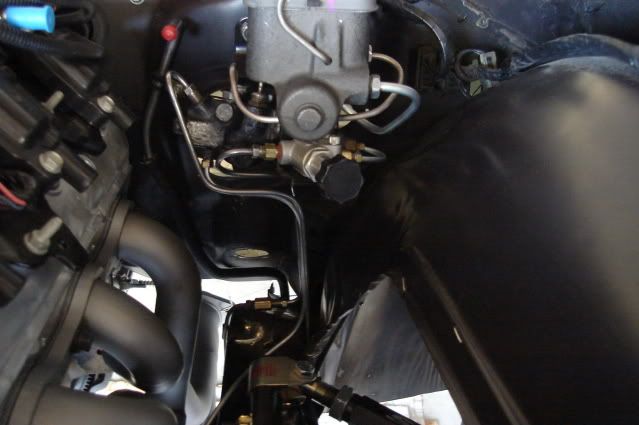
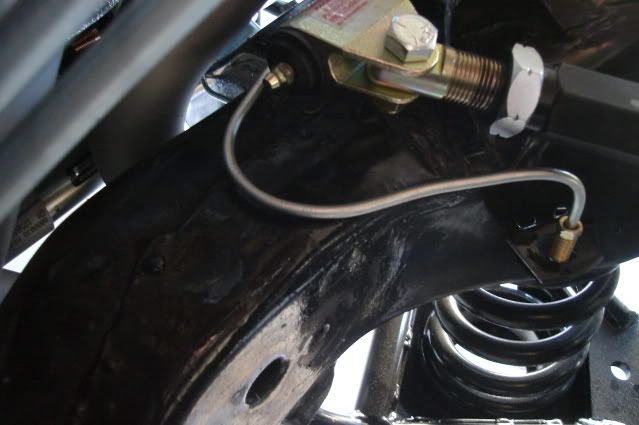
The lines coming down from the combo and prop valves were bent this way to leave room to pull the steering column in and out of the car. The line in front leads to the left front brake, the next one (60" long) goes under the engine along the front crossmember to the right front brake and the rear line coming off the prop valve connects up to the original rear brake line.
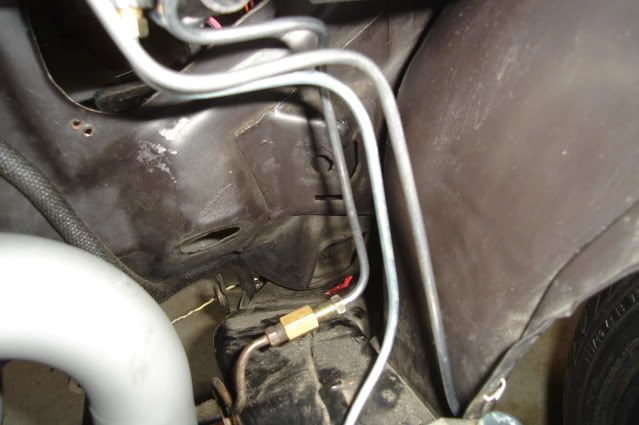
The 60" long line running under the engine terminates here, getting this line bent and routed was made a little easier with the inner fender out of the way. The engine will come out once more later on, I will tidy up the bends a little and fasten it down better at that time.
Another job out of the way that will bring me a bit closer to driving this old heap.
Keepin' on it.
The lines coming down from the combo and prop valves were bent this way to leave room to pull the steering column in and out of the car. The line in front leads to the left front brake, the next one (60" long) goes under the engine along the front crossmember to the right front brake and the rear line coming off the prop valve connects up to the original rear brake line.
The 60" long line running under the engine terminates here, getting this line bent and routed was made a little easier with the inner fender out of the way. The engine will come out once more later on, I will tidy up the bends a little and fasten it down better at that time.
Another job out of the way that will bring me a bit closer to driving this old heap.
Keepin' on it.

.....can really occupy a lot of time, it seems like there are a thousand and one little jobs that still need to be done.
I spent some time making up the necessary brackets to secure the fan shroud to the radiator. Quite a few months back I modified some factory lower saddles for the radiator to rest on and trimmed the fan shroud to fit, but until just lately I haven't worked on finishing up the installation.
The fan shroud will serve to hold the radiator in place. At the top of the core support the top radiator tank seams rest against a length of 1/4" rubber fuel hose that was slit lengthwise and slipped over a folded sheetmetal lip. The top radiator clamp (3rd picture below) keeps it held down in the rubber-insulated saddles at the bottom.
I made up some mounting brackets from 2 X 2 X 1/8" angle iron to secure the fan shroud to the radiator and fill the gap between the shroud and radiator support, there are two 10-32 tapped holes for each shroud mounting tab. The shroud mounting tabs are made from 1-1/4 X 1-1/4 x 1/8" angle iron, each one is tapped with 1/4-28 threads to hold the shroud in place.
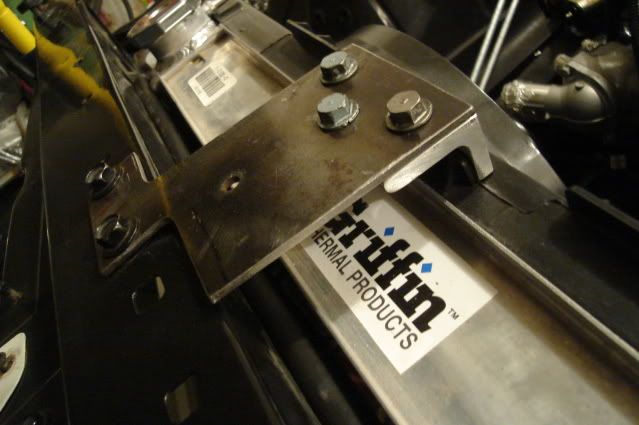
The top radiator clamp mounts to the same two factory tapped holes in the radiator support that mounted the stock radiator clamp. I made it from a leftover scrap of .135" thick steel plate that I had previously used to modify the trans crossmember and a piece of 1-1/2 X 1-1/2 x 1/4" aluminum angle. I'll round off a few of the sharp corners before it gets painted and use some nicer looking fasteners when it's all finished up, I used some old Pontiac valve cover bolts that were handy for now.
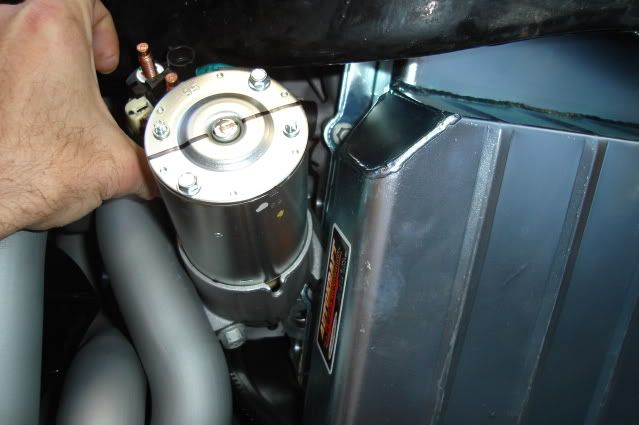
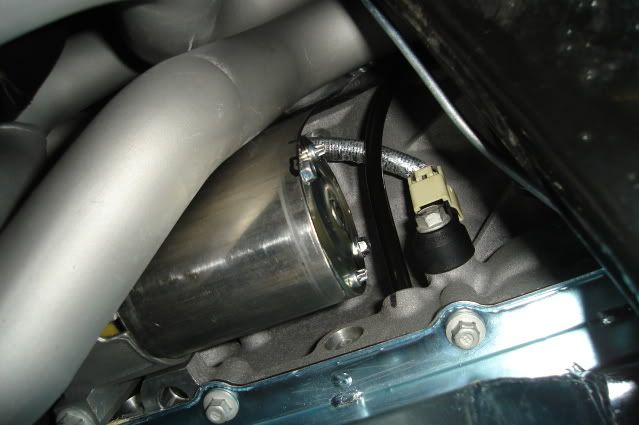
I also fabbed up a starter motor shield, it's made from a piece of 3.00 dia. X .060" wall 304 stainless steel tubing that was slit lengthwise, unrolled and flattened to extend upward from the starter motor. The shield extends up high enough to shield the solenoid, starter soleniod wire and positive battery cable along with the crank sensor wiring and knock sensor wiring.
I still need to make a small 'L' bracket coming off the lower 8mm hex head starter motor bolt to clamp the shroud to the bottom front of the starter motor. The outside wall of the shield will be polished on a buffer so it will reflect as much heat as possible, I sure hope my starter lives a long life since it will be a pretty big job to change it out.
The upper mounting bracket is made from 1 X 3/16" band iron. It mounts to one of the header bolts and has a 1/4-28 hole tapped in it to secure it to the top of the starter shield, it needed a small notch cut in the side so a 5/8" spark plug socket can sneak by. The .060" thick stainless shield and stout upper mounting bracket shouldn't vibrate and crack easily, some of the thin sheetmetal factory heat shields seem to have cracking issues.
Another small detail out of the way is the brake master cylinder pushrod. I cut the looped end off and had a machinist friend of mine single-point some 3/8-24 threads on his lathe. Now it will screw right into the factory brake pushrod clevis.
Thanks for looking.
I spent some time making up the necessary brackets to secure the fan shroud to the radiator. Quite a few months back I modified some factory lower saddles for the radiator to rest on and trimmed the fan shroud to fit, but until just lately I haven't worked on finishing up the installation.
The fan shroud will serve to hold the radiator in place. At the top of the core support the top radiator tank seams rest against a length of 1/4" rubber fuel hose that was slit lengthwise and slipped over a folded sheetmetal lip. The top radiator clamp (3rd picture below) keeps it held down in the rubber-insulated saddles at the bottom.
I made up some mounting brackets from 2 X 2 X 1/8" angle iron to secure the fan shroud to the radiator and fill the gap between the shroud and radiator support, there are two 10-32 tapped holes for each shroud mounting tab. The shroud mounting tabs are made from 1-1/4 X 1-1/4 x 1/8" angle iron, each one is tapped with 1/4-28 threads to hold the shroud in place.
The top radiator clamp mounts to the same two factory tapped holes in the radiator support that mounted the stock radiator clamp. I made it from a leftover scrap of .135" thick steel plate that I had previously used to modify the trans crossmember and a piece of 1-1/2 X 1-1/2 x 1/4" aluminum angle. I'll round off a few of the sharp corners before it gets painted and use some nicer looking fasteners when it's all finished up, I used some old Pontiac valve cover bolts that were handy for now.
I also fabbed up a starter motor shield, it's made from a piece of 3.00 dia. X .060" wall 304 stainless steel tubing that was slit lengthwise, unrolled and flattened to extend upward from the starter motor. The shield extends up high enough to shield the solenoid, starter soleniod wire and positive battery cable along with the crank sensor wiring and knock sensor wiring.
I still need to make a small 'L' bracket coming off the lower 8mm hex head starter motor bolt to clamp the shroud to the bottom front of the starter motor. The outside wall of the shield will be polished on a buffer so it will reflect as much heat as possible, I sure hope my starter lives a long life since it will be a pretty big job to change it out.
The upper mounting bracket is made from 1 X 3/16" band iron. It mounts to one of the header bolts and has a 1/4-28 hole tapped in it to secure it to the top of the starter shield, it needed a small notch cut in the side so a 5/8" spark plug socket can sneak by. The .060" thick stainless shield and stout upper mounting bracket shouldn't vibrate and crack easily, some of the thin sheetmetal factory heat shields seem to have cracking issues.
Another small detail out of the way is the brake master cylinder pushrod. I cut the looped end off and had a machinist friend of mine single-point some 3/8-24 threads on his lathe. Now it will screw right into the factory brake pushrod clevis.
Thanks for looking.