

Taking the plunge: LS3 into '64 Tempest. Need help with shopping list.
 07-10-2009, 07:38 PM
#141
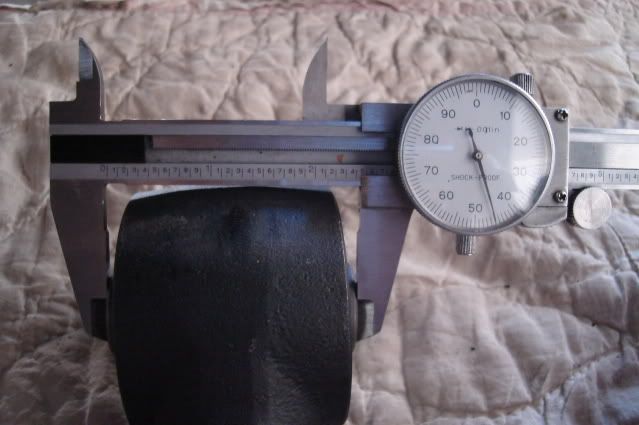
.....after work yesterday, I stopped by the local Pep Boys and picked up a couple of 40" lengths of 3/16" brake line on the way home.
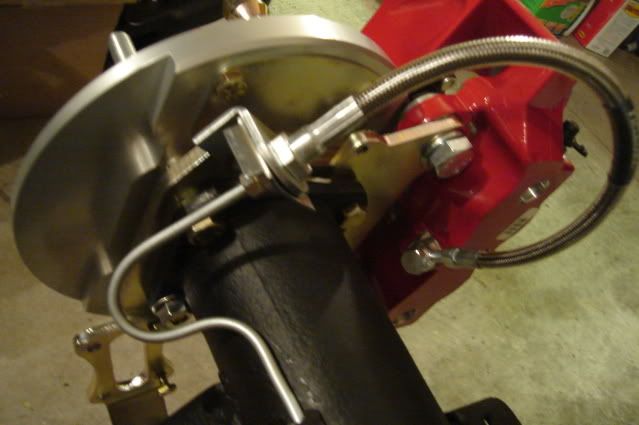
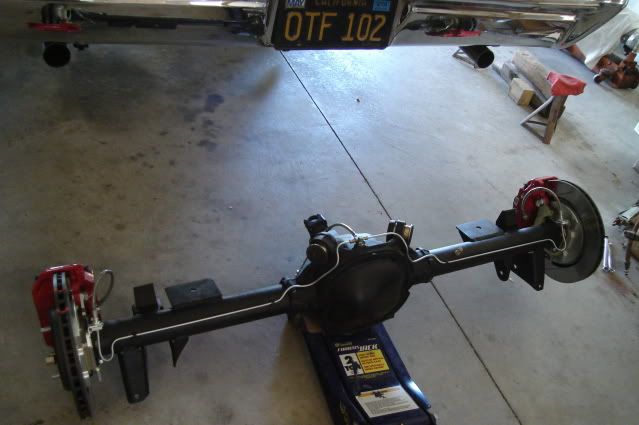
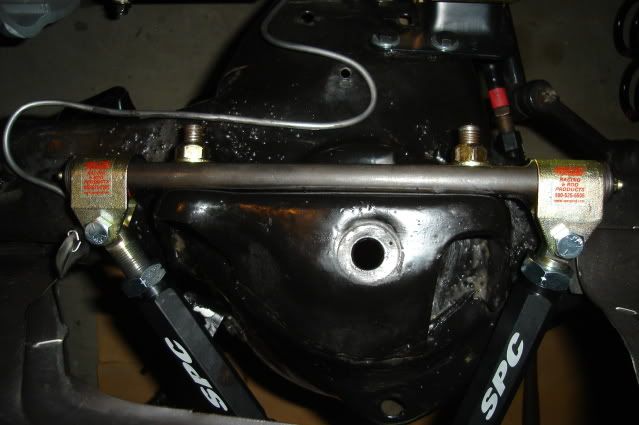
I ended up using 33.5" of line on the driver's side and 36" on the passenger side, owning a decent flaring tool is a must when shortening pre-made hard lines or making up new ones. The difference in line length was due to the offset location of the brake line tee on the top of the differential housing. The 8.5 rear has a cast-in bolt boss on top that's tapped for 5/16-18 thread to mount the tee, unlike the 8.2 rear these cars came with that use a bracket attached to the top cover bolt to mount the tee.
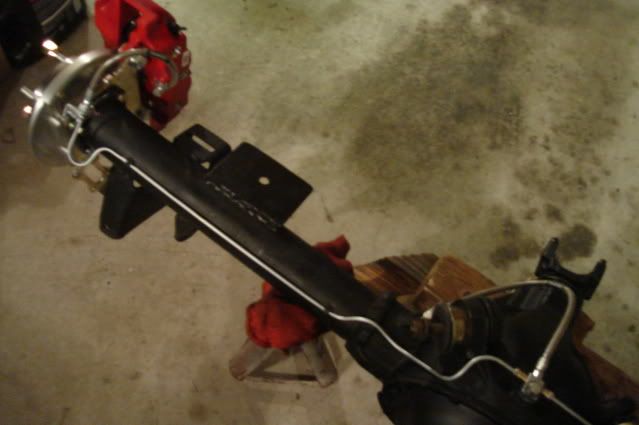
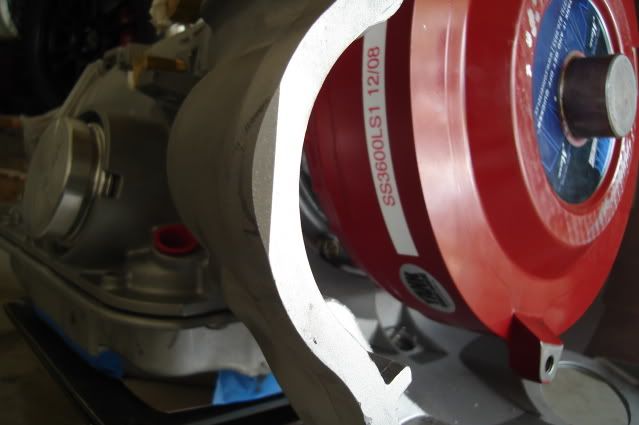
I bought some FlexKORE (TM) brake lines from KORE3 for the entire brake system to replace all of the flexible rubber lines, top-quality parts that will last forever and give better braking performance. I had to make sure that the FlexKORE lines were mounted in such a way that would allow the caliper to be pulled off the rotor for pad changes without disconnecting the lines.

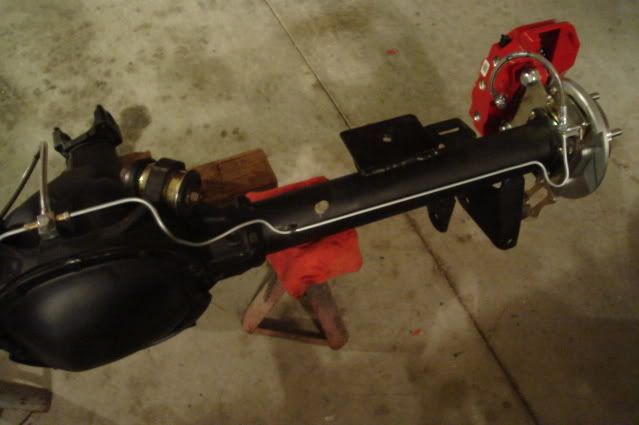
I filled the rear end with 2.5 quarts of Castrol 80W-90 gear oil (no synthetic for limited-slip units) and a 4oz bottle of GM #1052358 Limited Slip Additive, after 1000 miles I'll dump the oil and refill with new. With the gear lube taken care of and the brake lines completed it's finally ready to install this weekend for sure.
Moving forward.
I ended up using 33.5" of line on the driver's side and 36" on the passenger side, owning a decent flaring tool is a must when shortening pre-made hard lines or making up new ones. The difference in line length was due to the offset location of the brake line tee on the top of the differential housing. The 8.5 rear has a cast-in bolt boss on top that's tapped for 5/16-18 thread to mount the tee, unlike the 8.2 rear these cars came with that use a bracket attached to the top cover bolt to mount the tee.
I bought some FlexKORE (TM) brake lines from KORE3 for the entire brake system to replace all of the flexible rubber lines, top-quality parts that will last forever and give better braking performance. I had to make sure that the FlexKORE lines were mounted in such a way that would allow the caliper to be pulled off the rotor for pad changes without disconnecting the lines.
I filled the rear end with 2.5 quarts of Castrol 80W-90 gear oil (no synthetic for limited-slip units) and a 4oz bottle of GM #1052358 Limited Slip Additive, after 1000 miles I'll dump the oil and refill with new. With the gear lube taken care of and the brake lines completed it's finally ready to install this weekend for sure.
Moving forward.
 07-10-2009, 08:00 PM
#143

Very nice build!!! I love the brakes...I plan on using them on my project also..Welding the axle tubes around the center section will help to strengthen those rears and adding a Moser/TA diff cover to help out with rear gear deflection will too...I also plan on doing this to my 8.5"...Again very nice build...
07-11-2009, 10:37 PM
#144
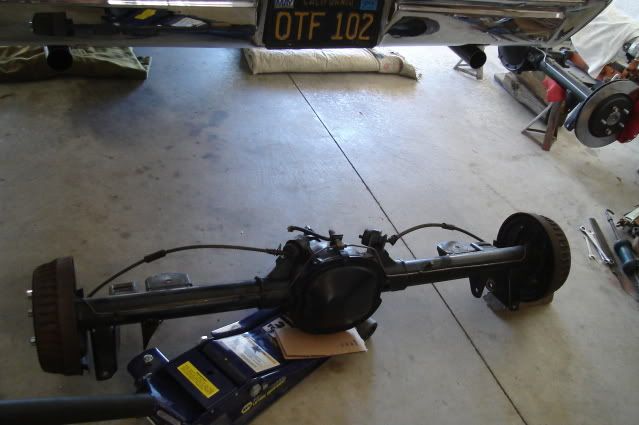
.....on the rear end install, I got up at 7AM because I knew it would be a long day out in the garage.
I pushed the Tempest out and laid out all of the rear suspension pieces: Currie Currectrac control arms, Global West S-60 springs, 1" rear sway bar, Bilstein shocks and some Hotchkis mounting braces to reinforce the frame. I found that I was missing a couple of bolts that I needed for the Hotchkis mounting braces (used parts generously given to me by PY member Colin Frolick along with the 1" sway bar), so after spending a few hours removing the old rear end I headed to NAPA and picked up the Grade 8 bolts.
I laid the new adjustable upper control arms next to the stock ones and slipped some bolts through them both. I adjusted the length on the new ones so they would match the stock ones to have a good baseline to start out with. I pumped all of the Johnny Joints and urethane bushings full of grease while I had easy access.

Out with the old.
I had read about the tight fit of the Currie arms to the frame mounting points, and sure enough there was about .010" of interference.
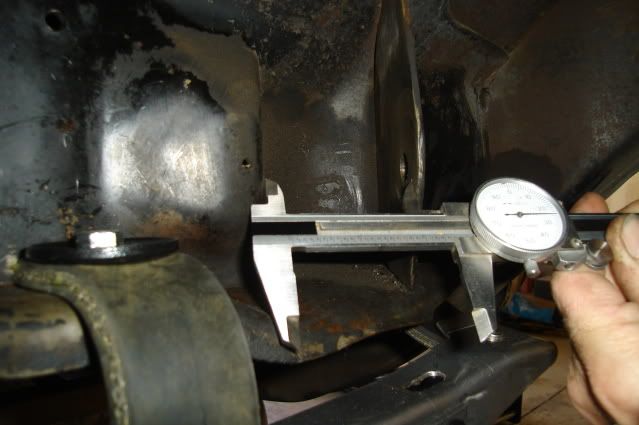
I used a slide hammer with a hook attachment and gave it about 3 hard knocks, this opened up the clearance that I needed. The mounting points are crushed inward a little by the previous tightening of the old suspension parts, it's not a big deal to open them back up again.
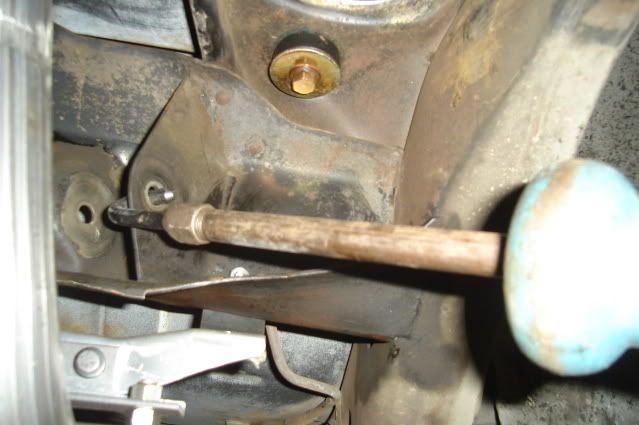
Control arms and mounting braces installed. On the lower arm on the pasenger side the very front end of the Currie arm interfered with the mounting bracket on the frame. I removed the arm and hammered the center of the mount in about 1/16" to get the clearance I needed.
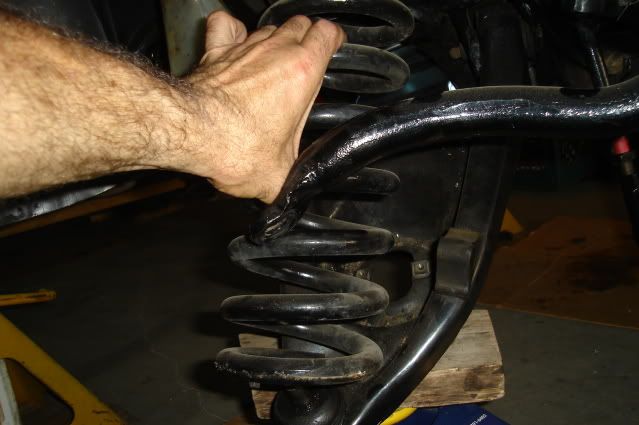
As you can see in the picture below, this was as low as the arm would pivot downward before doing the clearancing. You must remove the front grease zerk before installing these and put it back in when you're all finished, otherwise you'll break it off as the arm pivots down while putting the rear end in.
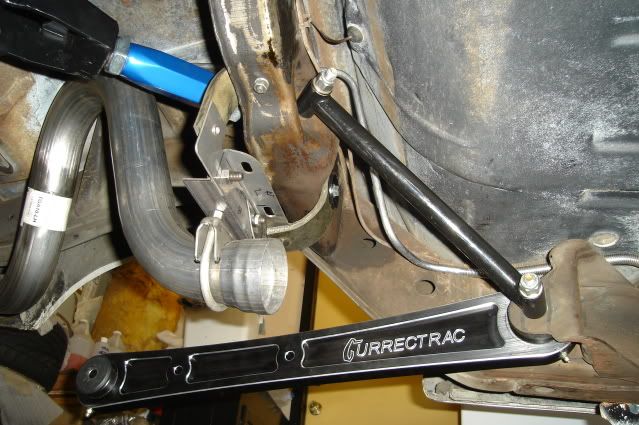
In with the new.
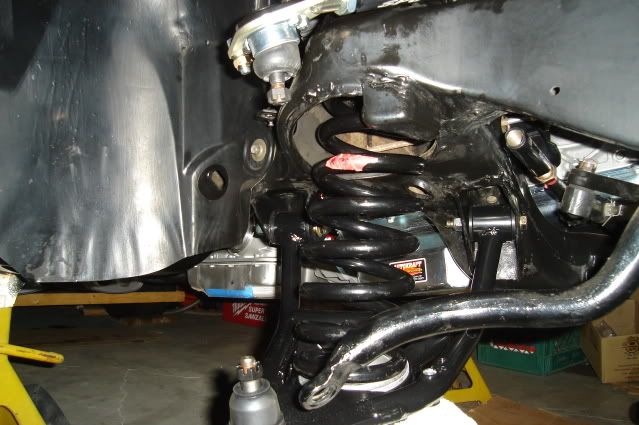
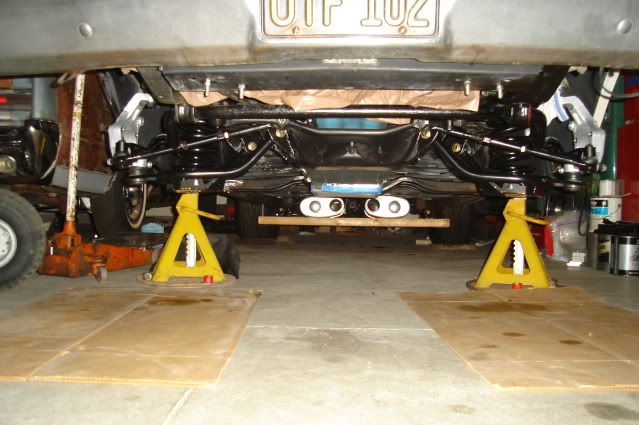
All buttoned-up. No sway bar installed yet nor any brake pads.
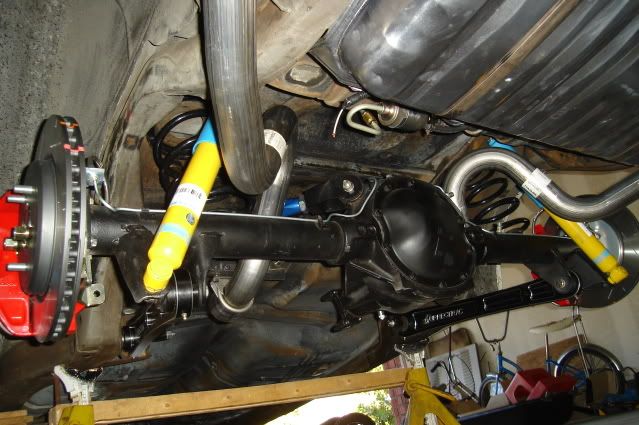
Suspension at full droop, shocks fully extended.
Rear end install complete, back down to earth.
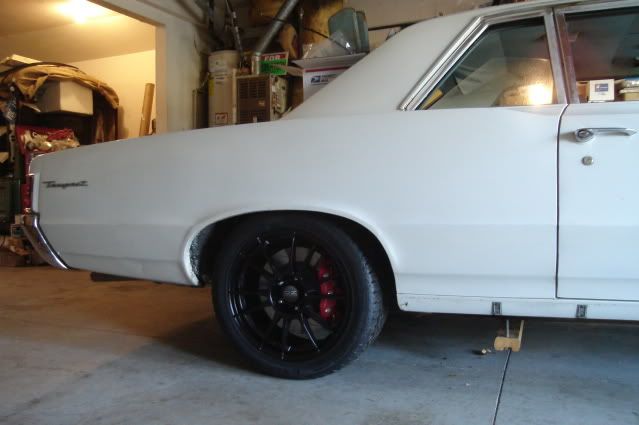
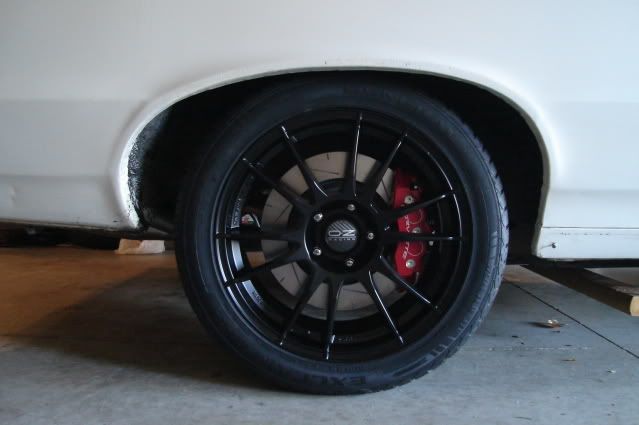
I'm really liking the contrast of the black wheels and the red Corvette Z06 calipers.
I'm stoked.
I pushed the Tempest out and laid out all of the rear suspension pieces: Currie Currectrac control arms, Global West S-60 springs, 1" rear sway bar, Bilstein shocks and some Hotchkis mounting braces to reinforce the frame. I found that I was missing a couple of bolts that I needed for the Hotchkis mounting braces (used parts generously given to me by PY member Colin Frolick along with the 1" sway bar), so after spending a few hours removing the old rear end I headed to NAPA and picked up the Grade 8 bolts.
I laid the new adjustable upper control arms next to the stock ones and slipped some bolts through them both. I adjusted the length on the new ones so they would match the stock ones to have a good baseline to start out with. I pumped all of the Johnny Joints and urethane bushings full of grease while I had easy access.
Out with the old.
I had read about the tight fit of the Currie arms to the frame mounting points, and sure enough there was about .010" of interference.
I used a slide hammer with a hook attachment and gave it about 3 hard knocks, this opened up the clearance that I needed. The mounting points are crushed inward a little by the previous tightening of the old suspension parts, it's not a big deal to open them back up again.
Control arms and mounting braces installed. On the lower arm on the pasenger side the very front end of the Currie arm interfered with the mounting bracket on the frame. I removed the arm and hammered the center of the mount in about 1/16" to get the clearance I needed.
As you can see in the picture below, this was as low as the arm would pivot downward before doing the clearancing. You must remove the front grease zerk before installing these and put it back in when you're all finished, otherwise you'll break it off as the arm pivots down while putting the rear end in.
In with the new.
All buttoned-up. No sway bar installed yet nor any brake pads.
Suspension at full droop, shocks fully extended.
Rear end install complete, back down to earth.
I'm really liking the contrast of the black wheels and the red Corvette Z06 calipers.
I'm stoked.
Last edited by b-man64; 07-12-2009 at 03:53 AM.
07-11-2009, 10:56 PM
#145
This is just an awesome car, not to mention all the pretty parts and picture eye-candy!! Fantastic thread too!!!
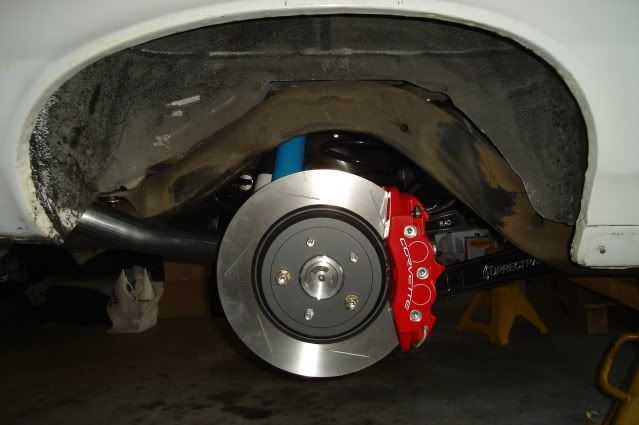
One question, are the calipers supposed to be mounted on the front like that? Seems like most kits place them on the rear side of the axle, do the Kore3 ones specify to be on the front or does it not matter other than having the bleed screws facing up? Also, on those calipers I'm assuming all 4 pistons are the same size, so there's no "directionality" to the caliper itself? I'm thinking about mounting my Wilwoods on the front of my 8.5" just to be different...
One question, are the calipers supposed to be mounted on the front like that? Seems like most kits place them on the rear side of the axle, do the Kore3 ones specify to be on the front or does it not matter other than having the bleed screws facing up? Also, on those calipers I'm assuming all 4 pistons are the same size, so there's no "directionality" to the caliper itself? I'm thinking about mounting my Wilwoods on the front of my 8.5" just to be different...
07-11-2009, 11:24 PM
#146
This is just an awesome car, not to mention all the pretty parts and picture eye-candy!! Fantastic thread too!!!
One question, are the calipers supposed to be mounted on the front like that? Seems like most kits place them on the rear side of the axle, do the Kore3 ones specify to be on the front or does it not matter other than having the bleed screws facing up? Also, on those calipers I'm assuming all 4 pistons are the same size, so there's no "directionality" to the caliper itself? I'm thinking about mounting my Wilwoods on the front of my 8.5" just to be different...
One question, are the calipers supposed to be mounted on the front like that? Seems like most kits place them on the rear side of the axle, do the Kore3 ones specify to be on the front or does it not matter other than having the bleed screws facing up? Also, on those calipers I'm assuming all 4 pistons are the same size, so there's no "directionality" to the caliper itself? I'm thinking about mounting my Wilwoods on the front of my 8.5" just to be different...
You have your choice of how you want to mount the calipers, it doesn't matter which way as long as you mount the calipers with the bleed screws up. It seemed to me that hooking up the parking brake cables would be easier this way, plus this way looked 'right' to me. You can flip the caliper brackets over to mount them rearward.
I was checking out some of the cars at my work in the parking lot and most of them have the rear calipers mounted like I did mine, including the owner's CLS55 AMG.
07-12-2009, 01:33 AM
#147
Teching In
iTrader: (3)

Join Date: Jun 2007
Location: Northern Virginia
Posts: 19
Likes: 0
Received 0 Likes
on
0 Posts

What did you end up doing to correct your tie rod issue. I've got the same problem with a 71 Chevelle, Edelbrock mounts. I'm thinking about notching the pan and raising up the engine a little.
Last edited by Russ_B_10; 07-12-2009 at 01:51 AM.
07-12-2009, 03:49 AM
#148
The front wheels were hitting the Hotchkis upper A-arms I have on the car now when I test fitted them, but those are being replaced with SPC adjustable uppers to help gain some clearance along with the entire front suspension anyway. So maybe the tie rod ends hitting the pan isn't such a bad thing now in this instance.
It looks like your engine sits a little lower than mine does, you'll probably need to put a 1/4" to 3/8" spacer plate between the frame mounts and the crossmember to get your engine up as high as mine in relation to the centerlink.
07-12-2009, 10:58 PM
#150
.....from the weld shop today, it came out looking pretty good.
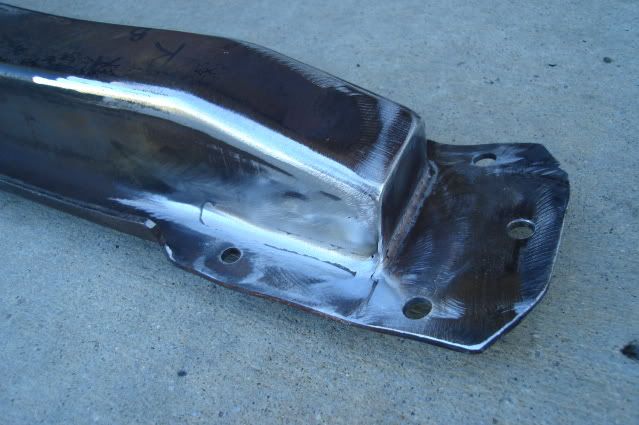
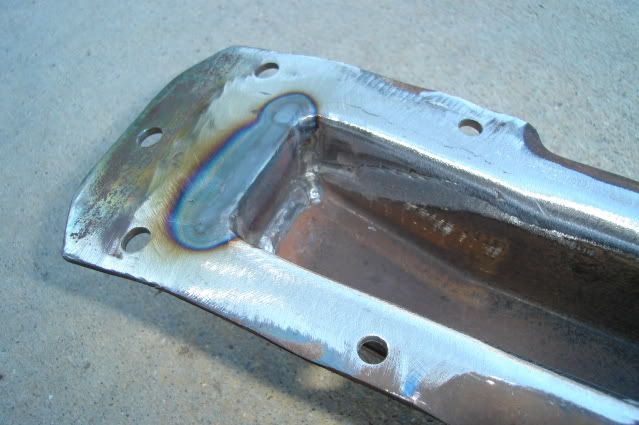
The welding on the crossmember was done by Jeff Moore at Chassis Fab in Acton CA.
http://www.chassisfab.com/
Jeff does top-quality work and has a fully-equipped shop that can easily handle the small jobs like this one or bigger projects requiring extensive chassis fabrication.
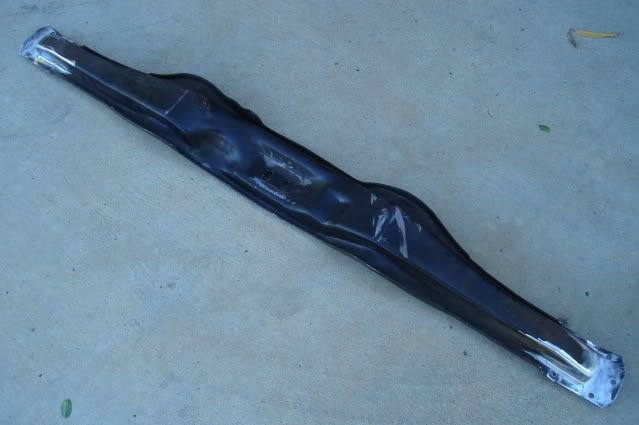
Now I'll be able to get the trans mounted in the car, this should add enough weight to make it easier to remove the front springs when I swap the old front end components for the new ones.
The welding on the crossmember was done by Jeff Moore at Chassis Fab in Acton CA.
http://www.chassisfab.com/
Jeff does top-quality work and has a fully-equipped shop that can easily handle the small jobs like this one or bigger projects requiring extensive chassis fabrication.
Now I'll be able to get the trans mounted in the car, this should add enough weight to make it easier to remove the front springs when I swap the old front end components for the new ones.
07-26-2009, 12:11 AM
#151
.....and took another step forward. The weather cooled down into the mid to low 90s today, last weekend it was close to 110 degrees and just too hot to do anything.
I put the Tempest up high on small wooden pallets once again and removed the passenger side header. The headers need to be out of the way so I can remove the lower control arm bolts, a complete front suspension upgrade is my next task. While doing some fitting and checking I found that with the transmission bellhousing just barely touched one of the passenger side header tubes right where the starter goes. I knocked off the corner of the bellhousing with a large flat file to give the header tube some clearance.
Next I bolted the trans up to the engine. I bolted the finished trans crossmember to the trans mount and jacked it up tight against the bottom of the frame.
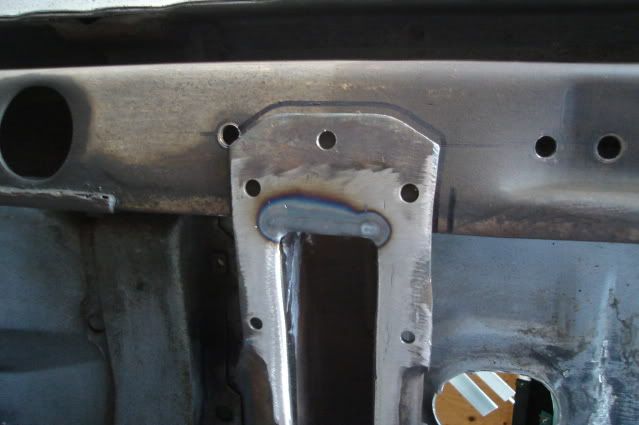
After drilling three 5/16" holes in each side of the frame using the crossmember holes as a guide I bolted the trans crossmember in place using the upper and lower reinforcement plates I made previously.
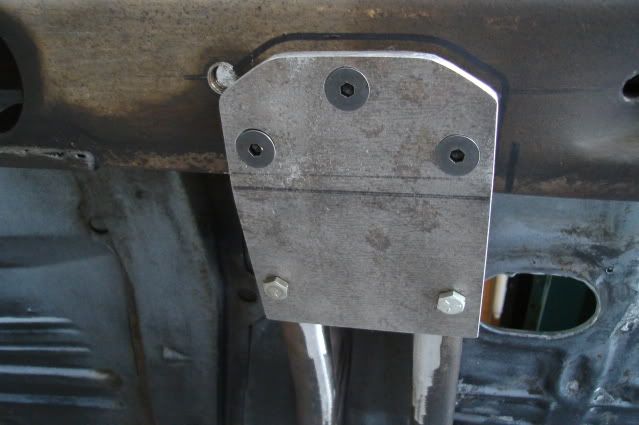
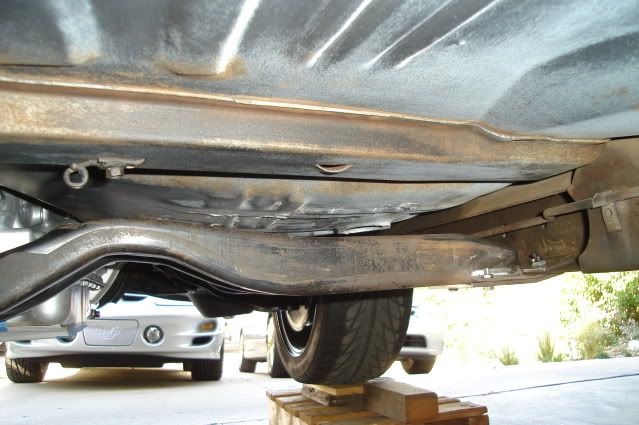
The crossmember and lower reinforcement plate hang a little over 5/16" below the bottom of the frame rail.

Right above the exhaust clearance hump you can just get your finger between the top of the crossmember and the floorpan, about 1/2" to 5/8" of clearance.
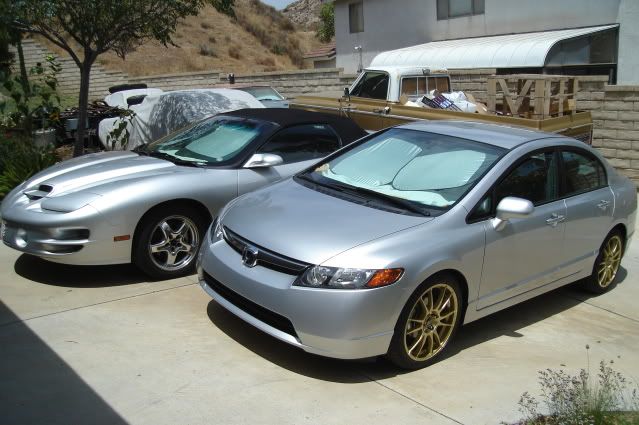
Finally, I would like to thank my two daily drivers for their patience, putting up with numerous cold starts when they're getting moved around and for braving the hot sun all day whenever the Tempest is getting attention. They're both very spoiled and really hate sitting outside.
Now there is finally enough weight over the front end to start to compress the springs, the added weight of the 4L70E trans got the front suspension off of the upper bump stops.
Next up is all of the front suspension and brake work, stay tuned.
I put the Tempest up high on small wooden pallets once again and removed the passenger side header. The headers need to be out of the way so I can remove the lower control arm bolts, a complete front suspension upgrade is my next task. While doing some fitting and checking I found that with the transmission bellhousing just barely touched one of the passenger side header tubes right where the starter goes. I knocked off the corner of the bellhousing with a large flat file to give the header tube some clearance.
Next I bolted the trans up to the engine. I bolted the finished trans crossmember to the trans mount and jacked it up tight against the bottom of the frame.
After drilling three 5/16" holes in each side of the frame using the crossmember holes as a guide I bolted the trans crossmember in place using the upper and lower reinforcement plates I made previously.
The crossmember and lower reinforcement plate hang a little over 5/16" below the bottom of the frame rail.
Right above the exhaust clearance hump you can just get your finger between the top of the crossmember and the floorpan, about 1/2" to 5/8" of clearance.
Finally, I would like to thank my two daily drivers for their patience, putting up with numerous cold starts when they're getting moved around and for braving the hot sun all day whenever the Tempest is getting attention.
They're both very spoiled and really hate sitting outside.Now there is finally enough weight over the front end to start to compress the springs, the added weight of the 4L70E trans got the front suspension off of the upper bump stops.
Next up is all of the front suspension and brake work, stay tuned.
07-27-2009, 12:11 AM
#152
.....by removing all of the old front end components.
I put the Tempest up on two large 6-ton jackstands and removed the wheels, then removed both front shocks and the sway bar end links. Next I loosened up the tie rod adjusters, but left the tie rods attached for now so they would help keep the spindles from moving while loosening up all 4 of the ball joint castle nuts.
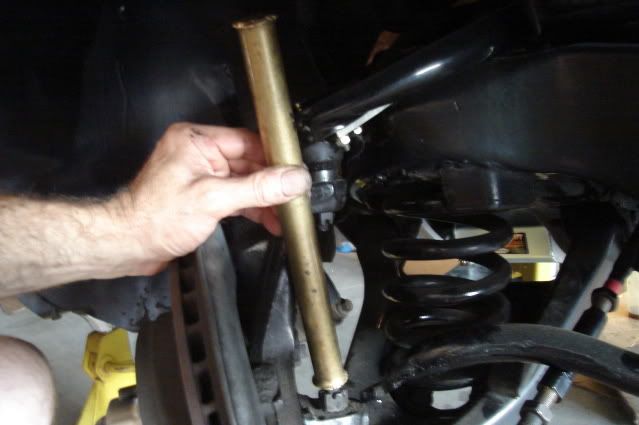
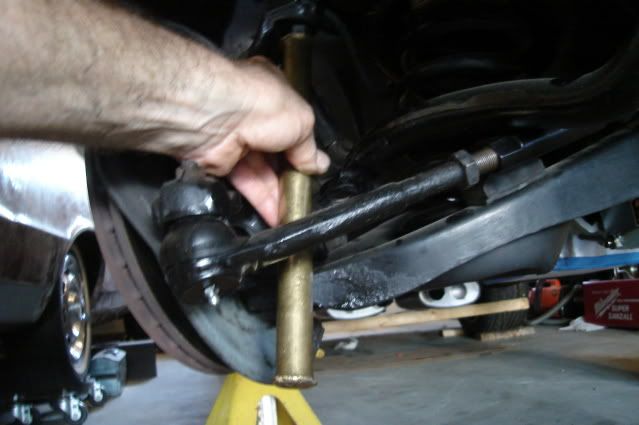
After removing the cotter pins and loosening the ball joint castle nuts by a few turns I used a 12" long by 1" diameter brass bar as a drift to knock them loose from the tapered holes in the spindle. After only a couple of hard raps on the ball joint studs with a 2-pound hammer they popped right out of the spindle, against the loosened castle nut. The brass bar is long enough to do all of your hammering clear of the suspension parts, plus you can get a good swing with the hammer.
Next I put my floor jack with a 2X6 wood block underneath the control arm spring pocket and jacked it up enough to remove the tension against the castle nuts. After removing the castle nuts I let the jack down just enough to get the spindle assembly out, I disconnected the brake hose at the frame bracket beforehand.
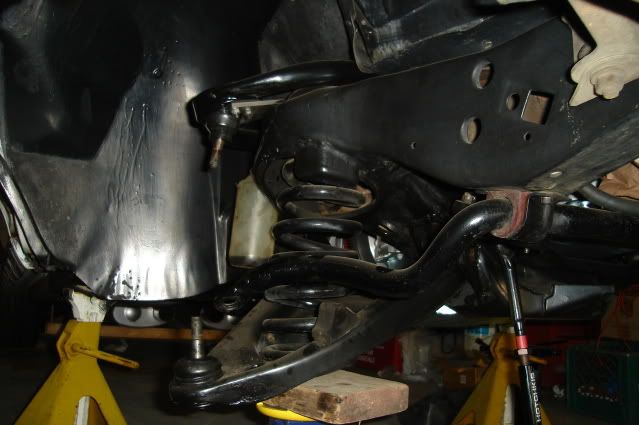
The H-O Racing front springs are fairly short and came out easily after letting the lower control arms all the way down with the jack, I didn't need to use a spring compressor. Having enough weight on the front end is the key to getting away without the need for a spring compressor, along with a short free-height spring.
To get the upper control arms off I had to remove the rubber spash shields from the inner fenders to get enough room to manuever them out. I also had to take the steering shaft loose from the rag joint coupler on the driver's side and push the steering shaft over as far as possible to get the control arm shaft off the 2 mounting bolts that are pressed into the frame.
Tear down is now complete, all I need to do now is a little cleaning of the suspension attachment points on the frame and I'll be ready to start installing the new parts.

There's really nothing wrong with the old '78 B-body spindles with 12" rotors, reinforced stock lower A-arms and Hotchkis upper control arms with greasable poly bushings. They truly made a night and day difference in braking and handling over the original factory 9.5" drum brakes and rubber-bushed suspension pieces that had over 140K miles on them.
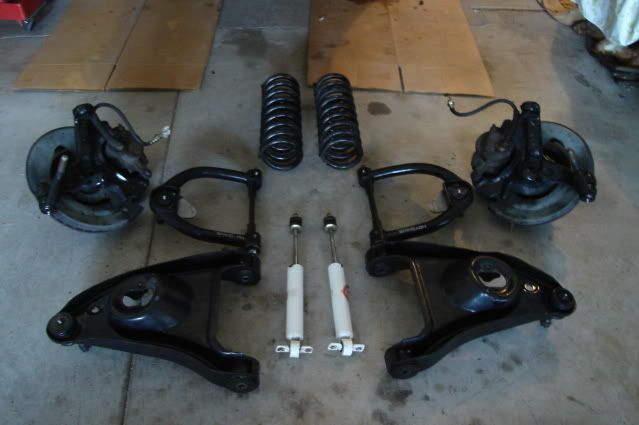
I'm replacing them all now with SPC adjustable upper control arms and tubular lowers, American Touring Specialties AFX forged aluminum spindles and C6 Z06 brakes with hopes that I'll see yet another night and day difference in braking and handling.
This is really going to be a fun canyon carver.
I put the Tempest up on two large 6-ton jackstands and removed the wheels, then removed both front shocks and the sway bar end links. Next I loosened up the tie rod adjusters, but left the tie rods attached for now so they would help keep the spindles from moving while loosening up all 4 of the ball joint castle nuts.
After removing the cotter pins and loosening the ball joint castle nuts by a few turns I used a 12" long by 1" diameter brass bar as a drift to knock them loose from the tapered holes in the spindle. After only a couple of hard raps on the ball joint studs with a 2-pound hammer they popped right out of the spindle, against the loosened castle nut. The brass bar is long enough to do all of your hammering clear of the suspension parts, plus you can get a good swing with the hammer.
Next I put my floor jack with a 2X6 wood block underneath the control arm spring pocket and jacked it up enough to remove the tension against the castle nuts. After removing the castle nuts I let the jack down just enough to get the spindle assembly out, I disconnected the brake hose at the frame bracket beforehand.
The H-O Racing front springs are fairly short and came out easily after letting the lower control arms all the way down with the jack, I didn't need to use a spring compressor. Having enough weight on the front end is the key to getting away without the need for a spring compressor, along with a short free-height spring.
To get the upper control arms off I had to remove the rubber spash shields from the inner fenders to get enough room to manuever them out. I also had to take the steering shaft loose from the rag joint coupler on the driver's side and push the steering shaft over as far as possible to get the control arm shaft off the 2 mounting bolts that are pressed into the frame.
Tear down is now complete, all I need to do now is a little cleaning of the suspension attachment points on the frame and I'll be ready to start installing the new parts.
There's really nothing wrong with the old '78 B-body spindles with 12" rotors, reinforced stock lower A-arms and Hotchkis upper control arms with greasable poly bushings. They truly made a night and day difference in braking and handling over the original factory 9.5" drum brakes and rubber-bushed suspension pieces that had over 140K miles on them.
I'm replacing them all now with SPC adjustable upper control arms and tubular lowers, American Touring Specialties AFX forged aluminum spindles and C6 Z06 brakes with hopes that I'll see yet another night and day difference in braking and handling.
This is really going to be a fun canyon carver.
 07-27-2009, 06:44 PM
#155
I've been wrenching for quite awile, on this site for a lil while; this is the best, most informative and detailed oriented build i've seen. Thanks; great work, cant wait for the start-up vid.
07-28-2009, 07:24 PM
#156
Thanks for the kind words guys.
Posting on my build here as I make progress is fun, hopefully it helps to motivate others who have projects out there that need attention.
Just knowing there are some fellow gearheads watching out there who want to see more progress on the Tempest really helps me to keep working on it.
Posting on my build here as I make progress is fun, hopefully it helps to motivate others who have projects out there that need attention.
Just knowing there are some fellow gearheads watching out there who want to see more progress on the Tempest really helps me to keep working on it.
07-28-2009, 08:11 PM
#157
I enjoy watching other people's builds progress....Makes me wish I could finish mine even more...My engine will be done before I deploy but not the install or all the other stuff. The good thing about it though is that I'm won't be tempted to cut corners and I'll have more than enough money to get exactly what I want when I return..anyways sorry for the blabbing... Your build is very nice and very well well done...kudos...
07-29-2009, 10:23 PM
#158
TECH Enthusiast
iTrader: (1)

Join Date: Jan 2006
Location: Charlotte, NC
Posts: 581
Likes: 0
Received 0 Likes
on
0 Posts
This is just an awesome car, not to mention all the pretty parts and picture eye-candy!! Fantastic thread too!!!
One question, are the calipers supposed to be mounted on the front like that? Seems like most kits place them on the rear side of the axle, do the Kore3 ones specify to be on the front or does it not matter other than having the bleed screws facing up? Also, on those calipers I'm assuming all 4 pistons are the same size, so there's no "directionality" to the caliper itself? I'm thinking about mounting my Wilwoods on the front of my 8.5" just to be different...
One question, are the calipers supposed to be mounted on the front like that? Seems like most kits place them on the rear side of the axle, do the Kore3 ones specify to be on the front or does it not matter other than having the bleed screws facing up? Also, on those calipers I'm assuming all 4 pistons are the same size, so there's no "directionality" to the caliper itself? I'm thinking about mounting my Wilwoods on the front of my 8.5" just to be different...

This was from my Z06 Brake install a week before the Hot Rod Power Tour a couple months back!
The car looks awesome! Nice to see those brakes!
I can tell you this, my car already stopped well... but DAMNNN it stops awesome now! Have fun w/ your new setup!
08-02-2009, 02:32 AM
#159
.....the new front end today. The weather has cooled down during the last week to the mid to low 90s, so I'd better take advantage of that and get some work done on the Tempest.
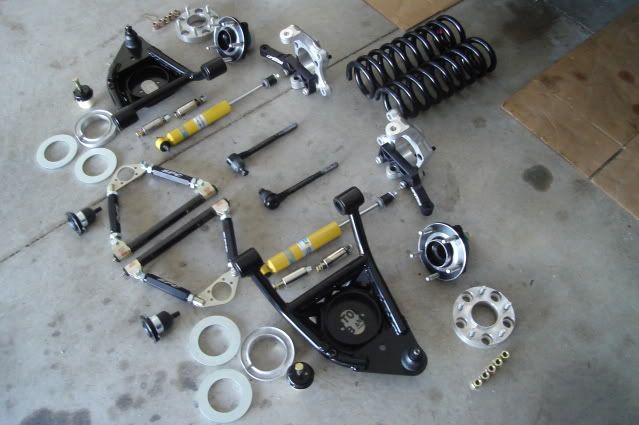
New front suspension components laid out, I'll be reusing the H-O Racing front springs.
I laid the SPC upper control arms over the Hotchkis arms and adjusted the links to get them close to where they'll need to be. Before doing this I took the links apart and put a good coat of moly on the link threads. The curved rear tube on the Hotchkis arm interfered with my 18X9" wheel at near full steering lock, I'm hoping to gain some clearance at that point.
The mounting holes in the new A-body Moog upper ball joints wouldn't line up with the two outward bolt holes in the SPC arms, those two holes are driled a little too far apart. A little work with a rat-tail file to slot the holes inward by .020" each took care of the slight mismatch. The mounting holes are already drilled to .300" in the arms which is plenty of clearance for a 1/4" bolt. I didn't like having to file on my new control arms, but after thinking about how much I had to hammer the crap out of my trans tunnel it didn't seem so bad.

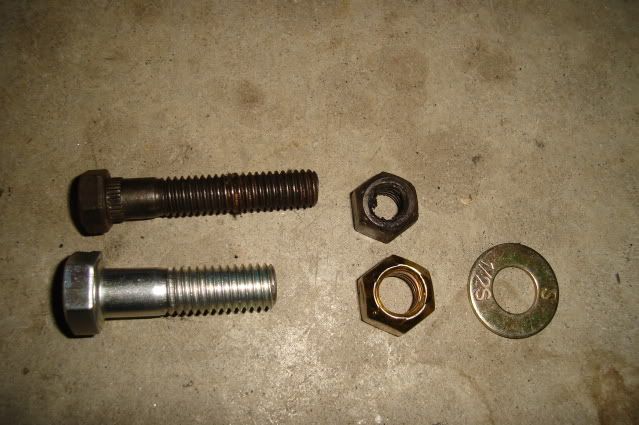
I bought some new hardware to attach the upper control arms to the frame, the billet aluminum cross shafts are drilled for 1/2" mounting hardware so the original 7/16" bolts wouldn't work. This gave me the opportunity to gain some additional clearance between the headers and the bolts, the new hardware is 1/2" shorter.
Upper control arm bolted in place. You have to bend the rear corner of the opening in the inner fender inward to clear the rear control arm pivot on the cross shaft, this slight modification was already done to make the old Hotchkis arms fit.
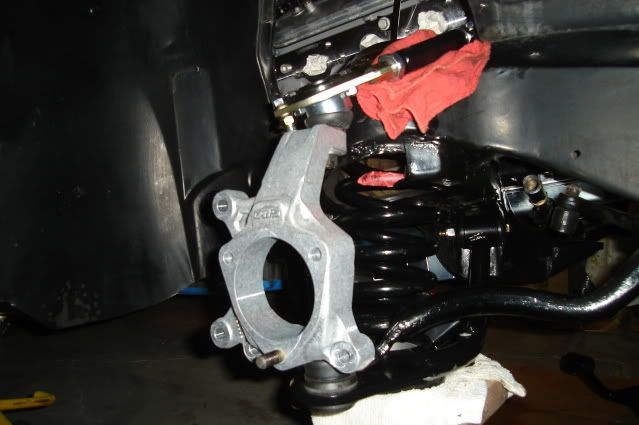
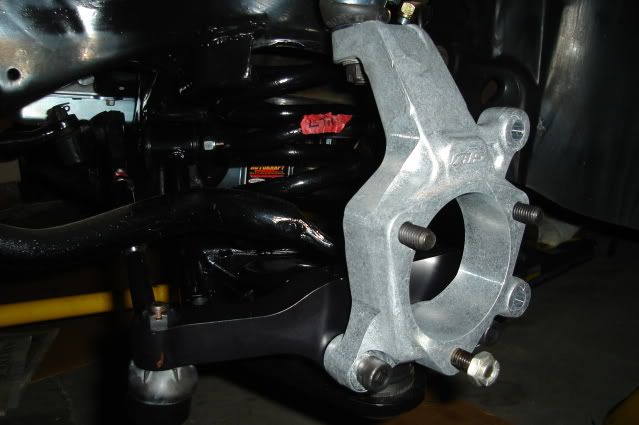
The bare aluminum AFX spindles and cast aluminum lower spring seats were treated with an aluminum cleaner (Alumiprep #33) with an alodine solution (Alodine #1001) to protect them from corrosion. You can buy them from Aircraft Spruce: http://aircraftspruce.com

The SPC lower control arms went in easily using some new 1/2-13 Grade 8 hardware and nylock nuts, these arms already have a 1" drop built into them. After making sure the top of the spring was correctly clocked in the upper spring seat I dropped the aluminum lower seat into the control arm and made sure that it was clocked correctly as well. I was able to pull the lower arm up into postion with the spring in place by hand and slide the jack underneath it, no spring compressor needed.
AFX spindle is now in place, there's just enough weight in the chassis to compress the spring so the ball joints would mate up with the spindle. The castle nuts on the ball joints were snugged lightly at this point. If I don't like the ride height after the car is fully assembled it will come apart easily so I can either cut the springs or add spring spacers under the spring seats.
The billet aluminum ATS steering arms are now in place along with the Moog tie rod ends. Most of the major components are not tightened up yet, things will be coming apart a few times to make various adjustments.
The front suspension assembly is complete enough now that I can see how everything is fitting up, it's looking pretty good at this point.
Tomorrow I'll try to get the front hubs mounted to the spindles and see how the brakes, wheels and tires fit.
New front suspension components laid out, I'll be reusing the H-O Racing front springs.
I laid the SPC upper control arms over the Hotchkis arms and adjusted the links to get them close to where they'll need to be. Before doing this I took the links apart and put a good coat of moly on the link threads. The curved rear tube on the Hotchkis arm interfered with my 18X9" wheel at near full steering lock, I'm hoping to gain some clearance at that point.
The mounting holes in the new A-body Moog upper ball joints wouldn't line up with the two outward bolt holes in the SPC arms, those two holes are driled a little too far apart. A little work with a rat-tail file to slot the holes inward by .020" each took care of the slight mismatch. The mounting holes are already drilled to .300" in the arms which is plenty of clearance for a 1/4" bolt. I didn't like having to file on my new control arms, but after thinking about how much I had to hammer the crap out of my trans tunnel it didn't seem so bad.
I bought some new hardware to attach the upper control arms to the frame, the billet aluminum cross shafts are drilled for 1/2" mounting hardware so the original 7/16" bolts wouldn't work. This gave me the opportunity to gain some additional clearance between the headers and the bolts, the new hardware is 1/2" shorter.
Upper control arm bolted in place. You have to bend the rear corner of the opening in the inner fender inward to clear the rear control arm pivot on the cross shaft, this slight modification was already done to make the old Hotchkis arms fit.
The bare aluminum AFX spindles and cast aluminum lower spring seats were treated with an aluminum cleaner (Alumiprep #33) with an alodine solution (Alodine #1001) to protect them from corrosion. You can buy them from Aircraft Spruce: http://aircraftspruce.com
The SPC lower control arms went in easily using some new 1/2-13 Grade 8 hardware and nylock nuts, these arms already have a 1" drop built into them. After making sure the top of the spring was correctly clocked in the upper spring seat I dropped the aluminum lower seat into the control arm and made sure that it was clocked correctly as well. I was able to pull the lower arm up into postion with the spring in place by hand and slide the jack underneath it, no spring compressor needed.
AFX spindle is now in place, there's just enough weight in the chassis to compress the spring so the ball joints would mate up with the spindle. The castle nuts on the ball joints were snugged lightly at this point. If I don't like the ride height after the car is fully assembled it will come apart easily so I can either cut the springs or add spring spacers under the spring seats.
The billet aluminum ATS steering arms are now in place along with the Moog tie rod ends. Most of the major components are not tightened up yet, things will be coming apart a few times to make various adjustments.
The front suspension assembly is complete enough now that I can see how everything is fitting up, it's looking pretty good at this point.
Tomorrow I'll try to get the front hubs mounted to the spindles and see how the brakes, wheels and tires fit.
08-02-2009, 09:06 AM
#160
TECH Enthusiast

Great build and great documentation , I like the air intake design. what are you doing to mount your compressor? I fabbed some brackets to keep it low on the pass. side with no notching on the frame .let me know if you need a set of templates or some measurements. JOHN