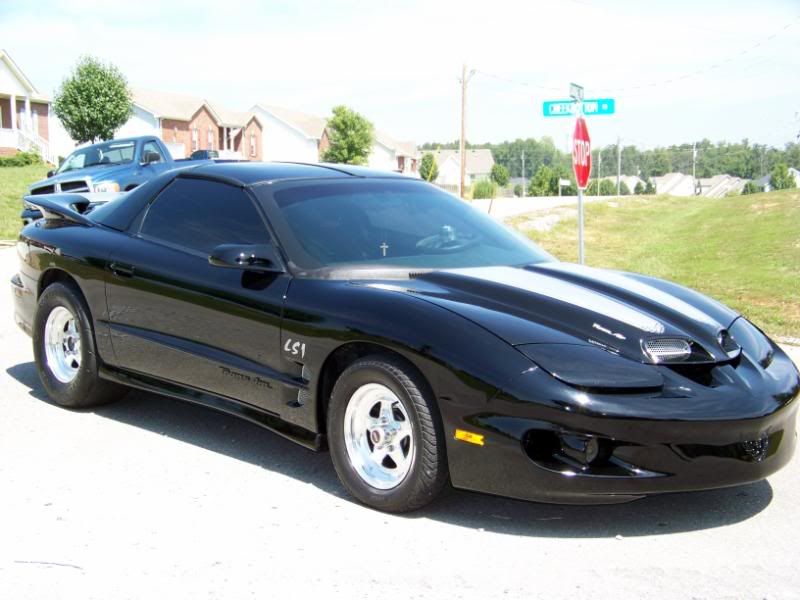
Add another S480 Build to the ranks!
I guess we should update this, huh!?
26Oct09
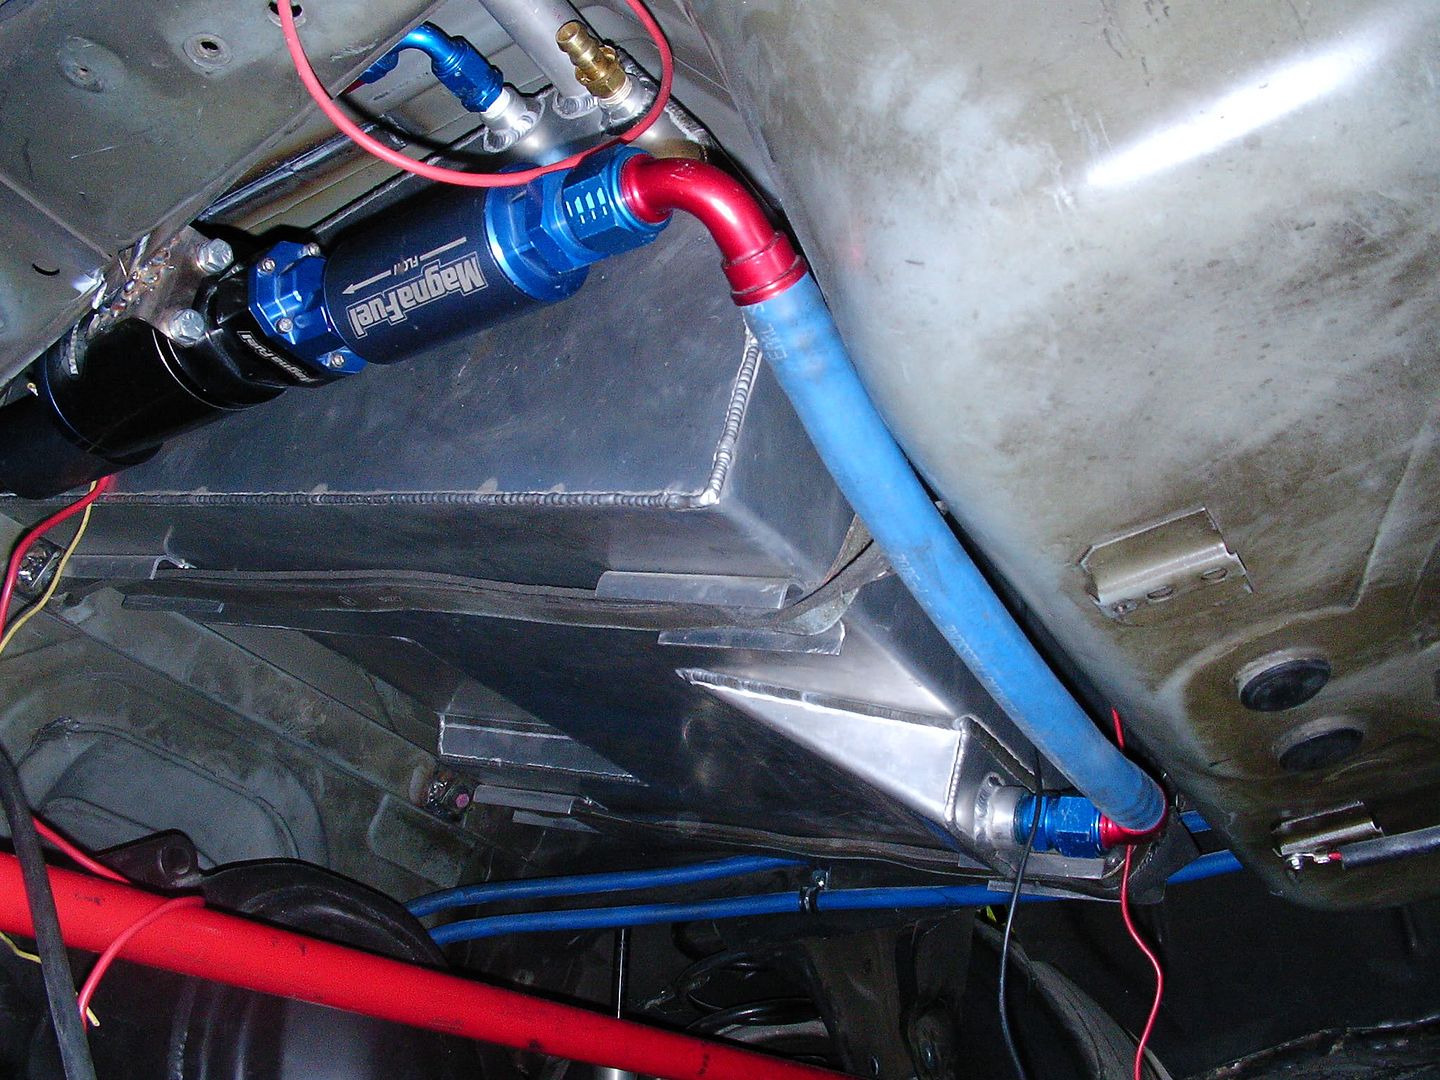
We got 99% of the Fuel system in and mounted. The Fuel tank install required us to modify where the straps for the tank botled into. We relocated that with a couple weld nuts and a lot of effort. From there, we ran the lines across the drivers side of the Torque arm and re-used the existing bolt holes for the stock lines. We zip-tied the return line to the main feed line, and it tucks nicely. We ran the lines up the back of the trans bellhousing and into the fuel rails. At the back of the car, we simply routed up and over the axle, following the natural lines of the car and the lines laid perfectly. We re-used a bracket that came with the pump, and rather than bolting the bracket to the car, we welded it to the frame. then bolted the pump and (2) filters to the bracket. It fits like a glove in there.
Amanda, the wifey, spent ALOT of time prepping the cage for paint. She finished up the last of the sanding on it, and then laid down all the plastic so all it needs is priming and painting. That should be done during the week this week.
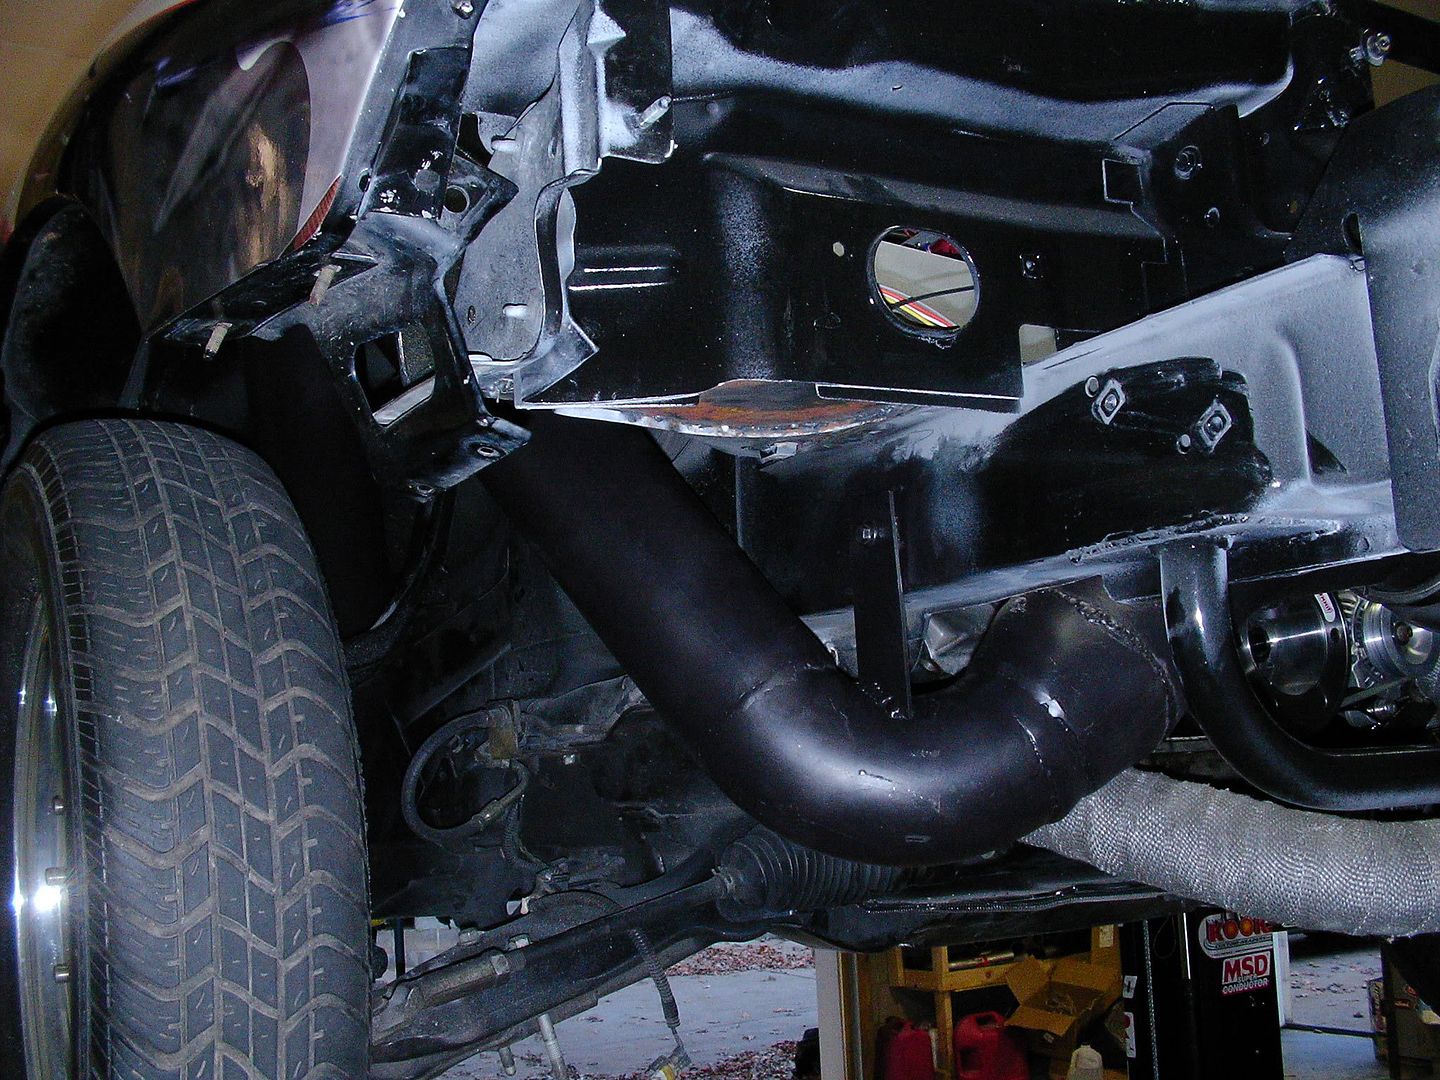
At the Downpipe, we used (3) 90* elbows, and about 3.5' of 4" tubing. Tater made a 5"-->4" neckdown, and then me and Blue smoothed all the welds on the inside of the piping.
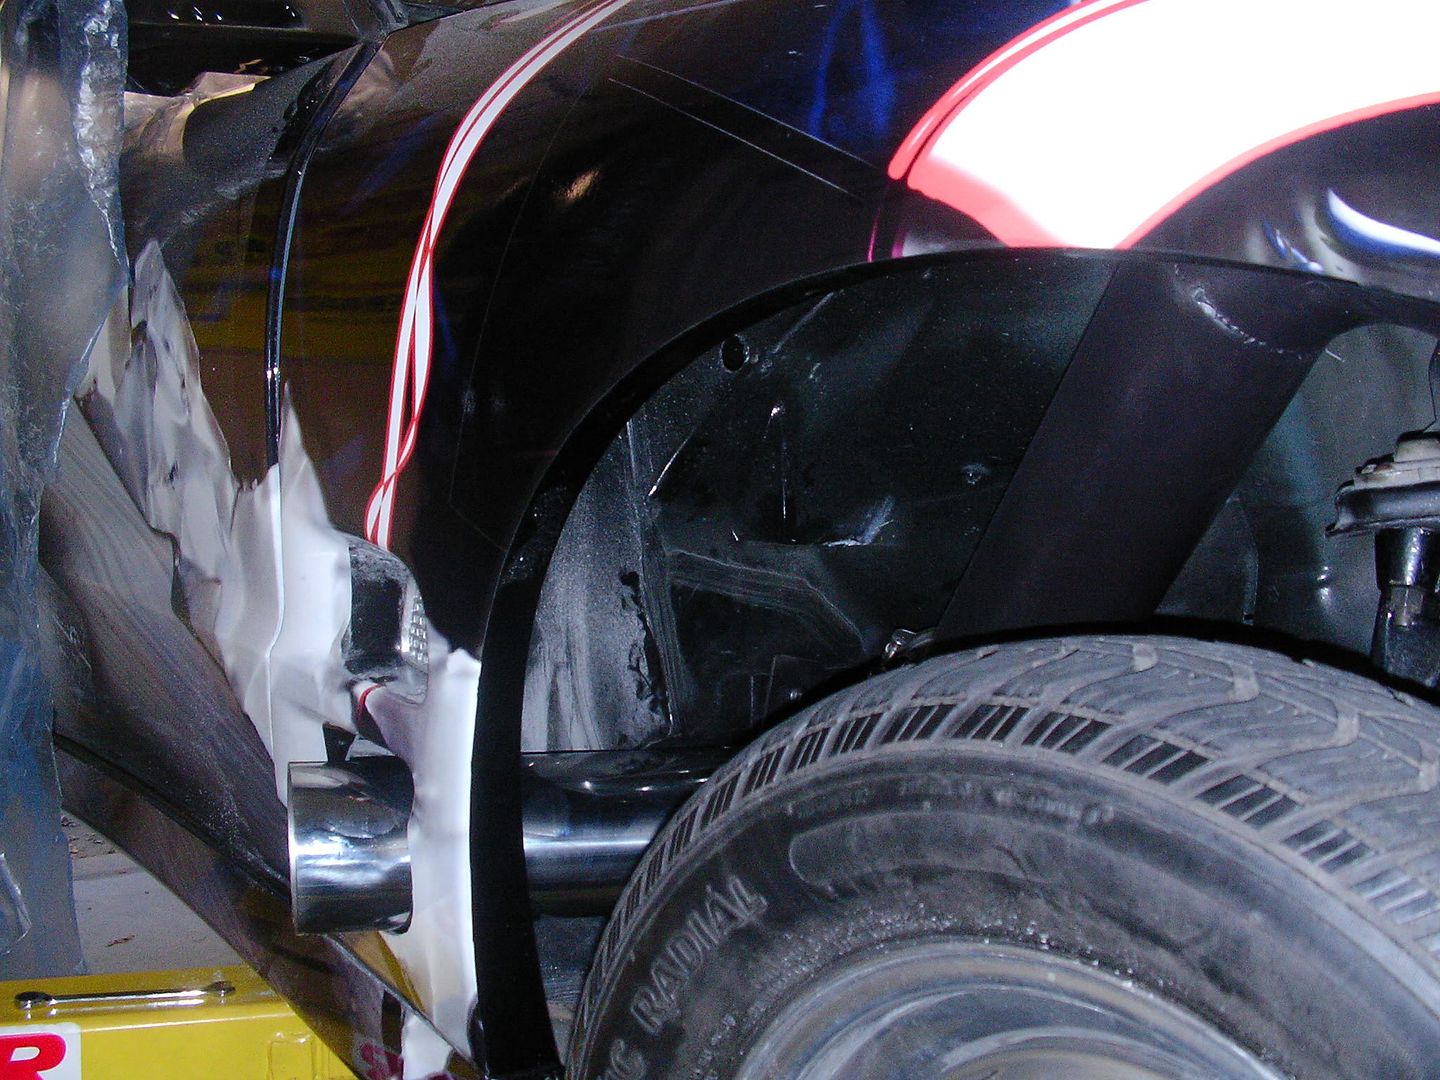
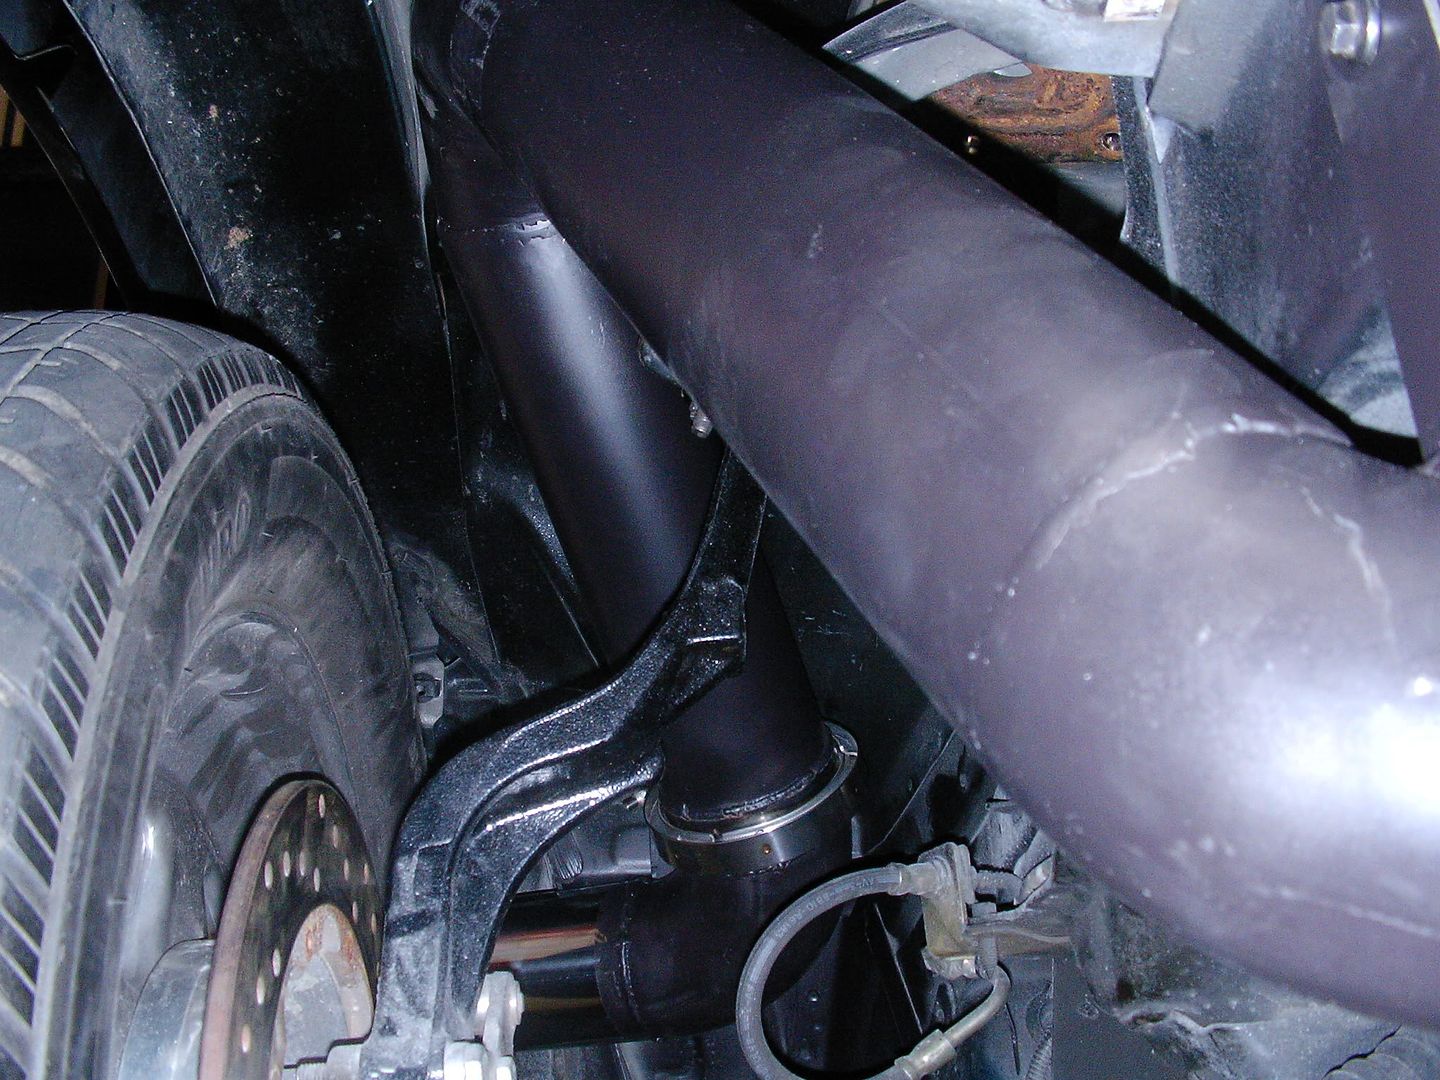
We did a 90* turn just after the neckdown(right at the frame), pointing upward to the shock tower. Ran a piece of straight 4" and split the difference between the tire and the upper A-Arm. We put another 90* elbow here. There is approximately 1mm on either side of the pipe here....IT's CLOSE!!! The 90 points back down past the tire and towards the firewall. at just the right spot we actually installe a 4" v-band assembly. This allows us to be legal for events that don't allow fender exit exhausts. For most classes though, on the other end of the V-band, we put another 90*elbow, and welded a 12" piece of 4" diamater stainless to it. It angles JUST BARELY down, and towards the rear of the car. It extends past the fender about 1.5-2". We'll be putting a stainless cover around the area that the tip comes out of. I've already got the general shape cutout yesterday, and we'll rivet that to the fender. To keep the whole thing in place, we picked two locations to mount to. We installed one weld-tab to the frame where the neckdown/90*turn is, and one weld-tab to the firewall where the tip is. we wanted to allow the upper section of the exhaust to bend and give if/when it did come in contact with the A-Arm/Tire. After we finished all this, we put 1500* paint on it, and I'll wrap the whole thing with black exhaut wrap(like what's on my crossover pipes right now).
Pics!!!


26Oct09
We got 99% of the Fuel system in and mounted. The Fuel tank install required us to modify where the straps for the tank botled into. We relocated that with a couple weld nuts and a lot of effort. From there, we ran the lines across the drivers side of the Torque arm and re-used the existing bolt holes for the stock lines. We zip-tied the return line to the main feed line, and it tucks nicely. We ran the lines up the back of the trans bellhousing and into the fuel rails. At the back of the car, we simply routed up and over the axle, following the natural lines of the car and the lines laid perfectly. We re-used a bracket that came with the pump, and rather than bolting the bracket to the car, we welded it to the frame. then bolted the pump and (2) filters to the bracket. It fits like a glove in there.
Amanda, the wifey, spent ALOT of time prepping the cage for paint. She finished up the last of the sanding on it, and then laid down all the plastic so all it needs is priming and painting. That should be done during the week this week.
At the Downpipe, we used (3) 90* elbows, and about 3.5' of 4" tubing. Tater made a 5"-->4" neckdown, and then me and Blue smoothed all the welds on the inside of the piping.
We did a 90* turn just after the neckdown(right at the frame), pointing upward to the shock tower. Ran a piece of straight 4" and split the difference between the tire and the upper A-Arm. We put another 90* elbow here. There is approximately 1mm on either side of the pipe here....IT's CLOSE!!! The 90 points back down past the tire and towards the firewall. at just the right spot we actually installe a 4" v-band assembly. This allows us to be legal for events that don't allow fender exit exhausts. For most classes though, on the other end of the V-band, we put another 90*elbow, and welded a 12" piece of 4" diamater stainless to it. It angles JUST BARELY down, and towards the rear of the car. It extends past the fender about 1.5-2". We'll be putting a stainless cover around the area that the tip comes out of. I've already got the general shape cutout yesterday, and we'll rivet that to the fender. To keep the whole thing in place, we picked two locations to mount to. We installed one weld-tab to the frame where the neckdown/90*turn is, and one weld-tab to the firewall where the tip is. we wanted to allow the upper section of the exhaust to bend and give if/when it did come in contact with the A-Arm/Tire. After we finished all this, we put 1500* paint on it, and I'll wrap the whole thing with black exhaut wrap(like what's on my crossover pipes right now).
Pics!!!
Full turn out of the front tire. It's suspension travel that was the nightmare. It was CLOSE splitting the difference on the upper a-arm and the tire depending where the suspension is in travel at. As long as you're on a skinny. Turning the wheel isn't a problem at all!
They previously only did plates for full tube chassis cars, but i was able to talk them into doing the R&D with me to get one in on the LS F-body platform. More importantly, it fits with log manifolds!
0
Last edited by tim99ws6; Oct 27, 2009 at 08:22 AM.
Update 27Oct09
We got the main body harness(EZ mini harness) laid in last night (Thanks Quint and Brian)! we routed all the front wires like the headlights, fan, horn and water pump wires through the floor into the frame rail so you dont see any wires in the engine bay. Its PIMP.
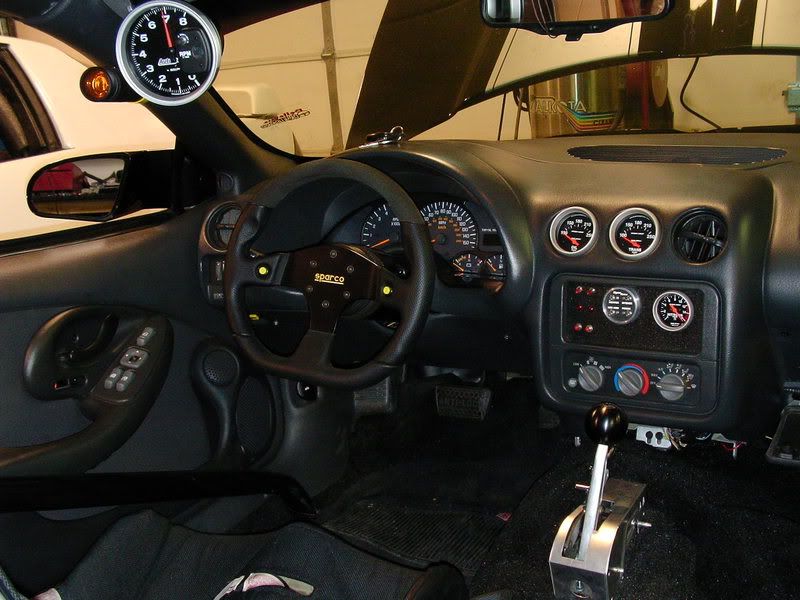
Also got the new switch panel mounted on the roll cage(ill get some pics of that tonight unless tim snapped some last night). The switch panel is housing the main Ignition switch(controls the FAST XFI and the AMS1000, starter button, both water pumps, fuel pump and fans. We got the dash/glove box cut out and ready to house the XFI and XIM boxes (thanks Blue!).
Tim got the injector harness hidden pretty well under the intake and we decided on the location of the coils.
I think alot of ppl aren't going to believe this thing even runs! there's literally no wires in the engine bay. The only wires are the injectors (which are routed under the intake), TPS, IAT (which are up under the cowl), oil pressure (back of the motor) cam and crank sensors (which are back and bottom of the motor) so pretty much you wont see ANY wires!
It's really difficult to capture the "scope" of whats being undertaken on this car right now, especially considering it's just a group of guys in someone's garage! But, alas, here are the pics from last night:


We got the main body harness(EZ mini harness) laid in last night (Thanks Quint and Brian)! we routed all the front wires like the headlights, fan, horn and water pump wires through the floor into the frame rail so you dont see any wires in the engine bay. Its PIMP.
Also got the new switch panel mounted on the roll cage(ill get some pics of that tonight unless tim snapped some last night). The switch panel is housing the main Ignition switch(controls the FAST XFI and the AMS1000, starter button, both water pumps, fuel pump and fans. We got the dash/glove box cut out and ready to house the XFI and XIM boxes (thanks Blue!).
Tim got the injector harness hidden pretty well under the intake and we decided on the location of the coils.
I think alot of ppl aren't going to believe this thing even runs! there's literally no wires in the engine bay. The only wires are the injectors (which are routed under the intake), TPS, IAT (which are up under the cowl), oil pressure (back of the motor) cam and crank sensors (which are back and bottom of the motor) so pretty much you wont see ANY wires!
It's really difficult to capture the "scope" of whats being undertaken on this car right now, especially considering it's just a group of guys in someone's garage! But, alas, here are the pics from last night:
LS1 Tech Stories
The Best V8 Stories One Small Block at Time

Gas Monkey Built a 6-Wheel Ferrari Testarossa With a Corvette LT4 Engine
Verdad Gallardo
7 Most Reliable High-Performance Engines GM Has Ever Built
Verdad Gallardo
Amazing '71 Camaro Restomod Is Modern Muscle Car Under the Skin
Verdad Gallardo
6 Common C5 Corvette Failures and What's Involved In Repairing Them
Pouria Savadkouei
Retro Modern Bandit Pontiac Trans AM Comes With Burt Reynolds' Autograph
Verdad Gallardo
Top 10 Greatest Cadillac V Series Performance Models Ever, Ranked
Pouria Savadkouei
Top 10 Most Powerful Chevy Trucks Ever Made!

Hennessey's New Supercharged Silverado ZR2 Has 700 HP
Verdad Gallardo
Coachbuilt N2A Anteros Is an LS2-Powered C6 Corvette In Italian Clothes
Verdad Gallardo Update 28Oct09
Forgot to grab pics on the iPhone last night.
We got the Intercooler mounted to the rollcage on the passenger side. Rather than running it behind the passenger seat, we mounted it up at the front passenger down bar. It'll sit right behind the dash now. We have about 6" of Charge piping to finish, and then that will be done.
We also found a location to mount up the Coil Packs. They will go behind the firewall inside the car, right about where the stock radio stuff used to be. Went to weld in the bar that they will mount to, and the MIG took a crap on us, haha.
No work planned for tonight. We'll get back at it Thursday:
-Finish mounting the coil packs
-Finish the last 6" of charge piping
-run the harness for the XFi

Update 30Oct09
Last night we made some pretty strong progress!
1) Got the front bumper and fender bolted back in
2) Cut the whole and ran the XFI harness through the firewall
3) Mounted the coil packs behind the dash
4) 100% finished the charge piping and fitted the A2W in the car
5) Made the bracket for the mounting of the XFi/XIM boxes
6) re-wired the XFI/XIM harnesses to only let what has to go through the firewall go through.
1) Brian and I got to the shop first and went to task on putting back on the front bumper. It shouldnt come off anymore till after the car show.
2) Special thanks to Quint on this one. He basically used a existing hole, and enlarged it to fit the XFI grommet through the firewall.
yea....um....he had us a little worried with his ability to make a circle when he started cutting...

Luckily....the finished product turned out a little nicer than his original cutting... :lol

3) Brian, Quint, Blue and I collaborated on a idea previously thought of by Tater and I. It basically mounts the coil packs to a single bar right behind the dash where the radio used to go. Nice and simple, and is all held on with two bolts/nuts.

4) Tater is 100% to thank on this one. Truly the mad scientist, it was awesome to see him put the final "Tater" touches on the charge piping. To say it fits perfectly is a MASSIVE understatement. It looks like it was made to fit where it's at, and yes, it fits perfect behind the dash. You just BARELY see a 4" pipe and the bottom 1/2 of the intercooler poking out to say "hi"...

5) Quint, Blue and I collaborated on this one. We basically took a sheet of sheetmetal, cut is exactly to width of the XFI boxes side by side. Then we built "V" slots. These were seam welded to the plate for the boxes. Then we will rivet these to some existing plastic from the dash. It will allow us to simply unplug the boxes and they will come out with the dash if/when we want to remove the dash. Simple, but effective.

6) Quint is THE MAN on this one. He stripped the harness down, removed the extra "stuff" that comes with it that we wont be using, and moved it all back before the firewall. All said and done, there's only like 4 plugs that actually run through the firewall....TALK ABOUT CLEAN!!
Tonight is more of the same. I want Blue to try and fab up the passenger seat bracket, me and tater will continue on the XFI mounting, and start on the final wiring of the XFi. We should nearly finish the wiring of the XFI tonight. Also maybe get blue to run the main power wire forward from the battery box to be done with it.
Ordered as of today:
-O-rings for charge piping and BOV
-Oil feed/drain kit for turbo
-Silicone coupler for TB to charge pipe and T-bolt clamp
-plug wire sleeves
-8AN straight to finish the last part of the fuel system
-Parachute mount kit from Wolfe
Also some miscellaneous bolts/sensors that we need from GM will be ordered today...I gotta thank Quint for that one!!
Last night we made some pretty strong progress!
1) Got the front bumper and fender bolted back in
2) Cut the whole and ran the XFI harness through the firewall
3) Mounted the coil packs behind the dash
4) 100% finished the charge piping and fitted the A2W in the car
5) Made the bracket for the mounting of the XFi/XIM boxes
6) re-wired the XFI/XIM harnesses to only let what has to go through the firewall go through.
1) Brian and I got to the shop first and went to task on putting back on the front bumper. It shouldnt come off anymore till after the car show.
2) Special thanks to Quint on this one. He basically used a existing hole, and enlarged it to fit the XFI grommet through the firewall.
yea....um....he had us a little worried with his ability to make a circle when he started cutting...
Luckily....the finished product turned out a little nicer than his original cutting... :lol
3) Brian, Quint, Blue and I collaborated on a idea previously thought of by Tater and I. It basically mounts the coil packs to a single bar right behind the dash where the radio used to go. Nice and simple, and is all held on with two bolts/nuts.
4) Tater is 100% to thank on this one. Truly the mad scientist, it was awesome to see him put the final "Tater" touches on the charge piping. To say it fits perfectly is a MASSIVE understatement. It looks like it was made to fit where it's at, and yes, it fits perfect behind the dash. You just BARELY see a 4" pipe and the bottom 1/2 of the intercooler poking out to say "hi"...
5) Quint, Blue and I collaborated on this one. We basically took a sheet of sheetmetal, cut is exactly to width of the XFI boxes side by side. Then we built "V" slots. These were seam welded to the plate for the boxes. Then we will rivet these to some existing plastic from the dash. It will allow us to simply unplug the boxes and they will come out with the dash if/when we want to remove the dash. Simple, but effective.
6) Quint is THE MAN on this one. He stripped the harness down, removed the extra "stuff" that comes with it that we wont be using, and moved it all back before the firewall. All said and done, there's only like 4 plugs that actually run through the firewall....TALK ABOUT CLEAN!!
Tonight is more of the same. I want Blue to try and fab up the passenger seat bracket, me and tater will continue on the XFI mounting, and start on the final wiring of the XFi. We should nearly finish the wiring of the XFI tonight. Also maybe get blue to run the main power wire forward from the battery box to be done with it.
Ordered as of today:
-O-rings for charge piping and BOV
-Oil feed/drain kit for turbo
-Silicone coupler for TB to charge pipe and T-bolt clamp
-plug wire sleeves
-8AN straight to finish the last part of the fuel system
-Parachute mount kit from Wolfe
Also some miscellaneous bolts/sensors that we need from GM will be ordered today...I gotta thank Quint for that one!!
Update 2Nov09
This weekend was pretty productive!
1) Wired up the Control box
2) Scuffed the cage
3) Primered the cage
4) Wired in the fuel pump/Ignition/Starter
5) Mounted the Window Net
6) Mounted the "fuse box"
7) Mounted XFI/XIM boxes to dash/bracket
1) Tater wired up the fuse box here. After about 60 female 12gauge heat shrink connections, it looks CLEAN. I forgot to grab a pic of it, so i will take a pic tonight.
2) Sunday before the Titans game, tater and I rolled the car outside and scuffed down the cage in prep for paint. We ended up stripping the Por 15 totally off the back bars so they would have a really clean look. Then we taped and covered everything up.
3) Brian and Tater primered the cage as I was leaving for the Titans game. Came back to see a BEAUTIFUL finished product! haha.


4) Tater and Brian wired in all nessecary body harnesses to be able to start the car. As usual, clean looking!!!
5) This took Tater and I most of friday night, haha. We wanted something clean looking yet functional. The wolfe net comes with a "sleeve" system where the whole net drops down. We weren't a fan of this, so we went to a "pivot" system. Basically the net is permanently attached at 3 points, and when you un-buckle the top forward point, it drops down behind the cage. Makes it VERY simple to open/close the net!
6) Using the existing bar where the coil packs are mounted, we mounted the mini-fuse box to it. Worked out nicely!!
7) Gooch and I installed the Fast mounting bracket we made earlier in the week to the inside of the dash via rivets. From there we got some nice bolts and nuts and mounted the XFi and XIM to the bracket. Worked PERFECT!!!
This weekend was pretty productive!
1) Wired up the Control box
2) Scuffed the cage
3) Primered the cage
4) Wired in the fuel pump/Ignition/Starter
5) Mounted the Window Net
6) Mounted the "fuse box"
7) Mounted XFI/XIM boxes to dash/bracket
1) Tater wired up the fuse box here. After about 60 female 12gauge heat shrink connections, it looks CLEAN. I forgot to grab a pic of it, so i will take a pic tonight.
2) Sunday before the Titans game, tater and I rolled the car outside and scuffed down the cage in prep for paint. We ended up stripping the Por 15 totally off the back bars so they would have a really clean look. Then we taped and covered everything up.
3) Brian and Tater primered the cage as I was leaving for the Titans game. Came back to see a BEAUTIFUL finished product! haha.
4) Tater and Brian wired in all nessecary body harnesses to be able to start the car. As usual, clean looking!!!
5) This took Tater and I most of friday night, haha. We wanted something clean looking yet functional. The wolfe net comes with a "sleeve" system where the whole net drops down. We weren't a fan of this, so we went to a "pivot" system. Basically the net is permanently attached at 3 points, and when you un-buckle the top forward point, it drops down behind the cage. Makes it VERY simple to open/close the net!
6) Using the existing bar where the coil packs are mounted, we mounted the mini-fuse box to it. Worked out nicely!!
7) Gooch and I installed the Fast mounting bracket we made earlier in the week to the inside of the dash via rivets. From there we got some nice bolts and nuts and mounted the XFi and XIM to the bracket. Worked PERFECT!!!

HAHAHAHA, I still remember the night you bought it and brought it into TOOTS and sat it on the table with us while we ate dinner...PRICELESS!!! Didn't I even tell the waitress that it was going on my focus?

Yep!!! That was freaking hilarious, and VERy smooth on your part. I think you also claimed to be a country music singer?!
Thanks man!
Reject,
Thanks man!!! We're doing our best! It's not a 25spec 7second car, so it doesn't have the "curb appeal" that some of the big boys on here have, but it's being done in a legit back yard shop by a bunch of good friends. Maybe some day it'll get into the 7sec realm, but right now we're just pumped about where it is and has come from!

Update 3Nov2009
Ok, yet another update.
Last night was good progress.
1) Removed bumper in preperation for parachute mount
2) Cut plastic panel to fit battery box in rear tire area
3) Painted Cage
4) Miscellaneous
1) Blue and I tackled this one first thing last night. Pretty straightforward. WE undid what i thing was 6 plastic rivets up top, and 4 from underneath. there are three 10mm bolts on the sides of the bumper that have to come off. 2 inside the car, and one outside the car right behind the tire. Thought i would post that for anyone searching later on how to remove the bumper.
2) Blue cut the plastic cover area. The battery box sits on the frame on the passenger side. Obviously, the plastic cover runs right against this, so we cut out the plastic cover to fit around it, and it looks pretty good!
3) Tater mostly painted the cage, but blue jumped in here and there on the back bars. We all benefited from the fumes though! The paint we went with is a Dupli-color wheel paint in silver. It's the same paint we used on my charge piping and my motor plate. It's a silver but is has ALOT of flake in it....ALOT. It's hard to capture in the camera phone pics, but you get the idea on the last pic!
4) Last, we slammed the dash back in, the intercooler back in, and pulled all the plastic covering off.
Tonight we will move the car back over to the lift bay, install all the interior back in the car, and start working on the motor stuff to get the car to fire. Also go ahead and re-spray the wrap with a new coat of DEI silicone black coating to bring it all back to life with a final spray.
In process of first coat of paint(after 4 cans of primer)

Second Coat, Silver is starting to reflect a little better:

Final coat, again it's tough to capture the metallic on a camera phone. I'll get some good pics of the car this weekend!

Ok, yet another update.
Last night was good progress.
1) Removed bumper in preperation for parachute mount
2) Cut plastic panel to fit battery box in rear tire area
3) Painted Cage
4) Miscellaneous
1) Blue and I tackled this one first thing last night. Pretty straightforward. WE undid what i thing was 6 plastic rivets up top, and 4 from underneath. there are three 10mm bolts on the sides of the bumper that have to come off. 2 inside the car, and one outside the car right behind the tire. Thought i would post that for anyone searching later on how to remove the bumper.
2) Blue cut the plastic cover area. The battery box sits on the frame on the passenger side. Obviously, the plastic cover runs right against this, so we cut out the plastic cover to fit around it, and it looks pretty good!
3) Tater mostly painted the cage, but blue jumped in here and there on the back bars. We all benefited from the fumes though! The paint we went with is a Dupli-color wheel paint in silver. It's the same paint we used on my charge piping and my motor plate. It's a silver but is has ALOT of flake in it....ALOT. It's hard to capture in the camera phone pics, but you get the idea on the last pic!
4) Last, we slammed the dash back in, the intercooler back in, and pulled all the plastic covering off.
Tonight we will move the car back over to the lift bay, install all the interior back in the car, and start working on the motor stuff to get the car to fire. Also go ahead and re-spray the wrap with a new coat of DEI silicone black coating to bring it all back to life with a final spray.
In process of first coat of paint(after 4 cans of primer)
Second Coat, Silver is starting to reflect a little better:
Final coat, again it's tough to capture the metallic on a camera phone. I'll get some good pics of the car this weekend!