


1971 Chevelle -> LS1 + T56
Here is a comparison of the f-body versus GM Musclecar windage trays. Since the Musclecar oil pan is a little deeper in the front, it allows the windage tray to go all the way to the front of the motor.
I guess that is going to be my one concern with this pan, the depth at the front of the pan might force me to shim the motor up somewhat.
I guess that is going to be my one concern with this pan, the depth at the front of the pan might force me to shim the motor up somewhat.
I am now finally getting to the point of installing the clutch, flywheel, etc in order to mate the transmission and motor together.
I am going with the LS7 style clutch and LS2 flywheel. I got all of these parts of LS1tech members. The LS7 clutch only has a few miles on it and came with the factory flywheel, but I decided to pick up this Fidanza flywheel instead. Compared to the factory LS1 setup, the LS7 clutch + Fidanza flywheel is ~6lbs lighter according to my scale.
I am going with the LS7 style clutch and LS2 flywheel. I got all of these parts of LS1tech members. The LS7 clutch only has a few miles on it and came with the factory flywheel, but I decided to pick up this Fidanza flywheel instead. Compared to the factory LS1 setup, the LS7 clutch + Fidanza flywheel is ~6lbs lighter according to my scale.
I also bought the GM EGR plug since I am going to reuse the LS1 intake manifold for now. I just can't justify spending the $500+ on the LS6 or other intake swap right now, but I sure can justify $10 on the plug for the EGR hole!
Finally, here is the motor basically ready to go into the car!
My next steps:
- get this pilot bearing out and new one in. The old one does NOT want to come out!
- Mount the flywheel / clutch
- Mate the motor & trans
- Pull the interior
- Slide the whole combo in!!
Troy
Finally, here is the motor basically ready to go into the car!
My next steps:
- get this pilot bearing out and new one in. The old one does NOT want to come out!
- Mount the flywheel / clutch
- Mate the motor & trans
- Pull the interior
- Slide the whole combo in!!
Troy
Well, I made 1 step forward and 2 steps backwards yesterday.
First, I got the pilot bearing out, new one installed, flywheel and clutch installed. All just as smooth as it should be.
Tip: O'Reilly's wants to loan you a slide-hammer arrangement for pulling the pilot bearings. Advance Auto however will give you what I believe to be a much nicer solution (in picture).
At this point, I thought I was good-to-go! All I needed to do was bolt the trans to the motor and slide the whole thing in. But, as I was just about to mate the trans and motor, I had a thought that I might want to put the motor in to test the oil pan fitment and the header fitment. Boy, I am glad I did.
First, the motor would not sit down on the mounts. It baffled me as to why it wouldn't set down on the mounts...then I realized it was setting on the oil pan.
If you look a few posts back, you can see how much deeper the front of the Musclecar pan is compared to the original f-body pan. I would not have thought this would have mattered...but it sure does. Honestly, I am not even confident that if I space the mounts up 1/4" to 1/2" that it would work.
The good thing about this pan is that there is a TON of clearance around the sump, and it does not hang as low as I thought it would...
So, I am now back to seeing if Summit will take this one back, and see if I can order the Champ pan. Even the Holley pan will not work as it has the same front depth as this pan.
Like I said, I was also test-fitting the pacesetter f-body headers for this swap. This is a set of headers I purchased of an LS1tech member. By the looks of it, the passenger side header might have already been modified slightly.
The headers fit fairly well, but I do have a hit on the driver's side #1 primary tube. If you look at the pictures, you can see how it is only 1/4" or so away from clearing. The motor mount ALMOST lines up how it is.
I am now contemplating whether I should cut/weld the tube, just dimple it slightly, or modify the crossmember slightly.
NOTE: I am using the "standard" location mounts. If I was using the 1" setback mounts, this would certainly not be a problem!
Last edited by 71Fakes; Feb 1, 2012 at 02:02 PM. Reason: added note
Well I got the Champ oil pan installed and did a test-fit in the car.
First - this is a great oil pan. This is thing makes the older SBC Moroso/Canton/etc oil pans look like junk! I really like the reinforced pan rail and quality fit & finish.
The pictures show a good comparison of F-body, Hummer H3 (GM Musclecar), and the Champ Oil Pan.
First - this is a great oil pan. This is thing makes the older SBC Moroso/Canton/etc oil pans look like junk! I really like the reinforced pan rail and quality fit & finish.
The pictures show a good comparison of F-body, Hummer H3 (GM Musclecar), and the Champ Oil Pan.
LS1 Tech Stories
The Best V8 Stories One Small Block at Time

Top 10 Greatest Cadillac V Series Performance Models Ever, Ranked
Pouria Savadkouei
Top 10 Most Powerful Chevy Trucks Ever Made!

Hennessey's New Supercharged Silverado ZR2 Has 700 HP
Verdad Gallardo
Coachbuilt N2A Anteros Is an LS2-Powered C6 Corvette In Italian Clothes
Verdad Gallardo
Awesome K5 Blazer Restomod Comes With C7 Corvette Power
Verdad Gallardo
10 Camaros You Should Never Buy

10 LS Engine Myths That Refuse to Die
Verdad Gallardo
Five Reasons the Camaro Was the Most Pivotal Player in the Pony Car Wars 2.0
Brett Foote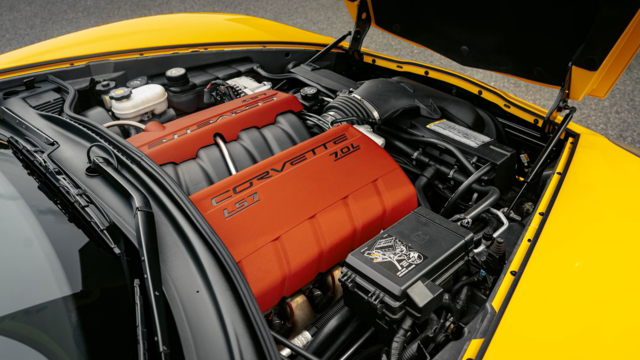
10 Reasons the LS7 Is GM's Most Extreme Naturally Aspirated V8 Engine Ever
Verdad Gallardo Also as noted before, the Champ oil pan does not come with a windage tray or dip stick, so I played around with the ones I had.
Due to the pan being slightly deeper than an F-body in the front, I was able to get away with using the Hummer H3 (GM Musclecar) windage tray. Using my son's PlayDoh, I confirmed I had just at 1/2" in of clearance between the bottom of the windage tray and the oil pan. Should work great.
Second, I tried both the F-body and the Hummer H3 dipstick. The F-body dipstick is too long, and interferes with the trapdoor system of the Champ Pan. But, the H3 dipstick works great! It just barely hits the trapdoor. It is easy to see the difference in the photos.
Last night, I test-fit the motor in the car with the Champ Pan. The clearance was great all around the motor. Of course, it still has the usual Chevelle problem of interference at max lock with the fittings on the steering linkage...but it is sooo close to clearing. As you can see in the last picture, it is almost there. But, I plan to just replace them with plugs and be done with it.
During my previous motor test-fit, I noted the Pacesetter F-body headers had a problem where the #1 primary tube turned down about 1/4" too soon. This caused it to hit the crossmember and not allow the motor to sit on the mounts correctly.
During this test-fit, I decided I was going to dimple the primary tube in that location to see if I could gain enough room. Long-story short...no. I dimpled it and got closer, but that whole primary tube needs to be moved back. That will be my next project. I tried to cheat and get out of it easy by dimpling, but it just didn't work. Now I need to find some tubing to make it correct.
Attached is a picture to give you a better idea what I am talking about.


Good to see your working out your problems.. but yeah. that is a know issue with the F-Body header with a A-Body. .. how is the Driver side collector ?
I read somewhere. (not sure for A of F/X body).. that using a earlier year steering end, that the grease fitting is in the middle of the end join and not on the outside. That might help.. I am thinking I read it for F-Body.. might be worth looking into..?
I read somewhere. (not sure for A of F/X body).. that using a earlier year steering end, that the grease fitting is in the middle of the end join and not on the outside. That might help.. I am thinking I read it for F-Body.. might be worth looking into..?
Time for an update! hopefully you are doing better than me lol. To shed a little more light on what BC said here is a link to chuckd71's build thread https://ls1tech.com/forums/conversio...rtible-14.html post #266 shows the grease zirks and their placement, hope it helps
OK - it is WAY past time for some updates. I am not sure if anyone is watching this thread, but if you are, I am sorry for the lack of posting. It is really hard for me to get to a computer to do this.
First, I did some cleaning on the fuel system. I picked up fuel rails and a regulator from an LS1tech member. I am not a fan of the blue/red braided fuel colors, so decided the wire wheel on the grinder would give them another look. I will hit them with a clear coat before they go on finally.
First, I did some cleaning on the fuel system. I picked up fuel rails and a regulator from an LS1tech member. I am not a fan of the blue/red braided fuel colors, so decided the wire wheel on the grinder would give them another look. I will hit them with a clear coat before they go on finally.
Then, I got the clutch pedal installed (very simple - just a remanufactured Chevelle OE from one of the big restoring companies).
I also mounted up the brake booster / clutch master cylinder bracket. Picked up off eBay for a great deal. Same guy I purchased the motor mounts from.
While I was at it, I did the popular "drill mod" to the factory clutch line.
I also mounted up the brake booster / clutch master cylinder bracket. Picked up off eBay for a great deal. Same guy I purchased the motor mounts from.
While I was at it, I did the popular "drill mod" to the factory clutch line.
I finally got the Pacesetter F-body headers where I think I want them. Both the driver's and passenger's side front primary tubes (cyl #1 and #2) needed to be modified to clear the factory cross member. I have no complaints besides that, but it took me a lot of time to get them where they are now. I am still not happy and will probably end up replacing them at some point in the future.
They are painted in a spray-can high-temp "cast iron" color that I picked up at the local parts store. I like the contrast with the block. Looks clean.
Bottom line: these headers are a lot of work when your conversion has the motor moved forward.
They are painted in a spray-can high-temp "cast iron" color that I picked up at the local parts store. I like the contrast with the block. Looks clean.
Bottom line: these headers are a lot of work when your conversion has the motor moved forward.
If you have followed this build, you know I was pretty adamant about trying to not cut my trans tunnel. It has already been shown that most people do, and it has been shown that some people get away with not having to.
With the motor and trans sitting under the factory floor and about 1/2" of clearance all around, my motor/trans was sitting at approximately 5 degrees down. I went back and forth in my mind about this for a couple weeks. Most driveline specialists suggest in the 2-4 degrees range for normal street driven vehicles. I felt that 5 degrees would probably be OK as long as I got the pinion angle somewhere close to matching.
At this point, all I had cut was a hole for the shifter (albeit not a very clean one...I would recommend anyone else to cut a smaller opening).
Looking back, I now regret this decision, but after much deliberating, I decided to go ahead and cut my trans tunnel in order to get the trans angle closer to 2 degrees down. I felt very defeated in my attempt to not cut the tunnel. Also, I now look back and think I should have just left it alone and not caused all of this other work.
*Note: My trans was now up so high that the driveshaft would not go in the trans. The driveshaft would hit the floor cross-support under the car and keep it at just enough of an angle so it would not go in. I have never seen anyone talk about this before, but I had to rework this whole area. Sorry - I forgot to take pictures.
Most people cut the whole tunnel out, but after some testing, I knew it only needed a couple inches more clearance. I had attempted to just work the tunnel with a hammer, but I was starting to open up some of the seams in the floor and I sure didn't like that. I decided to cut the "T" shape on the top of the tunnel.
The first cut was just straight up the middle of the trans tunnel (pic)
I then had to cut again near the top to make the final "T" shape. The side-to-side cut is key to let the tunnel really open up.
When all was said and done the trans still opened up in mostly a V shape with the wider part of the V towards the shifter. The widest part was approx 3".
I simply made a patch panel to go over this using a small piece of sheetmetal and a pole in my garage. Some quick welding and the floor was back solid. Really easy. I would highly recommend this method to anyone needing to cut their floor.
That is all of the updates I have for now.
Next on my list is to finish up the floor sheetmetal work. I am going to have to make some kind of covering for around the shifter so the shift boot can mount to it. I have debated making a custom center console...but who am I kidding? I barely have time to work on it right now.
After the metal work, it is going to be back to plumbing the fuel system and finishing the exhaust. I have the headers in place, but need to connect them to the old exhaust system.
I have been distracted from this project for about a month now. My wife and I decided we needed to build a garden shed. Hopefully I will have that wrapped up within the next month and I can get back to this. The bright side is the garden shed will free up some much-needed garage space!!