

1971 Chevelle -> LS1 + T56
 12-02-2011, 11:01 PM
#41
On The Tree
Thread Starter
iTrader: (2)

Join Date: Jun 2011
Location: Nashville, TN
Posts: 170
Likes: 0
Received 0 Likes
on
0 Posts
Another thing I wanted to check on today was the transmission versus transmission tunnel interference.
Looking through all of the build threads here on LS1tech, everyone has either chopped a large section out of their trans tunnel, or cut and reformed the metal. In all of these builds, I never got a clear understanding for just how much the transmission really needed to come up. Also, there was an article in one of the popular magazines (can't remember which one) where a rep was quoted as saying it was not necessary to cut the trans tunnel depending on where the motor was sitting. Anyway - all of this together made me want to see it first-hand so I could understand better.
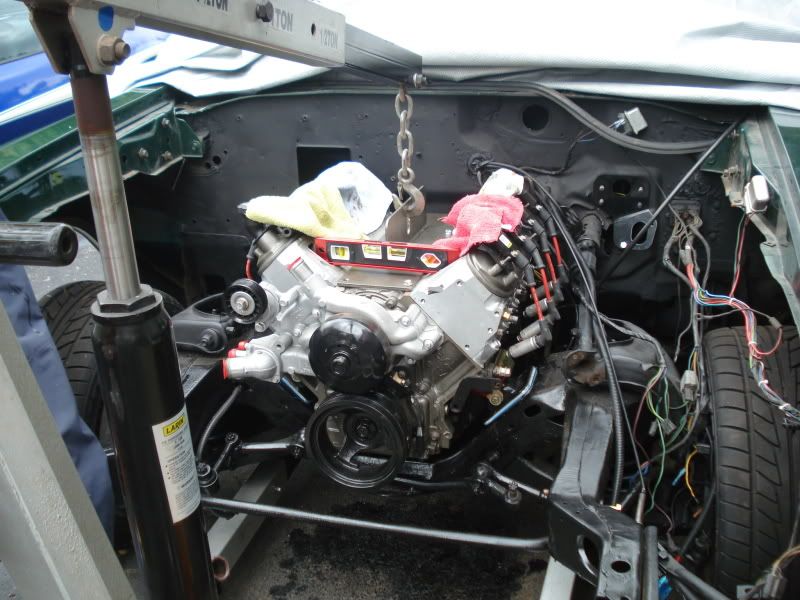
So, all I did was get the motor set down on the motor mounts, then jack-up the rear of the transmission until it hit the floor of the Chevelle.
This first location gave me a reading of somewhere in the 8.8 to 9.2 degree range. The limiting factor at this point was the reverse lockout solenoid.
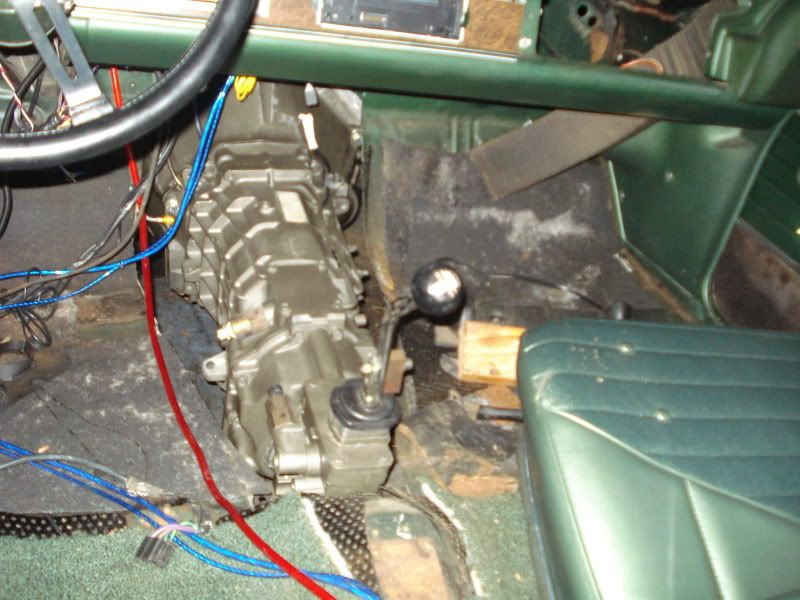
In my second attempt, I made sure the tranmission was centered in the tunnel and let the solenoid dimple the bottom of the floor a little (I figured why not if I was going to eventually chop it all out anyway...). You can see this in the 1st picture. The 2nd picture is looking at the shifter location from the passenger's side of the transmission.
At this point, I had a reading of 7.3 degrees at the back of the transmission (3rd picture). My driveway read 1.1 degrees, so I figure I am actually at 6.2 degrees downward angle at this point. Honestly, that is significantly better than I expected. The reverse lockout solenoid and the shifter mount were the only things hitting the tunnel. The rest of the transmission still had about 1" of room at this point (4th picture).
So - when it is time to actually install the transmission, I think I am going to just cut the portion around the shifter and reverse lockout solenoid and see what that gets me. If I am shooting for a 2-5 degree result, I think I could get there with less work. Perhaps I am wrong, but I will give it a shot. Keeping the motor as low as possible and forward will only help.
Looking through all of the build threads here on LS1tech, everyone has either chopped a large section out of their trans tunnel, or cut and reformed the metal. In all of these builds, I never got a clear understanding for just how much the transmission really needed to come up. Also, there was an article in one of the popular magazines (can't remember which one) where a rep was quoted as saying it was not necessary to cut the trans tunnel depending on where the motor was sitting. Anyway - all of this together made me want to see it first-hand so I could understand better.
So, all I did was get the motor set down on the motor mounts, then jack-up the rear of the transmission until it hit the floor of the Chevelle.
This first location gave me a reading of somewhere in the 8.8 to 9.2 degree range. The limiting factor at this point was the reverse lockout solenoid.
In my second attempt, I made sure the tranmission was centered in the tunnel and let the solenoid dimple the bottom of the floor a little (I figured why not if I was going to eventually chop it all out anyway...). You can see this in the 1st picture. The 2nd picture is looking at the shifter location from the passenger's side of the transmission.
At this point, I had a reading of 7.3 degrees at the back of the transmission (3rd picture). My driveway read 1.1 degrees, so I figure I am actually at 6.2 degrees downward angle at this point. Honestly, that is significantly better than I expected. The reverse lockout solenoid and the shifter mount were the only things hitting the tunnel. The rest of the transmission still had about 1" of room at this point (4th picture).
So - when it is time to actually install the transmission, I think I am going to just cut the portion around the shifter and reverse lockout solenoid and see what that gets me. If I am shooting for a 2-5 degree result, I think I could get there with less work. Perhaps I am wrong, but I will give it a shot. Keeping the motor as low as possible and forward will only help.
 12-03-2011, 09:48 AM
#43
I've pretty much done the same with Standard, 1" setback and early BRP, I made a plate with all of the bolt pattern to be able to compare and then cut off what I didn't need, once I decided on what type of plate.
On the 1st set of pic's with the 1" Setback. as you can see, you will not be able to put the long mount bolt through due to the Bracket / compressor.
On the standard (2nd set of Pic's) plate as you found out that the AC mount just barely clears/hits.. you should moumt the bracket and the Compressor both to fully see how much it well interferance you will have.. Some have flipped the mount upside down (both plate and mount). Also this might make tighting the long bolt very hard to do. When I did it. I figured it would not work for me.
What I did was used CTS-V pan, F-Body accessories w/Early BRP plates, moved the frame stands back and over to the passenger side about 1/4"-3/8" (both engine and trans). As long as you have it set straight inline, it will not be a problem. BBC are off set in the Chevelle, if you know or recall. This way my power steering box, pump and pulley just cleared. But you will lost firewall clearence. But my objected was to move the engine back as far as I could anyway.
Keep up the good work..
BC
12-16-2011, 09:46 PM
#46
On The Tree
Thread Starter
iTrader: (2)
Join Date: Jun 2011
Location: Nashville, TN
Posts: 170
Likes: 0
Received 0 Likes
on
0 Posts
Update:
I have been working on getting the block cleaned up and ready for the re-assembly to begin. As I think I have mentioned before, this motor was just plain nasty. It looked like it had leaked oil from just about every passage over the years - it was covered with grease.
After many hours with various degreasers, hosings, wire brushes, etc, I finally got to paint it. I used some SummitRacing high-temp aluminum paint. It seems like it will look pretty good. Pics attached are of the motor being painted, and a before & after of the valve covers.
As of today, the reassembly has finally begun. I only had enough time to get the crank, cam, timing set, and oil pump installed. Hopefully the new rings will be on the pistons and they pistons & rods will be back where they belong shortly.
 12-27-2011, 08:45 PM
#49
On The Tree
Thread Starter
iTrader: (2)
Join Date: Jun 2011
Location: Nashville, TN
Posts: 170
Likes: 0
Received 0 Likes
on
0 Posts
Update:
Motor is basically back together. Only thing lacking at this point is the intake manifold and oil pan. Based on the measurements I took a few weeks ago, I am not going to go with the F-body pan that I got off the donor car. It will be listed in the classifieds here soon.
I have officially run out of funds at this moment for the build. So, I am looking around the garage to find some stuff to sell. It looks like the F-body oil pan, f-body 6-speed crossmember, f-body 6-speed pedals, factory LS1 exhaust manifolds, and some stuff like that is going to be put up for sale. I don't think I need any of that stuff anyway.
Attached are some pictures of the motor as it was going together. It amazed me how much work there was in getting the pistons and rods cleaned up. A piston sure can gather a lot of carbon buildup over 100K+ miles! Also, the heads were cleaned up, milled slightly, and a valve job done at a local machine shop. That is actually what sucked up my oil pan money.
Anyway - hopefully the next time I post will be because my oil pan has arrived and I am ready to slide the motor/trans into the car!!!
Troy
 12-28-2011, 03:12 PM
#51
On The Tree
Thread Starter
iTrader: (2)
Join Date: Jun 2011
Location: Nashville, TN
Posts: 170
Likes: 0
Received 0 Likes
on
0 Posts
bochnak - To use the F-body pan in this era of A-body, it requires the engine to be setback at least 1", if not all the way against the firewall. It is possible, and not so hard to do, but not what I want.
For my setup, I am going to leave the motor in the "factory" SBC location to help with trans tunnel issues. My goal is to see how little I can cut the factory trans tunnel in order to fit the T56. Leaving the motor farther forward certainly helps with this.
My target for an oil pan is the Champ/Autokraft pan. The pan is not as deep as the Hummer/swapkit pan so leaves for more ground clearance. It is also shorter (front-to-back) than the F-body pan, which leaves room for my motor to be farther forward. Lastly, it is only in the $300 range instead of the big money some other aftermarket pans cost.
That is my logic anyway - it might be flawed, but it is all I have got!!
Troy
12-29-2011, 02:25 PM
#52
11 Second Club
iTrader: (8)
Join Date: Jan 2010
Location: Southern Idaho
Posts: 502
Likes: 0
Received 0 Likes
on
0 Posts
Good lookin Chevelle man, you posted some real helpful information on the motor mounts and pan choice. Looks like I might have to go in a different direction with my pan choice or mount choice after reading your info. Good luck with everything and keep the updates coming as $$$ allows. 
01-03-2012, 08:42 PM
#56
On The Tree
Thread Starter
iTrader: (2)
Join Date: Jun 2011
Location: Nashville, TN
Posts: 170
Likes: 0
Received 0 Likes
on
0 Posts
DroptopWS6 - I do believe there are some folks who have made the f-body radiator and fans work. I am not 100% sure on that, you would need to look through some other folks' build threads.
Fortunately for me, I already have an aluminum radiator and electric fan setup on my car that I did years ago. So, I should be good-to-go in that area.
Thanks, and good luck with your build!
Troy
Fortunately for me, I already have an aluminum radiator and electric fan setup on my car that I did years ago. So, I should be good-to-go in that area.
Thanks, and good luck with your build!
Troy
01-03-2012, 09:00 PM
#57
12 Second Club
iTrader: (13)
Join Date: Nov 2004
Location: 707
Posts: 453
Likes: 0
Received 0 Likes
on
0 Posts

I still have mountains of stuff to read through. I did basically the same thing as you, I bought an entire car. I figured it would be easier to do the swap then piece it together. I'm getting a lot of flak because my doner car is actually pretty nice. I didn't want to rebuild the motor or trans. The doner car parts will make a lot of my back. Anyway, looking great.
01-04-2012, 01:43 AM
#58
Launching!

Join Date: Jun 2005
Location: Chicago Area
Posts: 267
Likes: 0
Received 0 Likes
on
0 Posts
It's ~1/2 to 3/4" away from the K-member and ~1" away from the firewall but I'll GLADLY take that over hanging too low and risking damage.
I've seen some carnage from low hanging pans and it's not pretty.......
I don't have pics showing the proximity....
T-56 requires trans tunnel mods already so it wasn't a big deal.
But for someone NOT looking to do the tunnel mods, I have NO IDEA how they get/got it in.
Last edited by Aceshigh; 01-04-2012 at 02:01 AM.
01-04-2012, 06:41 AM
#59
On The Tree
Thread Starter
iTrader: (2)
Join Date: Jun 2011
Location: Nashville, TN
Posts: 170
Likes: 0
Received 0 Likes
on
0 Posts
Aceshigh - You are certainly right, there is no way to get the F-body pan to fit behind the factory crossmember + not have to cut the trans tunnel for the T56. That is why I am leaving my motor farther forward, and swapping to a different pan.
01-31-2012, 07:54 AM
#60
On The Tree
Thread Starter
iTrader: (2)
Join Date: Jun 2011
Location: Nashville, TN
Posts: 170
Likes: 0
Received 0 Likes
on
0 Posts
Update time:
I collected enough money and gave Champ Pans a call. I realized that I needed the oil pan ($255) and the oil pump pickup (~$30ish), but I didn't realize that I needed the oil filter adaptor plate at $100!!! That brings this really nice $300 oil pan up to a total of $400. At that price the Holley pan and others are very competitive with it. I realized that the champ pan is far superior for things like oil control, but I just bring myself to pull the trigger on it. Then debating the Holley pan made me feel ridiculous since it is basically a cut down Hummer H3 pan. So, at the end of the day I decided to go with the Hummer H3 pan (The GM Musclecar pan kit). At around $160-180 for the complete kit with windage tray, dipstick, bolts...everything, it is hard to beat. I am also not very worried about the ground clearance, as my old SBC pan hung ~2" below the crossmember and I never had a problem over the 10+ years it was on the car.
Attached are some pictures comparing the Musclecar pan versus the f-body.
Troy