


Horizontal FMIC project
Thread Starter
8 sec potential, 12 sec slip
iTrader: (50)
Joined: Apr 2002
Posts: 4,092
Likes: 2
From: Savannah, GA
Yes, I don't see any reason why it wouldn't. 
I actually drove it for the first time today. Just normal driving right now, not getting on it, but so far so good I actually rolled into it slightly getting onto the highway and I heard a loud POP and I figured a hose probably blew off. So upon exiting I rolled into it just a hair to see if it would make boost to see if I could tell if that was the case and it made 3psi at low RPM under some load so I was a bit confused. Anyways, parked it and popped the hood and sure enough the reducer that goes from the MAF to the 3" pipe was half way off. That impressed me even more that the F1 still made some boost with the pipe half way hanging off!
  Its a monster for sure! Can't wait to see some numbers after it gets tuned.
I actually drove it for the first time today. Just normal driving right now, not getting on it, but so far so good
I actually rolled into it slightly getting onto the highway and I heard a loud POP and I figured a hose probably blew off. So upon exiting I rolled into it just a hair to see if it would make boost to see if I could tell if that was the case and it made 3psi at low RPM under some load so I was a bit confused. Anyways, parked it and popped the hood and sure enough the reducer that goes from the MAF to the 3" pipe was half way off. That impressed me even more that the F1 still made some boost with the pipe half way hanging off! Thread Starter
8 sec potential, 12 sec slip
iTrader: (50)
Joined: Apr 2002
Posts: 4,092
Likes: 2
From: Savannah, GA
I actually did have to remake the tube going from the blower to the IC. The pipes kept blowing off. I figured out it was because of the way the bend was right into the intercooler. The silicone coupler needs to have at least an inch of straight pipe to clamp up to. And when that extra inch is added, that changes how the shape of the pipe needs to be to clear the stock overflow tank. I have pics, I'll upload them tonight and show yall what I’m talking about. As far as the results, I don’t have a lot. Once I got the new pipe built and was able to get full boost, I blew a head gasket while doing some testing  I haven’t had time to fix the gasket yet, so its just sitting for right now. But when I was driving it around normally, the ECT stayed around 177� and IAT’s were 10~15� above ambient temperature. This was all with the IC fans OFF in about 50~60� weather. I haven’t done any testing with the IC fans on yet because it never got hot enough to need to turn them on. It will probably be summer before it gets that hot to actually see how much extra cooling they can provide.
I haven’t had time to fix the gasket yet, so its just sitting for right now. But when I was driving it around normally, the ECT stayed around 177� and IAT’s were 10~15� above ambient temperature. This was all with the IC fans OFF in about 50~60� weather. I haven’t done any testing with the IC fans on yet because it never got hot enough to need to turn them on. It will probably be summer before it gets that hot to actually see how much extra cooling they can provide. That's why he has the fans. The whole point is to avoid the big open mouth that front mounts seem to require. It is a trade-off between appearance and performance. The whole point of an intercooler is to lower IATs. 10-15 degrees above ambient is certainly acceptable in my book. And not having that big, gaping mouth is a fantastic thing.
LS1 Tech Stories
The Best V8 Stories One Small Block at Time

6 Common C5 Corvette Failures and What's Involved In Repairing Them
Pouria Savadkouei
Retro Modern Bandit Pontiac Trans AM Comes With Burt Reynolds' Autograph
Verdad Gallardo
Top 10 Greatest Cadillac V Series Performance Models Ever, Ranked
Pouria Savadkouei
Top 10 Most Powerful Chevy Trucks Ever Made!

Hennessey's New Supercharged Silverado ZR2 Has 700 HP
Verdad Gallardo
Coachbuilt N2A Anteros Is an LS2-Powered C6 Corvette In Italian Clothes
Verdad Gallardo
Awesome K5 Blazer Restomod Comes With C7 Corvette Power
Verdad Gallardo
10 Camaros You Should Never Buy

10 LS Engine Myths That Refuse to Die
Verdad Gallardo Thread Starter
8 sec potential, 12 sec slip
iTrader: (50)
Joined: Apr 2002
Posts: 4,092
Likes: 2
From: Savannah, GA

To those of you interested- sorry I haven't got those pics up yet of the new pipe that goes from the blower to the IC. I just haven't had much time when I get home at night. I plan to get them up tonight tho
Thread Starter
8 sec potential, 12 sec slip
iTrader: (50)
Joined: Apr 2002
Posts: 4,092
Likes: 2
From: Savannah, GA
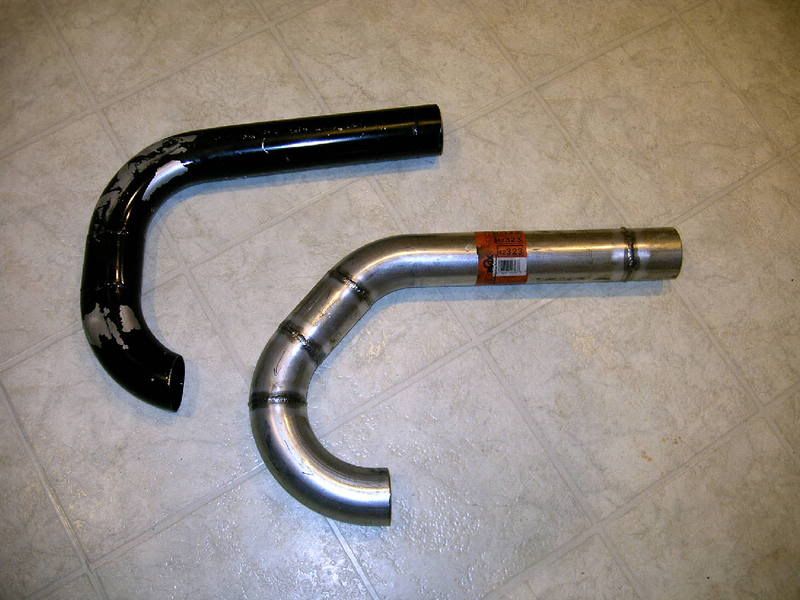
Okay, here is the new pipe compared to the old beat up one from blowing off the car completely while going down the road! You can see where the old one turned into the intercooler, there is no straight pipe at all, it abruptly ends at the end of the 90� bend. I figured out the hard way that this was not providing a good enough surface to clamp onto. So the new one has about 1 inch of straight after the bend to go straight into the intercooler. This moved the whole bend out towards the p/s and put it right smack dab in the middle of the overflow tank. So instead of a 90� bend and ~2.5" of straight pipe leading to another 90� bend, it ended up being a 135� bend into ~3" of straight pipe going into a 45� then to the blower.
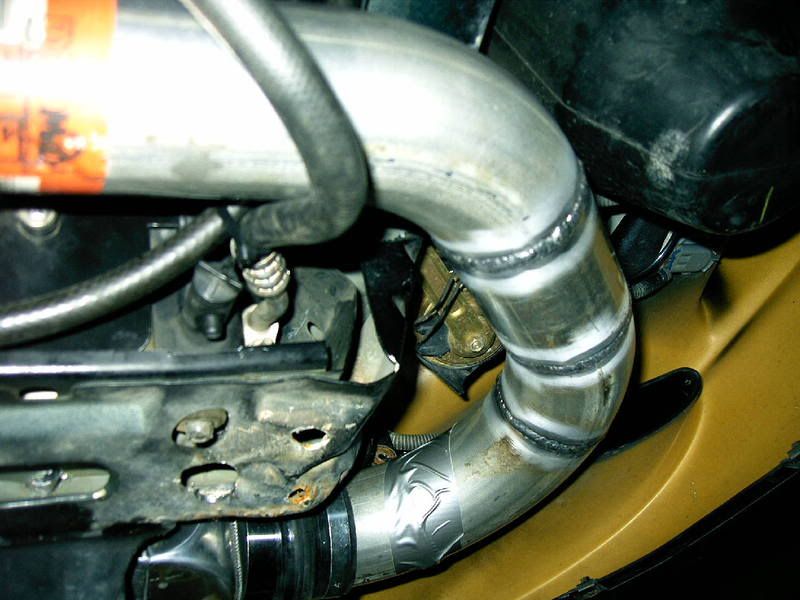
Here is how it fits into place around the overflow tank. You can see where the old pipe was actually rubbing it.
Plenty of clearance now!

Here is how it fits into place around the overflow tank. You can see where the old pipe was actually rubbing it.
Plenty of clearance now!
Thread Starter
8 sec potential, 12 sec slip
iTrader: (50)
Joined: Apr 2002
Posts: 4,092
Likes: 2
From: Savannah, GA
I got the piping from Jegs. It took 3 of these to do everything. Well, it actually took me 4 since I messed up that one. Good thing I ordered an extra one My buddy did the TIG welding on everything.
My buddy did the TIG welding on everything. hey when you cut your U bends in the middle, and then try to but one of the curved sides with a straight side, dose the curved pipe not fit exactly round? i noticed everytime i try to make it work, there seems to be like a oval and round thing going on, know what i mean? (i bought mandrel U bends as well but from summit)
Thread Starter
8 sec potential, 12 sec slip
iTrader: (50)
Joined: Apr 2002
Posts: 4,092
Likes: 2
From: Savannah, GA
if you make the cut exactly perpendicular to the curve, it should be a circular cross section. If you cut it at an angle tho, it will be parabolic (or if you want to call it oval)...
I got the piping from Jegs. It took 3 of these to do everything. Well, it actually took me 4 since I messed up that one. Good thing I ordered an extra one My buddy did the TIG welding on everything.
My buddy did the TIG welding on everything. Appreciate it. Did you go stainless steel or Aluminum?