
Rebuild DRL/fogs for CHEAP
 08-01-2009 | 08:57 PM
#1
Thread Starter
12 Second Club
iTrader: (28)
Joined: May 2007
Posts: 2,793
Likes: 14
From: under a JEGS hat
This writeup is for 98+ Firebirds with awful looking cracked and/or faded daytime running light (DRL) housings. I suppose it could also apply to 98+ fog lights or TA running lights as well. I will be revising this guide continually with pictures and more detailed steps... I am away from home at the moment so I don't have access to the various step by step pictures I took. Thanks for the idea/help goes to SVT Bait as I found out about this from him.
Tools needed:
Materials needed:
Tools needed:
- Metric socket set (for removal/installation)
- Pliers/wrenches/BFH/muscles/dremel (to remove old lens)
- Bandsaw (to cut material for new lenses)
- Fine sandpaper - 600 + grit (a sanding block works too)
- Steady hands
Materials needed:
- Pencil (I hope you have one of these)
- Tracing paper (other paper may work too. I had some tracing paper laying around)
- Low-tack spray glue... 3M 40 should work (I had some laying around)
- Stainless steel/aluminum spray paint. Metallic finish! I used Rustoleum Aluminum (I think, just had it laying around)
- 1 small sheet of Lexan from Home Depot. Thickness is up to you but go with a thickness at least as thick as the stock lens.
- 1 (or 2) small tube[s] of outdoor rated paintable caulk that dries clear (OUTDOOR and CLEAR and PAINTABLE are important!)
- Remove the DRL housing. There are two ways to do this: from above (turn the headlights on, then disconnect battery, remove plastic headlight shroud), or from below (place car on ramps/jacks, crawl underneath and on each side there are two bolts holding the access panel flap to the car). Disconnect the bulb by following the wire, then squeezing the bulb socket and twisting counter-clockwise while pulling. Next, loosen the nuts that hold the housing to the car. The housing is clamped onto the bumper by three nuts in a V arrangement. Once loosened, lift the housing up and remove it from inside the bumper, not through the front where you can see it.
- Trace the shape of the lens. Take the wax/tracing paper and the piece of Lexan. Spray a dusting of spray-glue on the lexan (it should still have its protective plastic layer covering both sides!), then firmly press the tracing paper on top, smoothing out any wrinkles or bubbles. Place the DRL lens face-down onto the Lexan nearly flush with a corner (maximizing space for other lenses you may need to cut) and trace the outline. Feel free to draw it a little larger than necessary as you will be sanding the corners smooth (reducing its size). Repeat this step as you will be cutting out two new lenses.
- Use the bandsaw to cut the new lenses. Use the bandsaw to cut the new lenses out. WEAR SAFETY GLASSES! Flying plastic shavings are not good to get in your eyes. Be careful with the cutting movement as the bandsaw likes to push outward and then dig inward fast. Slide the piece around on the bandsaw base - don't try and hold it in the air... Take as much time as you need to get a nice smooth edge. If you make a mistake, hopefully you have space on the Lexan to cut another one or two. The more accurate the cut the less sanding you will have to do, but keep in mind you should still leave some space for sanding.
- Sand the sides of the new lenses. Take the lenses and compare them to the original OEM lenses. Sand down the edges so they don't have sharp points and match the OEM lenses in terms of size/shape. Hopefully (like with body work) you don't have low areas. If you do then you will have to get creative to even it out, or start back at step 2 to make a new lens. Sand the edges smooth and so that they match the OEM lenses in terms of smoothness and shape.
- Remove the old lenses from the DRL housing. Now comes the fun part with lots of creativity. One of mine was cracked, and I was able to use a small prybar to pry the face off without doing too much damage to the sidewalls. The other one was not cracked and was a PITA to remove. I suppose you can use the bandsaw to just cut the lens off, but it'll take a very steady hand and gloves (so you dont cut your fingertips off). I don't recommend the bandsaw (due to danger), but either method will be frustrating. This step took quite a long time for me. A dremel might work, but remember you need a flat surface to seal the new lens to.
- Repair the DRL housings. If your housings are anything like mine were, then the reflectors are ABS Gray and bubbling and/or cracked right above the bulb socket. Make repairs using a file/sandpaper to get the most bubbled areas removed, then clean it out with water to remove all the plastic dust after filing, then fill the holes with caulk, and flatten the caulk smooth with your fingertips. Let the caulk dry thoroughly before painting. If the area gets dirty, wait until the caulk is dry before removing particles (air?).
- Paint the DRL housing reflectors. It is a good idea here to mount them to something like a piece of heavy cardboard or styrofoam to keep them stable and pointed upward. If you have to, find a way to clean the housings so that the paint will adhere. I didn't have too much of a problem. Remove the little rubber/paper filter from the back of the DRL! Take the DRL housings and leave them face-up and put them in a safe place to spray paint. Do a light coat or two of your reflective paint, let it sit for several minutes to get tacky, then continue doing more light coats as recommended by the instructions on the can.
- Glue the new lenses on. Once the paint is thoroughly dry, you can attach the new lenses. Take the clear caulk, and apply a small but thoroughly good enough bead of silicone around the lip of the reflector. Remember you want it to seal good enough to keep water/air out, but also you dont want too much getting on the lens or inside the reflector. It is good to have more on the outside edge than the inside edge, since with extra on the outside edge you can use your fingertips to smooth out the silicone and make a nice sealed edge. Once your silicone bead looks good, get your Lexan lens and remove the protective coatings. HANDLE THEM BY THE EDGES AND DON'T GET FINGERPRINTS ON THE INSIDE FACE! IT IS NEARLY IMPOSSIBLE TO CLEAN THE INSIDES OF DRL ASSEMBLIES. Carefully line up the lens over the silicone bead and push it down so that it's centered on the lens. Don't worry if you get a tiny bit of silicone smeared on the lens because it still dries clearish. Clean up the outer bead by running your finger along the edge to smooth it out and remove any excess, while forcing silicone into any air bubble gaps that you can see. Make sure the lenses won't shift or anything and let them sit for a long time until the bead is at least 70% clear, 30% white.
- Reinstall! Put the lenses back on the car. You might want to use a clean rag to clean off the DRL bulb and the socket and wiring harness so you don't get dirt inside the reflector. USE A DAMP MICROFIBER TOWEL TO CLEAN THE LEXAN LENS! Most rags will just scratch the Lexan.
- Enjoy. Don't worry if you accidentally got a piece of dust or something in the paint, or moved the lens a mm or two in the wrong direction. Unless somebody looks directly at the DRL's (and closely), they will not notice.
08-01-2009 | 09:10 PM
#2
Thread Starter
12 Second Club
iTrader: (28)
Joined: May 2007
Posts: 2,793
Likes: 14
From: under a JEGS hat
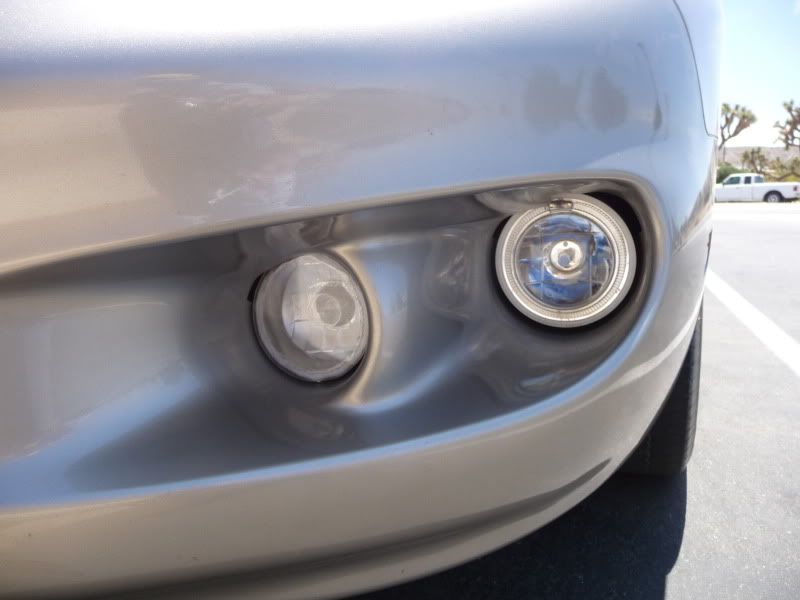
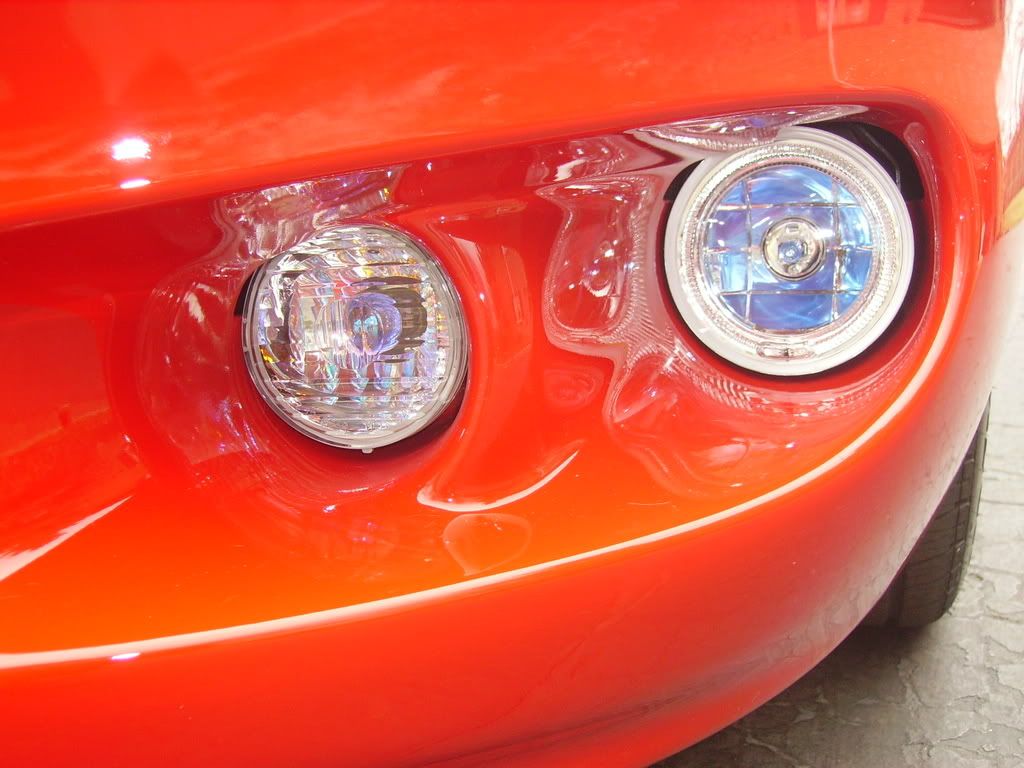
Before (I'll be posting a better picture when I get home):
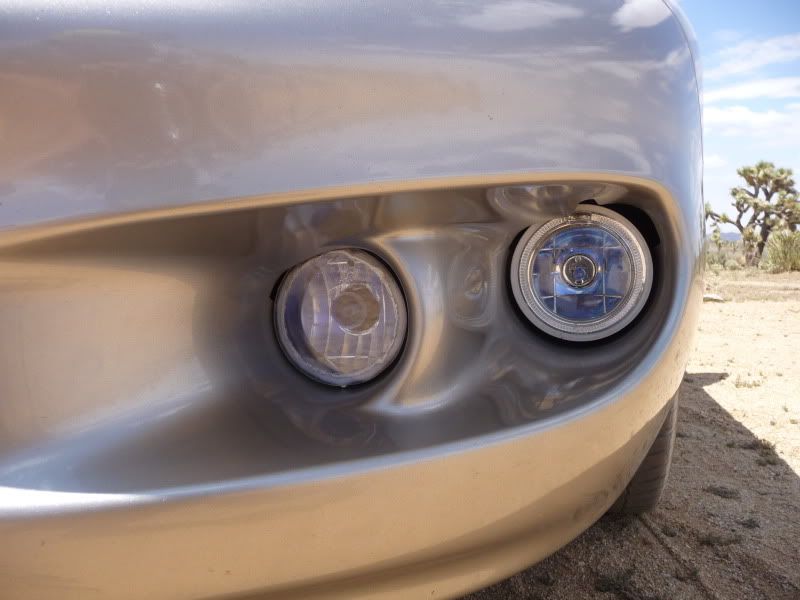
After:
I took these two pics when the silicone was still drying so there is still some white showing through in these pics.
With clear bulbs:
With blue glass bulbs:
For reference, here's the eBay replacement housings:
After:
I took these two pics when the silicone was still drying so there is still some white showing through in these pics.
With clear bulbs:
With blue glass bulbs:
For reference, here's the eBay replacement housings:
 08-02-2009 | 10:34 AM
#4

TECH Resident
Joined: Feb 2003
Posts: 827
Likes: 0
From: Dallas, TX
Here's a better option IMO. Get some new factory DRLs or fogs and wrap them in clear film (same used for clear bras). I have my DRLs done this way and I haven't had any further issues with them and they look factory rather than cheap aftermarket. Just my 2 cents.
08-02-2009 | 01:09 PM
#5
Thread Starter
12 Second Club
iTrader: (28)
Joined: May 2007
Posts: 2,793
Likes: 14
From: under a JEGS hat
- Cracked lens (from road debris breaking open the lens)
- Fogged/dirty lens (probably from not being properly sealed)
- Pitted (from road debris) lens
- Cracked reflector housings (from the melting effect... the reflector literally split open)
- MELTED reflector housings (yes, bubbled up and everything)
- GRAY reflector housings. There was no more reflective material inside. They were the same yellowed gray plastic color on the inside as they were on the outside.
The factory fogs look (and are) cheaper than the aftermarket ones. VIP1 even installed (and wrote a mini-guide for) these same aftermarket fogs on his Formula back in the day (that's how I found out about them). The OEM DRLs or reproductions are $60+s/h for a pair on eBay. I spent about $10 total to rebuild my DRLs since I had a lot of the materials laying around (just had to buy Lexan ($4-$5) and silicone ($3), with at most $2 in gas to get to Home Depot and back. If you don't have any of the materials, it should be around $20, which is still 1/3 the price of the eBay housings before shipping.
Your option is not better, IMO - especially for the prices involved. It is expensive to obtain NOS GM components, and then have them wrapped in a clear film (which does nothing to help fogging, cracking, or the reflector material from corroding). The whole point of this project was to save money and have a lens that lasts. Buying expensive OEM assemblies and then putting a piece of clear film on them is a waste of money. They are just going to crack as usual, the reflector material will fade to nothing, the housing will melt, and you will keep having to replace them every X miles and be out of X amount of money. I am confident that my lenses will last for at least the next 4 years.
Last edited by ZexGX; 08-02-2009 at 01:24 PM.
08-02-2009 | 02:48 PM
#6
TECH Resident
Joined: Feb 2003
Posts: 827
Likes: 0
From: Dallas, TX
If the factory ones shatter from small rocks hitting them, I doubt that a clear bra will help at all with shatter protection. Lexan is VERY impact resistant and has a little flex, which means they should be just as impact resistant or even more so than factory lenses. My fogs are glass lenses with metal housings and are superior to the factory pieces of crap in terms of looks, function, and light output.
The factory fogs look (and are) cheaper than the aftermarket ones. VIP1 even installed (and wrote a mini-guide for) these same aftermarket fogs on his Formula back in the day (that's how I found out about them). The OEM DRLs or reproductions are $60+s/h for a pair on eBay. I spent about $10 total to rebuild my DRLs since I had a lot of the materials laying around (just had to buy Lexan ($4-$5) and silicone ($3), with at most $2 in gas to get to Home Depot and back. If you don't have any of the materials, it should be around $20, which is still 1/3 the price of the eBay housings before shipping.
Your option is not better, IMO - especially for the prices involved. It is expensive to obtain NOS GM components, and then have them wrapped in a clear film (which does nothing to help fogging, cracking, or the reflector material from corroding). The whole point of this project was to save money and have a lens that lasts. Buying expensive OEM assemblies and then putting a piece of clear film on them is a waste of money. They are just going to crack as usual, the reflector material will fade to nothing, the housing will melt, and you will keep having to replace them every X miles and be out of X amount of money. I am confident that my lenses will last for at least the next 4 years.
You don't understand the process of what happens. There is nothing wrong w/ the reflector lens except when exposed to water. By sealing the front impact zone w/ clear film it not only looks better than ghetto rigged lexan it will also hold up better and the reflective material will not have any issues over time.
Wow a whole 4 years! My stockers lasted the past 8 years w/ NO clear film protecting them and 100K miles. Seriously dude, congrats on a lot of work. Your lenses don't look good and looks like a monkey assembled them.
You don't even understand the cost for what you did. Just because you had things lying around doesn't mean they are free. Someone paid for them at some point. Just judging that most people don't have 1.) Lexan or 2.) a band saw lying around I'd say your option is definitely more pricey than the solution I had for most.
To each his own, the only issue the factor lenses have is getting cracked by rock impacts. I have clear film already covering the entire front nose, hood, and fenders on this car and know how impact resistance it is and isn't. We've got 6 vehicles w/ clear film on them and the front ends still look new w/out rock chips.
Flying road debris is much more likely to chip your lexan than will even touch the clear film, not to mention cleaning the clear film is much easier.
Regardless, you have your solution that took a lot of work. It took me about 5 mins to wrap the DRL in clear film and it looks factory and looks brand new.
To each his own. I'm throwing out an option for others to consider before cutting up housings.
08-02-2009 | 07:11 PM
#7
Thread Starter
12 Second Club
iTrader: (28)
Joined: May 2007
Posts: 2,793
Likes: 14
From: under a JEGS hat
What happens is over time, the insides of the housings directly above the bulb start to melt. Water can get in this way. One of mine had the lens cracked, the other was intact. Both of them had water getting in and the bulbs were exploding. I took the housings out and found that the back of the housing had split open in at least one place above the bulb socket. SVT Bait also had the same issue, and several other people I know had similar things happen to them. The total price, assuming you have no materials, but do have a bandsaw, is around $20. I have no idea how you got yours for $40.
Here is GM Parts Direct:
http://www.trademotion.com/partlocat...layCatalogid=2 Fog light - $60 each + shipping
http://www.trademotion.com/partlocat...layCatalogid=2 DRL - $30 each + shipping
My stockers satisfied me for 135k miles. They looked ghetto by 95k miles. I have driven my car through snowstorms, hailstorms, sleet, sandstorms (used semi-trucks for cover), and thunderstorms. Pretty much everything but hurricanes and tornadoes. If I only drove my car when it was dry and never ever got closer than 500 feet to the car in front of me, then sure they could last well over 120k.
Edit: I also drive my car for several hours at a time. If you only make short trips and don't allow time for the DRL bulbs to heat up the enclosure then you will not have an issue with your DRLs.
Last edited by ZexGX; 08-02-2009 at 07:33 PM.