how did yall installs 6LE's cme?
 01-26-2010, 12:21 PM
#1
TECH Enthusiast
Thread Starter
iTrader: (5)
Join Date: Apr 2009
Location: Houston, TX
Posts: 637
Likes: 0
Received 0 Likes
on
0 Posts

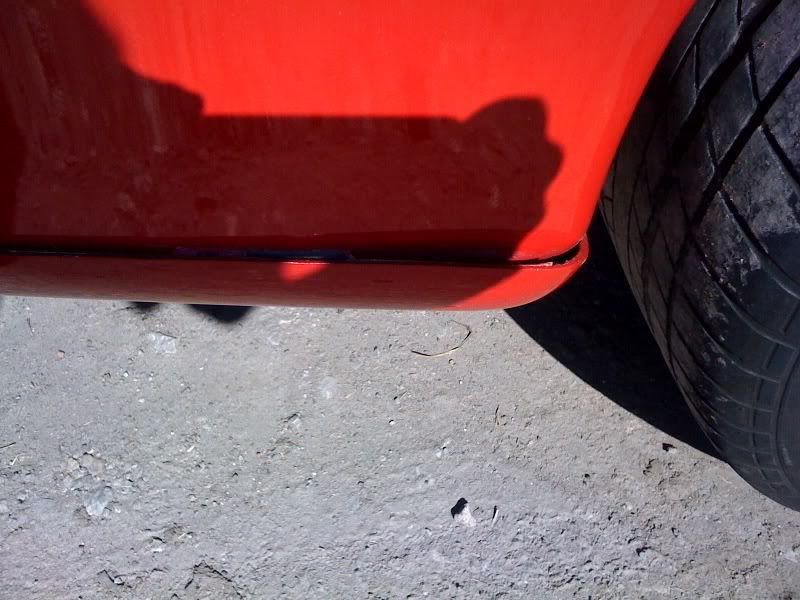
well i got my valence in about a week ago took it to my body guy he painted it and i took my car there today for him to put it on and he just called me and told me it doesnt fit to well... i dont doubt his abillities seeing how he has done many show cars before, any of yall have suggestions? he said one side is too short and something about under the license plate... 6LE im not bashing you just trying to get ppl's advice and yours also... ill post pics up asap

 01-26-2010, 02:20 PM
#5
I was at a forum members house yesterday and he has the 6LE valence and it didn't fit to well either. I sold my 6LE valence and got a OEM valence and tips and they fit perfectly. Try messing with the valence. Like the other member said, make sure its not to high in the rear. I had to do mine like 7 times to get it right. The 3M tape leaves no room for error so buy A LOT.
01-26-2010, 02:37 PM
#6
Always do a test fit first! Then attach it. THEN paint it. It's easier to blend the paint to match after it's on.
Where Does it not fit? Is it too short? Too long? All I've ever heard was that the ends are a bit longer, but so was SLP's. (a little)
The way I attached mine was by sectioning the 3M tape. In each corner I cut the tape so as I pulled the strip on the tape it would only stick the section I was working on. Also 2-3 guys is best. I attached mine under the plate first then the sides. Remember, the tape is on the very top of the valance for a reason... That's the only part touching the bumper.
It should attach just above the area where the bumper curves downward. It doesn't go "on" the bumper, it sticks to the bottom. Did you give your body guy lots of pictures to compare and look at?
-Mike

Trending Topics
01-26-2010, 02:41 PM
#9
I was at a forum members house yesterday and he has the 6LE valence and it didn't fit to well either. I sold my 6LE valence and got a OEM valence and tips and they fit perfectly. Try messing with the valence. Like the other member said, make sure its not to high in the rear. I had to do mine like 7 times to get it right. The 3M tape leaves no room for error so buy A LOT.

 01-26-2010, 03:55 PM
#13
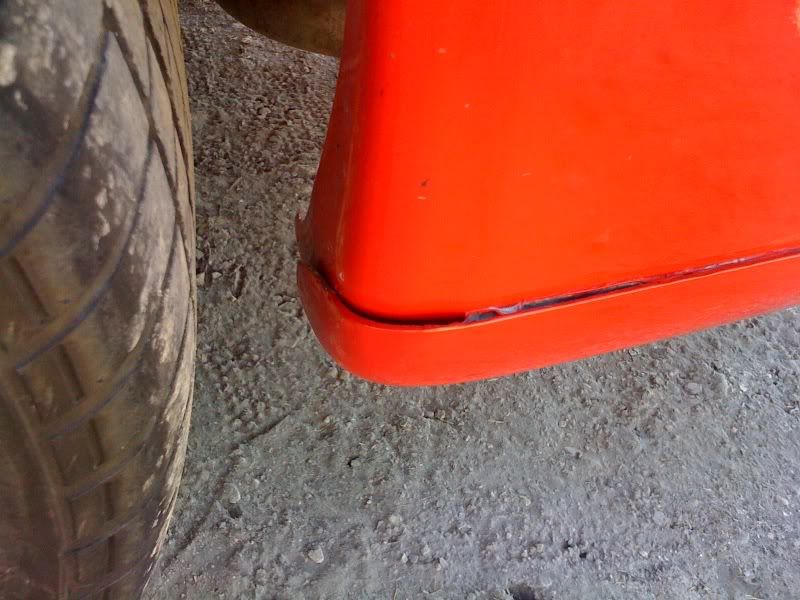
That's not bad really. I think all valences are like that even OEM. The problem I've noticed is that the 3M tape doesn't stick to the valence as good because of the material. If I had to do it over again I would have them paint the WHOLE valence and clear coat everything especially where the 3M tape is supposed to be on the valence. That way the 3M tape will stick really good.
01-26-2010, 04:32 PM
#14
TECH Enthusiast
Thread Starter
iTrader: (5)
Join Date: Apr 2009
Location: Houston, TX
Posts: 637
Likes: 0
Received 0 Likes
on
0 Posts
That's not bad really. I think all valences are like that even OEM. The problem I've noticed is that the 3M tape doesn't stick to the valence as good because of the material. If I had to do it over again I would have them paint the WHOLE valence and clear coat everything especially where the 3M tape is supposed to be on the valence. That way the 3M tape will stick really good.
01-26-2010, 05:50 PM
#16
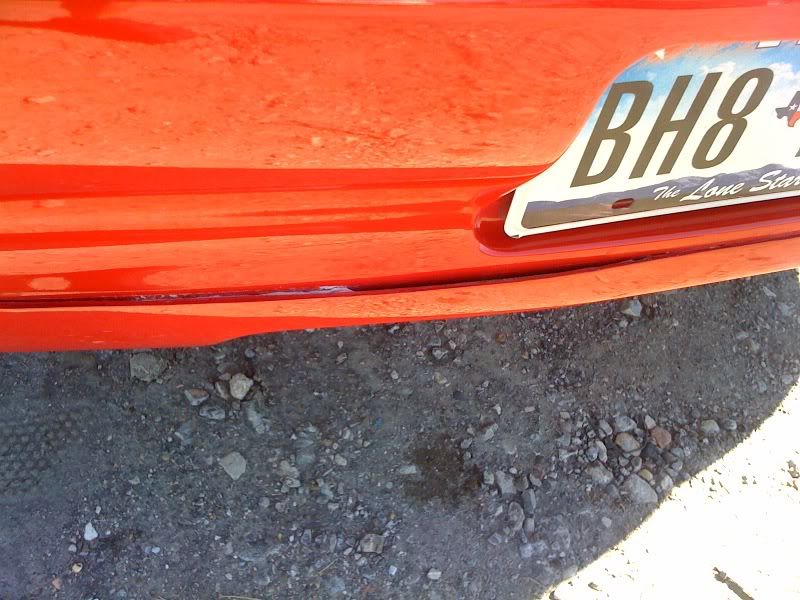
To be honest, it looks like the problem is just the tape. With all the rain we had here in So Cal it is very possible it just got damp in transit and isn't sticking the way it is supposed to. If the valance is not dead where it is supposed to be then it looks longer or shorter or pulls away from the bumper. It was even harder to get ride with the floppy urethane.
I would just apply new 3M and try again. PM me your address and I can send you a roll if you would like...
01-26-2010, 08:52 PM
#18
Mine is the exact same way. The paint shop installed mine and put two plastic push pins above the plate. The tape sucks so i'm putting some good 3M tape on. Not 6LE's fault, I think it's Florida's humid weather. Here's some pics of mine on this thread https://ls1tech.com/forums/appearanc...-cme-pics.html. Just be thankful for Mark doing the R&D to offer it to us haha! I honestly think it's the best mod I did. I think CME on our cars is unique. So play around with it and it will be good!
01-26-2010, 09:59 PM
#19
TECH Enthusiast
Thread Starter
iTrader: (5)
Join Date: Apr 2009
Location: Houston, TX
Posts: 637
Likes: 0
Received 0 Likes
on
0 Posts
Yeah, that wasn't what I was picturing either. I thought it was like too long or something...
To be honest, it looks like the problem is just the tape. With all the rain we had here in So Cal it is very possible it just got damp in transit and isn't sticking the way it is supposed to. If the valance is not dead where it is supposed to be then it looks longer or shorter or pulls away from the bumper. It was even harder to get ride with the floppy urethane.
I would just apply new 3M and try again. PM me your address and I can send you a roll if you would like...
 : but oh well i just want it to look a lil better than it does right now, still think this a GREAT product! plus your the only one that makes these so thanks!
01-26-2010, 10:38 PM
: but oh well i just want it to look a lil better than it does right now, still think this a GREAT product! plus your the only one that makes these so thanks!
01-26-2010, 10:38 PM
#20
PM'd you... yeah if the tape would have stuck im sure it would have fit right, but it was like there was too much preassure for the tape to hold it... when i re-do it i will do it in sections, starting under the license plate and go from there... only thing is they put screws on the edges behind the tires so there will prob be a small hole there still :: but oh well i just want it to look a lil better than it does right now, still think this a GREAT product! plus your the only one that makes these so thanks!
: but oh well i just want it to look a lil better than it does right now, still think this a GREAT product! plus your the only one that makes these so thanks! when I would mess up because I would have to put new 3M tape on the valence and start all over. It'll look sick when its all on.