
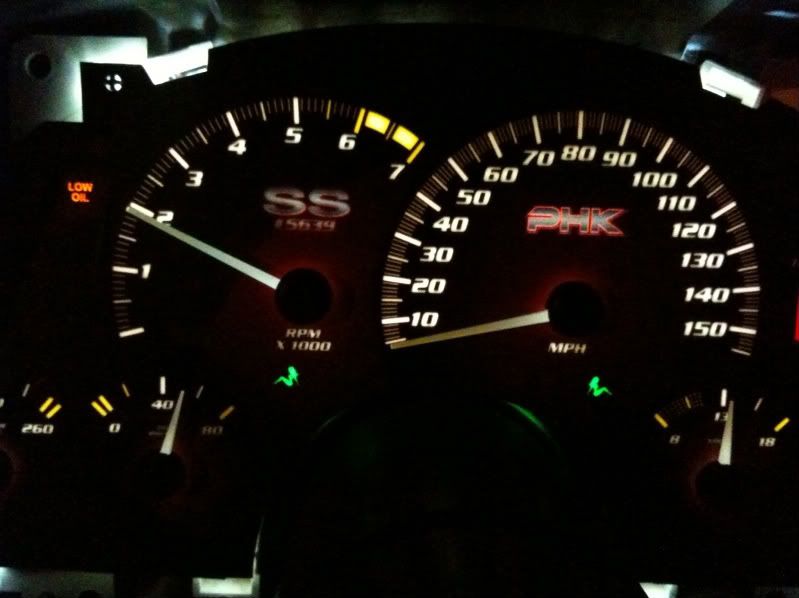
Finally did my 6LE overlay and blue odometer!

 12-04-2010, 09:30 PM
#24
TECH Enthusiast
Thread Starter
iTrader: (25)
Join Date: May 2009
Location: NY
Posts: 523
Likes: 0
Received 0 Likes
on
0 Posts

As of now, I have the blue gauge cluster and a blue alpine HU. I'm planning on swapping the HVAC controls with a camaro one thats blue (if anyone has one they want to get rid of let me know). That will cover most of it.
I don't really have any good day shots but here's one (dont mind the shitty pic or streaks on the lens):

And the original design pic:

Last edited by APG12; 12-04-2010 at 09:49 PM.
 12-05-2010, 12:02 AM
#27
TECH Enthusiast
Thread Starter
iTrader: (25)
Join Date: May 2009
Location: NY
Posts: 523
Likes: 0
Received 0 Likes
on
0 Posts
12-05-2010, 03:54 PM
#28
TECH Enthusiast
iTrader: (4)
Join Date: Mar 2009
Location: Louisville, KY
Posts: 676
Likes: 0
Received 0 Likes
on
0 Posts
That odometer MOD kinda scared me a lil bit...
Thats why my Camaro is in red, HaHa!!
What about getting the needles back in place?
What process did you do to ensure everything lined up right?
Thats why my Camaro is in red, HaHa!!
What about getting the needles back in place?
What process did you do to ensure everything lined up right?
12-05-2010, 08:14 PM
#30
TECH Enthusiast
iTrader: (4)
Join Date: Mar 2009
Location: Louisville, KY
Posts: 676
Likes: 0
Received 0 Likes
on
0 Posts
^^
I think I understand the entire process now.
1. Start it up, let it get to operating temp and get a time how long it took.
2. Make a drawing or pic where needles are once warmed up.
3. Remove gauge cluster.
4. Replace gauge overlay.
5. Replace gauge cluster.
6. Let car warm-up to operating temp (check with time taken earlier).
7. Time up and car warmed up, replace needles per drawing or picture.
8. Adjust as necessary according to this link.. https://ls1tech.com/forums/13588973-post5.html
The only question is about the speedo
Do you just plug it on while it's running as well? And start it out at bottom?
12-06-2010, 12:22 PM
#31
^^
I think I understand the entire process now.
1. Start it up, let it get to operating temp and get a time how long it took.
2. Make a drawing or pic where needles are once warmed up.
3. Remove gauge cluster.
4. Replace gauge overlay.
5. Replace gauge cluster.
6. Let car warm-up to operating temp (check with time taken earlier).
7. Time up and car warmed up, replace needles per drawing or picture.
8. Adjust as necessary according to this link.. https://ls1tech.com/forums/13588973-post5.html
The only question is about the speedo
Do you just plug it on while it's running as well? And start it out at bottom?
I think I understand the entire process now.
1. Start it up, let it get to operating temp and get a time how long it took.
2. Make a drawing or pic where needles are once warmed up.
3. Remove gauge cluster.
4. Replace gauge overlay.
5. Replace gauge cluster.
6. Let car warm-up to operating temp (check with time taken earlier).
7. Time up and car warmed up, replace needles per drawing or picture.
8. Adjust as necessary according to this link.. https://ls1tech.com/forums/13588973-post5.html
The only question is about the speedo
Do you just plug it on while it's running as well? And start it out at bottom?
This is pretty much the instruction sheet i send out with our needle sets. I just add a bit more detail, but you got the basics down perfect!
As for the speedo needle, I just go for a drive with my GPS and set the cruise control for 80 and place the needle straight up.
 12-06-2010, 12:31 PM
#32
TECH Enthusiast
Thread Starter
iTrader: (25)
Join Date: May 2009
Location: NY
Posts: 523
Likes: 0
Received 0 Likes
on
0 Posts
Yea thats pretty much how I did it. Just let the car warm up for 15min and took a picture of each gauge. When I was ready to put it back in, I warmed the car up for 15 mins again with the cluster in, but not the needles. When I hit that 15 min mark, just put the needles back in the same position.

 12-06-2010, 09:11 PM
#35
TECH Enthusiast
iTrader: (4)
Join Date: Mar 2009
Location: Louisville, KY
Posts: 676
Likes: 0
Received 0 Likes
on
0 Posts
This is pretty much the instruction sheet i send out with our needle sets. I just add a bit more detail, but you got the basics down perfect!
As for the speedo needle, I just go for a drive with my GPS and set the cruise control for 80 and place the needle straight up.
As for the speedo needle, I just go for a drive with my GPS and set the cruise control for 80 and place the needle straight up.
A TomTom will tell you how fast your going?
If that is the case, that's just bad ***.
*(Had a picture in my mind driving down the road with a buddy on a cell phone, sips from beer, how fast I'm going now Cleatus?)
How do you think a white gauge would look with white needles?


 12-08-2010, 02:59 PM
#39
I'm still kinda stupid with GPS's.
A TomTom will tell you how fast your going?
If that is the case, that's just bad ***.
*(Had a picture in my mind driving down the road with a buddy on a cell phone, sips from beer, how fast I'm going now Cleatus?)
How do you think a white gauge would look with white needles?
A TomTom will tell you how fast your going?
If that is the case, that's just bad ***.
*(Had a picture in my mind driving down the road with a buddy on a cell phone, sips from beer, how fast I'm going now Cleatus?)
How do you think a white gauge would look with white needles?
Here's a pic of my white needles with white LED's, Cleatus, lol.

WWWWWWWWOOOOOOOOO-WWWWWWWWWWEEEEEEE!!!!!!!