Appearance & Detailing Interior & Exterior Appearance Modifications

Trans Am Gauge Bezel with Gauge pods *Finished Pics*

Thread Tools
 
Search this Thread
 
Old 11-03-2011, 06:03 PM
  #21  
10 Second Club
iTrader: (30)
 
djfury05's Avatar
 
Join Date: Jan 2008
Location: Beaufort, SC
Posts: 3,428
Likes: 0
Received 3 Likes on 2 Posts

Default

looks great
Old 03-27-2012, 08:21 PM
  #22  
14k
TECH Fanatic
 
14k's Avatar
 
Join Date: Mar 2011
Location: Odessa, TX
Posts: 1,050
Likes: 0
Received 2 Likes on 2 Posts
Default

How do you route the wires for the gauge? Through the lap panel? Or some other way?
Old 03-27-2012, 10:37 PM
  #23  
On The Tree
iTrader: (1)
 
olskoolLT1's Avatar
 
Join Date: Jun 2011
Location: Hazel Green, AL
Posts: 146
Likes: 0
Received 0 Likes on 0 Posts
Default

that looks damn good
Old 03-28-2012, 02:08 AM
  #24  
TECH Fanatic
Thread Starter
iTrader: (9)
 
Swiat34's Avatar
 
Join Date: May 2007
Location: Jackson, TN
Posts: 1,527
Likes: 0
Received 3 Likes on 3 Posts

Default

The lap panel is probably the best way. It's like routing wires for any aftermarket ****, gotta be creative. I don't even use this in my T/A since it's a project and in pieces. I don't yet have the gauges I need even. I offer this one for sale just because I know others can put it to good use right away. Thanks for the compliments guys! I'll be working on one for Camaros too so stay tuned!
Old 03-28-2012, 08:50 AM
  #25  
TECH Fanatic
iTrader: (6)
 
CamaroSS27's Avatar
 
Join Date: Jan 2009
Location: Denton, TX
Posts: 1,474
Likes: 0
Received 1 Like on 1 Post

Default

wow great job!
Old 03-28-2012, 10:32 AM
  #26  
14k
TECH Fanatic
 
14k's Avatar
 
Join Date: Mar 2011
Location: Odessa, TX
Posts: 1,050
Likes: 0
Received 2 Likes on 2 Posts
Default

I'm definitely interested in a camaro one
Old 03-29-2012, 06:41 AM
  #27  
TECH Fanatic
iTrader: (8)
 
cancam99ss's Avatar
 
Join Date: Mar 2010
Location: Miami 33155
Posts: 1,140
Received 82 Likes on 59 Posts

Default

I'm in for a Camaro ione
Old 03-31-2012, 01:08 AM
  #28  
14k
TECH Fanatic
 
14k's Avatar
 
Join Date: Mar 2011
Location: Odessa, TX
Posts: 1,050
Likes: 0
Received 2 Likes on 2 Posts
Default

any update on the 'camaro version?
Old 03-31-2012, 07:12 AM
  #29  
TECH Regular
iTrader: (6)
 
ta-stanger's Avatar
 
Join Date: Jul 2009
Location: Lake Of the Ozarks, MO.
Posts: 495
Likes: 0
Received 1 Like on 1 Post

Default

Looks sweet!!
Old 03-31-2012, 03:29 PM
  #30  
TECH Fanatic
Thread Starter
iTrader: (9)
 
Swiat34's Avatar
 
Join Date: May 2007
Location: Jackson, TN
Posts: 1,527
Likes: 0
Received 3 Likes on 3 Posts

Default

Got a rough-in for the Camaro but my Z28 friend hasn't been by so I can test fit.
Old 03-31-2012, 05:04 PM
  #31  
TECH Apprentice
iTrader: (3)
 
WS.SIX's Avatar
 
Join Date: Jul 2009
Location: Maricopa, AZ
Posts: 317
Likes: 0
Received 2 Likes on 2 Posts

Default

are you going to start producing these for T/A's and Camaros or is it just a one time thing?
Old 03-31-2012, 07:39 PM
  #32  
TECH Fanatic
Thread Starter
iTrader: (9)
 
Swiat34's Avatar
 
Join Date: May 2007
Location: Jackson, TN
Posts: 1,527
Likes: 0
Received 3 Likes on 3 Posts

Default

I make em to order.
Old 03-31-2012, 09:18 PM
  #33  
11 Second Club
iTrader: (20)
 
98 WS6's Avatar
 
Join Date: May 2008
Location: New York
Posts: 3,767
Likes: 0
Received 1 Like on 1 Post

Default

Nice work dude! Once I have my dream T/A again I'll be putting gauges right back in the vents, that's my favorite so far.
Old 06-16-2017, 11:33 AM
  #34  
TECH Regular
 
Phoenix'97's Avatar
 
Join Date: Apr 2013
Posts: 456
Received 5 Likes on 5 Posts
Post

Originally Posted by Swiat34
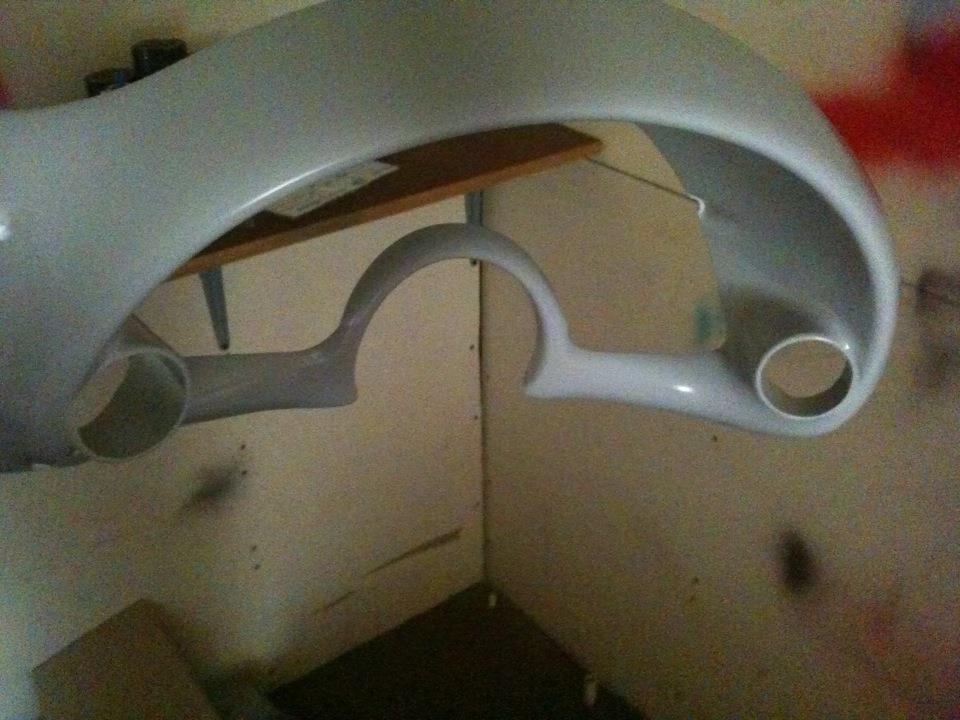
So I had a bit of a brain storm thinking about how much I don't like the look of pillar pods and came up with this. I used 2" PVC and borrowed an old Trans Temp gauge from a friend for test fitting. After deciding on placement, I cut the bezel and PVC then used JBStick epoxy to keep it in place. It's a VERY strong bond! I used my dremel to grind away the excess epoxy before contouring with a lightweight body filler. I shaped it by hand sanding. It got a coat of Spotting and Glazing putty to fill small imperfections. I sanded over the entire bezel to eliminate the factory texture before getting the coat of sandable primer. That'll get wet sanded and finally coated with a Dupont Semi-gloss black. So here's the pics!

I am going to have to remember this post in a few years. I have the pillar gauge pod set-up right now, and after experiencing how much more difficult it is to clean my windshield near that area and to apply new registration and inspection stickers, I would much rather have my factory pillar trim back.

I will be in the market for a single pod in the upper left portion of the gauge bezel, something that allows me to watch both my factory tachometer and the vacuum gauge that will be installed in that pod, without blocking the view of the warning indicators in that same upper left corner of the gauge cluster.

I have seen this desired set-up being offered online, but it's a dual pod version, I really wish to cease use of my second physical oil pressure gauge.
Old 06-21-2017, 10:31 PM
  #35  
TECH Enthusiast
iTrader: (3)
 
Tipnitty's Avatar
 
Join Date: May 2011
Location: OKC/STL
Posts: 523
Likes: 0
Received 0 Likes on 0 Posts
Default

Pretty sweet. I had one of these in my DD honda, but I couldn't read them very well. Thought about trying to make something similar, but I have far too many projects on hand. Good work!
Old 06-22-2017, 07:42 AM
  #36  
TECH Resident
iTrader: (9)
 
CoreyD's Avatar
 
Join Date: Apr 2010
Location: NOLA / Lafayette
Posts: 917
Received 318 Likes on 175 Posts

Default

Nice work!
Old 06-27-2017, 10:57 PM
  #37  
10 Second Club
iTrader: (16)
 
Firebirdmuscle's Avatar
 
Join Date: Jan 2012
Location: Mississippi
Posts: 1,203
Received 13 Likes on 13 Posts

Default

That looks very good. Definitely like this better than an a pillar setup even tho I have a triple pod one. Great job.


Quick Reply: Trans Am Gauge Bezel with Gauge pods *Finished Pics*


All times are GMT -5. The time now is 10:45 PM.