






Whistler Project Today!
Thread Starter
On The Tree
Joined: Jan 2012
Posts: 171
Likes: 0
From: Norfolk, VA
 Whistler Project Today!
 Alright so besides the 30* weather outside with this frigid cold front that passed... I thought that today would be a great day for the wife and I to tackle this Whistler Mod that I have always wanted to do! Since most of the mod is done indoors, it shouldn't be that bad! (try telling the wife that on her day off lol)... Got my supplies list, will be posting before and after pics for those who are either inspired or just looking for results!
Wish me luck, because here goes nothing!!
Wish me luck, because here goes nothing!!
Thread Starter
On The Tree
Joined: Jan 2012
Posts: 171
Likes: 0
From: Norfolk, VA
Just moved into my New place and needed power tools as well.. So I went to Lowes and dropped a nice penny on a new Dewalt drill, Dewalt drill bit set, and Kobalt ratchet set...
Sooooo I probably would have been better off just buying these Whistler headlights online!
Its the fun of the project though, and the feeling of self-accomplishment!
Last edited by BAD2theBONE; Jan 20, 2012 at 01:22 PM.
Thread Starter
On The Tree
Joined: Jan 2012
Posts: 171
Likes: 0
From: Norfolk, VA
But I havent gotten that far yet.... Taking my time cleaning them up and buffing the lenses to make em look brand New first!
Will post pics as I go!
Trending Topics
mine went flawlessly. the hardest part was the masking it off which is nothing. my headlights popped right out with no prying on the bumper. Now that I have done it every camaro I see I feel needs this mod.
LS1 Tech Stories
The Best V8 Stories One Small Block at Time

Gas Monkey Built a 6-Wheel Ferrari Testarossa With a Corvette LT4 Engine
Verdad Gallardo
7 Most Reliable High-Performance Engines GM Has Ever Built
Verdad Gallardo
Amazing '71 Camaro Restomod Is Modern Muscle Car Under the Skin
Verdad Gallardo
6 Common C5 Corvette Failures and What's Involved In Repairing Them
Pouria Savadkouei
Retro Modern Bandit Pontiac Trans AM Comes With Burt Reynolds' Autograph
Verdad Gallardo
Top 10 Greatest Cadillac V Series Performance Models Ever, Ranked
Pouria Savadkouei
Top 10 Most Powerful Chevy Trucks Ever Made!

Hennessey's New Supercharged Silverado ZR2 Has 700 HP
Verdad Gallardo
Coachbuilt N2A Anteros Is an LS2-Powered C6 Corvette In Italian Clothes
Verdad Gallardo Thread Starter
On The Tree
Joined: Jan 2012
Posts: 171
Likes: 0
From: Norfolk, VA
The turtle wax worked alright.... The Mothers Headlight restoration kit with an added bonus of a buffer ball was where its at though! Both working together came out amazing! But the problem wasn't getting my lenses apart @ 200* for 20mins... Sure they came off easily enough with a little bit of easy seperation of the butter knife. But it was the fact that I had put so much work into buffing those lenses clear for 3 hours to prior baking them in the oven....
Just a little bit of advice... if you plan on attempting this mod on your old, stock headlights... DO NOT restore them first from putting in all of the effort... lol big mistake!
It's almost like they bubbled and oxidized from the center of the plastic??? "I hope I can buff this out" is what I was thinking!!!
And yes I definitely agree with you buellxb12s... The masking off part took the most time and patience!
Just a little bit of advice... if you plan on attempting this mod on your old, stock headlights... DO NOT restore them first from putting in all of the effort... lol big mistake!
It's almost like they bubbled and oxidized from the center of the plastic??? "I hope I can buff this out" is what I was thinking!!!
And yes I definitely agree with you buellxb12s... The masking off part took the most time and patience!
Last edited by BAD2theBONE; Jan 20, 2012 at 01:31 PM.
Thread Starter
On The Tree
Joined: Jan 2012
Posts: 171
Likes: 0
From: Norfolk, VA
Driving to Walmart with no headlights on my car should be interesting... Need a headlight restoration kit! AGAIN!
This is where I picked up and went with the Mothers kit...
This is where I picked up and went with the Mothers kit...
Last edited by BAD2theBONE; Jan 20, 2012 at 01:32 PM.

Launching!
Joined: Apr 2006
Posts: 213
Likes: 0
From: Back to Newport News
Looking back on the whole process, I should have just ordered those already-Whistlered Depo headlights for like $140-150 for the pair from the get-go. Hell I still Might! That my advice dude, if you're not already at the "point of no return"!


get the meg . kit that plastic polish works very well, honest the best way to do it is grind on the tabs and hit them with a pc, cant compare work done by hand to using a machine, honest op i think you should have left your lights stock polish them up and get some clear corners, your ride is really clean looking , i think stock it looks great

How much money have u sunk into this project??? The reason I'm asking is because I feel your pain. I ran into the same problem with my lenses. Started with that turtle Wax kit. Didnt do ****. Then i went out and bought different grades of sandpaper, all the way up to 2500 grit and wetsanded the **** out of them. Slight improvement there. Still not satisfied, i went out and bought that Mother's powerball and Meguire's Plastic -X stuff. No improvement over the wetsanding. In a last ditch effort, I ordered this stuff called Novus Plastic Polish. This stuff was highly regarded on this site by some folks, and the internet alike. Again, nominal improvements, but nothing huge.
Looking back on the whole process, I should have just ordered those already-Whistlered Depo headlights for like $140-150 for the pair from the get-go. Hell I still Might! That my advice dude, if you're not already at the "point of no return"!
Looking back on the whole process, I should have just ordered those already-Whistlered Depo headlights for like $140-150 for the pair from the get-go. Hell I still Might! That my advice dude, if you're not already at the "point of no return"!
You must not have done it right. The Turtle wax kit works AWESOME for me. I've used it on 4 different vehicles with VERY heavily oxidized lenses and they came our crystal clear.
I literally used it yesterday on my old mans car. His lights were so bad that you couldn't see the bulb through the lens at all. I hit it with a used Turtle wax kit that I had left over from my car and the lights came out clear. You just have to put the work in.
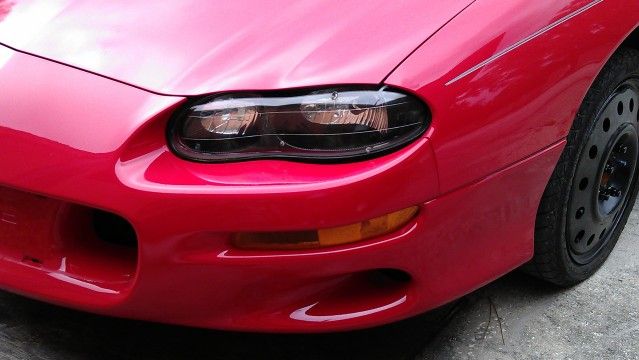
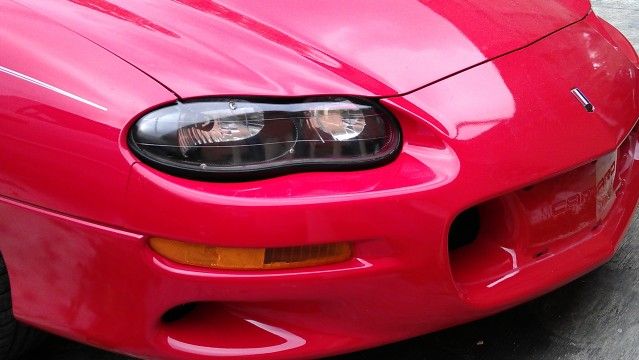
Here is a pic of mine after the turtle wax kit. I'll get a pic of my fathers lights when he comes by today.
Last edited by sepsis; Jan 18, 2012 at 12:32 PM.
^This. I chipped a few pieces off my housing on the first one I did. On the other light I heated it until I could pull it off with just my hands. But don't panic too much if you do get any chips or cracks in the housing; a little epoxy will fix it right up.
I wish I took before pics of my fathers lenses, but if you can imagine that they were completely cloudy and yellow. Nothing was visible through them, they were horrible, as bad as any I've ever seen.
I had my left over turtle wax kit and with a lot of work, this is the result. The passenger side lens has quite a few cracks and such from age I guess.
I had my left over turtle wax kit and with a lot of work, this is the result. The passenger side lens has quite a few cracks and such from age I guess.
You must not have done it right. The Turtle wax kit works AWESOME for me. I've used it on 4 different vehicles with VERY heavily oxidized lenses and they came our crystal clear.
I literally used it yesterday on my old mans car. His lights were so bad that you couldn't see the bulb through the lens at all. I hit it with a used Turtle wax kit that I had left over from my car and the lights came out clear. You just have to put the work in.
I literally used it yesterday on my old mans car. His lights were so bad that you couldn't see the bulb through the lens at all. I hit it with a used Turtle wax kit that I had left over from my car and the lights came out clear. You just have to put the work in.
Thread Starter
On The Tree
Joined: Jan 2012
Posts: 171
Likes: 0
From: Norfolk, VA
How much money have u sunk into this project??? The reason I'm asking is because I feel your pain. I ran into the same problem with my lenses. Started with that turtle Wax kit. Didnt do ****. Then i went out and bought different grades of sandpaper, all the way up to 2500 grit and wetsanded the **** out of them. Slight improvement there. Still not satisfied, i went out and bought that Mother's powerball and Meguire's Plastic -X stuff. No improvement over the wetsanding. In a last ditch effort, I ordered this stuff called Novus Plastic Polish. This stuff was highly regarded on this site by some folks, and the internet alike. Again, nominal improvements, but nothing huge.
Looking back on the whole process, I should have just ordered those already-Whistlered Depo headlights for like $140-150 for the pair from the get-go. Hell I still Might! That my advice dude, if you're not already at the "point of no return"!
Looking back on the whole process, I should have just ordered those already-Whistlered Depo headlights for like $140-150 for the pair from the get-go. Hell I still Might! That my advice dude, if you're not already at the "point of no return"!
Ok, so when I attempted the "BIG Mistake" of restoring the lenses FIRST, I had just used the Turtle Wax kit ($8)... for about an hour... and then switched back and forth between 1000 grit wet-sandpaper ($5) and started to see results! Worked at it for 2 more hours, resulting in 3 hrs total!
I was overall satisfied... and started the Whistler project at once!
After taking them out of the oven and removing the lenses, it was a HUGE dissapointment to see that my lenses had now fogged up again and it was almost like the lenses were messed up because of internal cracking of the plastic??? So it never came out "Perfect" (the lenses that is)... but took another 5 hours of just straight buffing them with the Mothers ($23), Turtle wax and 1000 grit combo! At the least you can say after all of my hard work I was just a "little" bit determined to make these turn out looking GREAT!
One headlight is being buffed, the other is almost finished... Not to great of a "before" pic... but just an idea of the PITA at the start of my Project! Roughly I would say I spent around $40 or under??? Just on supplies that is... not the tools I needed around my new house or heat gun (which wasn't much and didnt ever use it, the oven was sufficent enough, I GUESS!)
