camaro interior carbon fiber project*PICS*
 05-29-2012, 12:16 PM
#1
TECH Fanatic
Thread Starter
iTrader: (1)
Join Date: Jan 2009
Location: south jersey
Posts: 1,111
Likes: 0
Received 0 Likes
on
0 Posts
So i was looking at 1quicktransam's thread he made a couple of months ago of his carbon he did in his trans am. his project inspired me to do this myself for my camaro. let me just say right now this is no easy project by any means, you will be insanely itchy, get cut up and it will test your patience. i have more patience than anyone i know and it still tested me so if you have little patience pay some one else to do this for you or you will want to take a big F%@*ing hammer to your parts lol. i had a few offers to have it done for me, but i thought about it and decided i wanted to have the pride of doing it myself.well enough talking you guys want to see pictures lol.
first sneak peak (shot inspired by 1quicktransam)

all laid out to make sure i have enough carbon fiber to cover each piece.

Here all the parts are wrapped( i screwed up the lid so i had to put another layer of carbon fiber later )


The parts started to get to me lol

Not a happy camper (super itchy and the multi tool makes alot of dust)

just SOME of the trimmings lol

Finally making some progress

Wet coat of resin, not finished

and the last picture for right now teaser of the finished product

ill hopefully have them finished up and have some install pics up soon guys.
also i have a decent amount of carbon fiber left, enough to do the corvette style engine covers, anyone know a cheap place to get plain ones? i dont need anything fancy since i plan to wrap them in carbon fiber. thanks guys.
first sneak peak
(shot inspired by 1quicktransam)all laid out to make sure i have enough carbon fiber to cover each piece.
Here all the parts are wrapped( i screwed up the lid
so i had to put another layer of carbon fiber later )The parts started to get to me lol
Not a happy camper (super itchy and the multi tool makes alot of dust)
just SOME of the trimmings lol
Finally making some progress
Wet coat of resin, not finished
and the last picture for right now teaser of the finished product
ill hopefully have them finished up and have some install pics up soon guys.
also i have a decent amount of carbon fiber left, enough to do the corvette style engine covers, anyone know a cheap place to get plain ones? i dont need anything fancy since i plan to wrap them in carbon fiber. thanks guys.


Trending Topics
05-30-2012, 12:45 PM
#8
TECH Fanatic
Thread Starter
iTrader: (1)
Join Date: Jan 2009
Location: south jersey
Posts: 1,111
Likes: 0
Received 0 Likes
on
0 Posts
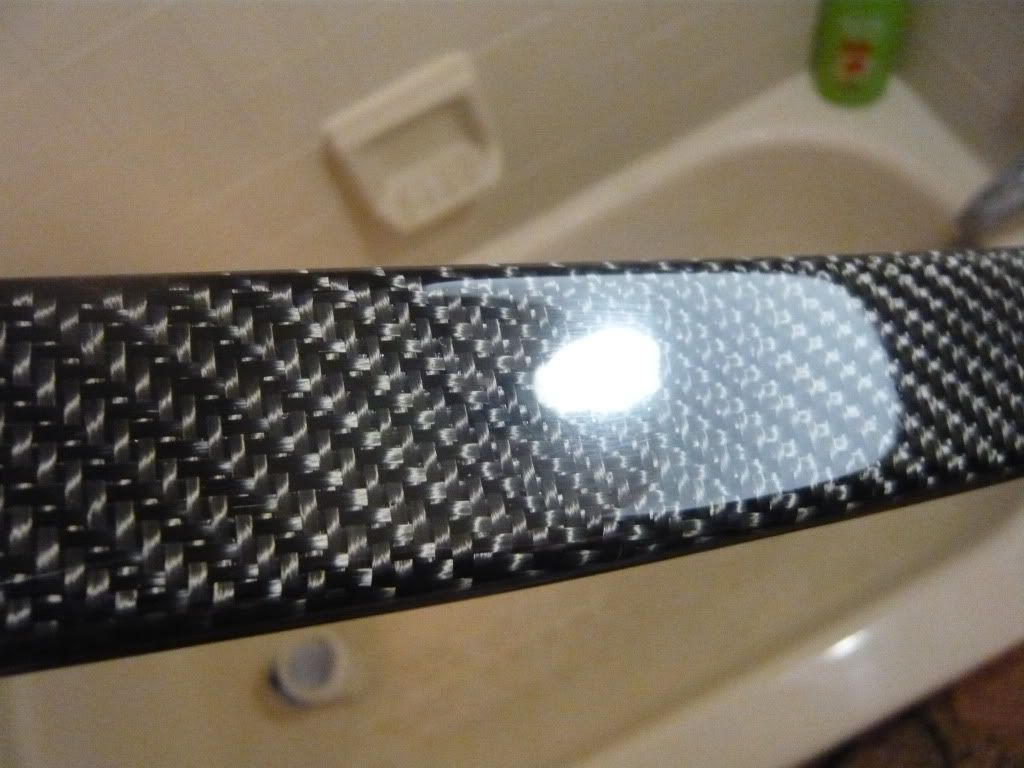
here is a preview of the finished product going to have to take everything back out though
  because while everything looks great, there alot of air bubbles in the clearcoat that the 1500 grit could not simply remove so im most likely going to have to start at 800 then work my way back up which sucks but not just not satisfied with the results they werent very noticeable until i put the M105 on to buff them then once everything was glossy smooth the M105 is stuck in the little popped air bubbles give alot of mini white specs in certain area's of the parts. also i really cant move my air vents up and down any more lol because the carbonfiber has them held so tight -__-
well here is your preview guys

going to have to take everything back out though because while everything looks great, there alot of air bubbles in the clearcoat that the 1500 grit could not simply remove so im most likely going to have to start at 800 then work my way back up which sucks but not just not satisfied with the results they werent very noticeable until i put the M105 on to buff them then once everything was glossy smooth the M105 is stuck in the little popped air bubbles give alot of mini white specs in certain area's of the parts. also i really cant move my air vents up and down any more lol because the carbonfiber has them held so tight -__-well here is your preview guys
05-30-2012, 03:53 PM
#9
To avoid the air bubbles in the clear coat (I had them at first too), spray from further away and thinner coats. You are spraying too much too close which is trapping air bubbles under a solid layer of clear. When the air finds its way to the surface, the bubble pops and creates the pit in the clear. Later attempts to cover this over will fail because the air in the void will just pop on the new layer as well.
By spraying from further away you're allowing the clear coat to atomize better so no air will be trapped, and spraying thinner coats will help ensure that you don't get any air trapped under (but really the key is the distance). You'll waste more clear, but the results are worth it.
I just had the same thing happen on an exterior spoiler part that I'm doing for a Mustang GT500, so after stripping the clear I tried this method and it turned out absolutely perfect.
And an angle shot showing how perfect the clear layed this way (after polishing here). Any defects would show in a reflection at this angle.
Can't wait to see some of your finished pics!
05-30-2012, 04:03 PM
#10
TECH Fanatic
Thread Starter
iTrader: (1)
Join Date: Jan 2009
Location: south jersey
Posts: 1,111
Likes: 0
Received 0 Likes
on
0 Posts
thanks man so do you suggest completely removing the clear coat ( if so how safely) then respraying or just sanding down smooth what i have now then buff smooth?
05-30-2012, 04:19 PM
#11
The important thing is that you are past all the pitting and have a smooth surface to work with.
05-30-2012, 04:37 PM
#12
TECH Resident
iTrader: (3)
Join Date: Nov 2011
Location: mn
Posts: 853
Likes: 0
Received 0 Likes
on
0 Posts
so where did you guys buy the carbon fiber? im thinking of making a dash in my camaro out of it and i would like to get the basics
what carbon fiber did you use? is it real or a mate?
what hardner for the carbon fiber?
and did you have to put a clear coat on it after?
if so is it just paint clear coat like ppg/ dupont
what carbon fiber did you use? is it real or a mate?
what hardner for the carbon fiber?
and did you have to put a clear coat on it after?
if so is it just paint clear coat like ppg/ dupont
05-31-2012, 04:53 AM
#16
 05-31-2012, 12:34 PM
#17
TECH Fanatic
Thread Starter
iTrader: (1)
Join Date: Jan 2009
Location: south jersey
Posts: 1,111
Likes: 0
Received 0 Likes
on
0 Posts
Thanks for all the compliments guys I'll post up another teaser today , I have all the pieces back off. To do a final sanding to make sure there are no wavy surfaces and all bubbles are gone will hopefully be completely finished by the end of the weekend lol and I guess the alcantara comment was sarcastic. But after I read it I looked up and realized how cheap old the factory. Head liner looked lol squee do you know of any of these pics?
 05-31-2012, 12:46 PM
#20
TECH Fanatic
Thread Starter
iTrader: (1)
Join Date: Jan 2009
Location: south jersey
Posts: 1,111
Likes: 0
Received 0 Likes
on
0 Posts
I tried to put a smaller piece of carbon fiber in the cup holder then and the larger sheet over that. Didn't work out too well... Lol carbon fiber frayed all over the place so I just ended up cutting the cup out from under neath Wrapping them seperate then epoxied them back together