
Diagnosing Your Paint Issue


Thread Starter
FormerVendor
Joined: Mar 2014
Posts: 263
Likes: 0
Just a little tech tip/writeup Dylan put together for our forums that might be helpful for people in understanding what different defects are.
There are a number of issues that can impact the quality of your finish, but some of the most misunderstood are those in the scratch and swirl family of defects. Just like treating a medical issue, as detailers and enthusiasts we must first isolate the cause (bad wash habits, a car cover, poor quality towels, previous detailers mistakes)
Once we know the cause and have eliminated it we have to diagnose the issue so that we can provide the "cure". Theres no sense in attacking your paint with a polisher if you don't first understand what you're attempting to fix. In essence the removal of any imperfection means to round off the edges of the damage and remove the surrounding material until the surface is again level, or at least visually level to the nake eye.
Using methods too aggressive for the problem means removal of excess amounts of material or use of methods not aggressive enough mean a waste of effort and time. Also understand that there is a limit to what can be 'buffed out'. When the damage exceeds the depth of the surrounding material you are dealing with a defect that is beyond repair using a polisher.
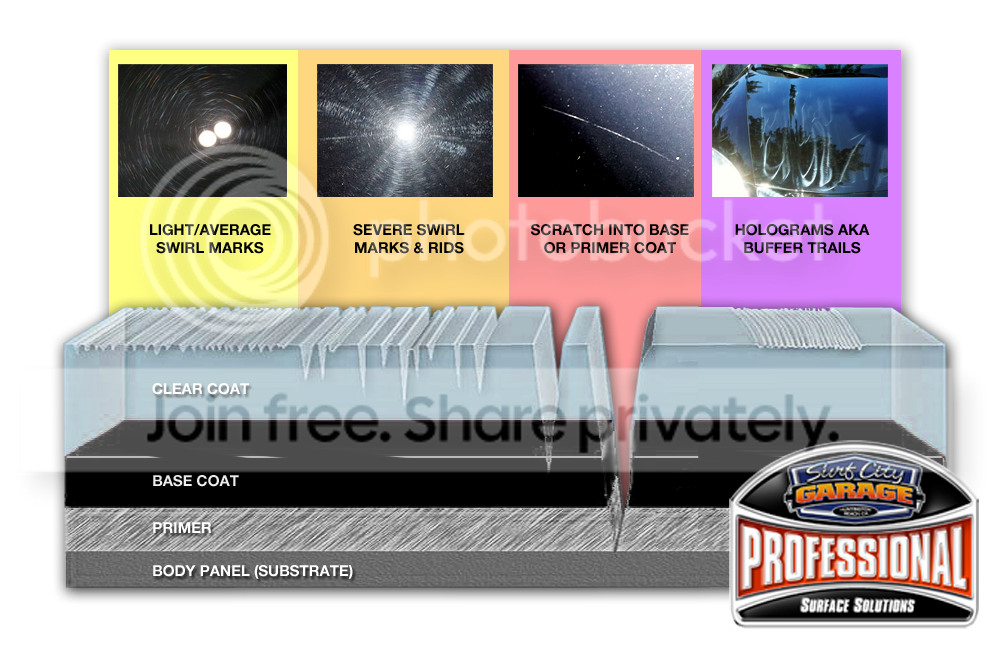
LIGHT / AVERAGE SWIRL MARKS
SEVERE SWIRL MARKS & RIDS
SCRATCH INTO BASE OR PRIMER COAT
HOLOGRAMS AKA BUFFER TRAILS
Once we know the cause and have eliminated it we have to diagnose the issue so that we can provide the "cure". Theres no sense in attacking your paint with a polisher if you don't first understand what you're attempting to fix. In essence the removal of any imperfection means to round off the edges of the damage and remove the surrounding material until the surface is again level, or at least visually level to the nake eye.
Using methods too aggressive for the problem means removal of excess amounts of material or use of methods not aggressive enough mean a waste of effort and time. Also understand that there is a limit to what can be 'buffed out'. When the damage exceeds the depth of the surrounding material you are dealing with a defect that is beyond repair using a polisher.
LIGHT / AVERAGE SWIRL MARKS
These are your common imperfections caused in the wash our wipe down routines. They can vary in the level of severity, but in most cases on average clear coat they should correct with very minimal effort and very mild products/approach. Even those who are meticulous with their wash routines and take the utmost care to prevent damage will still encounter some level of swirls over time just from general use. The key is to understand that its not a question of IF you'll encounter swirls, but WHEN.
SUGGESTED APPROACH: Start with a very mild polish and pad combination and moderate speed setting. This is a situation where you can easily introduce more damage than you remove simply by going to aggressive. Follow the golden rule of detailing and start with the least aggressive method first and work up from there as needed. In cases where you are not using a machine some improvement can be hand by hand, but temper expectations to a reasonable level.
SUGGESTED APPROACH: Start with a very mild polish and pad combination and moderate speed setting. This is a situation where you can easily introduce more damage than you remove simply by going to aggressive. Follow the golden rule of detailing and start with the least aggressive method first and work up from there as needed. In cases where you are not using a machine some improvement can be hand by hand, but temper expectations to a reasonable level.
SEVERE SWIRL MARKS & RIDS
Paint in this condition will certainly require the use of a machine to make any meaningful improvement. Depending on the hardness of the clear and the level of correction desired this may require a multi step correction working down to finer pads and chemicals. RIDS (Random Deep Scratches) may still be present after the swirls are addressed and require more intensive, focused polishing to correct. The presence of RIDS is typically obvious even before swirl removal as they will generally run perpendicular or at opposition to the surrounding damage and be more visible.
SUGGESTED APPROACH: Cutting foam or microfiber pads are recommended, but always test a section first to determine the effectiveness of the pad/polish combination on your machine. You should, at the very least, see a drastic improvement in the visibility of RIDS if they are present, additional passes or more aggressive approaches may be required if they do not improve during the initial swirl removal process.
SUGGESTED APPROACH: Cutting foam or microfiber pads are recommended, but always test a section first to determine the effectiveness of the pad/polish combination on your machine. You should, at the very least, see a drastic improvement in the visibility of RIDS if they are present, additional passes or more aggressive approaches may be required if they do not improve during the initial swirl removal process.
SCRATCH INTO BASE OR PRIMER COAT
Damage this severe will often times require wetsanding and in the case of damage into the primer or substrate will not be repairable without a respray/repaint of the panel. As the saying goes - "You can't fix what isn't there". If a scratch passes into the primer and past the base coat no amount of polishing will completely remove it. The void needs to be filled with paint. Deep scratches into the base coat can be greatly reduced, but typically will leave behind a small trace of their presence as the lack of clear will show as a void.
SUGGESTED APPROACH: Attempt to polish and reduce the appearance of the damage using a cutting pad and moderate to aggressive polishing compound. At the very least rounding the edges of the void will reduce the appearance and make the damage less noticable. Be cautious not to go overly aggressive or polish on the edge of damage where the paint could be peeled from the substrate, making the damaged area larger. If attempting to wet sand be sure that adequate material remains in the adjacent areas.
NOTE: A good rule to follow is the 'fingernail' rule. Generally a scratch that will catch your nail is going to require pretty substantial cutting power to repair or may be too deep to polish out. Its not an exact science, but a quick and gentle pass of your fingernail over a scratch will give you a rough idea of what you'll be up against.
HOLOGRAMS AKA BUFFER TRAILS
The evidence of a job done incorrectly. Holograms are typically caused by poor technique and a pad/polish/speed combination that is too aggressive. Most people have seen this type of damage when a car is fresh out of the bodyshop or has been rotary buffed by an unskilled operator. The good news is that holograms are generally very mild imperfections and can be addressed with even lower power DA tools. Having a hard time telling if you have holograms? Simple focus on one spot of the imperfection and move slowly side to side - if the damage appears to move/shift around as you move you are dealing with holograms. If it appears stationary its just swirl marks or scratches.
SUGGESTED APPROACH: Start with a very mild pad/polish/machine combination. As the visual aid above shows, holograms are typically just tightly packed, very shallow, voids in the clear coat. A light polishing should correct them. In the event they are not improved with one pass attempt a 2nd pass or step the level of pad/polish up to speed up the process.
NOTE: DA and RO polishers are all but incapable of introducing holograms. If you see something that resembles a hologram after polishing wipe the area down with isopropyl alcohol or a surface prep spay. What you are likely seeing is polishing oils.


