


Trans Am LED headlights
Thread Starter
On The Tree
Joined: Jul 2014
Posts: 140
Likes: 2
From: Utah
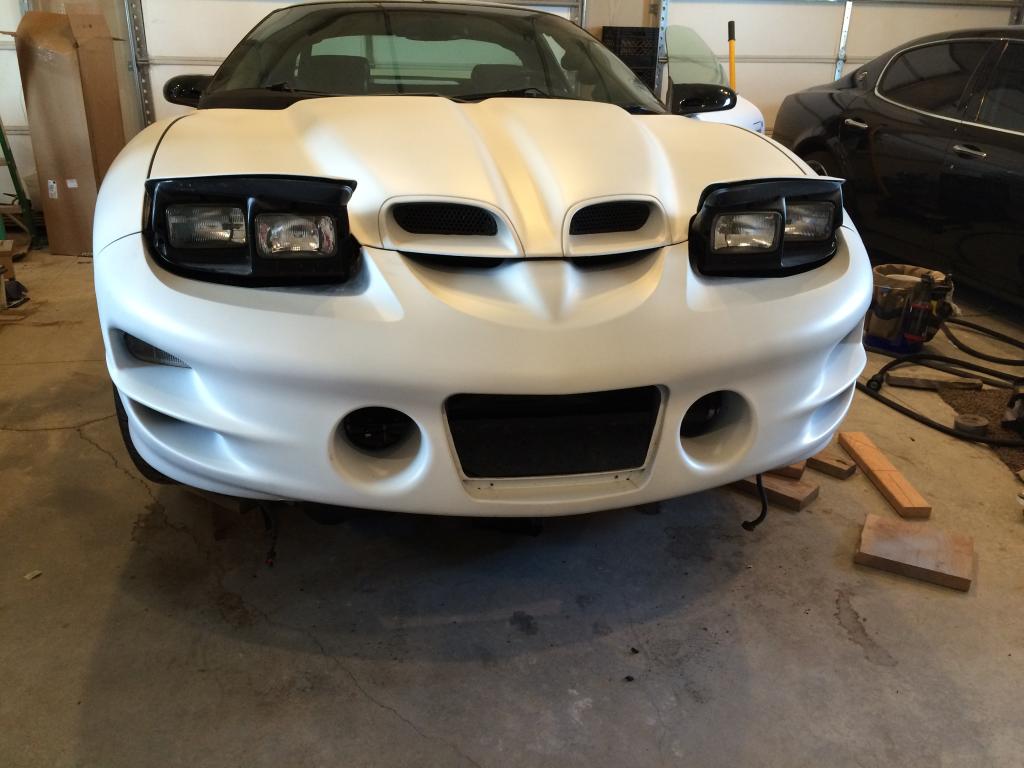
Hey everyone, I just wanted to get on here and share my latest mod. I have definitely never seen this done on a Trans Am before. I’m sure that there will be a lot of people who don’t care for what I have done but I love it! I am huge into lighting, particularly LED lighting. I also live in an area where when nighttime comes around every animal seems to have a personal vendetta against me and want to kamikaze into my vehicles. This mod was done so I could have plenty of light to see incoming danger, and I definitely accomplished my goal with what I have done. I will post a teaser pic of the 95% finished project and then I will do a quick rundown of what I did. I will also apologized ahead of time for the somewhat less than desirable quality of the photos. I’ll throw in some pics of some of my other winter mods I’ve accomplished thus far.

Materials:
-(low beam) 60mm Hella projectors (~$100)
-(high beam) flush mount spot cree LEDs (~$70)
-2 sets of adapter plates from user Tram on eBay (~$120)
-Morimoto 9005 HID kit (~$150)
-necessary hardware
I have read plenty of threads on here about retrofitting projectors into the headlights of our cars. But I’ve seen side by side comparisons of projectors vs the LED’s and the LED's put out far more light. So I decided to attempt to replace the high beam headlight with the flush mount LED’s. Wiring the Morimoto hid kit into the car was pretty straight forward. The hardest part was routing the wires and finding good spots to mount the ballasts.
Here is where I ended up placing the ballasts. They turned out better then I had anticipated. They are extremely sturdy, out of the elements, and fairly hidden. I could have found a better place for my relays but I was happy with placing them on the wheel well.


Last edited by WidowMaker_13; Jun 18, 2015 at 04:02 PM.
Thread Starter
On The Tree
Joined: Jul 2014
Posts: 140
Likes: 2
From: Utah
After getting the hid kit wired in I focused on mounting up my projectors. That was incredibly easy. I took a pair of the plates that Tram sent me and I coated them with Rust-Oleum bedliner. I then purchased the necessary hardware and mounted them right up. They turned right on when I tested them out. The cutoff is very sharp and abrupt. I know that this bothers some people but it doesn�t bother me at all. I actually like it.


Thread Starter
On The Tree
Joined: Jul 2014
Posts: 140
Likes: 2
From: Utah
After getting the projectors installed I turned my focus to my LED high beams. This was much more difficult than simply installing a hid kit and the projectors.
The headlight buckets themselves required quite a bit of modification. In order for the heatsink of the LED to fit into the headlight buckets it needed to be square shaped and big enough to allow the LED to slide back as far as it will go. There comes a point it can’t go back any farther because of the adjuster screws for the headlight lid. The headlight bucket is also cast aluminum so it breaks fairly easy. I just took my time and went slow. I tried to use hand tools as much as possible so I could feel how much I was stressing it. Once it was cut I hit it with a couple coats of black paint. Here is a crappy before and after shot of the headlight buckets.


Once the buckets are modified next the plates that Tram sent need modified so that the LED’s can slide all the way into them. That part was really easy. I didn’t take too much care to make the edges look clean because I knew that they wouldn’t be visible anyway.

The next challenge was that my “flush mount” LED couldn’t sit flush on the plate because as I mentioned before the LED can’t go all the way beck because it hits the adjuster screws. So what I did was I ran my bolts (I had to use different ones, the bolts provided with the LED were not long enough) through the LED and then I threaded two nuts onto each bolt to act as spacers. Again, actual spacers could be used to “look” better, but they won’t be visible anyway. After I threaded the two nuts onto each bolt I attached my adapter plate, slipped on a lock washer and threaded another nut onto the back of the plate to hold the LED to the plate. Once I did that I cut the extra threads from the bolt that protruded past the nut. Space is very tight so I did everything I could to give me clearance. Once all that was accomplished I hit everything with bedliner and then mounted it right up. Space was tight but I got it to go in perfectly. I just took my high beam wiring, cut the connector off, and wired it straight into the LED. The LED’s are small enough that no relays or bigger fuses are necessary. Here are a few pics of the LED’s mounted up.


Thread Starter
On The Tree
Joined: Jul 2014
Posts: 140
Likes: 2
From: Utah
Here is some pictures of the lights on. I personally love how it turned out. Just to give you an idea here is a before and after shot of the stock lights vs my setup. The headlight bezels are not on the car right now because I am still fine tuning and adjusting the angle of the lights. Several feet of snow is preventing me from accomplishing that task lol.


Thread Starter
On The Tree
Joined: Jul 2014
Posts: 140
Likes: 2
From: Utah
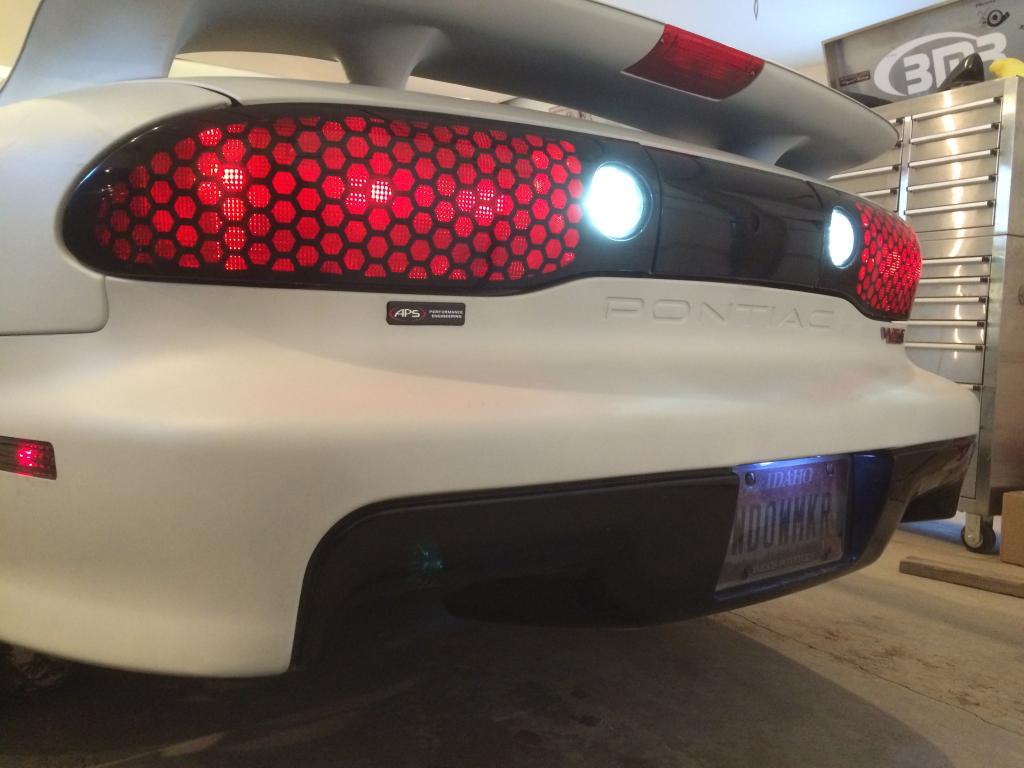
While I was on my lighting kick I decided to continue my black and white theme on the car. As some of you may have noticed the car is not originally white. It is black. The car is actually just plasti-dipped matte white (I love plasti-dip, it is so easy to care for). The black paint is perfect I just wanted a change. Anyway, I purchased smoked corner lights and new DRL lights. When the DRL’s arrived I hit them with Rust-Oleum lens tint. I then cleared them, wet sanded them down, and compounded and polished them. Ill attach a pic that shows just how shiny they are. They look very dark in the pictures but they aren’t jet black. They match the corner lights perfectly.


After that was accomplished I moved to the back of the car. I used finger nail polish remover to get rid of the Trans Am and bird from the filler plate. I then wet sanded and compounded the tails to a brilliant shine. While I was back there I replaced the reverse lights and license plates lights with LED’s. The interior lights will be next but I haven’t gotten to them yet.
Here is a few final pictures. When I finished the lights the gaps when the headlights were closed were horrendous. I spent a lot of time adjusting the adjuster screws and getting the gaps to where I could deal with them.

Everything lit up with my smoked DRL’s and side markers


After that was accomplished I moved to the back of the car. I used finger nail polish remover to get rid of the Trans Am and bird from the filler plate. I then wet sanded and compounded the tails to a brilliant shine. While I was back there I replaced the reverse lights and license plates lights with LED’s. The interior lights will be next but I haven’t gotten to them yet.

Here is a few final pictures. When I finished the lights the gaps when the headlights were closed were horrendous. I spent a lot of time adjusting the adjuster screws and getting the gaps to where I could deal with them.

Everything lit up with my smoked DRL’s and side markers

Thread Starter
On The Tree
Joined: Jul 2014
Posts: 140
Likes: 2
From: Utah
Some of my other winter mods thus far have been to install a Burkhart tubular bumper support, and cut my bumper for an air path to my intercooler. I also bought a used filler plate and cut and modified it to allow airflow. My bumper support allows for foglights but I don’t think I will install them. Id rather the extra airflow.


Oh and my daily got a few goodies a pushbar with a 28” light bar. I will be installing another 28” bar directly above the first. I just haven’t gotten to it yet.


Oh and my daily got a few goodies
a pushbar with a 28” light bar. I will be installing another 28” bar directly above the first. I just haven’t gotten to it yet. 
Trending Topics
Thread Starter
On The Tree
Joined: Jul 2014
Posts: 140
Likes: 2
From: Utah
I dont have any pictures of the outputs at the moment. I took the car out one night and was messing with the lights but I didnt even think to take pictures. Now there is several feet of snow and I dont want to take my car in it so it will be awhile. The LED's i got are spot LED's so they dont go very wide, but they do really reach out far. Overall with both projectors and LED's on they are very bright
LS1 Tech Stories
The Best V8 Stories One Small Block at Time

6 Common C5 Corvette Failures and What's Involved In Repairing Them
Pouria Savadkouei
Retro Modern Bandit Pontiac Trans AM Comes With Burt Reynolds' Autograph
Verdad Gallardo
Top 10 Greatest Cadillac V Series Performance Models Ever, Ranked
Pouria Savadkouei
Top 10 Most Powerful Chevy Trucks Ever Made!

Hennessey's New Supercharged Silverado ZR2 Has 700 HP
Verdad Gallardo
Coachbuilt N2A Anteros Is an LS2-Powered C6 Corvette In Italian Clothes
Verdad Gallardo
Awesome K5 Blazer Restomod Comes With C7 Corvette Power
Verdad Gallardo
10 Camaros You Should Never Buy

10 LS Engine Myths That Refuse to Die
Verdad Gallardo
Thread Starter
On The Tree
Joined: Jul 2014
Posts: 140
Likes: 2
From: Utah
I dont at the moment. Ive had it out but I didnt take any pics. I wont be able to do so until the weather allows it. Id prefer not to take my car out into the snow. The light output is VERY impressive though.
Last edited by WidowMaker_13; Jan 3, 2015 at 12:04 PM.
Thread Starter
On The Tree
Joined: Jul 2014
Posts: 140
Likes: 2
From: Utah


Thread Starter
On The Tree
Joined: Jul 2014
Posts: 140
Likes: 2
From: Utah
Thanks man! I appreciate it.
For everyone asking here are a few pictures I got of the lights at night. They are NOT yet fully adjusted. I just turned my car around and backed it right back into the garage to get a few pictures. The cutoffs on the projectors are very sharp! The light output is incredible compared to stock. Projectors alone are a very worthwhile mod. The photos don't really do justice to just how bright the projectors + LED's are. In the pic with the LED's the snow in front of the car was almost blinding to look at. It is hard to tell in the photos just how much of a difference the LED's make. Plus the photos aren't very accurate because my garage is at a downward angle and the snow piled up across the road was stopping the light and preventing me from seeing how far they can really go.
Projectors

Projectors + LED's

Interesting. I wish you had a stock light on one side to compare with.
How about pics with the light up against a wall.
Can you unplug your low beams and just show how much light is output by the LEDs by themselves?
How about pics with the light up against a wall.
Can you unplug your low beams and just show how much light is output by the LEDs by themselves?
Thread Starter
On The Tree
Joined: Jul 2014
Posts: 140
Likes: 2
From: Utah
Thanks I appreciate it! I love tinkering with the car.
TECH Fanatic
Joined: Sep 2005
Posts: 1,293
Likes: 1
From: Fredericksburg Va
Damn nice work! I hate my lights, but it just looks like soooo much damn work to get it to come to the point you have. I'm going to keep looking cause your work like others is gonna get me interested in changing mine so I can see better at night. You did a great job man!