
Center Console Lid

Thread Starter
Copy & Paste Moderator


Joined: Apr 2002
Posts: 9,764
Likes: 208
From: Eastern MA
I was tired of the broken center console lid so I made a new one.
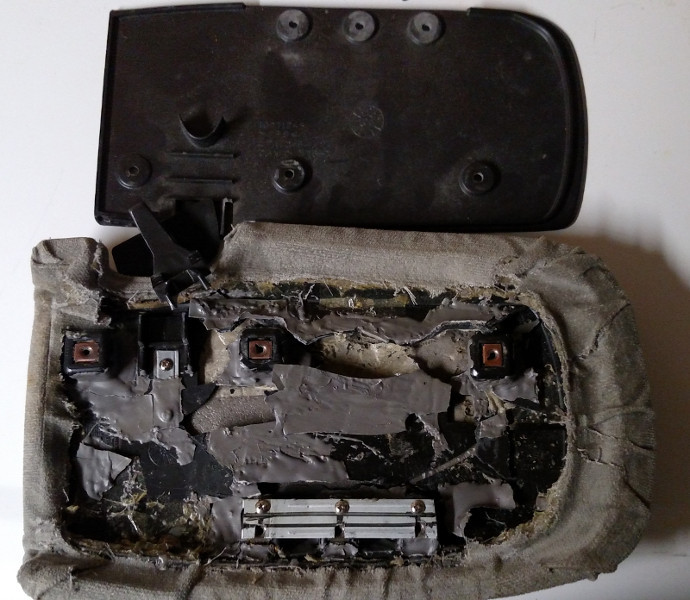
Here is how is looked after a few attempts at repair over the years. Some areas were reinforced with metal and screws. At one point, I used plastic epoxy. Later, after it broke more, I added more metal and screws and JB Weld. It broke more.
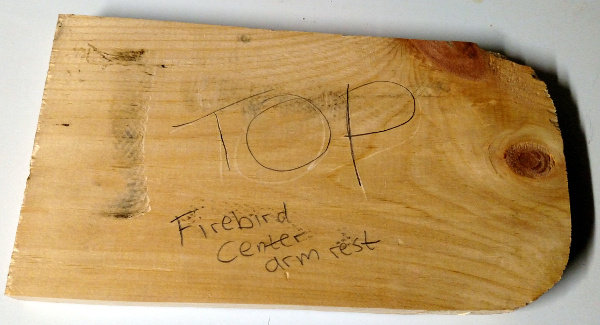
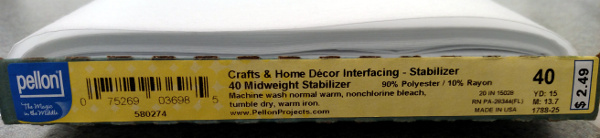
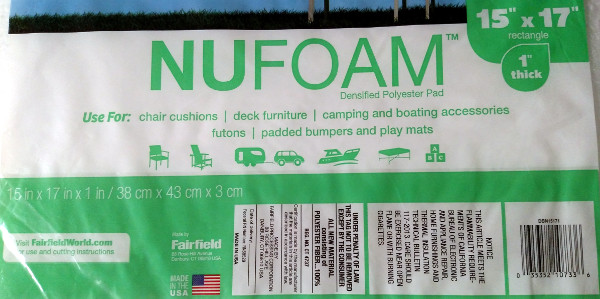
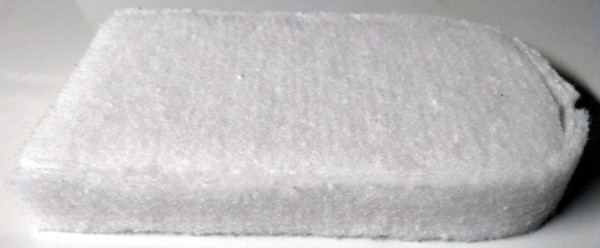
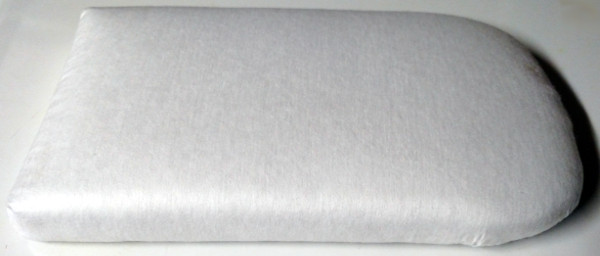
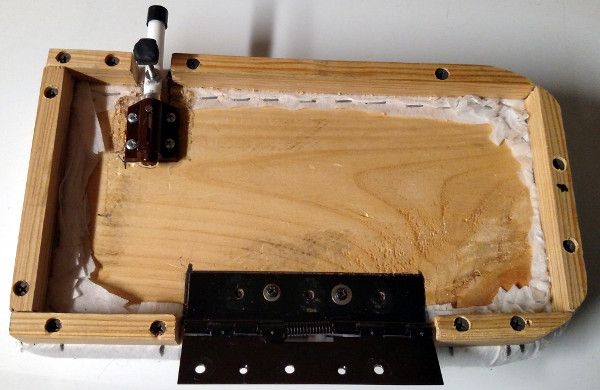
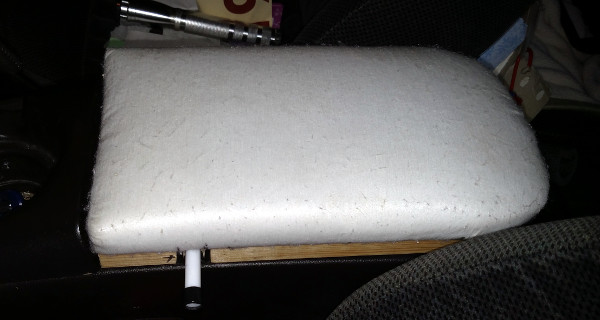
So I got started on building a new center console lid. Here are the materials I started with: Wood, Interfacing, and Batting. The wood was a scrap piece of 1X12 that I had in a pile (I think it is pine). The interfacing I used is not the iron-on kind. It doesn't have any heat-activated adhesive on it. Although the brand name of the batting is "NUFOAM", this isn't foam. Its a synthetic fiber semi-dense batting that doesn't quite have a consistent smooth texture (hard to explain, you can barely see in the pics, there are tiny lumps, but the wrapping I did smoothed it out).
After cutting the wood to the right shape (not the smoothest around the knot, but once wrapped, you can't tell), I started wrapping the top with a layer of batting and the sides with a half thick layer of batting. Then I wrapped the whole thing in 2 layers of interfacing.

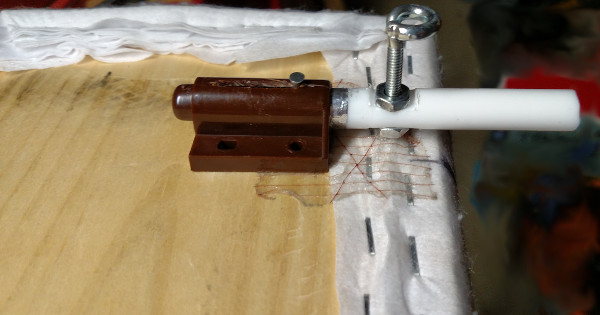
I wanted it to mount and latch the same way as stock. I used the stock spring-loaded hinge, but I had to make my own latch. The brown part of the latch is the body and spring of a spring loaded magnetic cabinet latch. The white part is a piece of a broken white hanger. The spring is set into the white plunger a little (maybe 1/3 length of the spring) via a hole I trilled into the back of the plunger (not visible in pics because it is assembled). The metal loop is an "eye" bolt that I bent (thanks to my brother for that idea) and wrapped the loop (in later pics) with a rubber grommet and heat shrink tubing to add thickness and slight cushion/give. I waited until the console was fully wrapped and test fit before trimming the plunger. The silver visible on the white plunger poking out of the brown latch body is aluminum tape to make up a small difference in thickness for a better fit.
I also added some thing strips around the edge to make the remaining height that I needed.
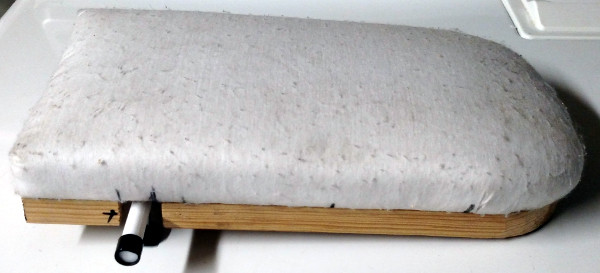
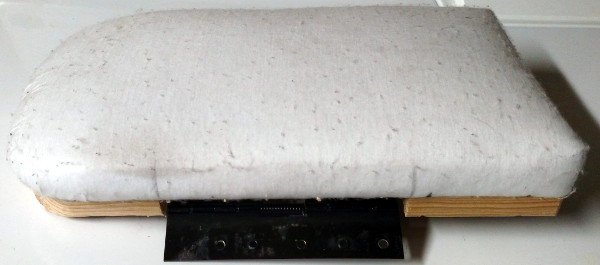
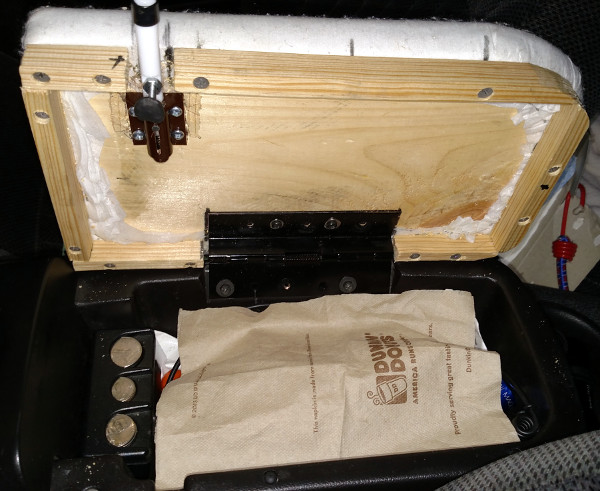
Here is a test fitment in the car.
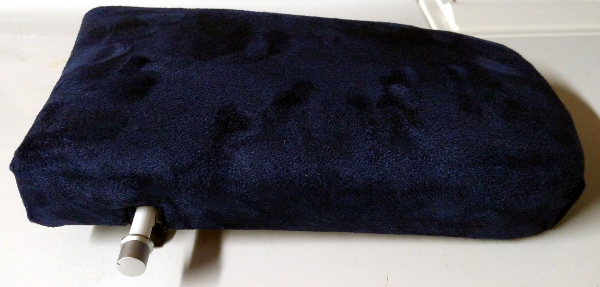
I wrapped the whole thing in one more layer of interfacing, then in dark blue velor/suede fabric. I don't have pics of the final wrap in white interfacing, but here are pics of it wrapped in blue fabric. I trimmed the plunger and added an aluminum shield before wrapping the bottom. The end cap of the latch plunger is a trimmed outer shell of a control **** from a broken PC fan control bay. I trimmed off the flared edge at the back of the ****. The black ring in some pics is part of the inside of the **** that I trimmed to fit on the white plunger.
The area around the plunger was more tricky. I used cut down small nails to secure the fabric, then added another small folded strip over that notched area also secured with small cut down nails. With the latch in place, the small nails are not visible.
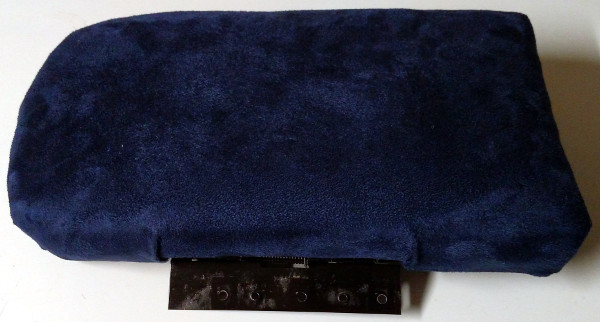
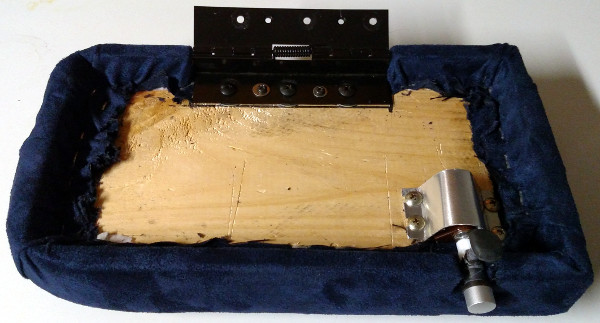
I added 3 wide-headed screws to the the hinge in the remaining 3 holes visible (which were the holes used in the original lid - visible in second pic below). I put wide washers between the hinge and lid (one under each of the three added screws). The wide washers between the hinge and lid were to give slightly more height/space for lid opening/closing when installed in the car. The two thinner screws you see in these pics with the visible washers were just "fitment" screws using existing slightly slotted holes in the hinge which allowed for adjustment before final fitment. In the first pic below, the latch plunger is not yet trimmed, but it is trimmed in the next two pics. I also added a bent strip of aluminum over the latch to smooth the area before the final bottom wrapping and to make sure the fabric doesn't come in contact and interfere with the metal pin that is holding the plunger into the brown latch body (since that pin slides in the groove). The first pic only shows two screws holding the latch, but that was temporary. There are four screws holding the latch in place.
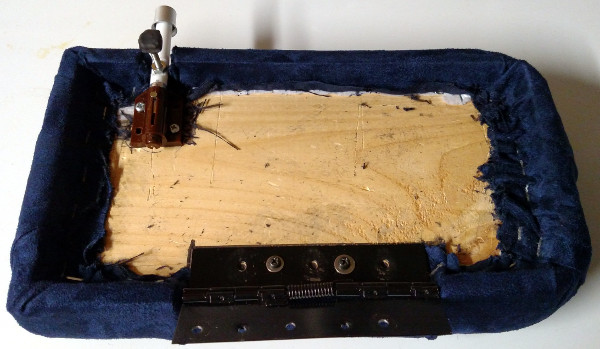
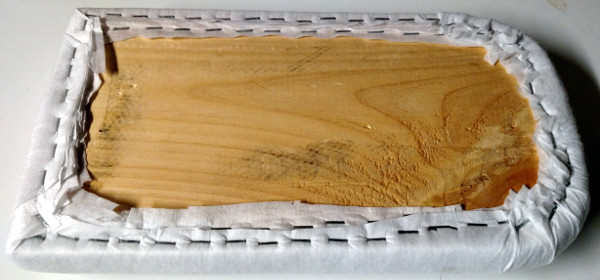
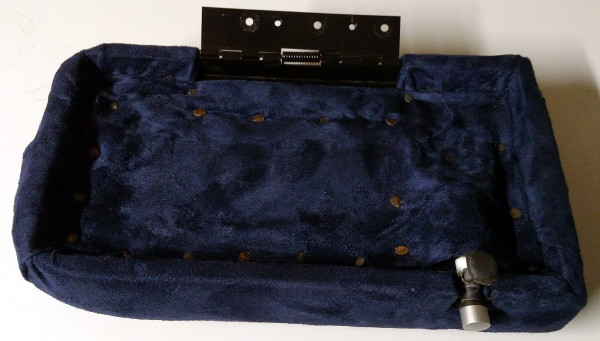
I was using staples to secure the fabric to the base. For this last finishing touch of the bottom, I used carpet tacks. I thought It looked better than staples. This underside cover is more of the same blue material, but with the edges folded over to give better edges. Those folded edges were held folded with duct tape, which is still there, but not visible since it is on the back side facing the wood core of the lid and it is all nailed together now. I should have taken a pic of the folded and taped fabric panel before nailing it in place.
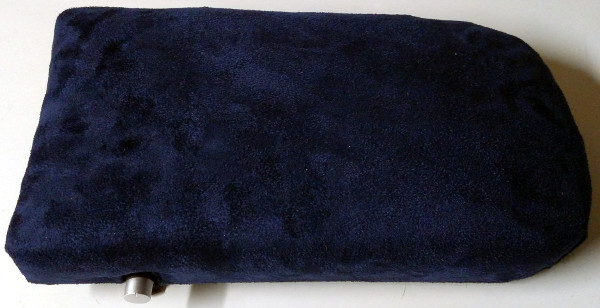
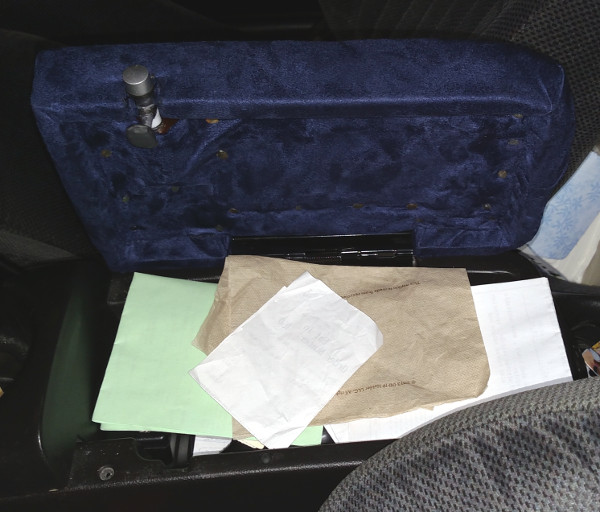
Here it is completed and installed.
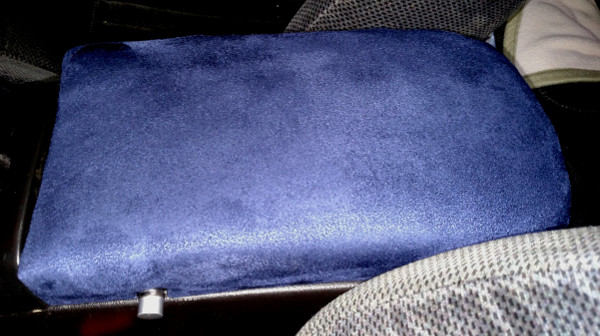
The new lid sits slightly higher than stock which is what I wanted. Plus since the leading edge doesn't have the same slight forward slant as the original, the extra height helps hide that difference.
I can't give a final cost for this project since I already had most of the supplies. I think the only items I bought specifically for this project where the batting, interfacing, eye bolt, and cabinet latch (which I ended up breaking trying to modify it and making a more-suitable plunger for it). That totaled to around $13. However, if I was to do this from scratch, it would most-likely cost $35+ (this material alone can cost $10-$30/yrd depending which version you get, sales/coupons/etc and I got the batting on sale).
Here is how is looked after a few attempts at repair over the years. Some areas were reinforced with metal and screws. At one point, I used plastic epoxy. Later, after it broke more, I added more metal and screws and JB Weld. It broke more.
So I got started on building a new center console lid. Here are the materials I started with: Wood, Interfacing, and Batting. The wood was a scrap piece of 1X12 that I had in a pile (I think it is pine). The interfacing I used is not the iron-on kind. It doesn't have any heat-activated adhesive on it. Although the brand name of the batting is "NUFOAM", this isn't foam. Its a synthetic fiber semi-dense batting that doesn't quite have a consistent smooth texture (hard to explain, you can barely see in the pics, there are tiny lumps, but the wrapping I did smoothed it out).
After cutting the wood to the right shape (not the smoothest around the knot, but once wrapped, you can't tell), I started wrapping the top with a layer of batting and the sides with a half thick layer of batting. Then I wrapped the whole thing in 2 layers of interfacing.
I wanted it to mount and latch the same way as stock. I used the stock spring-loaded hinge, but I had to make my own latch. The brown part of the latch is the body and spring of a spring loaded magnetic cabinet latch. The white part is a piece of a broken white hanger. The spring is set into the white plunger a little (maybe 1/3 length of the spring) via a hole I trilled into the back of the plunger (not visible in pics because it is assembled). The metal loop is an "eye" bolt that I bent (thanks to my brother for that idea) and wrapped the loop (in later pics) with a rubber grommet and heat shrink tubing to add thickness and slight cushion/give. I waited until the console was fully wrapped and test fit before trimming the plunger. The silver visible on the white plunger poking out of the brown latch body is aluminum tape to make up a small difference in thickness for a better fit.
I also added some thing strips around the edge to make the remaining height that I needed.
Here is a test fitment in the car.
I wrapped the whole thing in one more layer of interfacing, then in dark blue velor/suede fabric. I don't have pics of the final wrap in white interfacing, but here are pics of it wrapped in blue fabric. I trimmed the plunger and added an aluminum shield before wrapping the bottom. The end cap of the latch plunger is a trimmed outer shell of a control **** from a broken PC fan control bay. I trimmed off the flared edge at the back of the ****. The black ring in some pics is part of the inside of the **** that I trimmed to fit on the white plunger.
The area around the plunger was more tricky. I used cut down small nails to secure the fabric, then added another small folded strip over that notched area also secured with small cut down nails. With the latch in place, the small nails are not visible.
I added 3 wide-headed screws to the the hinge in the remaining 3 holes visible (which were the holes used in the original lid - visible in second pic below). I put wide washers between the hinge and lid (one under each of the three added screws). The wide washers between the hinge and lid were to give slightly more height/space for lid opening/closing when installed in the car. The two thinner screws you see in these pics with the visible washers were just "fitment" screws using existing slightly slotted holes in the hinge which allowed for adjustment before final fitment. In the first pic below, the latch plunger is not yet trimmed, but it is trimmed in the next two pics. I also added a bent strip of aluminum over the latch to smooth the area before the final bottom wrapping and to make sure the fabric doesn't come in contact and interfere with the metal pin that is holding the plunger into the brown latch body (since that pin slides in the groove). The first pic only shows two screws holding the latch, but that was temporary. There are four screws holding the latch in place.
I was using staples to secure the fabric to the base. For this last finishing touch of the bottom, I used carpet tacks. I thought It looked better than staples. This underside cover is more of the same blue material, but with the edges folded over to give better edges. Those folded edges were held folded with duct tape, which is still there, but not visible since it is on the back side facing the wood core of the lid and it is all nailed together now. I should have taken a pic of the folded and taped fabric panel before nailing it in place.
Here it is completed and installed.
The new lid sits slightly higher than stock which is what I wanted. Plus since the leading edge doesn't have the same slight forward slant as the original, the extra height helps hide that difference.
I can't give a final cost for this project since I already had most of the supplies. I think the only items I bought specifically for this project where the batting, interfacing, eye bolt, and cabinet latch (which I ended up breaking trying to modify it and making a more-suitable plunger for it). That totaled to around $13. However, if I was to do this from scratch, it would most-likely cost $35+ (this material alone can cost $10-$30/yrd depending which version you get, sales/coupons/etc and I got the batting on sale).
Last edited by VIP1; Aug 11, 2015 at 08:59 AM.


