


T/A Blue Gauges - WRITE UP
Thread Starter
Joined: Apr 2004
Posts: 1,458
Likes: 14
From: Vinton, Louisiana
If your have a Trans Am, how would you like blue gauges? I�ve always wanted something different than red ones, but never really took the time to see how to do it till the other day. After doing a lot of research on Camaro gauges versus Trans Ams, I found that they�re very similar in fit. And so, my project begins�.
In this write-up, I am not responsible for any damage you do to your car.
MATERIALS
Camaro Reverse Indiglo Gauges (Pick what style, I have the 2nd one)
http://www.procarparts.com/store-lis...0&cat=3&sub=37
FOUR #74 Blue LED Replacement Bulbs
http://autolumination.com/74.htm
98-up Camaro HVAC & Headlight Switch
E-Bay is your best bet for this or an F-Body Salvage Yard
ONE 5mm Blue LED & 390 Ohm Resistor
Radio Shack is you easiest bet
SPEEDO & TACH GAUGE CLUSTER
Remove the outside bezel of sorts and make sure to unplug your fog light switch. Be careful around the clear lense of the cluster as you can EASILY scratch it. Then, just four 9/32� bolts around the perimeter of the cluster and it pulls out. Also, again, be careful of the clear lense. Once this is out, you can see how to pop the clear lense off. Now it�s time to start cutting up your brand new Reverse Indiglo Camaro Gauges! CAREFULLY cut the sides around where the indicator lights go as well as the very bottom corners. This will be trial and error till you can fit them. I kept putting mine up to my bezel to get them to fit properly before actually installing them. When you have it nice and pretty, slide them on top of your gauges. Get all the needles through the holes and slide it in place. After this, I used some double-sided tape to keep the gauges in place because the connector for them is at the bottom and when I went to install mine they slide around. Now put your lense back on and be careful that all the needles are out of the way before popping it on.
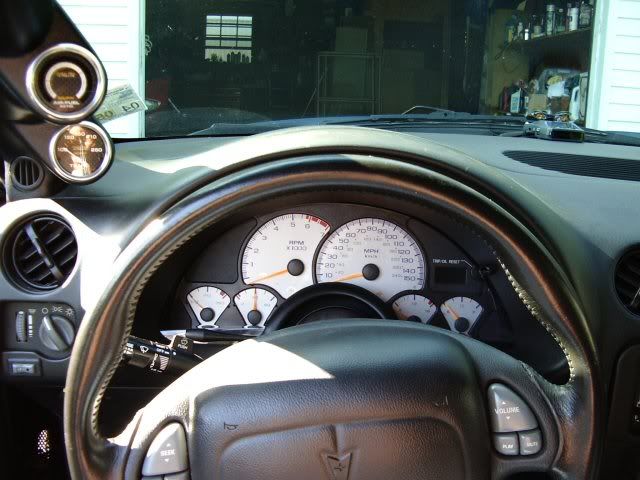
Time to wire up the transformer for your gauges. I wired mine up to my fog light switch for the reason being that the wire was bigger than the parking light switch. I used a Quick Splice connector to tap into the wires. I�m sorry, but I don�t know the color of the wires off hand. Use a multi-meter to test them and tap the proper ones. I mounted the switch under the dash, which will be the next section. Before you install the cluster bezel back, go down to HEADLIGHT SWITCH and do that step, then afterwards you can reverse the above procedure to put the gauges back in the car. Make sure to test them to make sure they work before putting it all back together.
MOUNT DIMMER SWITCH & DISCONNECT STEERING WHEEL BUTTONS
To remove the knee panel, remove the two 9/32� bolts at the bottom, 2 Phillips head screws and remove. Remember to unplug the hatch button as well. If you look by the steering column you will see a set of 4 wires coming out covered in a gray sheath. Follow it and it will follow to a plug. If you cut the gray wire on it and tape it up, that will be the one for the illumination. Since I can�t use my steering wheel controls due to my screen, I just unplugged the entire plug. While under there you can find a place to mount the dimmer/color switch for your gauges. Sorry I have no pictures of where I mounted mine. Before putting the panel back on wait till it�s dark so you can adjust the brightness and color of your gauges to you liking.
HVAC SWITCH
Carefully pop off the bezel around the radio. Remove the two 9/32� bolts on the sides of the HVAC and slide it out. Remove the ***** around the gauge by sliding them off. Then you�ll see a set of tabs on the top and there is also some on bottom. Pop that off and the face will slide right off. Careful of the defroster button and spring. Now you can put the Camaro face on and replace the ***** with the T/A ones or Camaro, you�re choice. If you look on the back of the HVAC, you�ll see 2 little sockets. Unplug those, pull out the stock bulbs and replace with 2 blue #74 LED bulbs. Test them to make sure they work. If they don�t, pull them out and flip 180 degrees in put them back in. Reverse everything to put it back together.
HEADLIGHT SWITCH
Carefully pop out the switch and unplug it all. Remove the dimmer switch from the side, it will just pop off. Now remove the clear plastic around the switch. Twist the actual switch itself and you will be able to remove it. You will see a small circle with a slit in it for the illumination. Using a small flathead screwdriver, remove the bulb. Using a grinding wheel, I ground down my LED to fit inside the hole on the switch itself. Be careful not to go too far and grind on the metal piece inside the LED as that�s for the light.
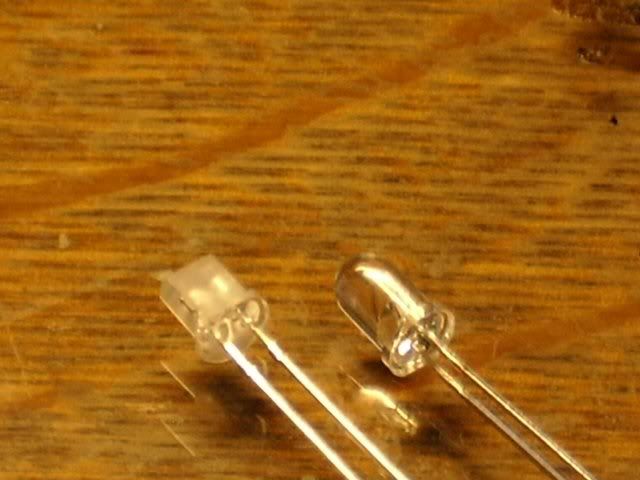
Now you can solder the resistor to the positive side of the LED leg. It will be the longer leg of the 2 on the LED. Now place the LED in the hole on the switch and solder the contacts. The positive contact should be the ones closest to the edge of the switch. Now you can put the switch back together. Peel off the face of your stock switch and off the Camaro switch very carefully and slowly. Put the Camaro face on your Trans Am switch. Now you can plug ALL plugs back into the switch and test. Then push it back in the dash.
DOOR LIGHTS
Remove the Phillips head screw and pop off the door lock cover. Carefully slide off the door handle bezel and remove the bulb in the back. You will need to drill out the red lense inside where the bulb goes. ONLY drill out the bottom of it and leave the top intact so you will have something to lock your socket back in place. This will be trial and error. I�d drill a little bit, check to see if all the red lense was gone with a flash light and keep going until it was. When you have all the red gone you can bring it back to the car. On the socket, remove the #74 bulb and replace it with the #74 blue LED bulb. Verify it works and re-install it back to the door. Repeat on the other door.
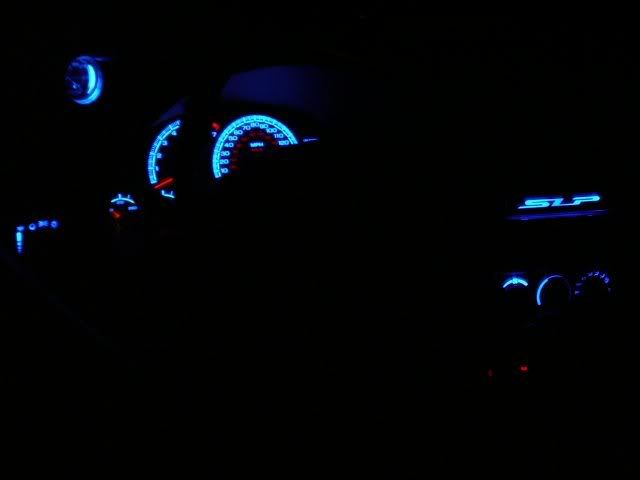
You should be done, wait till night time (or in a garage) to adjust your brightness of the gauges and admire your work!!!
In this write-up, I am not responsible for any damage you do to your car.
MATERIALS
Camaro Reverse Indiglo Gauges (Pick what style, I have the 2nd one)
http://www.procarparts.com/store-lis...0&cat=3&sub=37
FOUR #74 Blue LED Replacement Bulbs
http://autolumination.com/74.htm
98-up Camaro HVAC & Headlight Switch
E-Bay is your best bet for this or an F-Body Salvage Yard
ONE 5mm Blue LED & 390 Ohm Resistor
Radio Shack is you easiest bet
SPEEDO & TACH GAUGE CLUSTER
Remove the outside bezel of sorts and make sure to unplug your fog light switch. Be careful around the clear lense of the cluster as you can EASILY scratch it. Then, just four 9/32� bolts around the perimeter of the cluster and it pulls out. Also, again, be careful of the clear lense. Once this is out, you can see how to pop the clear lense off. Now it�s time to start cutting up your brand new Reverse Indiglo Camaro Gauges! CAREFULLY cut the sides around where the indicator lights go as well as the very bottom corners. This will be trial and error till you can fit them. I kept putting mine up to my bezel to get them to fit properly before actually installing them. When you have it nice and pretty, slide them on top of your gauges. Get all the needles through the holes and slide it in place. After this, I used some double-sided tape to keep the gauges in place because the connector for them is at the bottom and when I went to install mine they slide around. Now put your lense back on and be careful that all the needles are out of the way before popping it on.
Time to wire up the transformer for your gauges. I wired mine up to my fog light switch for the reason being that the wire was bigger than the parking light switch. I used a Quick Splice connector to tap into the wires. I�m sorry, but I don�t know the color of the wires off hand. Use a multi-meter to test them and tap the proper ones. I mounted the switch under the dash, which will be the next section. Before you install the cluster bezel back, go down to HEADLIGHT SWITCH and do that step, then afterwards you can reverse the above procedure to put the gauges back in the car. Make sure to test them to make sure they work before putting it all back together.
MOUNT DIMMER SWITCH & DISCONNECT STEERING WHEEL BUTTONS
To remove the knee panel, remove the two 9/32� bolts at the bottom, 2 Phillips head screws and remove. Remember to unplug the hatch button as well. If you look by the steering column you will see a set of 4 wires coming out covered in a gray sheath. Follow it and it will follow to a plug. If you cut the gray wire on it and tape it up, that will be the one for the illumination. Since I can�t use my steering wheel controls due to my screen, I just unplugged the entire plug. While under there you can find a place to mount the dimmer/color switch for your gauges. Sorry I have no pictures of where I mounted mine. Before putting the panel back on wait till it�s dark so you can adjust the brightness and color of your gauges to you liking.
HVAC SWITCH
Carefully pop off the bezel around the radio. Remove the two 9/32� bolts on the sides of the HVAC and slide it out. Remove the ***** around the gauge by sliding them off. Then you�ll see a set of tabs on the top and there is also some on bottom. Pop that off and the face will slide right off. Careful of the defroster button and spring. Now you can put the Camaro face on and replace the ***** with the T/A ones or Camaro, you�re choice. If you look on the back of the HVAC, you�ll see 2 little sockets. Unplug those, pull out the stock bulbs and replace with 2 blue #74 LED bulbs. Test them to make sure they work. If they don�t, pull them out and flip 180 degrees in put them back in. Reverse everything to put it back together.
HEADLIGHT SWITCH
Carefully pop out the switch and unplug it all. Remove the dimmer switch from the side, it will just pop off. Now remove the clear plastic around the switch. Twist the actual switch itself and you will be able to remove it. You will see a small circle with a slit in it for the illumination. Using a small flathead screwdriver, remove the bulb. Using a grinding wheel, I ground down my LED to fit inside the hole on the switch itself. Be careful not to go too far and grind on the metal piece inside the LED as that�s for the light.
Now you can solder the resistor to the positive side of the LED leg. It will be the longer leg of the 2 on the LED. Now place the LED in the hole on the switch and solder the contacts. The positive contact should be the ones closest to the edge of the switch. Now you can put the switch back together. Peel off the face of your stock switch and off the Camaro switch very carefully and slowly. Put the Camaro face on your Trans Am switch. Now you can plug ALL plugs back into the switch and test. Then push it back in the dash.
DOOR LIGHTS
Remove the Phillips head screw and pop off the door lock cover. Carefully slide off the door handle bezel and remove the bulb in the back. You will need to drill out the red lense inside where the bulb goes. ONLY drill out the bottom of it and leave the top intact so you will have something to lock your socket back in place. This will be trial and error. I�d drill a little bit, check to see if all the red lense was gone with a flash light and keep going until it was. When you have all the red gone you can bring it back to the car. On the socket, remove the #74 bulb and replace it with the #74 blue LED bulb. Verify it works and re-install it back to the door. Repeat on the other door.
You should be done, wait till night time (or in a garage) to adjust your brightness of the gauges and admire your work!!!
Last edited by InfiniteReality; Feb 1, 2006 at 12:14 PM.
RIP April 14, 2008
Joined: Aug 2004
Posts: 1,603
Likes: 0
From: the land where cars repeatedly hit my bumper when I'm in the store...
damnthat looks fantastic. I am thinking about overhauling my interior in blue or green/blue interior LED's. Thanks for the excellent write up.
Brad
Brad

On The Tree
Joined: Feb 2004
Posts: 193
Likes: 0
From: Central, Fl
Originally Posted by Diolar Magnum
damnthat looks fantastic. I am thinking about overhauling my interior in blue or green/blue interior LED's. Thanks for the excellent write up.
Brad
Brad
Trending Topics
TECH Fanatic
Joined: Aug 2004
Posts: 1,326
Likes: 1
From: NW Houston/Nacogdoches, Texas
Originally Posted by InfiniteReality
thanks!
I don't see why not. Just leave your stock faces on and swap out the bulbs. Swap out the bulbs behind the gauges too.
I don't see why not. Just leave your stock faces on and swap out the bulbs. Swap out the bulbs behind the gauges too.
Do you know of any good places to pick up the bulbs, and do you know part numbers?
LS1 Tech Stories
The Best V8 Stories One Small Block at Time

6 Common C5 Corvette Failures and What's Involved In Repairing Them
Pouria Savadkouei
Retro Modern Bandit Pontiac Trans AM Comes With Burt Reynolds' Autograph
Verdad Gallardo
Top 10 Greatest Cadillac V Series Performance Models Ever, Ranked
Pouria Savadkouei
Top 10 Most Powerful Chevy Trucks Ever Made!

Hennessey's New Supercharged Silverado ZR2 Has 700 HP
Verdad Gallardo
Coachbuilt N2A Anteros Is an LS2-Powered C6 Corvette In Italian Clothes
Verdad Gallardo
Awesome K5 Blazer Restomod Comes With C7 Corvette Power
Verdad Gallardo
10 Camaros You Should Never Buy

10 LS Engine Myths That Refuse to Die
Verdad Gallardo
Thread Starter
Joined: Apr 2004
Posts: 1,458
Likes: 14
From: Vinton, Louisiana
I'm not sure, I don't remember. Just use a test light or multimeter to check. Also you can run leads off your LED and just into the dash light wire on the harness. It's way easier than soldering it to those contacts.
Thread Starter
Joined: Apr 2004
Posts: 1,458
Likes: 14
From: Vinton, Louisiana
Originally Posted by 1998TA__1991RS
so i could run it to a posative lead then just ground it somewhere else?
I've had mine installed for 9 months now and I have zero hot spots and I don't expect any to appear.


Originally Posted by 1998TA__1991RS
ok i got a blue 5mm led (5 volt,30mA,300mcd), the only resistor i could find that was close was 330ohm. is this going to work? do i need a brighter led?
 I had to buy some blue leds from ledgauges.com. I think the guy to look up on here is like LS1_SS or something. Anyways these leds from him are 12,000 mcd. I thought that they might be too bright and show hot spots but they don't. It was $2 a led + coulpe dollars shipping