





need help with new reverse glow gauges

Thread Starter
TECH Addict
iTrader: (8)
Joined: Aug 2005
Posts: 2,541
Likes: 2
From: Spartanburg, SC
 need help with new reverse glow gauges
 idk if this if this should go here or the stereo/electronics section. i order a set of silver reverse glow gauges and a carbon fiber bezel to go over it. the gauges did not come with instructions on how to wire them up or take the neeles off or anything, just came with the gauges. can someone give me the basics of how to do this? i know you gotta connect to a 12 volt source and also ground it, but where has everyone wired this at? also, wheres the best place for the little box, and the switch w/ the ****?
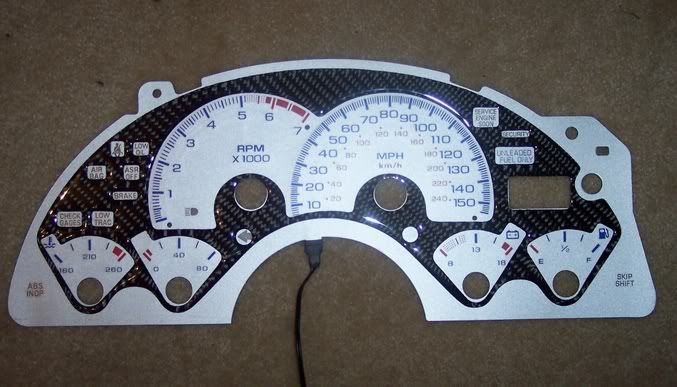
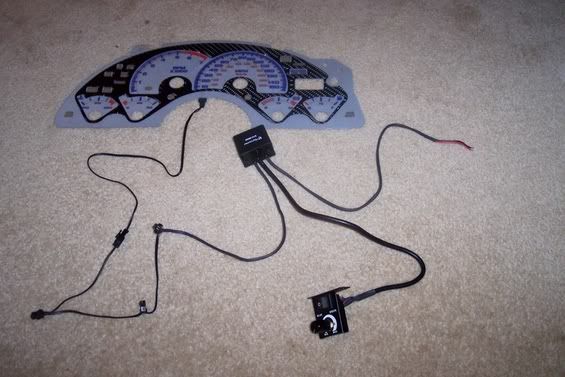
i feel sorry for you. i bought the same one, just not carbon fiber or whatever. my needles are now all kinds of messed up and no one can seem to give me any advice on how to make them work properly now, theyre a bit off.
Thread Starter
TECH Addict
iTrader: (8)
Joined: Aug 2005
Posts: 2,541
Likes: 2
From: Spartanburg, SC
ive heard just crank your car up.......draw a pic of the eaxact position each needle is in. then once the gauges are in, crank the car up again and place the needles in the same spot once the car is runnin. sound right?
You want your car warmed up at operating tempurature. Drive it down the road at 55mph(or any easy to remember speed) and make note of where your RPM's are at. At idle I took a digital picture of where the needles were at for reference so I could put them back in the right spots. To take off the needles use a fork and go underneath the needle center and gently pry up. As for where to put the ****, that's up to you and the space you have to put it. You'll want to wire the positive to the switched lead on the parking light switch. You'll need a voltmeter to check which one is switched with the parking lights.
I bought those same gauges (without the CF bezel) about a year ago and still haven't put them in. Anyone want to take them off my hands? 
Anyways, I've also heard to just make note of where the needles are and re-place them afterwards.
Anyways, I've also heard to just make note of where the needles are and re-place them afterwards.
Trending Topics
Thread Starter
TECH Addict
iTrader: (8)
Joined: Aug 2005
Posts: 2,541
Likes: 2
From: Spartanburg, SC
believe it or not.....i took the needles out and once they were back on, they all went back to their original positions. now i just gotta wire everything up and mount the switch. still having trouble finding the parking light switch....where is it located and does anyone know what color? i've got a test light to double check once i find it.
LS1 Tech Stories
The Best V8 Stories One Small Block at Time

Gas Monkey Built a 6-Wheel Ferrari Testarossa With a Corvette LT4 Engine
Verdad Gallardo
7 Most Reliable High-Performance Engines GM Has Ever Built
Verdad Gallardo
Amazing '71 Camaro Restomod Is Modern Muscle Car Under the Skin
Verdad Gallardo
6 Common C5 Corvette Failures and What's Involved In Repairing Them
Pouria Savadkouei
Retro Modern Bandit Pontiac Trans AM Comes With Burt Reynolds' Autograph
Verdad Gallardo
Top 10 Greatest Cadillac V Series Performance Models Ever, Ranked
Pouria Savadkouei
Top 10 Most Powerful Chevy Trucks Ever Made!

Hennessey's New Supercharged Silverado ZR2 Has 700 HP
Verdad Gallardo
Coachbuilt N2A Anteros Is an LS2-Powered C6 Corvette In Italian Clothes
Verdad Gallardo
Originally Posted by GETGONE
Umm...do you not have a headlight switch? Pull that out and check for a wire that gets 12V when you turn on the parking lights and tap into it.
Thread Starter
TECH Addict
iTrader: (8)
Joined: Aug 2005
Posts: 2,541
Likes: 2
From: Spartanburg, SC
i've got everything done now......the 12 volt source i used was the grey wire (headlight switch). right next to it was a black wire that would never light the test light up, so i figured it was a ground, i was right. the wires are right next to each other so it was very easy. now my rpm gauge is actin up....it is a little delayed when i rev, and sometimes get stuck. also, the speedo needle doesnt move at ALL. do i need to put it on at the correct speed while im driving ? il post pics up when i get everything back in there tomorrow.

TECH Enthusiast

Joined: Sep 2005
Posts: 588
Likes: 0
From: Ohio
Just for future reference, YOU DO NOT NEED TO REMOVE THE NEEDLES. This should avoid the pain in the *** of taking pictures,making marks and all of that bull ****. With patience, I slipped my glow gauges right over all of them without removing the needles. Start from the left two needles point them up,slip on, then the RPM and MPH needles same thing, then the two on the left for last. There you go! No problems, work just as good as before.
It depends on the gauge cluster whether or not you can get the overlay on with the needles still on. I tried to do this in my Sonoma but they way they were layed out there was no way to get them all started and have the room to get it over the larger center part of the needle.
As for the RPM and speedo, make sure you DO NOT have them pushed on too tight. If you get them too far on they will bind on the new overlay and stick or not move at all. Pull them off a bit and try again and see if they work. You'll want to check your speed and RPM against what you noted before putting the overlay on to make sure they are in the correct spots.
As for the RPM and speedo, make sure you DO NOT have them pushed on too tight. If you get them too far on they will bind on the new overlay and stick or not move at all. Pull them off a bit and try again and see if they work. You'll want to check your speed and RPM against what you noted before putting the overlay on to make sure they are in the correct spots.


You must not have wired it up right. If you wire it into your parking light wire, it will turn on when you turn the lights on. How did you wire it that you were even able to turn it on and off manually?
wow this post got revived from the grave...2005
Like the above post wire it to the parking light wire and there should be no need to have to always turn them on manually. I have the same gauge kit and i wired it into the automatic headlight fuse, so the gauges come on like the factory ones did
Like the above post wire it to the parking light wire and there should be no need to have to always turn them on manually. I have the same gauge kit and i wired it into the automatic headlight fuse, so the gauges come on like the factory ones did


Yep! The generic directions suck, but they are clear to wire to the parking lights (brown wire behind the headlight switch).
Just did this last night and I like it!! Matches my Eclipse HU perfectly!
Just did this last night and I like it!! Matches my Eclipse HU perfectly!
