When you click on links to various merchants on this site and make a purchase, this can result in this site earning a commission. Affiliate programs and affiliations include, but are not limited to, the eBay Partner Network.
What's up guys? It's finally time to jump head first into my 4l60e rebuild. I am pretty confident but I'm sure things will change once I'm actually into it hands on. Hopefully this is a short thread lol but have already ran into a bump. Removed bell housing, tail shaft and pan then pulled the filter out to find a bunch of metal shavings. Looks to be a possible bushing that let loose.....?
Any help that you smart guys are willing to provide along the way will be much appreciated. I'm absolutely mechanically inclined but like the title says I'm a absolute rookie to this so stick with me lol. Thank you in advance
Welp, figured out where all the metal was coming from.
Forward sprag assembly is burnt and has heat marks all over it. 3-4 clutch pack is done but the forward clutch pack is absolutely dismantled and the forward sprag cage was twisted. What would cause the forward clutches to take such a beating but the 3-4 just looks like a toast clutch pack? forward clutches and steels
That thin metal in the input drum are strips from the clutches
the picture below is a forward clutch and the forward steels have massive grooves in them
Last edited by 98CayenneT/A; Mar 15, 2016 at 08:28 PM.
Your showing pictures of the 2 Overrun Clutches that sit below the Forward Clutches.
The Overruns cannot apply in D4/4th gear or the overruns burn down, The Forwards, 3-4's & Band will show distress...Like GMCSIERRA5.3 stated, Torn inner forward piston lip seal, Cracked piston (Should be bonded steel in '98 though). A Cracked input drum is another possibility.
You stated the Forward Sprag is hurt...Is it locked down in both directions?
How is the rear stator bushing? And the Inner Stator Sleeve?
My apologies for giving the wrong info, it is the over runs that are dismantled. I was a little taken back when i saw them and should of payed more attention when giving a description in my post. All bushings so far look good which some were replaced as the one on the stator with my last rebuild (local shop) about 10,000 mi. ago
what's left of the overruns
The forward sprag still turns in one direction and locks in the other as it should, just had massive heat discoloring or maybe it's normal.....? This forward sprag has the sun gear attached meaning 99+ right ?
forward sprag
Last edited by 98CayenneT/A; Mar 16, 2016 at 12:13 AM.
Went back to the garage to take the rest of the input drum apart and found a crack in the piston. Thank you GMCSIERRA5.3 and clinebarger for making me aware of what I should be looking for
crack in forward piston
LS1 Tech Stories
The Best V8 Stories One Small Block at Time
Topdon ONE vs. Artidiag 800 BT2: Which is the Diagnostic Tablet For You?
Pouria Savadkouei
Gas Monkey Built a 6-Wheel Ferrari Testarossa With a Corvette LT4 Engine
Verdad Gallardo
7 Most Reliable High-Performance Engines GM Has Ever Built
Verdad Gallardo
Amazing '71 Camaro Restomod Is Modern Muscle Car Under the Skin
Verdad Gallardo
6 Common C5 Corvette Failures and What's Involved In Repairing Them
Pouria Savadkouei
Retro Modern Bandit Pontiac Trans AM Comes With Burt Reynolds' Autograph
Verdad Gallardo
Top 10 Greatest Cadillac V Series Performance Models Ever, Ranked
Pouria Savadkouei
Top 10 Most Powerful Chevy Trucks Ever Made!
Hennessey's New Supercharged Silverado ZR2 Has 700 HP
Verdad Gallardo
Coachbuilt N2A Anteros Is an LS2-Powered C6 Corvette In Italian Clothes
With a cracked piston and so much other damage, I would be concerned about damage to the input drum. I recall Frank @PerformaBuilt saying that when you tap it should sound like a clean bell. As a DIYer, unlike Clinebarger and GMCSIERRA who are pros, I'd probably replace it with a good used one as we don't have the experience to fully evaluate it.
I recommend that the Sonnax input drum reinforcement kit be installed in all rebuilds; during the process also pull out the input shaft and reinstall it with Loctite. This kit now comes with a custom overrun piston which will works with the new-style steel forward piston.
When I saw the metal, I immediately suspected the forward sprag. Although you should replace it, you should also take it apart to confirm the source of the metal.
I just disassembled the forward sprag and besides the heat marks on the outside everything looks brand new. Bushings look good (which I will check again when assembling), outer reece is perfectly smooth, sprag clutch also looks good, no flat spots anywhere. I will probably roll with it unless seriously advised not to....
I also plan on pushing the input shaft out of the drum and reinstalling with thread lock as I have seen you mention.
One thing I am struggling to find is the input reinforcement kit. I have looked since seeing you mention it in previous threads but all I see is unavailable, probably a rookie error not knowing exactly where to look. Would ya mind pointing me in the right direction?
Last edited by 98CayenneT/A; Mar 16, 2016 at 11:16 AM.
Also what causes the forward piston to crack? Excessive heat, line pressure or another issue? In general with my somewhat untrained eye everything looks to be fine generally speaking (bushings, no torn seals/o rings ect) besides the 3-4 and forward clutches and band having excessive wear (there is still some clutch material left on some but not much)
Last edited by 98CayenneT/A; Mar 16, 2016 at 02:25 PM.
Info about the forward sprag given to me by PBA. I don’t think he will mind me sharing it.
The later 29 element sprag from Borg Warner has wider elements PN is A74658D (Transtar number). The elements are 12.7% wider than the normal BW sprag. It is a "dual cage" and one of the cages is nylon, and the other has bronze guides instead of the steel ones. It must be used with a 4L60E overrun hub. You should grind in 6 oil slots on the bronze guide that faces the overrun hub for better oiling like the steel guides have. Use the steel guide as a "template" for adding the oil slots. I have used these for when the normal sprag has been problematic.
The inner race must have no wear and must be perfectly flat and have a "mirror" finish. The outer race should be flat and rough. Use 36 grit sand paper and sand it in the direction of rotation by rolling it across a wooden bench and do it about 15 - 20 times. Rinse with solvent and blow it off with high pressure air.
Info about the forward sprag given to me by PBA. I don�t think he will mind me sharing it.
The later 29 element sprag from Borg Warner has wider elements PN is A74658D (Transtar number). The elements are 12.7% wider than the normal BW sprag. It is a "dual cage" and one of the cages is nylon, and the other has bronze guides instead of the steel ones. It must be used with a 4L60E overrun hub. You should grind in 6 oil slots on the bronze guide that faces the overrun hub for better oiling like the steel guides have. Use the steel guide as a "template" for adding the oil slots. I have used these for when the normal sprag has been problematic.
The inner race must have no wear and must be perfectly flat and have a "mirror" finish. The outer race should be flat and rough. Use 36 grit sand paper and sand it in the direction of rotation by rolling it across a wooden bench and do it about 15 - 20 times. Rinse with solvent and blow it off with high pressure air.
I think the kit im going with, https://www.700r4l60e.com/store/prod...&cat=55&page=1 comes with the 29 element sprag.
So in the first picture is the inner race and should be smooth. The second picture is the outer race and is the one you're talking about to run sandpaper on. Correct? And the last picture is my used sprag
The aluminum forward pistons were prone to crack. That is why GM changed to the steel pistons.
Your sprag assembly/gears/housing looks OK, but I would still replace the actual sprag with the BW unit mentioned. A good kit should include it.
You still need to figure out where the metal in the pan came from.
I figured the metal in the pan was shavings from the dismantled 2 overrun clutches shown in post #4 and #7. Or is that not possible? When I got past the forward clutch pack and to the overruns there were strips of metal and random thin shavings and the overrun clutches were warped, twisted. The clutch that is in post #4 laying on the table coned is the one where all the metal came from
Last edited by 98CayenneT/A; Mar 16, 2016 at 03:11 PM.
Here is a little better picture of the overruns. The steels have deep grooves in them. The metal on the clutches totally came apart and coned, especially the one on the left. After taking apart the input drum, the metal I found in the pan was exactly like what I found in the input drum like what's laying there in the picture
I think the kit im going with, https://www.700r4l60e.com/store/prod...&cat=55&page=1 comes with the 29 element sprag.
So in the first picture is the inner race and should be smooth. The second picture is the outer race and is the one you're talking about to run sandpaper on. Correct?
This is the kit I just ordered. I'm no transmission expert but Dana at Pro-Built Automatics is very knowledgeable and helped me out. I already pulled the trans and will start tearing it down this weekend. I also already have the kit and I can provide feedback on the kit once I start it this weekend.
I think the kit im going with, https://www.700r4l60e.com/store/prod...&cat=55&page=1 comes with the 29 element sprag.
So in the first picture is the inner race and should be smooth. The second picture is the outer race and is the one you're talking about to run sandpaper on. Correct? And the last picture is my used sprag
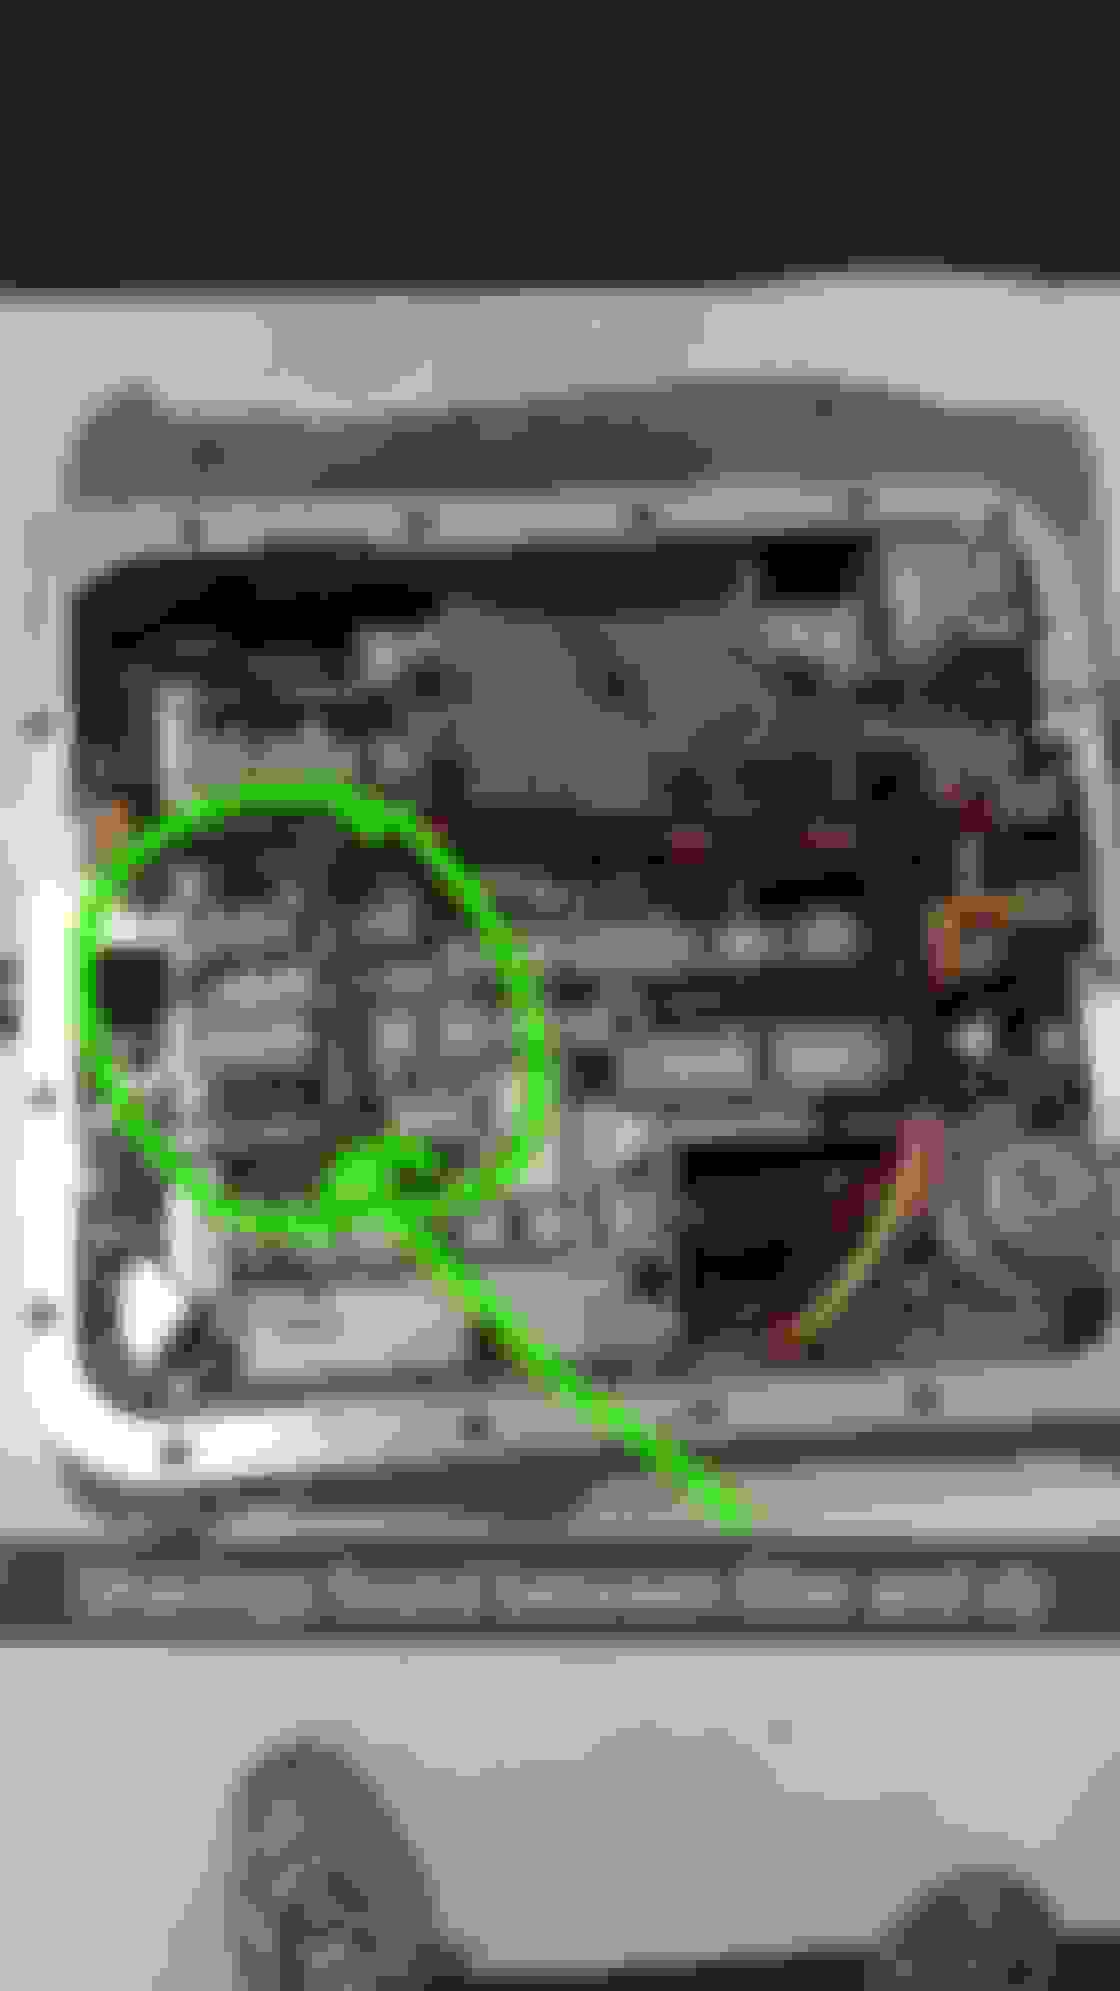
HOLD ON!
It looks like you have a Sonnax Smart Shell & a Sonnax Performance Pack Shift Kit, Note the Wave Spring on top of the Pinless 2nd accumulator piston in your picture.
Is there a "Check Valve" above the 3rd Accumulator check ball?
.490" O-ringed Boost Valve?
Purple Pressure Regulator spring?
Purple Primer spring?
Plugged PWM hole in the Plate (Only hole plugged)
Accumulator Valve Spring Shim? Take that out & throw it away!
Pinless 4th & Forward Pistons?
One piece TCC PWM Regulator Valve? (No Isolator Valve).
If the shift kit is all there & installed correctly, You don't need the Trans Go HD-2 in the rebuild kit above,
And if you do want to use the HD-2....You got to pull Sonnax Servo Release Check Valve out, It does not work well with TG's recommended Plate orifice sizes. You cannot use the Pinless 2nd Accumulator piston with TG accumulator springs.
I personally would reuse the Sonnax Shift Kit & the Smart Shell, In my opinion Both are excellent products albeit expensive, But it seems you already have them.
Sonnax updated the Reinforcement Kit to work with a Bonded Steel Forward Piston, Not that I ever had an issue with using a Bonded piston with their older kit or using Aluminum Overrun Pistons with Bonded Forward Pistons in general. The new Sonnax part# is 77733-51K, Runs about $65-$70.
Your Sprag Assembly looks serviceable, with a new sprag. PBA's instructions that Bbond posted is solid advice.
Clean all the burnt clutch material off & make sure ALL lube holes are clear!
Replace the Torrington bearing that the Sprag Assembly rides on.
Also Replace the Overrun Return spring assembly, The Torrington & Return Springs got subjected to a ton of severe heat.
Clean the Input Drum really well & carefully inspect for cracks, Tap the drum with a wrench while holding the Input Shaft, It will make a very CLEAR Long Lasting bell sound if no cracks are present, Replace the 3-4 check ball capsule.
But as mrvedit pointed out...Buying a New Drum is a safer approach for a beginner, My cost at a Local GM dealer is around $125.
You will need a new/good used Forward Clutch Apply Plate, Does NOT come in steel modules. If the Forward Backing plate has hot spots, Replace. Good time to order a Thicker one if the Forwards were a little loose.
Replace the 3-4 Apply & Backing Plate 100%.
Gas Monkey Built a 6-Wheel Ferrari Testarossa With a Corvette LT4 Engine
Slideshow: The controversial Ferrari F6 swaps its original flat-12 for a Corvette Z06-derived LT4 V8 and sends power to four rear wheels through a custom-built drivetrain.
7 Most Reliable High-Performance Engines GM Has Ever Built
Slideshow:These GM engines didn't just make huge power, they survived abuse, boost, track days, and six-digit mileage with a reputation for refusing to quit.
6 Common C5 Corvette Failures and What's Involved In Repairing Them
Slideshow: From wobbling harmonic balancers to failed EBCMs, these are the issues that define long-term C5 ownership and what repairs typically involve.
Retro Modern Bandit Pontiac Trans AM Comes With Burt Reynolds' Autograph
Slideshow: A modern Camaro transformed into a retro icon, this limited-run "Bandit" build blends nostalgia with brute force in a way few revivals manage.
Top 10 Greatest Cadillac V Series Performance Models Ever, Ranked
Slideshow: Cadillac didn't just crash the high-performance luxury vehicle party, it showed up loud, supercharged, and occasionally a little unhinged...
Coachbuilt N2A Anteros Is an LS2-Powered C6 Corvette In Italian Clothes
Slideshow: A one-off sports car that looks like a vintage Italian exotic-but hides a C6 Corvette underneath-just sold for the price of a new mid-engine Corvette.