

1st ever 4l60e Teardown 4WD to 2WD conversion 4l65e
 06-17-2018, 04:14 PM
#61
Launching!
Thread Starter

Join Date: Sep 2016
Posts: 254
Likes: 0
Received 0 Likes
on
0 Posts
Here we go.
Sorry for delays. Mad couple of weeks.
1) If you dont like music you might want silent. Just figured I'd add some basic editing. More to follow shortly.
Servo checkball leak test
Sorry for delays. Mad couple of weeks.
1) If you dont like music you might want silent. Just figured I'd add some basic editing. More to follow shortly.
Servo checkball leak test
 06-17-2018, 06:09 PM
#63
Launching!
Thread Starter
Join Date: Sep 2016
Posts: 254
Likes: 0
Received 0 Likes
on
0 Posts
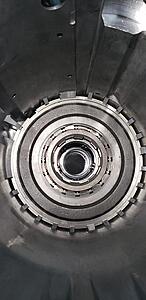
Messed up and deleted my video of the low/reverse clutches and silencer and roller. sucks as couldnt work out how to recover it after an hour so giving up.
So heres a pic.
So heres a pic.
 06-17-2018, 08:40 PM
#64
Launching!
Thread Starter
Join Date: Sep 2016
Posts: 254
Likes: 0
Received 0 Likes
on
0 Posts
2WD shaft is in together with shell/planetary/reaction shaft etc.
Guess tomorrow Ill start on the input drum and 3/4 clutches only being replaced ........... unless you guys see any problems so far.
Guess tomorrow Ill start on the input drum and 3/4 clutches only being replaced ........... unless you guys see any problems so far.
06-21-2018, 07:21 AM
#65
Launching!
Thread Starter
Join Date: Sep 2016
Posts: 254
Likes: 0
Received 0 Likes
on
0 Posts
Well didnt get any further yet - wok up yesterday to pics of my moms travel trailer flipped and destroyed .... been dealing with that - but they are ok.
I ordered the VB end plugs and boost valve (sonnax).
Side question
Whats this band ?
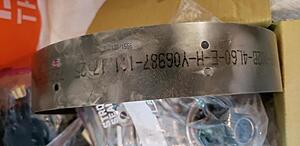
I tried looking up the serial/numbers but cant find anything.
Videos useful in following any mistakes ?
I ordered the VB end plugs and boost valve (sonnax).
Side question
Whats this band ?

I tried looking up the serial/numbers but cant find anything.
Videos useful in following any mistakes ?
 06-21-2018, 10:06 AM
#67
 06-21-2018, 11:53 AM
#68
Launching!
Thread Starter
Join Date: Sep 2016
Posts: 254
Likes: 0
Received 0 Likes
on
0 Posts
Yeah not sure. Super lucky the suv didnt tip ......
This was in australia.
The car was heavily loaded - jeep cherokee (diesel) to keep weight out of the trailer. Was a Geist caravan made by some LMC spinoff.
Apparently he was driving along and were a little close to the inner lane so he pulled down a little sharper than normal and that set it off.
They have been travelling around the contry in that setup for the last 10 years ... no issues.
06-21-2018, 12:20 PM
#69


Well didnt get any further yet - wok up yesterday to pics of my moms travel trailer flipped and destroyed .... been dealing with that - but they are ok.
I ordered the VB end plugs and boost valve (sonnax).
Side question
Whats this band ?

I tried looking up the serial/numbers but cant find anything.
Videos useful in following any mistakes ?
I ordered the VB end plugs and boost valve (sonnax).
Side question
Whats this band ?
I tried looking up the serial/numbers but cant find anything.
Videos useful in following any mistakes ?
06-21-2018, 12:29 PM
#70
Launching!
Thread Starter
Join Date: Sep 2016
Posts: 254
Likes: 0
Received 0 Likes
on
0 Posts
Yup - everything in the trans looks stock - just not sure what the replacement model would be.
Debating about running the old band ..... but was going to see how thick it was compared to OEM if I could.
Debating about running the old band ..... but was going to see how thick it was compared to OEM if I could.
06-21-2018, 12:50 PM
#71
TECH Junkie
Don't run the old band. A new one is maybe $15. Upgraded extra wide carbon band is maybe 30 bucks.
No matter which band you use, you need to check the reverse input drum for straightness and heat spotting.
It's usually a good idea for a performance build to just get a new reverse input but you definitely don't HAVE to.
I have a couple units out there that I built that have reused drums holding 500+ to the tire. Just check it with a straight edge and make sure before using it.
06-21-2018, 12:58 PM
#72
Launching!
Thread Starter
Join Date: Sep 2016
Posts: 254
Likes: 0
Received 0 Likes
on
0 Posts
Don't run the old band. A new one is maybe $15. Upgraded extra wide carbon band is maybe 30 bucks.
No matter which band you use, you need to check the reverse input drum for straightness and heat spotting.
It's usually a good idea for a performance build to just get a new reverse input but you definitely don't HAVE to.
I have a couple units out there that I built that have reused drums holding 500+ to the tire. Just check it with a straight edge and make sure before using it.
No matter which band you use, you need to check the reverse input drum for straightness and heat spotting.
It's usually a good idea for a performance build to just get a new reverse input but you definitely don't HAVE to.
I have a couple units out there that I built that have reused drums holding 500+ to the tire. Just check it with a straight edge and make sure before using it.
I thought reusing the band would potentially make sense as both surfaces are essentially mated together - I had read using a wide band on a drum with a oem band can sometimes create issues - not sure if real or not.
Not really a performance build - just a stock ~ 275-300HP shaft swap with new 3/4 clutches. Im totally happy to have it out at least 1 more time if it comes down to it. This was really just to do the shaft swap for my LS swap.
Assume if I grab a new OEM band anything from a regular auto parts supplier will work ....... even a local napa etc ? Just give them the year of truck.
Any tips on checking clearances - and adjustment I think I saw a thread a while back - something about a washer thickness ... but its not in my notes (head).
Anyone watch the videos ? Thought that would help see what I am doing .... but if not of any value - much easier to just take pics.
06-21-2018, 01:43 PM
#73
TECH Junkie
Drum and everything in the trans looks about as new/straight/clean as I think you can find. I checked cursory with the straight edge but will pay more attention when I get to install.
I thought reusing the band would potentially make sense as both surfaces are essentially mated together New Bands do "seat" during the first 100 or so miles, but not "mated" to the drum - I had read using a wide band on a drum with a oem band can sometimes create issues - not sure if real or not. It will if the drum is warped. If its a straight drum then it wont.
Not really a performance build - just a stock ~ 275-300HP shaft swap with new 3/4 clutches. Im totally happy to have it out at least 1 more time if it comes down to it. This was really just to do the shaft swap for my LS swap.
Assume if I grab a new OEM band anything from a regular auto parts supplier will work ....... even a local napa etc ? Just give them the year of truck. Yes any new band should be fine.
Any tips on checking clearances assemble servo without seals and o rings. Put in case. Check in-and-out play. After you have clearance set, assemble with seals and o rings and toss it back in - and adjustment I think I saw a thread a while back - something about a washer thickness Transgo has washers that come with every shift kit. They go between the intermediate housing and the servo cover (the 2 pieces with o rings). You can use them to set clearance. If you don't have them, you can weld a ball on the tip of the servo pin to add length. Grind down to set clearance where you want it. If the stock pin is too tight for clearance, you can grind the tip as well. ... but its not in my notes (head). Target .060 servo travel for clearance
Anyone watch the videos ? Thought that would help see what I am doing .... but if not of any value - much easier to just take pics.
06-21-2018, 03:27 PM
#75
I did. Probably the first diy rebuild I saw in video. They're short and to the point, not rambling on bs. I like it much better than pictures.
 06-25-2018, 06:49 AM
#77
Launching!
Thread Starter
Join Date: Sep 2016
Posts: 254
Likes: 0
Received 0 Likes
on
0 Posts
So this is turning out to be the slowest rebuild in history ....... sorry about that ....... going to try and get back on it ........... just got back from 3rd weekend in GA in last 5 weeks - 10 hour drive each way and then the drama with parents and bunch of other excuses !!
I'll get the 3/4 clutches set and check clearances .... as well as some VB/pump parts coming today/tomorrow ..... (boost/plugs) etc
06-26-2018, 07:50 PM
#78
Launching!
Thread Starter
Join Date: Sep 2016
Posts: 254
Likes: 0
Received 0 Likes
on
0 Posts
Whats the most accurate way to set 3-4 end clearance.
I stacked dry and measured with feeler gauge. Anything over about 0.45" starts to get snug .. but I can push a 0.70 in there.
I then pulled the dial gauge out and did a test similar to
Problem is it again felt like 0.40" on gauge with moderate pressure but if I crank on the pressure a bit as much as 0080.
Think air test ? I believe the answer is just where its fairly snug under the snap ring or under the top plate but not where its hard to get in.
But not 100% sure on making sure Im accurate dry.
06-27-2018, 06:58 AM
#79
TECH Junkie
I like to assemble dry, air check with about 30-40 psi a couple times just to make sure stuff seats, then use 2 feeler gauges at the same time, opposite to each other to make sure things are even.
Like with any feeler gauge, you're looking for a slight drag. I target .003-.005 per friction.
Once you have your clearance set, you can soak clutches if you prefer to do so, and reassemble.
Like with any feeler gauge, you're looking for a slight drag. I target .003-.005 per friction.
Once you have your clearance set, you can soak clutches if you prefer to do so, and reassemble.
06-30-2018, 11:28 AM
#80
Launching!
Thread Starter
Join Date: Sep 2016
Posts: 254
Likes: 0
Received 0 Likes
on
0 Posts
0.060 with air and about 0.065 with feeler
dry
think I'll dissasemble and replace 4 of the 7 clutches with 0.67 part# 74001D instead of the 7x0.062 part #0.062
that should bring me to around 0.040 dry ... seems like a good middle ground for 300hp