Fluidampr Installation on LS6 CTS-V
 05-11-2012, 01:50 PM
#1
TECH Enthusiast
Thread Starter
iTrader: (4)
Join Date: Jun 2009
Location: Portland, OR
Posts: 574
Likes: 0
Received 0 Likes
on
0 Posts
Fluidampr Harmonic Balancer Installation – Cadillac CTS-V
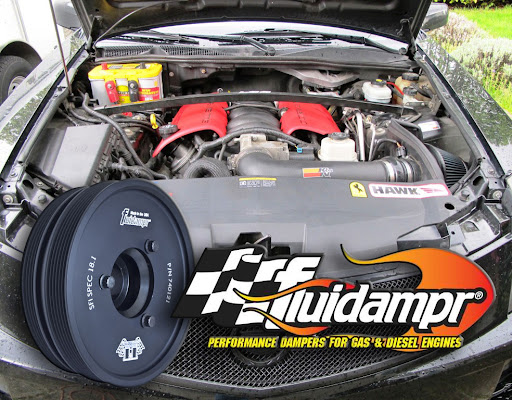
Everyone loves a motor that purrs. The factory does a fantastic job of making modern cars idle buttery smooth – even high performance variants (such as the V variants of the Cadillac models) are subject to the same standards. When horsepower junkies get their hands on these high performance models, we feel that where the factory left off, is a great starting point for us. After a few modifications, the car is definitely outside the realm of factory specifications. The case with this V model, after the addition of long tube headers, new high performance LS7 clutch, and super stiff motor mounts, the buttery smoothness is all but gone, truly transforming this Cadillac into a 4 door Corvette. One of the primary drivers for installing the Fluidampr was to address the vibrations felt at 2,000-2,250 RPM with the mods, most likely brought by the UMI motor mounts. One of the key selling feature of the Fluidampr, from Vibratech TVD, a Horschel Company, is that it is made in the USA. The damper utilizes a silicone fluid between the damper housing and the inertia ring to quell the vibrations from the eight combustion events every two crank rotations.
The torsional damper works to prevent:
• Crankshaft Cracking or Failure
• Excessive Bearing Wear
• Excessive Gear Wear or Failure
• Broken Accessory Drives
• Throwing or Slapping of Belts
Installing the Fluidampr on the 2004-2005 CTS-V with the LS6, requires your basic garage tools – sockets, ratchets, pliers, screwdrivers, as well as a few KEY specialty tools and items:
• LS specific harmonic balancer installer tool (balancer bolt is a 16mm X 2.0)
• 3-Jaw Harmonic balancer puller
• Torque wrench with a 240+ ft. lb capacity
• New OE harmonic balancer bolt (not a tool, but a must have)
• GM approved Dex-Cool coolant (if you don’t want to reuse the collected coolant)
Most parts-store balancer installation tool will not work with the LS motor, as the 16mm balancer bolt goes deep into the crankshaft. I did not realize that until I had the stock balancer off, and had to have a friend / Cadillac tech / fellow forum member bring his installer over (he had to go back to the shop to go get it). So, let that be a lesson learned for you guys. Also note – this is a good time to replace the upper and lower radiator hoses since you have everything apart.

First step is the easiest part. Drive onto a set of ramps – you’ll need to remove the undertray to access the lower radiator hose and decouple the AC condenser.

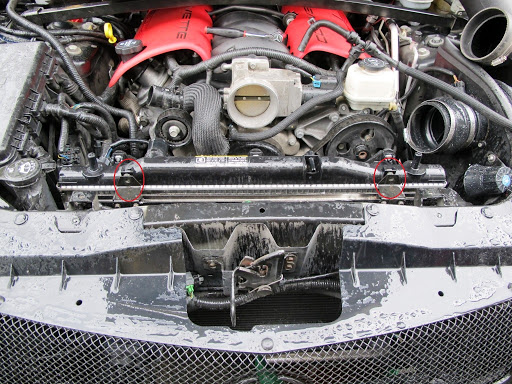
After removing the front engine cover to expose the radiator, undo the bolts that secure the radiator (circled in red) to the core support.

Remove the air intake tube from the filter to the throttle body. Then grab the pliers and remove all the coolant lines into the radiator (circled in red).
Then separate the AC condenser from the radiator. Two of the four bolts are circled in red.

A pair of dykes (cable cutters) are used like the back end of a claw hammer to remove the push pins that secure the bottom tray to the V. Use it pry, not to cut.

Slide a catch pan underneath the V, and disconnect the lower radiator hose. Be prepared to catch the coolant, or take a bath!

After the coolant is drained, remove the lower AC condenser bolts, unhook 1 AC line clamp, and 2 fan electrical connectors, freeing the radiator from the car. Note – the red circles indicate the AC condenser attachment points.

Put a ratchet up to the two tensioners to remove the main serpentine belt and the AC belt.

Put the Caddy in gear, set the parking brake, grab a socket, and the biggest breaker bar you can find. Throw a fender cover or towel over the right side fender, and pull back with all you got. It will rock the car when you are breaking the bolt loose, but keep going. Keep the original bolt, as you’ll need it later. Note – some oil will weep out of the hole when you pull he bolt.
Everyone loves a motor that purrs. The factory does a fantastic job of making modern cars idle buttery smooth – even high performance variants (such as the V variants of the Cadillac models) are subject to the same standards. When horsepower junkies get their hands on these high performance models, we feel that where the factory left off, is a great starting point for us. After a few modifications, the car is definitely outside the realm of factory specifications. The case with this V model, after the addition of long tube headers, new high performance LS7 clutch, and super stiff motor mounts, the buttery smoothness is all but gone, truly transforming this Cadillac into a 4 door Corvette. One of the primary drivers for installing the Fluidampr was to address the vibrations felt at 2,000-2,250 RPM with the mods, most likely brought by the UMI motor mounts. One of the key selling feature of the Fluidampr, from Vibratech TVD, a Horschel Company, is that it is made in the USA. The damper utilizes a silicone fluid between the damper housing and the inertia ring to quell the vibrations from the eight combustion events every two crank rotations.
The torsional damper works to prevent:
• Crankshaft Cracking or Failure
• Excessive Bearing Wear
• Excessive Gear Wear or Failure
• Broken Accessory Drives
• Throwing or Slapping of Belts
Installing the Fluidampr on the 2004-2005 CTS-V with the LS6, requires your basic garage tools – sockets, ratchets, pliers, screwdrivers, as well as a few KEY specialty tools and items:
• LS specific harmonic balancer installer tool (balancer bolt is a 16mm X 2.0)
• 3-Jaw Harmonic balancer puller
• Torque wrench with a 240+ ft. lb capacity
• New OE harmonic balancer bolt (not a tool, but a must have)
• GM approved Dex-Cool coolant (if you don’t want to reuse the collected coolant)
Most parts-store balancer installation tool will not work with the LS motor, as the 16mm balancer bolt goes deep into the crankshaft. I did not realize that until I had the stock balancer off, and had to have a friend / Cadillac tech / fellow forum member bring his installer over (he had to go back to the shop to go get it). So, let that be a lesson learned for you guys. Also note – this is a good time to replace the upper and lower radiator hoses since you have everything apart.
First step is the easiest part. Drive onto a set of ramps – you’ll need to remove the undertray to access the lower radiator hose and decouple the AC condenser.
After removing the front engine cover to expose the radiator, undo the bolts that secure the radiator (circled in red) to the core support.
Remove the air intake tube from the filter to the throttle body. Then grab the pliers and remove all the coolant lines into the radiator (circled in red).
Then separate the AC condenser from the radiator. Two of the four bolts are circled in red.
A pair of dykes (cable cutters) are used like the back end of a claw hammer to remove the push pins that secure the bottom tray to the V. Use it pry, not to cut.
Slide a catch pan underneath the V, and disconnect the lower radiator hose. Be prepared to catch the coolant, or take a bath!
After the coolant is drained, remove the lower AC condenser bolts, unhook 1 AC line clamp, and 2 fan electrical connectors, freeing the radiator from the car. Note – the red circles indicate the AC condenser attachment points.
Put a ratchet up to the two tensioners to remove the main serpentine belt and the AC belt.
Put the Caddy in gear, set the parking brake, grab a socket, and the biggest breaker bar you can find. Throw a fender cover or towel over the right side fender, and pull back with all you got. It will rock the car when you are breaking the bolt loose, but keep going. Keep the original bolt, as you’ll need it later. Note – some oil will weep out of the hole when you pull he bolt.
 05-11-2012, 01:51 PM
#2
TECH Enthusiast
Thread Starter
iTrader: (4)
Join Date: Jun 2009
Location: Portland, OR
Posts: 574
Likes: 0
Received 0 Likes
on
0 Posts

Put the 3-jaw puller on the factory balancer, and pull it out. Note – a standard 2-ton 3-jaw puller is not big enough, as it will spin the threads off the puller. Ask me how I know.


Here are a few photos that compare the factory harmonic balancer to the Fluidampr.
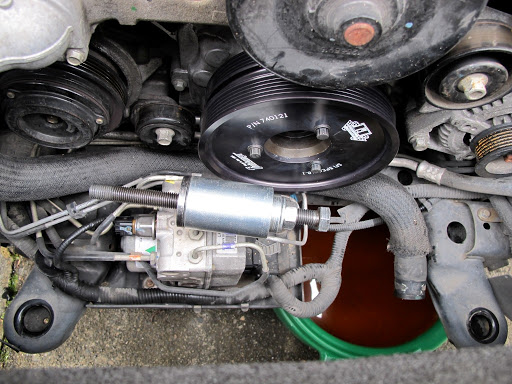
Slide the Fluidampr onto the crankshaft. Here’s a photo of the installer tool that Hunter Sylvester (Ecotech88fiero on the forums) hand carried to my house - gotta love the V Community! This particular installer tool is made by Mac Tools – there are other ones you can find online for about $50. Some people have been able to slide a balancer onto the crank snout far enough to where the threads on the balancer bolt will reach the crank. In the case of this installation, the bolt did not reach crank. (It was over a ˝” away from even being able to start the bolt.)

Slide the installer tool, and go to town on it. You’ll feel it get snug when it bottoms out on the crank. Note – do NOT use a hammer If you don’t have the proper tool. You could dent the balancer or snout, and install it off center/cockeyed.
Using a hammer during installation will void the Fluidampr warranty.
Use the original balancer bolt, and torque it to 240 ft-lbs. Then remove it, as you’ll replace it with the new factory bolt.
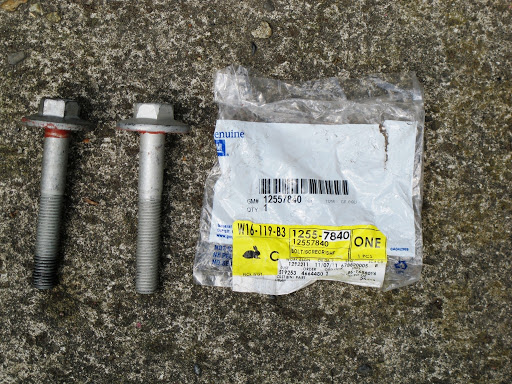
Grab the new OE bolt, and torque it to 40 ft-lbs. These are torque to yield bolts (meaning that there is plastic deformation in the metal, so it cannot be re-used).
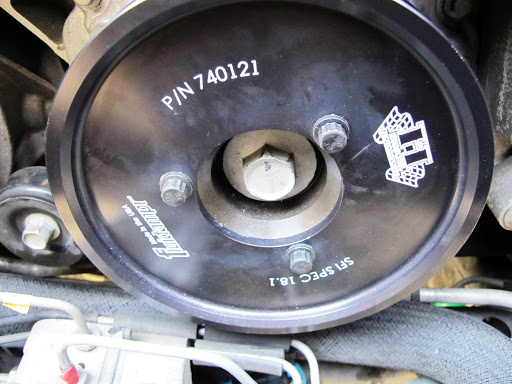
After tightening the new bolt to 40 ft-lbs, mark the bolt with a pen. You’ll torque it an additional 140 degrees. Using a protractor, mark the starting point on the balancer, and the stopping point. In this case, it starts pointed to the “1” in the part number, and the stopping point is the “F” in the “SFI.” This registered 265 ft-lbs on my torque wrench.

Re-install the belts in reverse order (AC first, then main serpentine).
Last edited by DrSpeed; 05-11-2012 at 02:02 PM. Reason: Image link error
05-11-2012, 01:53 PM
#3
TECH Enthusiast
Thread Starter
iTrader: (4)
Join Date: Jun 2009
Location: Portland, OR
Posts: 574
Likes: 0
Received 0 Likes
on
0 Posts

Drop the radiator back in, reinstall the 4 bolts that hold the condenser to the radiator. Reconnect all the wiring to the electric fans, and AC line support clamp.

The radiator hoses all go back on, along with the radiator brackets to secure it back to the core support. Double check all the spring loaded hose clamps are positioned correctly so you don’t blow a hose off later. Reinstall the lower hose, and the lower tray as well.
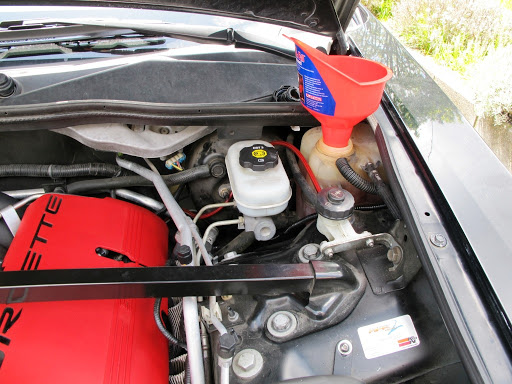
Last but not least, top off the coolant reservoir with DexCool coolant. You can use the coolant collected in the catch pan, or 2 gallons of diluted coolant. Let the Caddy warm up, and burp out all the air in the system.

Last but not least, use the supplied decal, and apply it to the V! Rumor has it that each decal is worth 5 HP!
Now, go take the V out for a test drive. Make sure there the V is not leaking any coolant before calling it done! More about the test drive – I had high expectations after installing a Fluidampr in my 800 HP, Cummins powered Ford with compound turbos (800 HP Diesel Truck Sled Pulling), the Cadillac simply purred. The engine idles significantly smoother, and revving it into the problematic 2,000-2,250 RPM where the vibrations were, it took away about 80% of the vibrations. Taking it out on the freeway, running the motor from near idle and wrapping it all the way up to redline, the engine feels more like a Cadillac again. The smoothness is there again, and that will definitely help with engine longevity. If I had to do it all over again, it would be a no brainer. Guys with more modifications would easily reap more rewards (like those with an aftermarket cam and some headwork).
As for the installation, evident from the step by step tutorial above, I would rank the difficulty a 3/10. Outside of the few specialty tools, there’s nothing too terribly difficult to remove, install, or dial in. If you can change a set of brake pads, you can install the Fluidampr. All said and done, if it weren’t waiting for Hunter to bring by the installer tool, the entire process from start to finish, would have taken less than 3 hours. And this was done outside, in the rain (it is Seattle, after all), with hand tools.
And if you want to know more about the truck, I’m here to answer those questions too.
Hi res photos are here:
Link to Hi Res Photos
Fluidampr’s Contact Information:
http://www.fluidampr.com/
180 Zoar Valley Road
Springville, NY 14141
(716) 592-1000 phone
05-11-2012, 02:42 PM
#4
TECH Fanatic
Excellent write up and review...def something that I will be looking into since I hate the vibes. Do they offer an OD option? What was the cost of the one you installed? Thanks!
05-11-2012, 02:50 PM
#5

Good install thread. Question and a comment that I'm going to relay from Shane at Thunder Racing:
- The balancer bolt: what size is it, and do you know off-hand whether it's the same bolt on the LS2 CTS-V? If not, I'll see if I can figure it out via a brute force search on GMPartsDirect.
- Shane @ Thunder Racing says (AFAIK), from his personal experience, ATI > SLP > Fluidampr. In his opinion, it's almost not worth spending the money on the SLP and Fluidampr parts--essentially, if you're going to run a harmonic damper, you should be putting that money toward an ATI Superdamper (which will run you about $500).
Personally, I don't have the experience to say either way, but I literally *just* got my ATI Superdamper in the mail and will be posting up an install thread (with cam) later on.
Last edited by FuzzyLog1c; 05-11-2012 at 04:36 PM.
05-11-2012, 03:21 PM
#6
TECH Enthusiast
Thread Starter
iTrader: (4)
Join Date: Jun 2009
Location: Portland, OR
Posts: 574
Likes: 0
Received 0 Likes
on
0 Posts
Price ranges are what you can get online - I've seen it from $340-380.
RE: bolt, the thread pitch is 16mm x 2.0. You can use a 24 mm or 15/16" socket to tighten it.
RE: Shane's personal experience. Not sure how to comment on that. Fluidampr and ATI are both SFI rated, so we know that it meets the same stringent standards. As for one being better than another, I'm basing my experience on how well it worked on my truck. That's significantly more modified than the V (cams, head work, turbos, valve springs, 150 lb dual disc clutch - and the motor spins to 4,000 RPM).
Translating that to the V, I expected the same, and I was happy with the results.

Trending Topics
05-11-2012, 04:46 PM
#8
TECH Enthusiast
Thread Starter
iTrader: (4)
Join Date: Jun 2009
Location: Portland, OR
Posts: 574
Likes: 0
Received 0 Likes
on
0 Posts
Yep - watch me speed shift that tranny....<haha>
http://youtu.be/AoALtb6gSJE
Need it when for the sled pulls. 5th gear launch in 4 Low - basically pin the throttle wide open, and slip the clutch!
http://youtu.be/AoALtb6gSJE
Need it when for the sled pulls. 5th gear launch in 4 Low - basically pin the throttle wide open, and slip the clutch!
05-11-2012, 05:23 PM
#9
There are only two lengths of balancer bolts for the Gen 3/4 motors, the LS7/9 (dry sump) bolt and the wet sump (LS-everything else) bolt.
I had a new GM bolt break right at the thread/shank junction @ 6400. Not a pretty sight.
A much better choice is an ARP bolt @ around $30. The wet sump bolt is PN 234-2503 (4.325" UHL) and the dry sump bolt is PN 234-2504 (5.225" UHL). They install at 250 lb/ft, have a 200,000 psi tensile strength and are reusable.
05-11-2012, 06:11 PM
#12
Good install thread. Question and a comment that I'm going to relay from Shane at Thunder Racing:
- The balancer bolt: what size is it, and do you know off-hand whether it's the same bolt on the LS2 CTS-V? If not, I'll see if I can figure it out via a brute force search on GMPartsDirect.
- Shane @ Thunder Racing says (AFAIK), from his personal experience, ATI > SLP > Fluidampr. In his opinion, it's almost not worth spending the money on the SLP and Fluidampr parts--essentially, if you're going to run a harmonic damper, you should be putting that money toward an ATI Superdamper (which will run you about $500).
Personally, I don't have the experience to say either way, but I literally *just* got my ATI Superdamper in the mail and will be posting up an install thread (with cam) later on.
- The balancer bolt: what size is it, and do you know off-hand whether it's the same bolt on the LS2 CTS-V? If not, I'll see if I can figure it out via a brute force search on GMPartsDirect.
- Shane @ Thunder Racing says (AFAIK), from his personal experience, ATI > SLP > Fluidampr. In his opinion, it's almost not worth spending the money on the SLP and Fluidampr parts--essentially, if you're going to run a harmonic damper, you should be putting that money toward an ATI Superdamper (which will run you about $500).
Personally, I don't have the experience to say either way, but I literally *just* got my ATI Superdamper in the mail and will be posting up an install thread (with cam) later on.
05-11-2012, 08:03 PM
#13
 05-11-2012, 10:04 PM
#14

There is a longer crank bolt available, where you use to simply 'suck' the new damper on the snout. Much easier than specialized tools.
And, I wish I knew I could purchase the Fluidamper before I put on the ATI, as I had to get ASP to custom make an 8" pulley for the blower to 'key' in to the ATI. A blower pulley exists for the Fluidamper.
Another trick is to keep the bolt (but loose) in the crank, and PUSh against the bolt to remove the stock pulley. Then you can get away with using the smaller pulley pullers
Nice write-up.
05-11-2012, 11:12 PM
#15
TECH Enthusiast
Thread Starter
iTrader: (4)
Join Date: Jun 2009
Location: Portland, OR
Posts: 574
Likes: 0
Received 0 Likes
on
0 Posts
Nice write-up.
05-12-2012, 07:18 AM
#17
05-12-2012, 09:15 AM
#18
The three-finger Craftsman works well when removing all the stock Gen 3/4 harmonic balancers. It also has two different sizes of reversible jaws which allow it to be used to pull the timing gear/oil pump drive off the crank snout.
The last time I looked, they were around $30 and are US-made.
Moroso makes a puller-centering centering pilot for the SBC/BBC cranks that will work with our motors by sliding a short piece of neoprene tubing over it's shaft. It helps a lot when doing an in-car cam change, providing that often-needed "third hand" to keep the puller centered.