
Tick Performance C6 Master in a CTS-V

 03-25-2014 | 11:13 AM
#62

TECH Enthusiast
Joined: May 2011
Posts: 560
Likes: 11
As I had promised, here are additional pictures and information regarding my experiences with this install. I can tell you it was a challenge to figure out exactly what is needed, I believe 90% of that is resolved at this point, I will get to the one potentially outstanding item that may need to be figured out for some of you later.
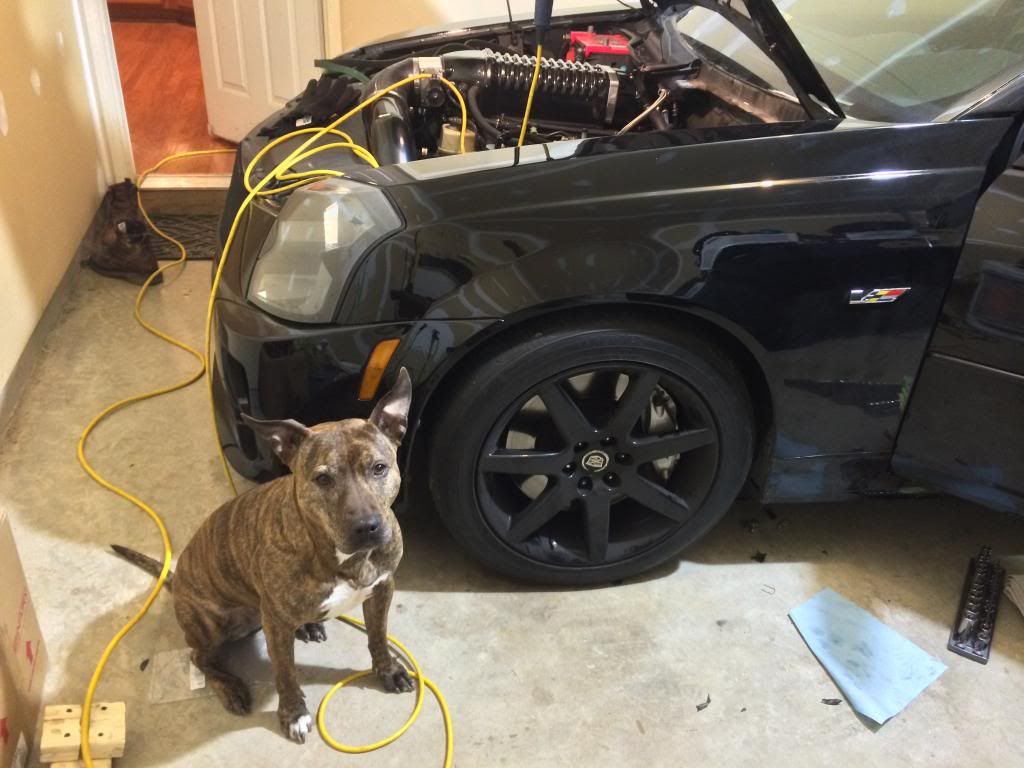
A little info on my setup. It has an LS9 Clutch that was not fully disengaging with the factory 110k miles master cyl. I wanted to remedy this situation and after seeing Psychos write up, I dove in. It took me a good while to get everything sorted but I'm Glad I did. Hopefully this will help the next person speed up the process.
Get your pup and some brews
1) as Psycho said, buy the Tick C6 Master cylinder kit. You will have the option of which Master to Slave cylinder line you would like included with your kit. *NONE* of the available lines with this kit will connect to the factory slave line coming out of your transmission. With that said, I had to replace my slave anyhow (replaced with ZR1 slave (its cheaper) which has identical travel to CTSV slave, but with slightly different angles where the bleeder and master cyl line attach), so I removed my trans and ordered the "LONG LINE" option. This is a steel braided line that attaches the Master directly to the Slave. I had to notch my transmission by about 1/2" due to the angle of the fitting on the line, no big deal. I cannot say for certain whether this line will work without modification on the CTSV slave.
That brings me to the line that would need to be custom made if you retain your factory slave line. I've been in contact with Psycho regarding that issue and he may have a solution.
2) IF you're already taking the trans out, buy the remote bleeder from tick. You will surely kick yourself later if you don't… I can guarantee that.
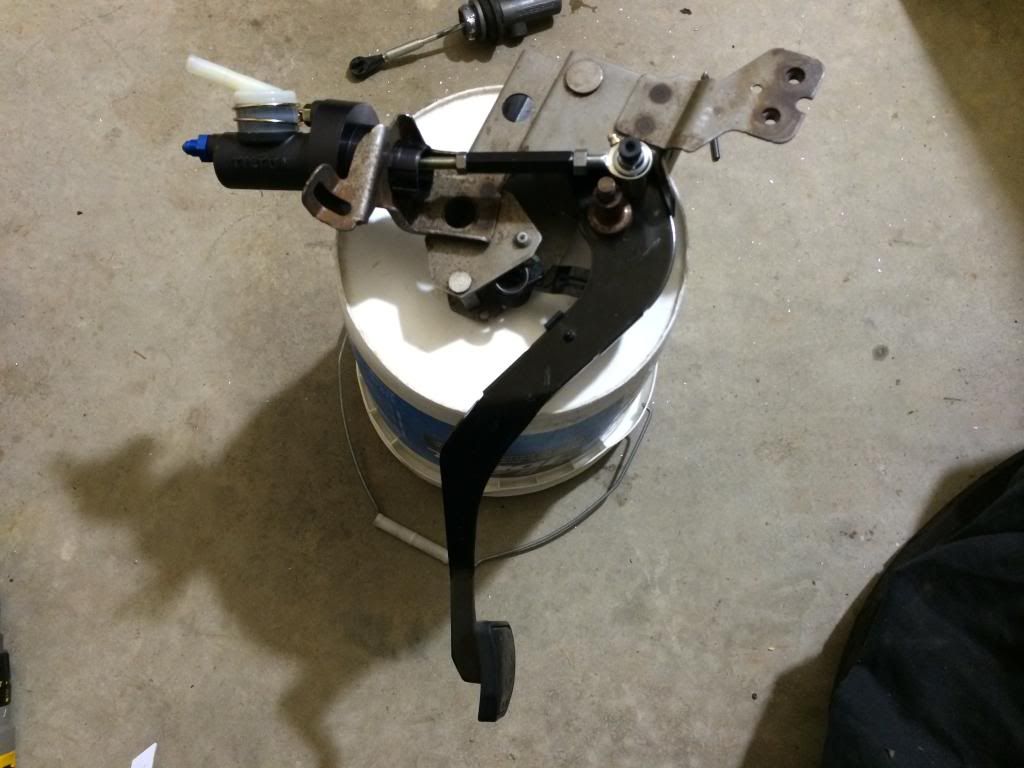
3) Once you have your kit, you need to remove your factory master cylinder and clutch pedal assembly. Remove the rain trail and windshield wiper assembly. Disconnect all master/slave line and try not to get brake fluid all over your paint, as we all know how corrosive it is. to remove the master cylinder you need to rotate it about 90 degree CLOCKWISE while under the hood. you may want to get some lube on the rubber gasket. it will then unlock from the twist lock and pull through the firewall after you have disconnected it from the pedal attachment.
DO NOT actuate your new master cylinder dry. I may or may not have damaged my original master by doing this when mocking it up to the pedal assembly. get some fluid in it enough to lubricate it first. ultimately I was never able to get it to bleed and replaced it with a second new master cylinder… oops
Remove the vent to the left of the steering wheel, as well as the side panel between the dash and drivers side door. You are going to need to remove the emergency brake pedal assembly in order to make this all happen. It is NOT fun to get out, or back in. Just tell yourself it'll be worth it. Also keep in mind that in MANY vehicles, the entire dash has to be removed in order to get it out. So... as much cussing as I did, I kept reminding myself of that.
There are 2 nuts that need removed behind the vent, you must first remove a wiring harness out of the way to access the holes. You'll need deep sockets and an extension here.
The biggest tip I can give to getting the brake pedal out once all the nuts and bolts are removed is to pull, hard, on the brake line that is mashed up against the firewall. it'll make more sense when you're in there. leave the e-brake pedal attached and get it out of the way. Remove the clutch pedal.
4) When you're done with that headache, it's time to start the real modifications
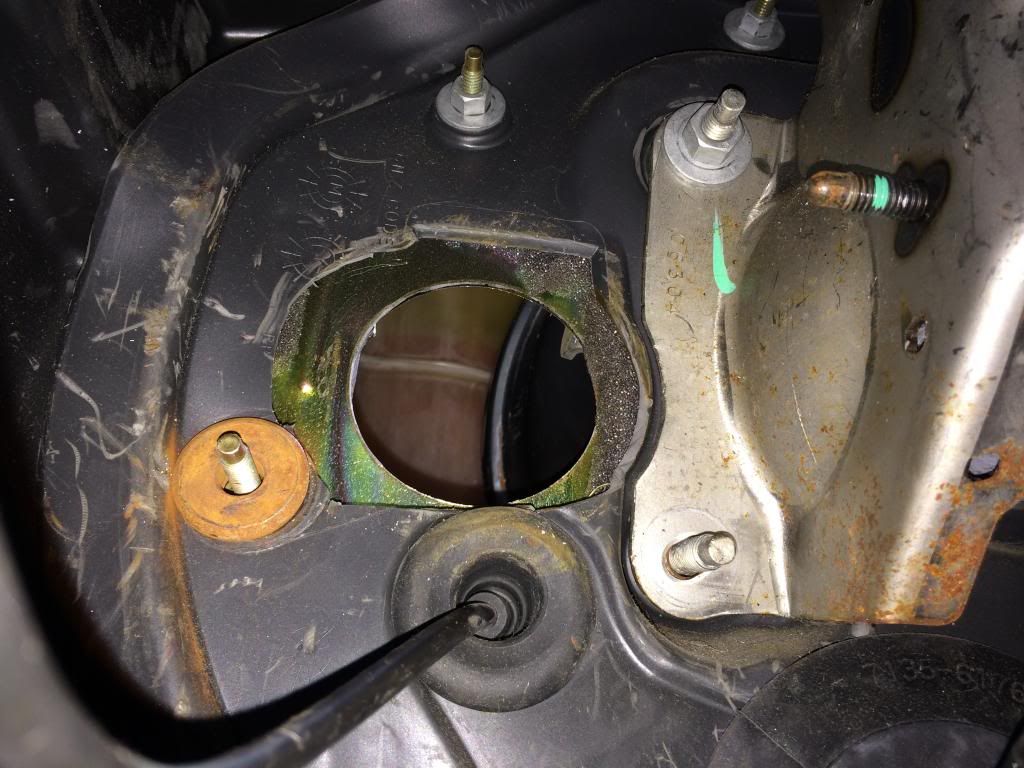
Hole in the firewall is too small.

I was fortunate enough to have access to basically a hydraulic hole punch and knocked out a 2" hole. a little bit more would need to be trimmed from here
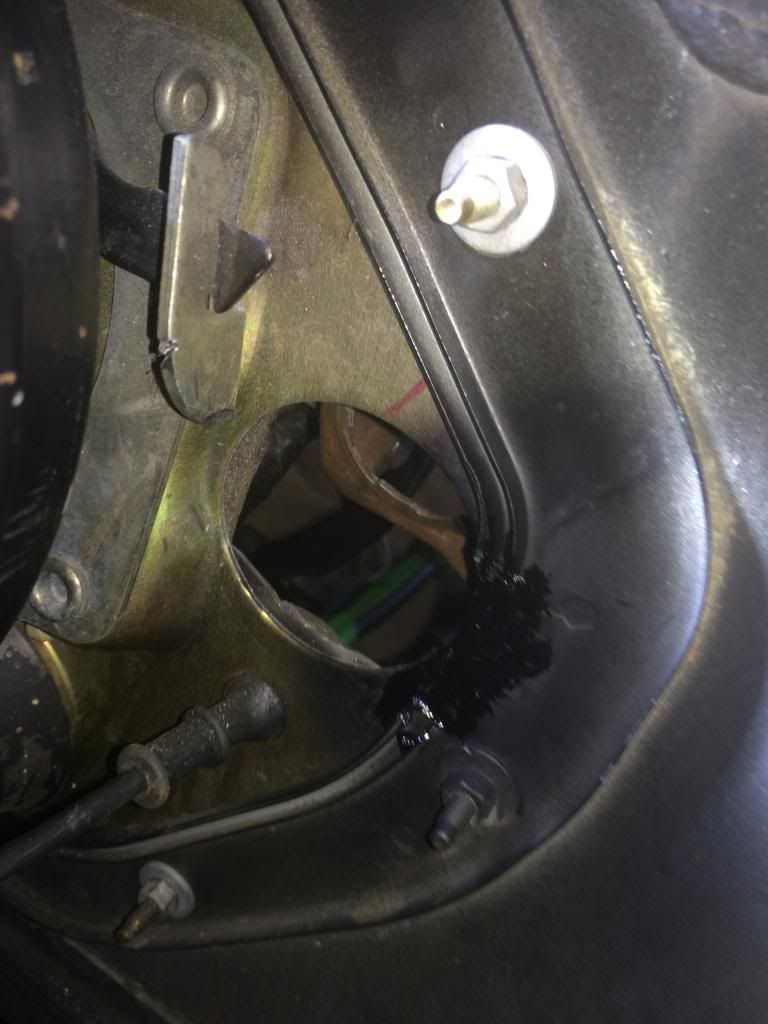
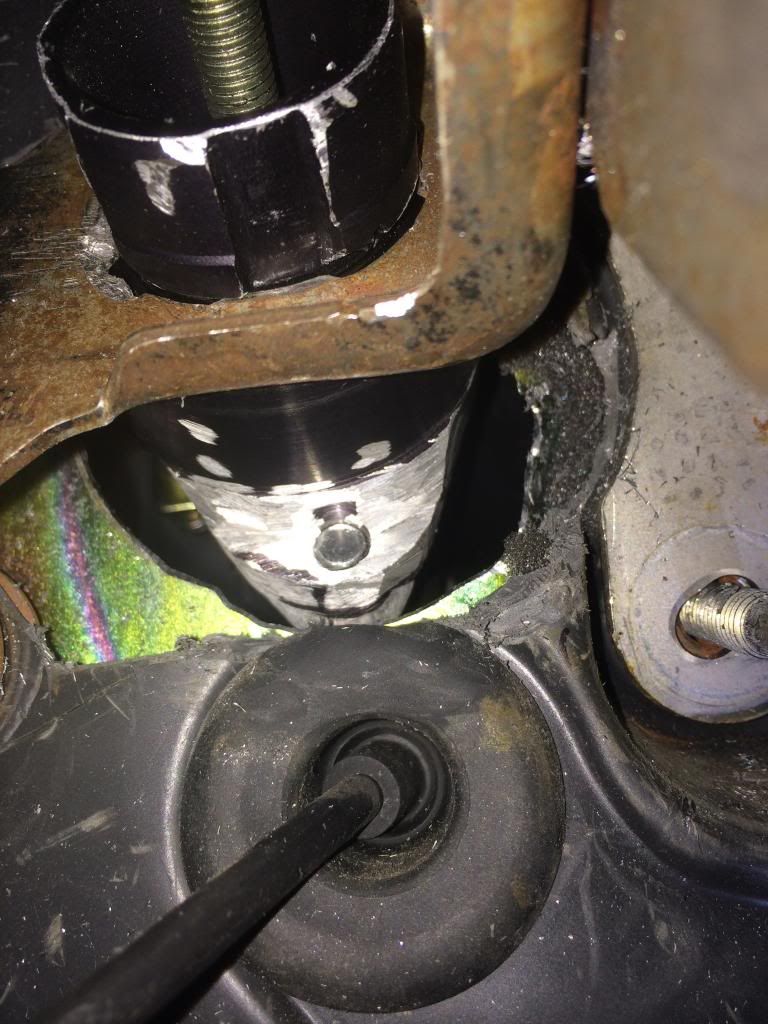
Under hood
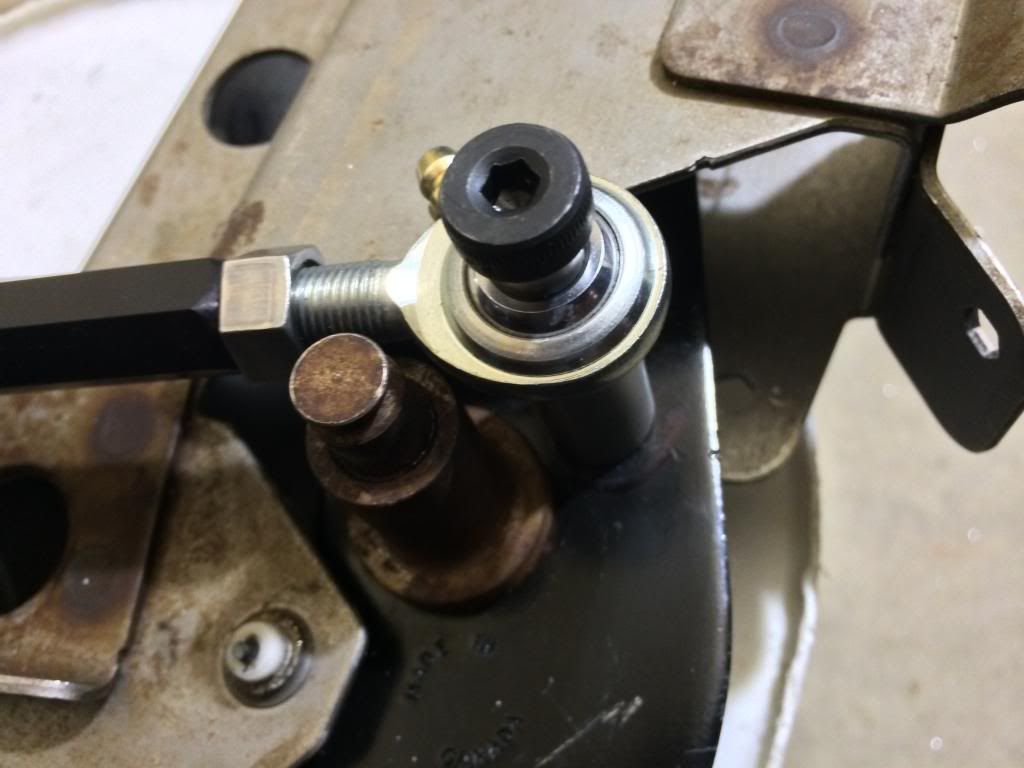
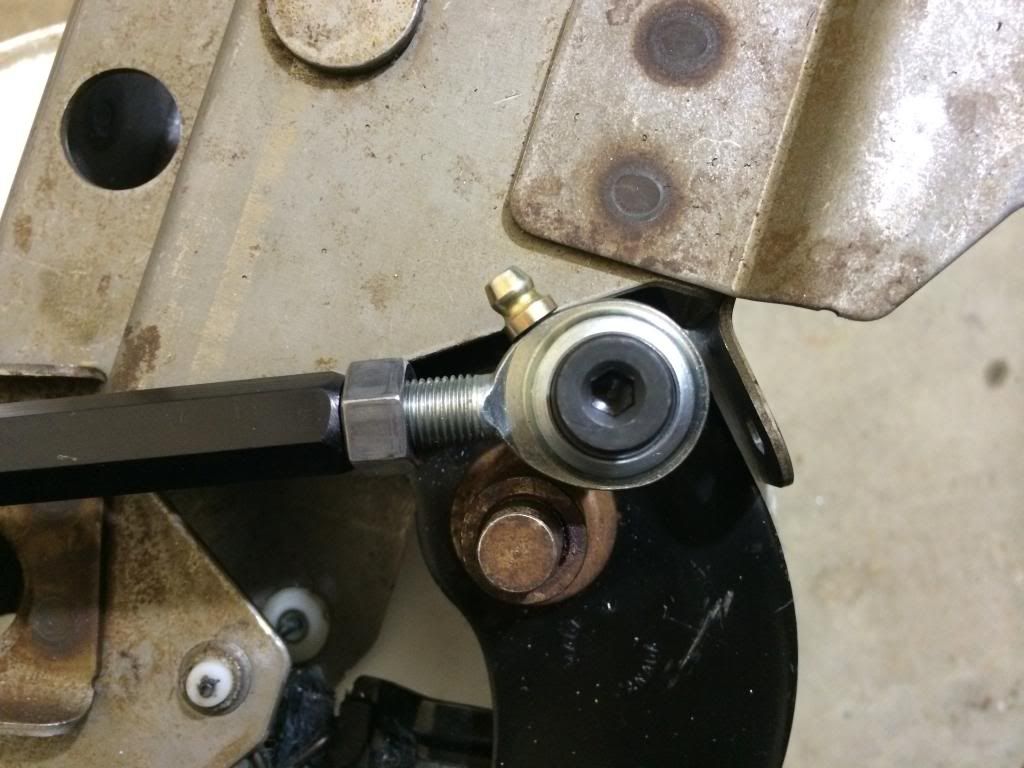
5) You'll need to relocate the attachment point for the heim joint on the clutch pedal arm. This is where a standoff needs to be purchased. you'll need to purchase the stud that Psycho listed. The standoff he has posted is too large of a diameter. This is the standoff you need. it needs to be welded to the clutch pedal arm for extra strength. (Psycho broke his un-welded aluminum standoff and now has to remove everything and do it again)
http://www.grainger.com/product/Stan...JA8?s_pp=false
Make sure the plunger is entering the master cylinder centered. Keep in mind the adapter has an angle to it, so it goes through the adapter at what looks like an incorrect angle, but in to the master strait. Use these pics as a guide as to where the standoff needs to mount
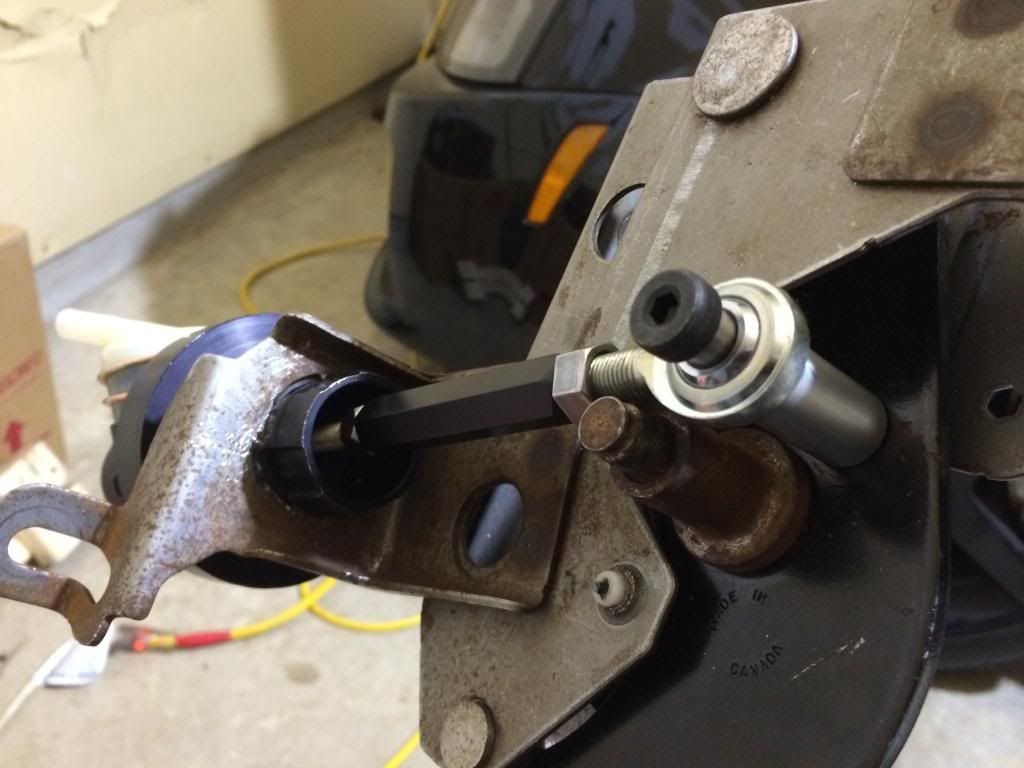
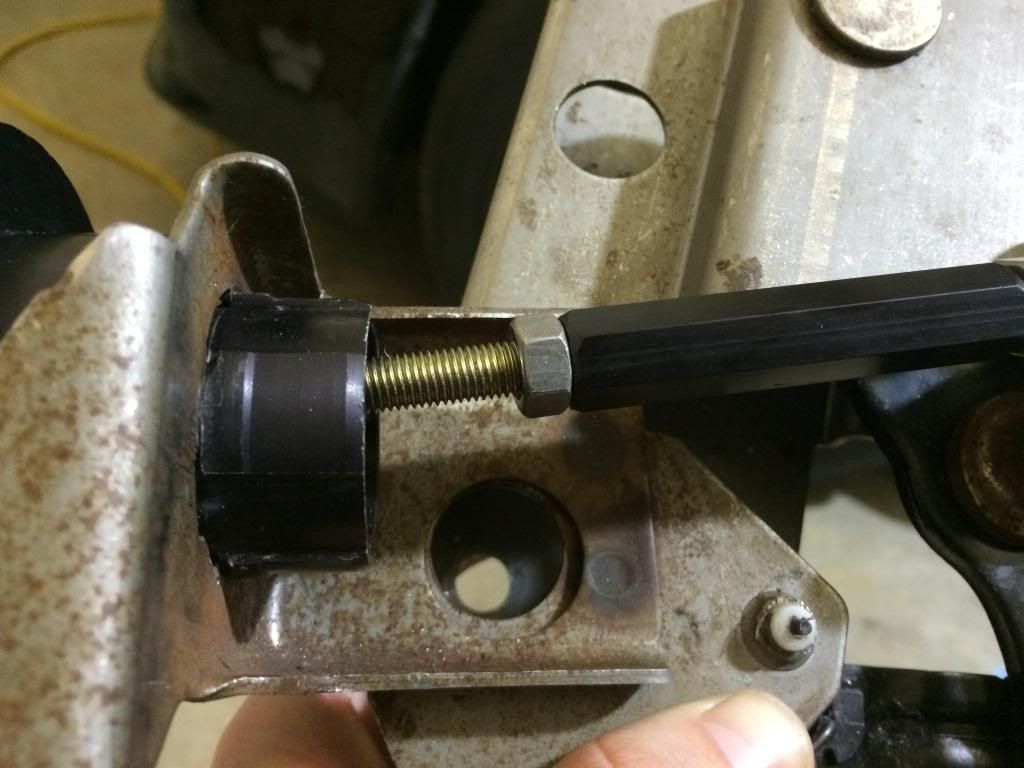
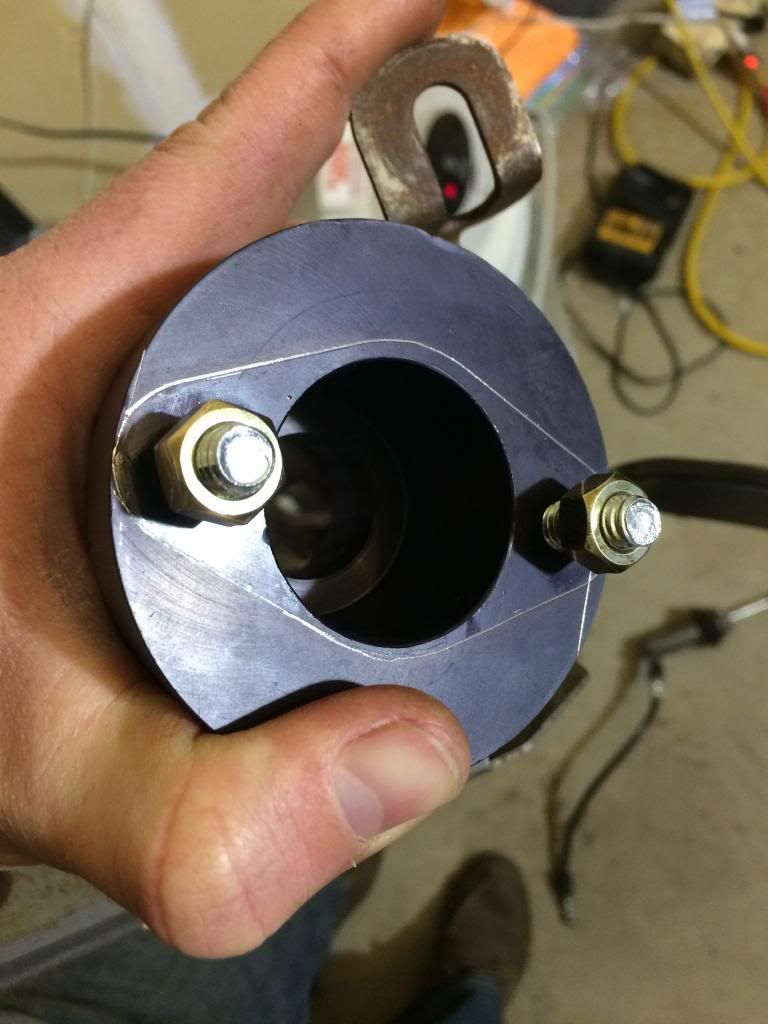
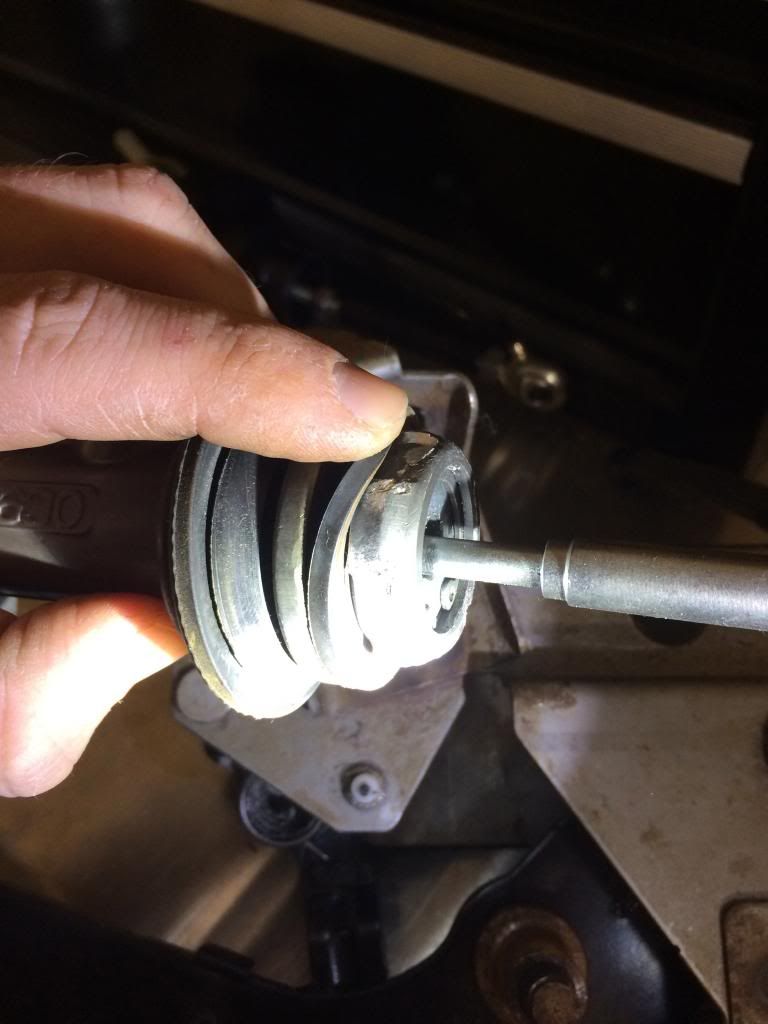
6) Next you're going to need to modify the twist lock adapter pretty substantially. Start off by marking the adapter where it bolts to the Tilton. I used an electric cut wheel to do most of the modifying.
Cut
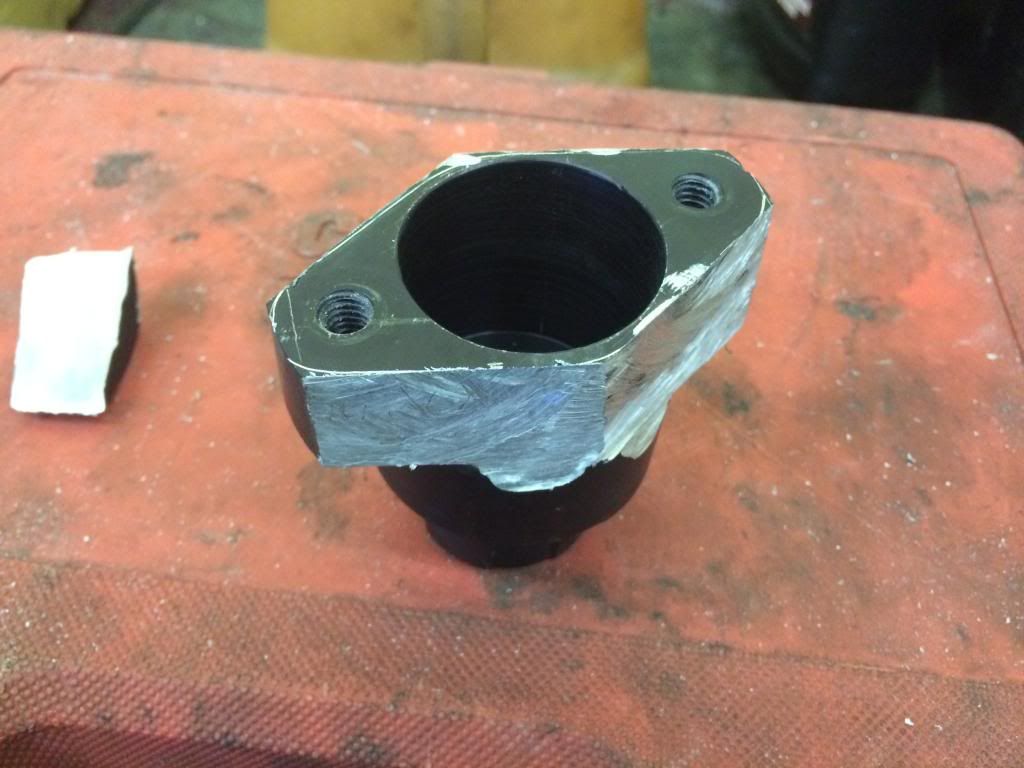
You're going to need to cut off quite a bit, grind and re-test, rinse and repeat quite a bit until you're able to get it to twist lock in to the pedal assembly through the firewall. I had to grind a bit off of the bottom of the tilton as well to make it clear the firewall.
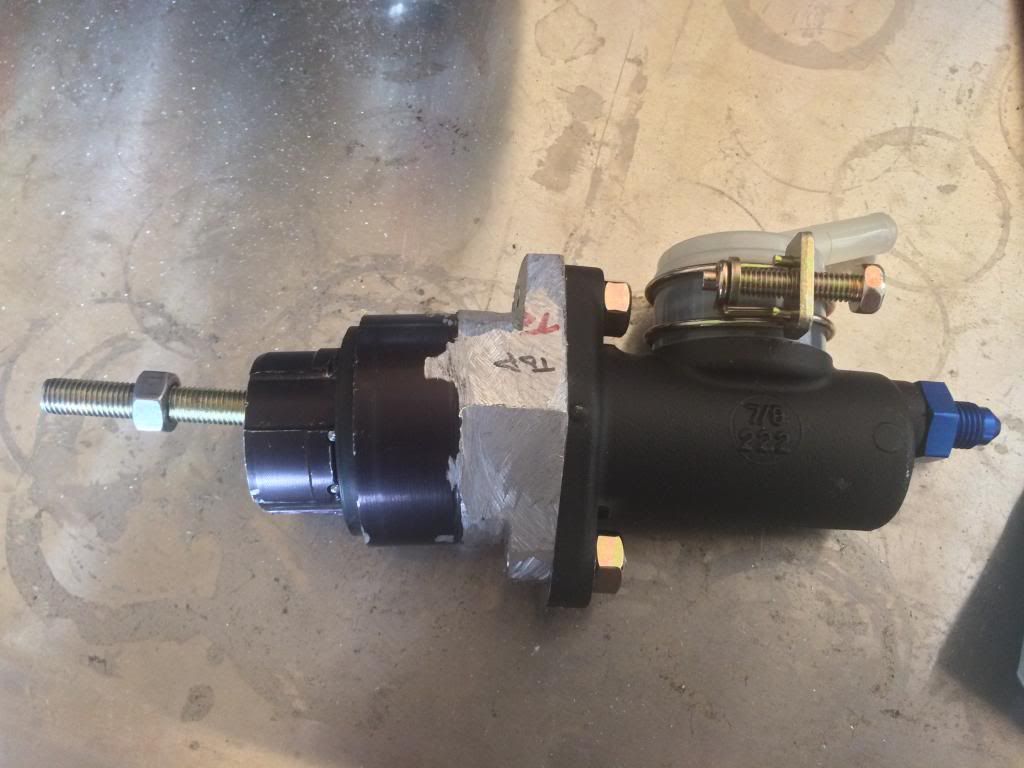

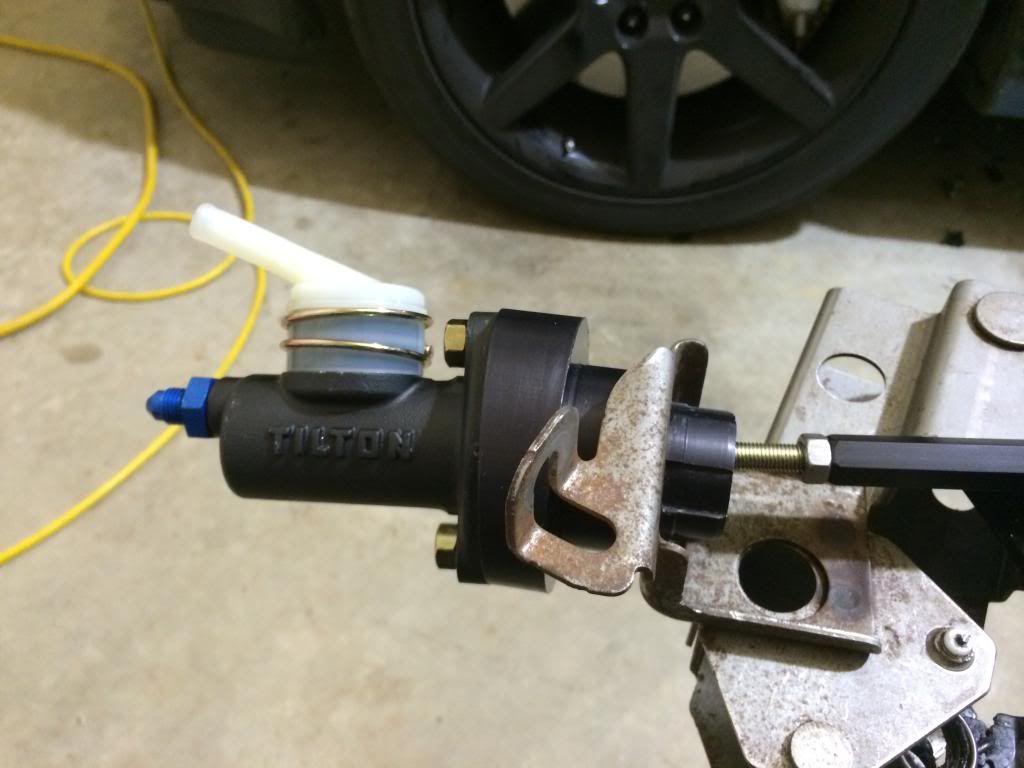
7) Now its time to get the pedal assembly back in the car and start getting the adapter and master in to place. Re-install the rubber gasket from the factory master on to the new adapter.
***BENCH BLEED THE MASTER*** this will save you time.
More grinding of the firewall and/or adapter may be necessary at this point. particularly the brake booster side of the hole.
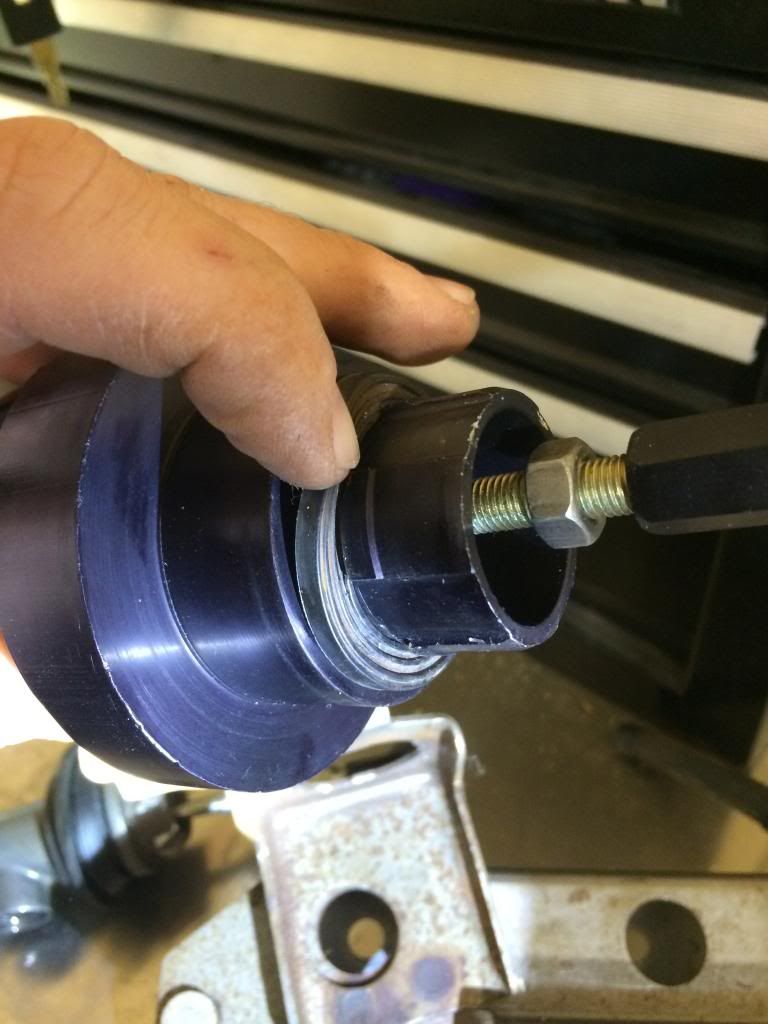
Twist
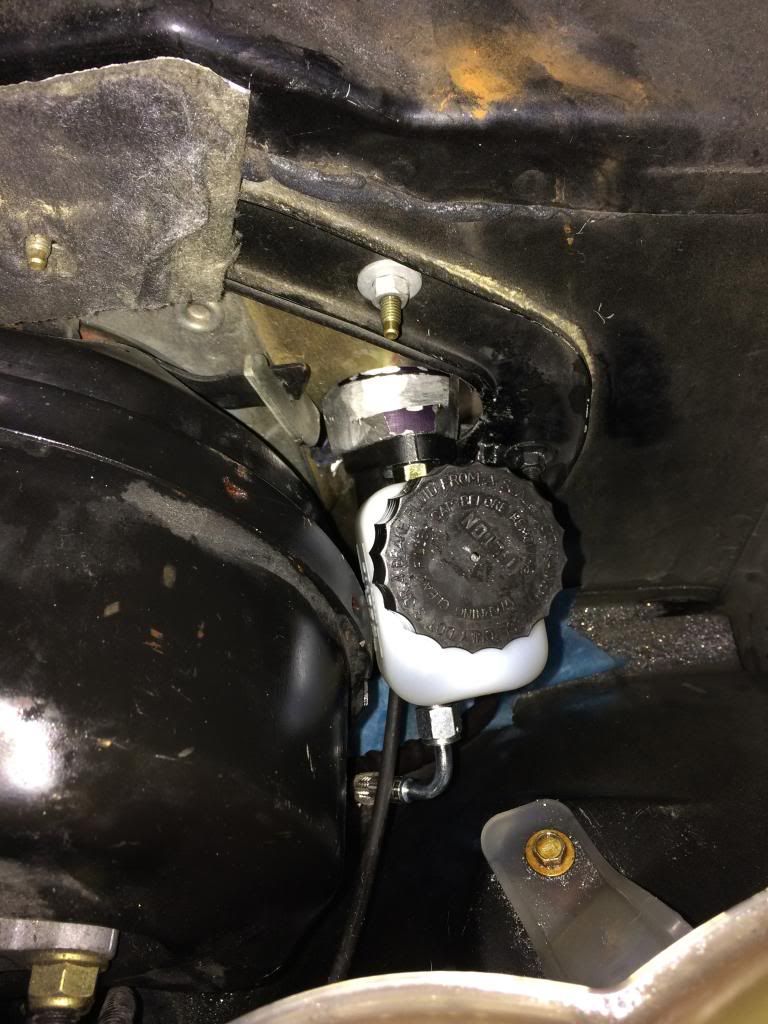
Under hood. (I opted to delete the external reservoir in favor of a larger attached one)
Once everything is clearing well and the master is twist locked in to place, attach your heim joint. adjust the pedal so that you are getting MAXIMUM travel of the master while NOT bottoming out the master. you want the pedal stop to stop the pedal before the internals of the master make contact. This will ease in the bleeding process.
Bleed, Bleed, Bleed. Do not damage your fittings. Do not over tighten your fittings. Get the fittings as finger tight as you can, and then give an additional 1/8 to 1/4 turn. thats all it takes.
Ultimately, don't over think this process. Use your remote bleeder if you have it. pump the pedal until you have decent pressure, then hold the pedal down, crack the bleeder and you should be getting quite a bit of air/foam. repeat until the air is out of the system and you have a firm pedal.
Enjoy being able to shift again!!!
A little info on my setup. It has an LS9 Clutch that was not fully disengaging with the factory 110k miles master cyl. I wanted to remedy this situation and after seeing Psychos write up, I dove in. It took me a good while to get everything sorted but I'm Glad I did. Hopefully this will help the next person speed up the process.
Get your pup and some brews

1) as Psycho said, buy the Tick C6 Master cylinder kit. You will have the option of which Master to Slave cylinder line you would like included with your kit. *NONE* of the available lines with this kit will connect to the factory slave line coming out of your transmission. With that said, I had to replace my slave anyhow (replaced with ZR1 slave (its cheaper) which has identical travel to CTSV slave, but with slightly different angles where the bleeder and master cyl line attach), so I removed my trans and ordered the "LONG LINE" option. This is a steel braided line that attaches the Master directly to the Slave. I had to notch my transmission by about 1/2" due to the angle of the fitting on the line, no big deal. I cannot say for certain whether this line will work without modification on the CTSV slave.
That brings me to the line that would need to be custom made if you retain your factory slave line. I've been in contact with Psycho regarding that issue and he may have a solution.
2) IF you're already taking the trans out, buy the remote bleeder from tick. You will surely kick yourself later if you don't… I can guarantee that.
3) Once you have your kit, you need to remove your factory master cylinder and clutch pedal assembly. Remove the rain trail and windshield wiper assembly. Disconnect all master/slave line and try not to get brake fluid all over your paint, as we all know how corrosive it is. to remove the master cylinder you need to rotate it about 90 degree CLOCKWISE while under the hood. you may want to get some lube on the rubber gasket. it will then unlock from the twist lock and pull through the firewall after you have disconnected it from the pedal attachment.
DO NOT actuate your new master cylinder dry. I may or may not have damaged my original master by doing this when mocking it up to the pedal assembly. get some fluid in it enough to lubricate it first. ultimately I was never able to get it to bleed and replaced it with a second new master cylinder… oops
Remove the vent to the left of the steering wheel, as well as the side panel between the dash and drivers side door. You are going to need to remove the emergency brake pedal assembly in order to make this all happen. It is NOT fun to get out, or back in. Just tell yourself it'll be worth it. Also keep in mind that in MANY vehicles, the entire dash has to be removed in order to get it out. So... as much cussing as I did, I kept reminding myself of that.
There are 2 nuts that need removed behind the vent, you must first remove a wiring harness out of the way to access the holes. You'll need deep sockets and an extension here.
The biggest tip I can give to getting the brake pedal out once all the nuts and bolts are removed is to pull, hard, on the brake line that is mashed up against the firewall. it'll make more sense when you're in there. leave the e-brake pedal attached and get it out of the way. Remove the clutch pedal.
4) When you're done with that headache, it's time to start the real modifications
Hole in the firewall is too small.

I was fortunate enough to have access to basically a hydraulic hole punch and knocked out a 2" hole. a little bit more would need to be trimmed from here

Under hood

5) You'll need to relocate the attachment point for the heim joint on the clutch pedal arm. This is where a standoff needs to be purchased. you'll need to purchase the stud that Psycho listed. The standoff he has posted is too large of a diameter. This is the standoff you need. it needs to be welded to the clutch pedal arm for extra strength. (Psycho broke his un-welded aluminum standoff and now has to remove everything and do it again)
http://www.grainger.com/product/Stan...JA8?s_pp=false
Make sure the plunger is entering the master cylinder centered. Keep in mind the adapter has an angle to it, so it goes through the adapter at what looks like an incorrect angle, but in to the master strait. Use these pics as a guide as to where the standoff needs to mount


6) Next you're going to need to modify the twist lock adapter pretty substantially. Start off by marking the adapter where it bolts to the Tilton. I used an electric cut wheel to do most of the modifying.

Cut

You're going to need to cut off quite a bit, grind and re-test, rinse and repeat quite a bit until you're able to get it to twist lock in to the pedal assembly through the firewall. I had to grind a bit off of the bottom of the tilton as well to make it clear the firewall.


7) Now its time to get the pedal assembly back in the car and start getting the adapter and master in to place. Re-install the rubber gasket from the factory master on to the new adapter.
***BENCH BLEED THE MASTER*** this will save you time.


More grinding of the firewall and/or adapter may be necessary at this point. particularly the brake booster side of the hole.
Twist

Under hood. (I opted to delete the external reservoir in favor of a larger attached one)

Once everything is clearing well and the master is twist locked in to place, attach your heim joint. adjust the pedal so that you are getting MAXIMUM travel of the master while NOT bottoming out the master. you want the pedal stop to stop the pedal before the internals of the master make contact. This will ease in the bleeding process.
Bleed, Bleed, Bleed. Do not damage your fittings. Do not over tighten your fittings. Get the fittings as finger tight as you can, and then give an additional 1/8 to 1/4 turn. thats all it takes.
Ultimately, don't over think this process. Use your remote bleeder if you have it. pump the pedal until you have decent pressure, then hold the pedal down, crack the bleeder and you should be getting quite a bit of air/foam. repeat until the air is out of the system and you have a firm pedal.
Enjoy being able to shift again!!!
Last edited by gtistile; 03-26-2014 at 12:50 PM.
03-25-2014 | 11:33 AM
#63

I don't want to diminish the hard work demonstrated above, but you guys are aware that Philistine is developing a machined adapter that makes most of this OBE, right? Stay tuned to the Pig in Slop thread on the Cadillac Forums if this sounds interesting to you.
That said, I would be interested in hearing driving impressions with the Tilton master. How's the pedal effort?
That said, I would be interested in hearing driving impressions with the Tilton master. How's the pedal effort?
03-25-2014 | 11:52 AM
#64
TECH Enthusiast
Joined: May 2011
Posts: 560
Likes: 11
I don't want to diminish the hard work demonstrated above, but you guys are aware that Philistine is developing a machined adapter that makes most of this OBE, right? Stay tuned to the Pig in Slop thread on the Cadillac Forums if this sounds interesting to you.
That said, I would be interested in hearing driving impressions with the Tilton master. How's the pedal effort?
That said, I would be interested in hearing driving impressions with the Tilton master. How's the pedal effort?
I own 2, 2004 cts-vs. The one pictured above with the tick, and a totally stock one as well. Which makes for a nice comparison. The pedal with the tick and LS9 is slightly firmer, but it is a welcome feeling it feels great. Very consistent emgagement and very easy to drive. The stock setup feels totally sluggish and sloppy in comparison.
I was unaware of the adapter being built, but as slow as things happen for this platform, I couldnt wait. I have 800+whp on tap and had no way to shift it. I researched quite a bit and found no other solution than this, i couldnt wait around for something that may never be finished as often happens.
Can you link to what you're referring to? I'd love to see what they have going on?
03-25-2014 | 12:17 PM
#65
This is all great work! I enjoy the pics. It's true I'm working on an adapter but these things take time. The design work has been completed and it's with the machinist for a prototype.
03-25-2014 | 01:12 PM
#66
TECH Enthusiast
Joined: May 2011
Posts: 560
Likes: 11
Thanks man,
I briefly went through your thread which I plan on spending quite a bit more time reading. looked to be tons of good info and interesting things going on in there… many of which (mainly 8.8 rear end install stuff), that I will be doing shortly.
In the process of doing this I definitely felt that it would be possible to build an adapter to make this more plug and play. I don't have the resources, time, or expertise ultimately to make it happen. It would be awesome if you do make it happen for everyone else. i would certainly buy a bolt in option for my other stock CTS-V when you get it finished. Not worth the time on that car to do what I've done here though as it is just a daily driver and the factory stuff is functional at best as is, though not great.
What you see in this thread isn't exactly pretty and perfect looking, but I am however extremely pleased with the results and really have to give credit to Psycho for going out on a limb and cutting in to his car without truly knowing this would work. It really does work 100% correctly. The angles are correct, the travel is correct and it isn't a hacky type result, though it is a hell of a lot of work. Again, now that its done, well worth the effort.
Last edited by gtistile; 03-25-2014 at 01:20 PM.
03-28-2014 | 08:49 AM
#67
TECH Enthusiast
Joined: May 2011
Posts: 560
Likes: 11
Are most of you guys with clutches beefier than the LS7 just dealing with the inability to shift? Or are you somehow getting away with the stock master and some combo of slave shims or something? It's just curious to me that there is a solution to this and there isnt a ton of interest.
03-28-2014 | 02:05 PM
#69
TECH Enthusiast
Joined: May 2011
Posts: 560
Likes: 11
Now? Tick Master being the only real change results in smooth shifting, whether at 7,000rpms, or backing out of the garage… I'm pretty convinced the factory master is a big problem, otherwise I wouldn't have even thought about attempting this.
What else would be the cause of the shifting issues these cars have that are not shared with other LS platforms??? When you consider the Vette and Camaro guys are using the same clutches, with essentially identical slave cylinders, what else could it be?
Not to mention in Psycho's first post he talks about how many different clutch/shim/slave combos + brand new factory master that he had tried and ended up without solid disengagement time and time again. Yea, this took some time, but not as much time as pulling the trans and swapping clutches and shimming and all the headache that goes with that time and time again.
In the end, the info is here and this is a real solution if someone else wants to go for it. Being able to bang gears like the vette/camaro guys is priceless.
I totally agree that an adapter is the ultimate solution. It just isn't available now, and I couldn't stand to have so much potential anymore with the lack of disengagement. No telling when that adapter will be available. So for the time being, i'll be driving without the frustration and hope that it actually comes to market
03-30-2014 | 08:40 PM
#70
What was the part number on the grainger steel standoff? Im going to start pulling all this apart again so I can weld it on.
04-05-2014 | 01:50 PM
#72
TECH Enthusiast
Joined: Jun 2012
Posts: 608
Likes: 2
OK count me among the early adopters. After dropping my trans, measuring, mesuring , and measuring again then replacing the slave cylinder for the third time; I bit the bullet and ordered the Tick master. I know that McLeod swears you don't have to have a better master but after two stock masters and three stock slaves failed to work with optimal slave to pp geometry and multiple bleeding attempts and techniques I don't have a lot of other choices. I know some have stated the RXT worked with their stock hydraulics but I am not among that group. I hope this will be the final piece of the puzzle as my V hasn't been driven regularly in over a year and that is too long.
04-14-2014 | 09:19 AM
#75
TECH Enthusiast
Joined: Jun 2012
Posts: 608
Likes: 2
OK folks the new MC is in! A couple of things I should share...
First I believe I know why I was having unusual issues with my clutch/MC combo. Fuzzy and Phili were right, well sort of, I think. Take a look at the pic below.
https://www.dropbox.com/s/b5b19acfz8...2014.04.18.jpg
Apparently when the mechanic I hired to do the clutch/mc install found out the clutch was dragging. He decided to get creative and move the mount for the twist lock back further toward the firewall (see the new welds in the pic). This would have likely worked had he done something/anything to address the pedal stop. Since he did not I had the standard amount of clutch pedal/MC throw but in a different portion of the MC's stroke. I believe this caused the issues when the new MC was installed.
I won't go into a full rant about mechanics because not all should be thrown under the bus but WOW! First, I would have preferred they ask me before cutting moving and welding the twist lock collar. Second, after you have done it and things still don't work you might want to tell me.
OK off of the rant. When they moved the twist lock collar back they also changed the alignment. With this alignment I was able to use the factory standoff on the clutch pedal to get proper alignment. This got me thinking that it might be the easier way to do this install (as some have reported breaking the aftermarket standoff and suggested welding it to the pedal).
If you move the twist lock collar and reweld, you also get a chance to move the master ever so slightly so that you avoid the brake booster a little more. A VERY good thing.
Other observations:
Don't bother with trying to retain as much of the collar material as possible. It has absolutely no function (other than to get in the way) with this install. I kept cutting a little test fitting cursing and cutting some more. I basically got down to a very similar point as the two previous posters. Because the slope of the firewall does NOT match the slope of the collar (the part that has to be mostly cut away) the collar does NOT add any structural support. I am anxiously awaiting phili's solution as I will likely buy his twist lock collar and attach to this MC.
Save the grommet from your stock MC. You can use it to fill the gap around your Tick MC.
Save the quick disconnect off of your old MC. Unless you are dropping the transmission you will need this to connect the "short line" option to your LS7 slave.
As mentioned earlier BENCH BLEED THE MASTER. I did not initially and had to pull the MC off of the twist lock and bench bleed it then replace. More tedious work with this approach. I thought the Motive bleeder would pull that last little pocket of air out of the system. One hour later it did not.
Results, well this is just a teaser post. I haven't cranked the car and tested the new MC yet. I wanted to flash the PCM to remove the CPP interlock and the battery was low so I put it on to charge and enjoyed a frosty beverage. I assume bypassing the interlock and connecting the started enable circuit to an ignition hot is all that is required on the electrical side. Please chime in if I am missing something.
04-15-2014 | 10:26 AM
#77
TECH Enthusiast
Joined: Jun 2012
Posts: 608
Likes: 2
No one knows the slave fitting size?
I got the CPP interlock disabled and jumpered the starter enable circuit last night. The car drove and shifted like a dream. The 500 mile break in period on this clutch is going to be murder.
Phili, if you are following this thread you need to hurry up with your special part for the Vs. Redline shifts and engagement strength are awesome. I can't say if it is the clutch or the hydraulics but it is MUCH better than stock. Everyone should seriously consider this mod.
04-15-2014 | 11:19 AM
#78
Phili, if you are following this thread you need to hurry up with your special part for the Vs. Redline shifts and engagement strength are awesome. I can't say if it is the clutch or the hydraulics but it is MUCH better than stock. Everyone should seriously consider this mod.
This thread has been very helpful!
04-15-2014 | 02:55 PM
#79

TECH Resident

Joined: Aug 2010
Posts: 756
Likes: 0
Philistine you have to get this moving. Im not having any major issues yet with my ls9r but this would compliment it nicely
Yep, I'm watching with a lot of interest. I've been quiet because I didn't want to tease the community. My delay was caused because I was procuring parts for a mock-up. I have that now and the design is final. It will soon be in production.
This thread has been very helpful!
This thread has been very helpful!
04-15-2014 | 04:05 PM
#80

On The Tree
Joined: Oct 2012
Posts: 125
Likes: 0
From: Texas
my plan is to get rid of the $325 tick kit and just get the slave, line, and ball joints. I will weld a 3/16 mounting plate with the correct holes and mount the new master using the factory geometry. There will be a little more resistance due to the lesser mechanical advantage from the mounting point being further but if it is too much you have the option of switching to a 13/16 bore master.
doing it this way will cost less than $150 for all the parts.