
LS1 and 200-4r to L92 / T56 in 71 Chevelle convertible...now Gen V LT1 6L80e swapping
 02-21-2012, 01:58 AM
#281
The weather took a turn for the better today and working on the car was a good excuse to get outside.
Putting the gauge wiring on hold for now I had planned to take the front suspension apart and begin mocking things up, but at the last minute I decided to go ahead and try to pull the axles. As it turns out it's one of the simpler things I've done so far; a bit of a mess but not terribly difficult (the backing plates, however, were a pain). One of the C clips initially didn't want to come out but other than that no real issues. Keeping that dowel rod or whatever it's called in place when I turned the axle kept the spider gears lined up, and as best I can tell reassembly should be easy.
Back on topic, the reason for pulling the axles is so I can install some f-body backing plates to mount the rear discs on. Replacing the control arms and installing shockwaves are also on the agenda, and at this point I'm thinking I might as well just pull the whole rear end out. That way I could clean it up, paint it and have an easier time getting the old bushings out. Not going to mess with painting the frame though, as once I get out of school I'm hoping to get it galvanized and powder coated.
Anyway, this mess of springs is what you see when you pop off the wheels. I just undid the top two springs and then the one at the bottom right that is perpendicular to the face of the plate, and from there the assembly basically just fell off. Wouldn't have expected the setup itself to be so complicated, but the ebrake is seemingly made up of about 4,000 pieces.
[IMG][url=http://www.flickr.com/photos/21527394@N06/6912511155/]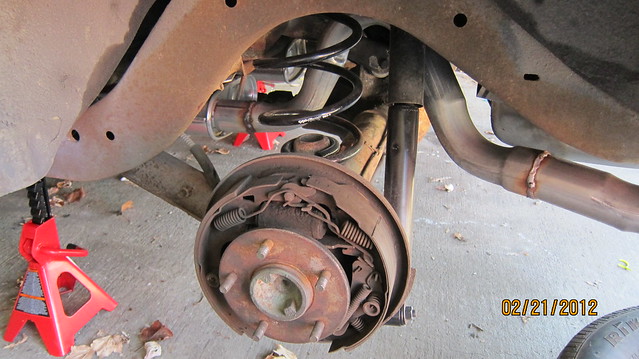
The bolts holding the backing plate to the flange were old and hard to get out, one even broke in half which was a bitch. The fitting on the end of the brake line was also locked in place and when I tried to use a ratchet it just rounded off. Pretty awesome. Since it's all going in the trash anyway I just cut the brake line and let it drain.
The fbody backing plate bolts right on, but to keep the ebrake levers pulling in the same direction I'm flipping the plates to the "wrong" side (drivers to pass, etc). As a side note, the rotors (brakemotive for an fbody) appear to sit flush on the surface of the axle face; some had reported issues with this not always being the case.
[IMG][url=http://www.flickr.com/photos/21527394@N06/6912514803/]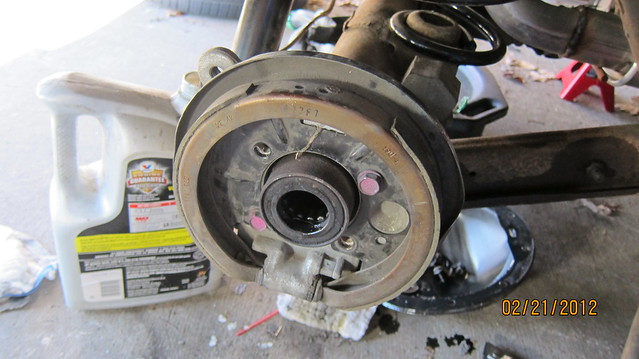
[IMG][url=http://www.flickr.com/photos/21527394@N06/6912518929/]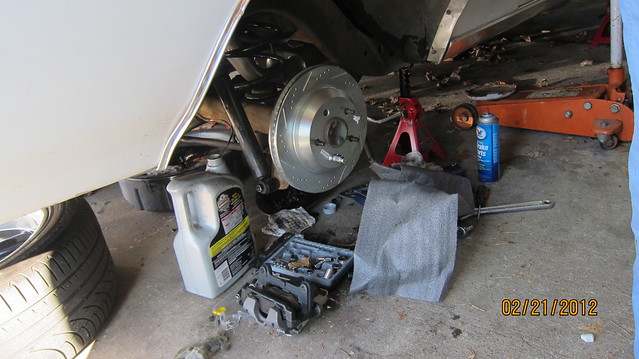
Good progress was being made until I tried to get the caliper bracket onto the plate. I can only guess that C6 abutments are different than those of the fbodies, despite the calipers themselves supposedly being interchangeable. To test this I'm going to order some new abutments from rockauto. Fortunately they are dirt cheap, so if they don't solve my problem I'm not out much but some time. When the caliper is centered around the rotor the C6 abutment and the backing plate lie in the same plane, and even if that were not the case the dust shield prevents the abutment from fitting onto it anyway.
[IMG][url=http://www.flickr.com/photos/21527394@N06/6912520147/]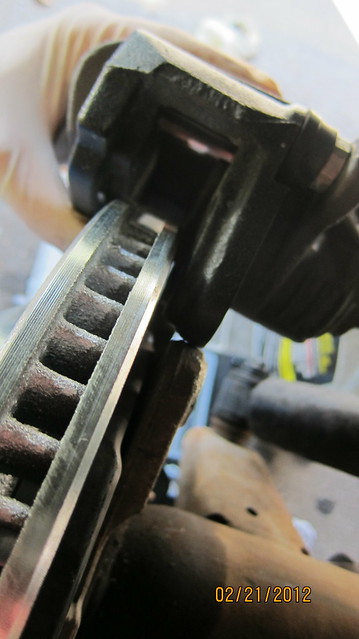
[IMG][url=http://www.flickr.com/photos/21527394@N06/6912518251/]
Depending on how the night goes I'm hoping to be able to go back out in the morning and start pulling off the front end. Other than having to cut the frame I'm expecting the ATS and ridetech stuff to be fairly straightforward.
Despite my initial misgivings about doing so I'm glad I went ahead and pulled the axles myself. No idea how to go about refilling the housing, but I'll worry about that later.
Last edited by chuckd71; 01-22-2018 at 07:21 PM.
 02-21-2012, 11:54 AM
#282
On The Tree

Join Date: Apr 2011
Location: Mobile Alabama
Posts: 108
Likes: 0
Received 0 Likes
on
0 Posts
There is a fill plug on the front passenger side of the differential. Mine takes right at 2 quarts. Some people say they take a hair more.
As to the color that happened to me all the time when I was younger, on my IHC Scouts after offroad trips without proper vent plumbing and I always assumed it was from the water getting in there.
However, that does seem unlikely on a chevelle that has been sitting in your garage and not driving through every mud hole I could find. Hopefully someone that knows will chime in here.
02-21-2012, 02:27 PM
#283
Front passenger side? What a fantastic place for it, nice and awkward.
The stuff in the rear reminds me of when we used to take my friends crappy dirtbike out and try to go mud bogging when I was a kid. Good times. Not sure how water would have gotten in the car though, it's been out in the garage forever and fortunately the flood a couple years ago never made it in there.
I just spoke with Tobin at Kore 3, and it sounds like the ls1 f-body abutment is in fact what I need. The alternative would be a bracket that kore 3 sells, but it is for an all C5/6 setup (I'm using fbody rotors). What sucks is that I had some at one point but sold them. Guess I'll order the right stuff and get to work on the front while I wait.
Posting this link here so I can find it on a different computer later https://ls1tech.com/forums/suspensio...-abutment.html
02-24-2012, 04:46 PM
#284
Today started with grand dreams of pulling everything off the front and at least getting my upper and lower control arms in; today ended with one front assembly removed and a potential massive delay. Turns out the ATS spindles I have are for a B/G body. I bought them from someone on chevelles.com way back when and only today thought to call ATS and double check to see if they were going to work. Based on the conversation I had it appears I have the wrong parts. Fortunately (I guess) the spindles and steering arms have never been used and ATS is back ordered on B/G body spindles so resale shouldn't be too bad, but unfortunately I think the A body stuff is back ordered as well and I have to wait it out. I just sent ATS some pics to confirm everything, but I'm not expecting much. Ridetech set up my shockwaves with the tall ATS spindles in mind so I'm sort of committed to getting more at this point, but it's hardly the worst thing that's happened in this thread so onward we go.
Just a data point, but the ATS guy said that a/f and b/g spindles were the same except for the taper inserts for the ball joints. This pic shows the thickness of the insert where the castle nut would set on the lower ball joint; it's 6.Xmm, meaning it's a b/g spindle. The a/f spindle inserts are 2.X mm. Also, the steering arms (at least since speedtech bought out Tyler et al.) for the b/g bodies have a pronounced dimple in them (as though you hit it with a punch or nail) near the steering linkage attachment, the a/f do not.

In other less depressing and expensive news, when it comes to suspension and steering work I've never done much more than put a spacer lift on my 4runner, so today's work probably took about ten times longer than it should. Over the few miles I've actually put on the car in the last 3 years it has always handled like the stereotypical land yacht, but after getting under it and looking at it I'm surprised I never killed anyone (or myself) in it. Everything is rotten and rusted, like one of those discovery channel shows where they show footage of the titanic on the ocean floor. I couldn't even get the calipers off after taking out all the bolts because the brake pads had worn so much they were stuck in the groove on the rotor. Routine maintenance had fallen to the wayside a few decades ago.

Looking rough. Since I have a forced period of nonproductivity I'm going to go ahead and sand and paint this mess. The orange chain was my safety net when taking out the spring.

These were the shims at the top of my control arms. Not sure but this seems excessive.

Old vs new.

A shitty but not unexpected problem, the new upper control arms hit the frame. Might sell these arms and pick up some ridetech pieces, or perhaps just do what everyone else does and bend/ cut that excess metal flap.

And this is where we are for the foreseeable future, hopefully at some point I can find enough compatible parts in the garage to actually make a complete car again. Gotta take the bad with the good I guess, not sure what I'd do with my time if everything went smoothly.

Just a data point, but the ATS guy said that a/f and b/g spindles were the same except for the taper inserts for the ball joints. This pic shows the thickness of the insert where the castle nut would set on the lower ball joint; it's 6.Xmm, meaning it's a b/g spindle. The a/f spindle inserts are 2.X mm. Also, the steering arms (at least since speedtech bought out Tyler et al.) for the b/g bodies have a pronounced dimple in them (as though you hit it with a punch or nail) near the steering linkage attachment, the a/f do not.
In other less depressing and expensive news, when it comes to suspension and steering work I've never done much more than put a spacer lift on my 4runner, so today's work probably took about ten times longer than it should. Over the few miles I've actually put on the car in the last 3 years it has always handled like the stereotypical land yacht, but after getting under it and looking at it I'm surprised I never killed anyone (or myself) in it. Everything is rotten and rusted, like one of those discovery channel shows where they show footage of the titanic on the ocean floor. I couldn't even get the calipers off after taking out all the bolts because the brake pads had worn so much they were stuck in the groove on the rotor. Routine maintenance had fallen to the wayside a few decades ago.
Looking rough. Since I have a forced period of nonproductivity I'm going to go ahead and sand and paint this mess. The orange chain was my safety net when taking out the spring.
These were the shims at the top of my control arms. Not sure but this seems excessive.
Old vs new.
A shitty but not unexpected problem, the new upper control arms hit the frame. Might sell these arms and pick up some ridetech pieces, or perhaps just do what everyone else does and bend/ cut that excess metal flap.
And this is where we are for the foreseeable future, hopefully at some point I can find enough compatible parts in the garage to actually make a complete car again. Gotta take the bad with the good I guess, not sure what I'd do with my time if everything went smoothly.
 02-24-2012, 05:05 PM
#286
On The Tree
iTrader: (2)

Join Date: Jun 2011
Location: Nashville, TN
Posts: 170
Likes: 0
Received 0 Likes
on
0 Posts
I rebuilt my suspension years ago. A few things for you:
- that number of whims is perfectly normal, and you will see many more on lowered vehicles.
- the caliper not wanting to come off is normal when there has been a lot of rotor wear. Almost every car I have worked on has shown that at one point or another. Just pry the caliper off.
- from all the research I have done, there are few upper control arms that do not hit those frame tabs. I bent mine over years ago and never saw any adverse effects through multiple autocrosses and open track days.
Honestly, it looks like you are doing everything right. Once it is back together, you will not believe the difference! Best modification I ever did to my car!
Troy
02-24-2012, 05:17 PM
#287
Thanks guys.
I tried to pry the caliper off but it wasn't working so well. Knocking the **** out of it with a hammer proved to be very effective, however. If a stack of shims is normal I don't feel so bad, I had always put shims in the same category as things like stick-on wheel balancing weights and fuse taps - things that work okay but are not necessarily the best solution. But if it works it works. I'm not building a show car, for now I just want a car.
I tried to pry the caliper off but it wasn't working so well. Knocking the **** out of it with a hammer proved to be very effective, however. If a stack of shims is normal I don't feel so bad, I had always put shims in the same category as things like stick-on wheel balancing weights and fuse taps - things that work okay but are not necessarily the best solution. But if it works it works. I'm not building a show car, for now I just want a car.
02-28-2012, 02:17 PM
#289
As of an hour ago the car has no front steering or suspension at all and everything I need to pull from the back has been pulled (except the shocks, but that's easy). Today I was thinking about going ahead and mounting the rear shockwaves and their brackets, but my rear end is all crappy looking and trying to replace the control arm bushings with the rear in place doesn't seem that fun. Getting it out looks easy enough, but I don't know what to do about the drive shaft. I can see how to unhook it from the rear, but what about the trans side? James told me how to do it one time but it was a while back and I don't remember the details.
03-02-2012, 01:13 PM
#290
Staging Lane

Join Date: Oct 2010
Posts: 72
Likes: 0
Received 0 Likes
on
0 Posts
Chuck, I have S&S adjustable upper control arms with the same issue. I was advised by them (Mark I believe) to cut the frame where they hit. I have not done this. But just wanted to let you know what my manufacturer said to do.
03-05-2012, 06:01 AM
#291
I'm going to cut them sometime this week I think. I had completely forgotten that my friend's dad collects old GTOs and parts for them (has something like 80+ cars, plus a barn the size of a gym full of parts) and has 5 of pretty much every tool in the world plus some. Turns out they have a couple welders and plasma cutters so all I have to do is go pick one up. Weather looks l good this week so I'm hopeful things will work out.
Today it was in the 40s, which I hate because it's warm enough that I feel like I should be working on the car but too cold to actually get much done. The rear LS1 F-body caliper brackets came in, bought them from Rockauto expecting them to be refurbed Aussie made parts but instead they are some crappy-looking Korea garbage. Guess they'll do for now though. I've seen pics of the caliper and rotor differences, but here is a shot showing why the C5/6 abutments won't fit on F-body backing plates. Not even close. Hoping to get a proper test fit later today.

Today it was in the 40s, which I hate because it's warm enough that I feel like I should be working on the car but too cold to actually get much done. The rear LS1 F-body caliper brackets came in, bought them from Rockauto expecting them to be refurbed Aussie made parts but instead they are some crappy-looking Korea garbage. Guess they'll do for now though. I've seen pics of the caliper and rotor differences, but here is a shot showing why the C5/6 abutments won't fit on F-body backing plates. Not even close. Hoping to get a proper test fit later today.
03-05-2012, 07:12 AM
#293
I didn't know if there were any bearings or anything that might fall out. I didn't know about the axle bearings and seals until I had the axles out (not a big deal in that case) so I just wanted to make sure there wasn't a potential mess or small pieces waiting inside the trans. Heading to take the diff out and pull the trans here in a couple hours, then I think I'll take the shaft to a shop and get it checked out. Putting in new U joints seems fairly easy with a vice and some sockets based on the youtube videos I found.
03-06-2012, 01:44 AM
#294
TECH Fanatic
iTrader: (12)
Join Date: May 2005
Location: Nashville, TN
Posts: 1,250
Likes: 0
Received 0 Likes
on
0 Posts

yea man, you are all good. Just undo the u joint straps off the rearend, drop the driveshaft down and pull it out of the trans. Theres a pretty good chance transmisson fluid is going to pour out of the tailshaft, so be ready with a drain pan. Thats about the jist of it.
Replacing u joints isnt too bad either. I usually just put the driveshaft end on a flat block of wood and beat the old joint down with a hammer and proper sized socket. If you take the driveshaft to be checked, i'm sure they will install some new spicer joints in it for a little bit of nothing though, beats trying to do it with no extra hands
Replacing u joints isnt too bad either. I usually just put the driveshaft end on a flat block of wood and beat the old joint down with a hammer and proper sized socket. If you take the driveshaft to be checked, i'm sure they will install some new spicer joints in it for a little bit of nothing though, beats trying to do it with no extra hands
03-06-2012, 06:34 AM
#295
Yeah, I'll probably just let them do it. An arbor press makes it a 2 minute job for them vs my hour. Of course this whole drive shaft thing has me thinking I should consider going ahead and getting an 4l65. Having to make the TB, intake, bracket, TV cable, etc etc provisions for the 200-4r has been an issue every step of the way. Depending on what wiring needs to be changed and what turns up on craigslist I might get a 4L and new drive shaft.
03-06-2012, 08:29 AM
#296
Chuck.. I'd recommend doing the 4L60E/4L65E.. the your PCM should ge able to control the Trans, you just need to add the wires. But If you PCM isn't able to control the Trans. .that could be costly.. as stand alone control are $$$.... Would also clean up your installation.
And like you stated. they are showing up and pertty affordable.
my 2 cents...
BC
And like you stated. they are showing up and pertty affordable.
my 2 cents...
BC
03-06-2012, 03:47 PM
#297
Yeah, I'll probably just let them do it. An arbor press makes it a 2 minute job for them vs my hour. Of course this whole drive shaft thing has me thinking I should consider going ahead and getting an 4l65. Having to make the TB, intake, bracket, TV cable, etc etc provisions for the 200-4r has been an issue every step of the way. Depending on what wiring needs to be changed and what turns up on craigslist I might get a 4L and new drive shaft.
for the 200-4r, bowtie overdrives' tv made ez kit, should work... its what I have and am going to be using with my 700-r...
also, if you did get the electric tranny, a less expensive route may be to just grab another harness and then reflash your computer, if you flashed all that stuff, out, you can get a harness for pretty inexpensive and just delete all the stuff out you dont need. when I modified my ls1 harness, I deleted the tranny stuff too, dont know why i just didnt leave it on there in case i changed back to e tranny later
I may have a truck harness in the garage that still has the tranny stuff on it, ill check and if you want me to cut that off so that you can integrate it back into your harness, i can...
if your budget allows, I like this kit, for the e trannys, if you dont wanna do all the mod
[youtube]X_AW0ncj7Es&feature=g-all&context=G21f9b7cFAAAAAAAABAA[/youtube]
03-06-2012, 11:02 PM
#298
I've used the tv made ez, twice, once with a carb and once with the ls truck intake kit. It works, it just limits what you can easily do as far as throttle bodies and intakes. I like it and they are helpful on the phone, but the time I've spent on it is second only to that wasted on the kwik bracket.
I already have my harness in place and set up, so all things considered pulling it and replacing is something I'd prefer not to do if I don't absolutely have to. Adding some wires back to the harness I have, if that is in fact a workable option, would be the way to go. Well, that or an external controller. The one in the video looks awesome but $550 is pretty pricey, though it is cool to see people making that kind of stuff. A shop I called today mentioned a full manual valve body, so I'm trying to read up on exactly how that would work.
About the reflashing, with a personal computer it's one thing to erase a program but another to put it back; you have to actually have it on hand somewhere in order to restore it. When things are "deleted" from the car ecm, are they just ignored, unused or totally removed? If removed, where do you get the trans software in order to put it back?
Might take you up on that harness, I just bought some new wiring tools and a soldering iron and wouldn't mind breaking them in.
03-09-2012, 02:35 PM
#299
The rear end and drive shaft made it out today, didn't have time to do much else since I had to come back into town but it went pretty well and was as easy as advertised. My A/F body ATS spindles and steering arms came in today, here is a comparison, as mentioned before the taper is the only difference. The A/F are the ones with the sensor cut off (which I didn't care about anyway).

This thing is coated in a thick layer of what I guess is old grease, which on the bright side appears to have kept it from rusting. Should turn out okay with some time and some paint. With the rear hanging there was a surprising amount of room to work in under there, so getting all the bolts out was a piece of cake.

Just in case anyone else is ever buying ATS arms used, here is how the rep said to tell them apart (I don't see the dimple I was told about anywhere on any of them). Hopefully nobody else will accidentally buy (or sell) the wrong ones.
The steering arms for the A-Body and G-Body are the same except for the ball joint taper. Here are some measurements to look for in the ball joint taper:
A-Body: .48 tapering to .57" or 12.2 to 14.48
G-Body: .43 tapering to .55" or 11.03 to 14.09
This thing is coated in a thick layer of what I guess is old grease, which on the bright side appears to have kept it from rusting. Should turn out okay with some time and some paint. With the rear hanging there was a surprising amount of room to work in under there, so getting all the bolts out was a piece of cake.
Just in case anyone else is ever buying ATS arms used, here is how the rep said to tell them apart (I don't see the dimple I was told about anywhere on any of them). Hopefully nobody else will accidentally buy (or sell) the wrong ones.
The steering arms for the A-Body and G-Body are the same except for the ball joint taper. Here are some measurements to look for in the ball joint taper:
A-Body: .48 tapering to .57" or 12.2 to 14.48
G-Body: .43 tapering to .55" or 11.03 to 14.09
Last edited by chuckd71; 09-06-2014 at 08:36 AM.
03-11-2012, 05:24 PM
#300
Something tells me this might not be the original rear end for this car.

Spent hours yesterday cleaning the grime off of it, priming it and then slapping on a couple coats of paint. Not sure I'm in love with red, but that's what I had so that's what I used. At least it'll match the UMI stuff. Looks a million times better, at least until the first time I drive it.

Getting the bushings out was easy, just drilled out the rubber then used a punch to collapse the metal shell and piece of metal and a rubber mallet to knock it out. Getting the new ones put in was proving to be a bit more difficult, so I gave up for now and tossed them in the freezer. Next time the sun comes out I'm going to put in the new rear arms and start test fitting the shockwaves.
Unless some insane deal pops up I'm going to stick with the trans I have and run it until it dies, then upgrade when necessary. At some point you gotta stop playing the 'well if you do XXX, you might as well do YYY' game.
LSCustoms, just saw your ebrake thread. Going to try and read through it tonight.
Spent hours yesterday cleaning the grime off of it, priming it and then slapping on a couple coats of paint. Not sure I'm in love with red, but that's what I had so that's what I used. At least it'll match the UMI stuff. Looks a million times better, at least until the first time I drive it.
Getting the bushings out was easy, just drilled out the rubber then used a punch to collapse the metal shell and piece of metal and a rubber mallet to knock it out. Getting the new ones put in was proving to be a bit more difficult, so I gave up for now and tossed them in the freezer. Next time the sun comes out I'm going to put in the new rear arms and start test fitting the shockwaves.
Unless some insane deal pops up I'm going to stick with the trans I have and run it until it dies, then upgrade when necessary. At some point you gotta stop playing the 'well if you do XXX, you might as well do YYY' game.
LSCustoms, just saw your ebrake thread. Going to try and read through it tonight.